This worksheet for measuring square footage is part of my latest series on DIY basics, everything you need to know but may not have learned in do-it-yourself school. Wait, there’s not one of those? We should do something about that.
I should have titled this article “How to Calculate Square Feet for the Mathematically Challenged.” My method for measuring square footage isn’t sophisticated, but it works. And I promise you can use this even if you can’t remember anything about 6th grade math word problems, other than the tears.
Before getting into interior design, I got my Bachelor of Fine Arts mostly because I was looking for the degree path involving the least amount of math classes. And science classes. Because they sneak a lot of math into those too.
So here I find myself in a strange predicament. It turns out that interior design and home improvement projects actually involve a fair amount of math. Thankfully it’s pretty basic math, the kind you can usually figure out by drawing on a napkin. But it’s math nonetheless. Karma.
Why do I need to know square footage?
No one warned me how much math would be involved in owning a home. From the very first meeting with a realtor, the process of home ownership is fraught with terms like “amortization” and “interest,” not to mention the very scary “credit score.”
But none of those numbers matter much once you close on the house and get the key to the front door. Once you step in that door, it all becomes about the square feet.
- How much flooring do you need?
- How much paint to cover the walls?
- How do you figure out a budget for that bathroom remodel?
All these questions rely on getting an accurate square footage measurement. If you’re hiring someone to do the work for you, they’ll probably take care of the measuring and math. But of course, you’ll pay more for that service. Doing the work yourself can save a lot of money, if you know how to figure out what you need.

There are online calculators that will do this for you, but I find that most of the work is in the measuring anyway, so it’s handy to have a printed worksheet to keep track of your numbers.
And I’m sure there are complicated formulas that mathematically describe the whole elegant procedure, but that’s not how my mind works. So if you’re math-challenged like me, read on to find out how to do this yourself, with a very simple process.
Measuring Square Footage Worksheet
Since we love doing things ourselves, and saving money, we’ve had to learn a few skills and tricks along the way. And I had to make my peace with some basic math concepts. Over time, I’ve developed this worksheet that I use for figuring out square footage, so I know how much product to order. Let me show you how it works.
Say you’re changing your floors, like we did recently with our new waterproof laminate floors.
The first thing you need to know about square footage is this: length times width equals square feet.
Length x width = Sq. Ft.
Easy enough, right? If you have a bedroom measuring 10 feet in length and 12 feet wide, you’ve got:
10 x 12 = 120 sq. ft.
That’s great, as long as every room you’re redoing is a perfect rectangle. But what do you do for the more complicated layouts? You break them up!
Here’s where the worksheet comes in handy. Take a quick moment to get yours. I’ll wait…
Get your FREE Printable:
Sign up for The Palette Muse Newsletter and get access to all my free printables, including this one!
If you’re already a subscriber, click over to the Free Printables Library to find the download. You’ll need the password at the bottom of any of my emails.
How to Use the Square Footage Worksheet
Start by sketching out the area you’re measuring. Then fill in the lengths and widths of the rooms, measuring from wall to wall. Do a quick “sanity check” to make sure the measurements of the walls add up to each other. In the example below, the long wall of the living room is equal to the total of both shorter walls opposite it.
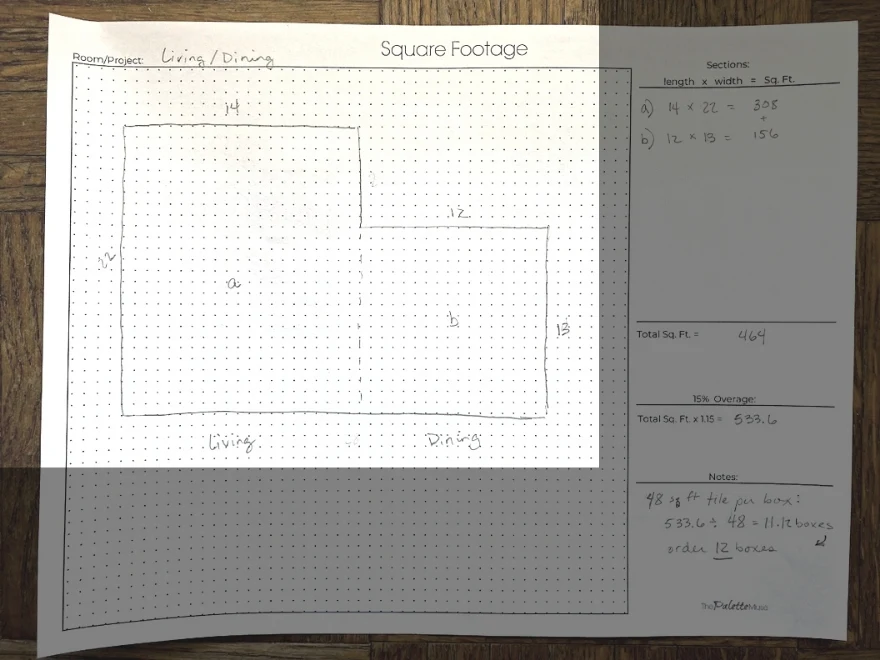
Now break up the space into the simplest arrangement of rectangles you can find. (In this example there are two.) Label the rectangles with letters.
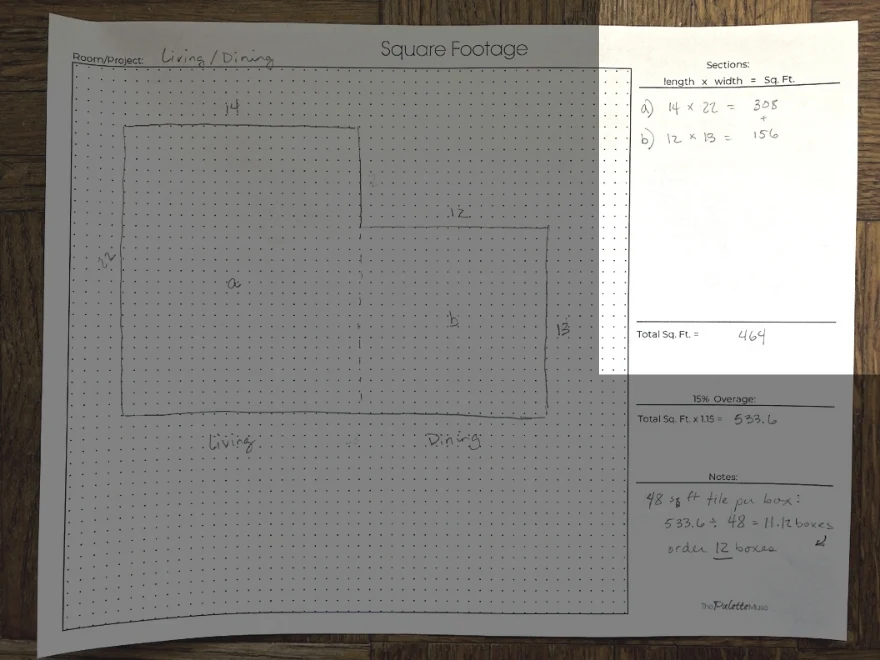
For each letter, copy the length and width measurements into the column on the right side of the page. Do each lengthxwidth calculation for each rectangle separately, then add the totals together. That will be your total square footage for the space.
Here’s another example, of our hallway with lots of turns and alcoves. (The dashed lines are where I’ve divided the rectangles.)
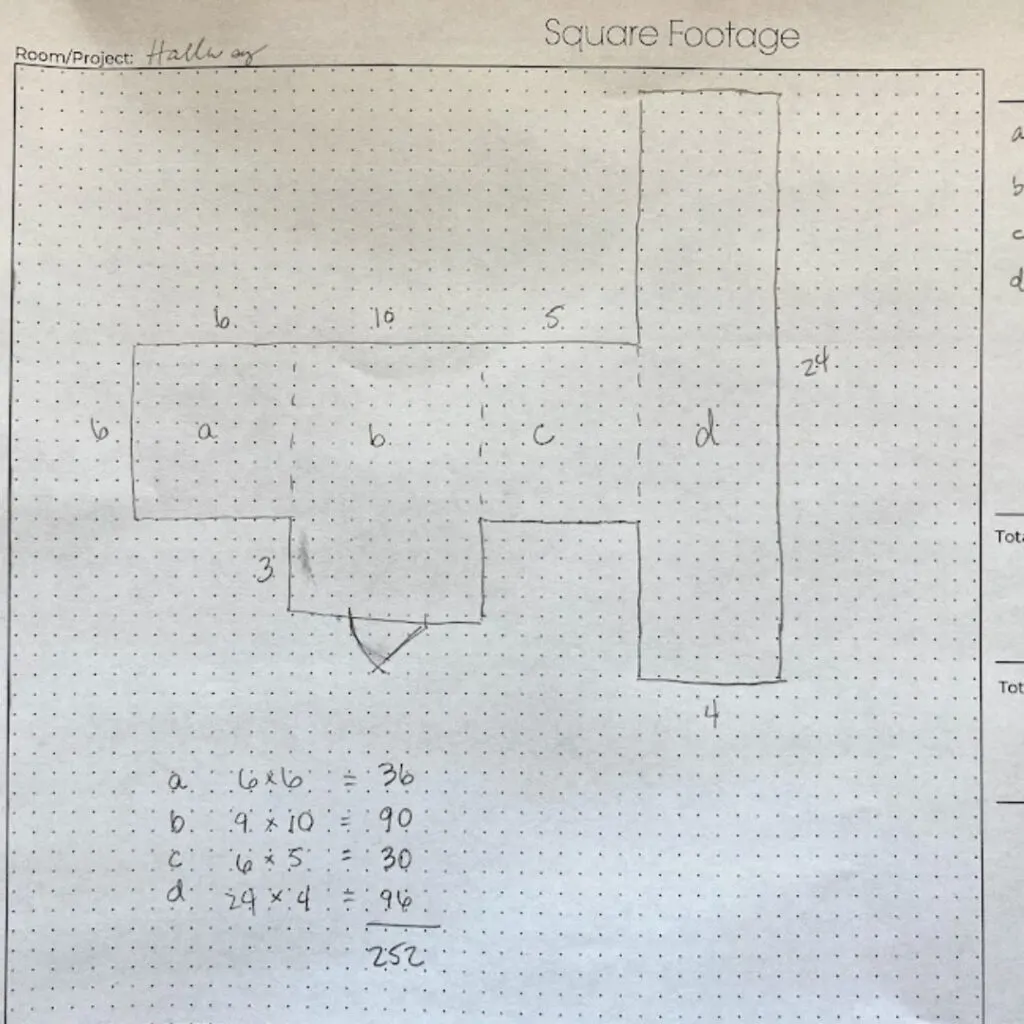
That’s the basic process, and you can simply add more chunks or rectangles when your space gets more complicated. For example, if you’re measuring for a tile shower surround, you’ll need to measure each of the three walls around your shower, as well as the shower floor. Each of these would be a separate rectangle, or letter, on your worksheet drawing.
Just remember, each rectangle gets the length times width treatment, then they all get added up for a total.
But wait, there’s more…
Once you know your square footage numbers, the next step is probably to use that knowledge to order products, like tile or flooring. Here’ where we add two more steps to the process.
First, you’ll need a little more product than the measurement of your space. Most of the time I hear pros recommend ordering 10% to 20% more product than you think you’ll need. This is called “overage” and it covers mistakes, off cuts, and pattern matching differences.
I split the middle and figure 15% when I’m ordering product, and of course there’s a space for this on the worksheet. Simply take your total square feet number and multiply it by 1.15 to get the total amount of product you’ll need to order.
In my first example, I came up with 464 total sq. ft., which means I need 533.6 sq. ft. of laminate flooring.
464 x 1.15 = 533.6
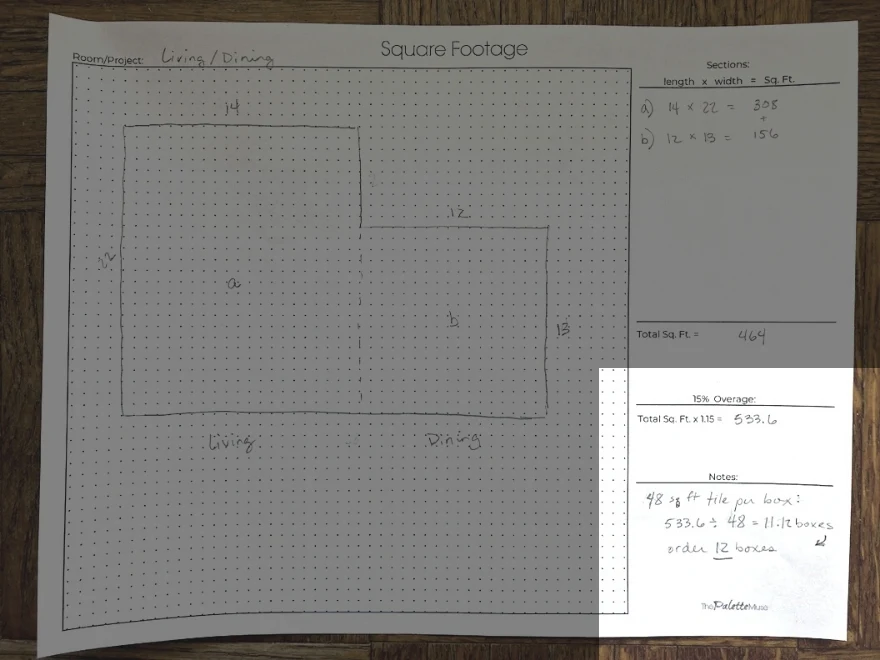
But wait, they usually sell tile and laminate in boxes, right? So there’s one more calculation, and I put it under “Notes” on the worksheet. When you know what product you’re ordering (laminate flooring in my case), you can find out how many square feet are in a box. Let’s say this product comes in boxes of 48 square feet planks.
Then you’ll divide 533.6 by 48 to get the total number of boxes you’ll need.
533.6 / 48 = 11.12
Then, to order the correct amount of product, simply round up to the next whole number of boxes. So you’ll order 12 boxes.
Whew! That’s a mother of a word problem! But it’s not so bad when you break it down into understandable parts, and each part is laid out on your worksheet. Then, if you have questions during your project, you can refer back to your worksheet to remind yourself where your numbers come from.
Read on, to learn a few more tips you’ll need to know to get your project off to the right start.
Tips when Measuring Square Footage for Home Projects
If you’re not completely overwhelmed yet, I’ve got a few more tips for you to keep in mind while you’re working on your measurements.
- Always round up! Even though you learned to round down sometimes in school, that doesn’t work with actual materials. If your project calls for 11.12 boxes of material, you’ll really need to buy 12 boxes.
- Use whole or half feet, rather than converting inches, especially for larger projects. It just makes the math easier.
- It’s usually easier to order too much product than to get more if you need it later. Check with your store to see if you can return any unused tiles or planks.
- Measure twice and get someone to check your work before you put in a big order.
- Don’t forget closets, steps and alcoves when you’re measuring flooring. They can have their own rectangles on the worksheet or you can include them in other areas, as long as you capture the measurement somewhere.
Now go forth and measure! But first, check out my other remodeling budgeting tips, and my remodeling budget worksheet to help you get your project off to the right start. And let me know in the comments if you have any questions!
