We replaced our nasty old carpet with new waterproof laminate flooring, and I couldn't be happier, both with the product, and with the process! Here's how to put new flooring in your own house.
It had to go. It was dingy, dirty, and just downright gross. The carpet that lived in this house before we moved in had seen better days. It had also seen more than its share of the underside of the previous owner's dogs.
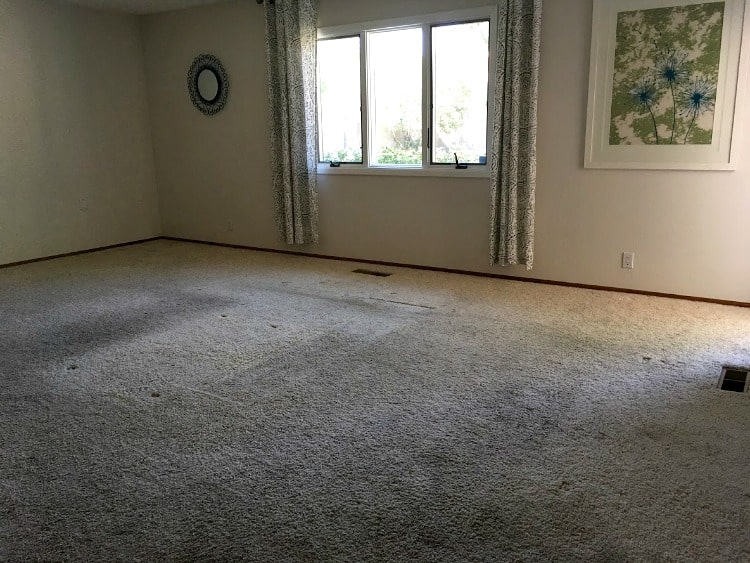
We knew we had to get rid of it as soon as possible, but as the days turned into months and even years, that day couldn't come soon enough for me.
One Saturday morning while my husband was out with his friends, I pulled out my heavy duty box cutter and started ripping up the carpet. I just couldn't take it any more.
Now I don't recommend starting a project like this on a whim like I did, but I'm so glad we finally got around to doing it!
Maybe take a little time to read this post, plan ahead, and then you can get busy replacing your carpet with waterproof laminate too. (These tips will also work with just about any other laminate flooring type!)
~ This post contains affiliate links. If you make a purchase, I may receive a small commission at no additional cost to you. ~
Replacing Carpet with Hard Floors
Waterproof Laminate to the Rescue!
Why waterproof laminate? Because we have two kids and a dog. Not to mention we want to eventually run the same flooring all throughout the house, including the kitchen and bathrooms.
I grew up with hardwood floors in our kitchen and spent more time than I care to think about, chasing errant ice cubes and cleaning up every little mess immediately. That's not how I want to spend the rest of my adult life.
So when I heard about waterproof laminate, I knew that was what I wanted.
We ended up choosing Pergo Timbercraft + WetProtect in Anchor Grey. I love the driftwood gray color, satin sheen, and beveled edge. It looks so realistic, and hides an embarrassing amount of dust.
This was an intimidating project, but the good news is it turned out to be easier than I thought it would be. I'm not going to give a step by step tutorial or we'd be here for days, but I wanted to share some of my experiences along the way, hoping they'll help you if you're thinking of making a similar change.
Here's how it went:
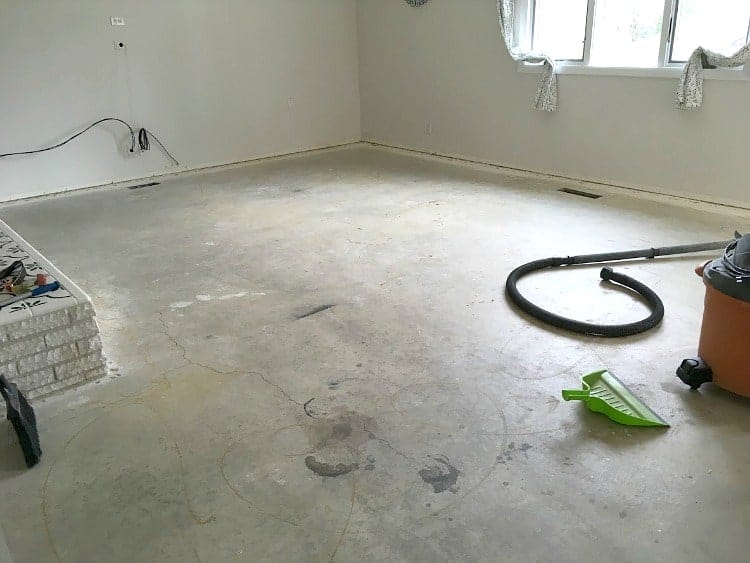
Removing Carpet
This was kind of fun in a gross and satisfying way. I used my box cutter blade to pry up an edge at the very back corner of the room. I tugged on it until it started unzipping from the carpet tack strip underneath.
Then I cut a line from the back of the wall, about 6 feet from the left edge. I pulled on the carpet and rolled it up as I backed up, cutting along the line as I went. The end result was several rolls of nasty carpet, waiting to be hauled to the dump.
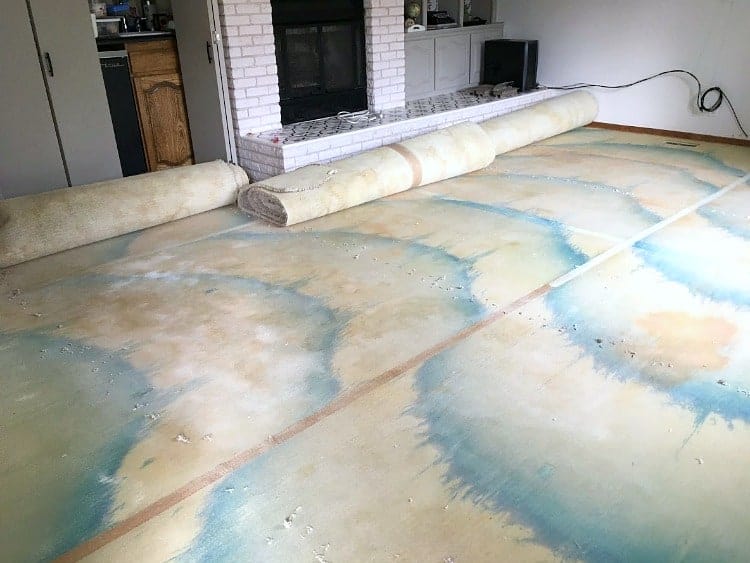
Then I repeated the same process for the padding underneath. Be sure to use gloves, because the only soft thing about carpet is the part you walk on!
When my husband got home from his breakfast, he got on board with the project (fortunately) and helped me break out the tack strips around the perimeter of the room.
We found that a standard shovel was the best way to pry them loose and break them up. He pounded on them, and I gathered up the broken pieces behind him. I also had to use a crowbar to pry out a few stubborn nails from the concrete.

Finally, all that gross carpet was gone, and we were ready for the next phase!
Prepping the Sub-Floor
The first step to a successful hard floor installation is making sure you have an even and level sub-floor. Because we're on a concrete slab, this was pretty easy.
There was one high spot near one of the vents, that we sanded down with an angle grinder.
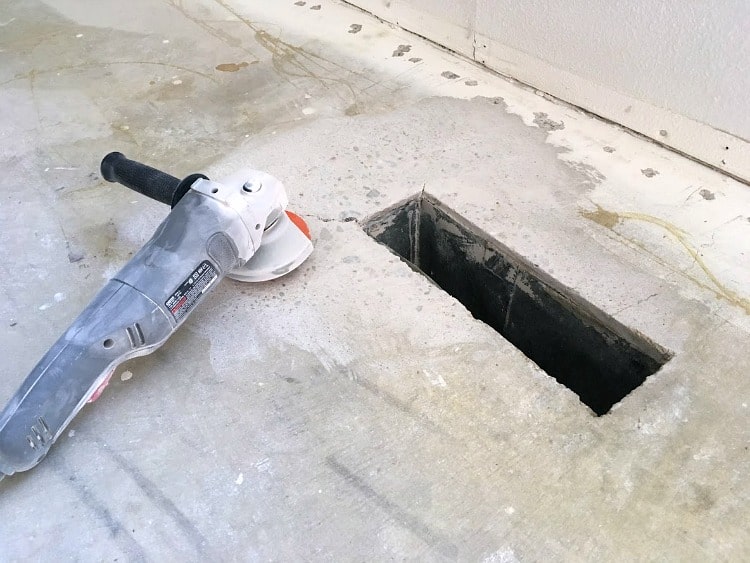
If you have high or low spots in your sub-floor, it can cause your flooring to pull apart at the seams. So it's definitely worth investing the time to make it right. If you are installing hard floors over an area that previously also had hard floors, it's hopefully already been done, but it's always good to check.
If you're replacing carpet, definitely check first before assuming the floor is flat.
You can easily test this by using a long level (at least three feet). Simply set it down in multiple places and directions on the floor and see if it slopes, dips, or rocks.
Prepping the Fireplace
I was worried about how we would make the flooring look good as it adjoined the fireplace hearth, but then I found this video that explained exactly what we needed.
It was a dusty process, but it looks so nice and clean when it's finished!

Be sure to clean your floor really well before moving on to installing the laminate. Give it a little time for the dust to settle, then vacuum with a wet/dry vac.
We even damp-mopped afterwards, just to be sure there were no pieces of grit and debris left over from all the prep work.
Installing Laminate Flooring
This is the part where you'll want to follow the manufacturer's directions very closely, so I won't bother trying to recap them here. Pergo did a great job of making the instructions easy to understand, so I would defer to them for the step-by-step.
I think getting the space ready took more time than actually laying the floor. Y'all, we were rockin' and rollin' so fast on this part that I didn't even stop to take pictures until we were almost done. (Blogger fail!)
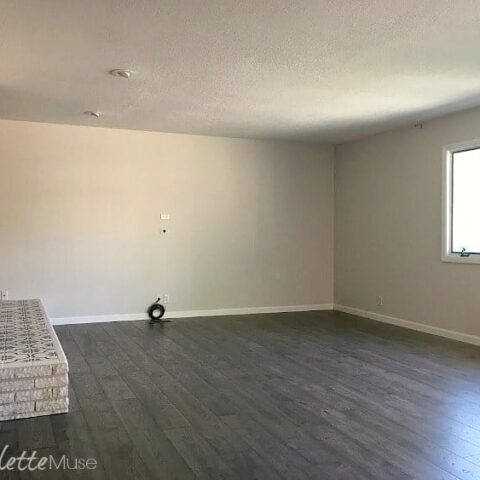
Here you can see the majority of the flooring already installed, and on the left side is the gold underlayment moisture barrier that hasn't yet been covered up by flooring.
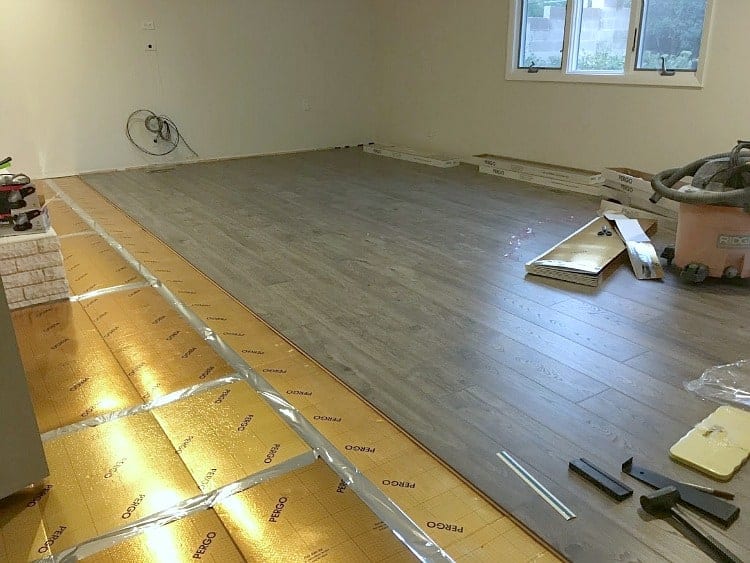
This type of floating floor clicks together, although I know some others require glue. I loved how easy it was to install, kind of like putting together a giant and very heavy jigsaw puzzle.
The hardest part was getting the first few lines put together. They wanted to move around a little bit whenever we pounded on the last piece. Once we had about three rows laid, everything became very stable and solid.
Replacing Baseboards
This feels like an afterthought, but it's truly the icing on the cake. All the actual hard work goes into laying the floor, but until the baseboards are back on it just doesn't look right.
If your baseboards are in good shape, you can simply reattach them and save yourself some time and money. Mine were not at all what I wanted, so I bought nice thick primed MDF baseboard.
All I had to do was paint them with my trusty Valspar Swiss Coffee Semigloss (My go-to for all my trim).
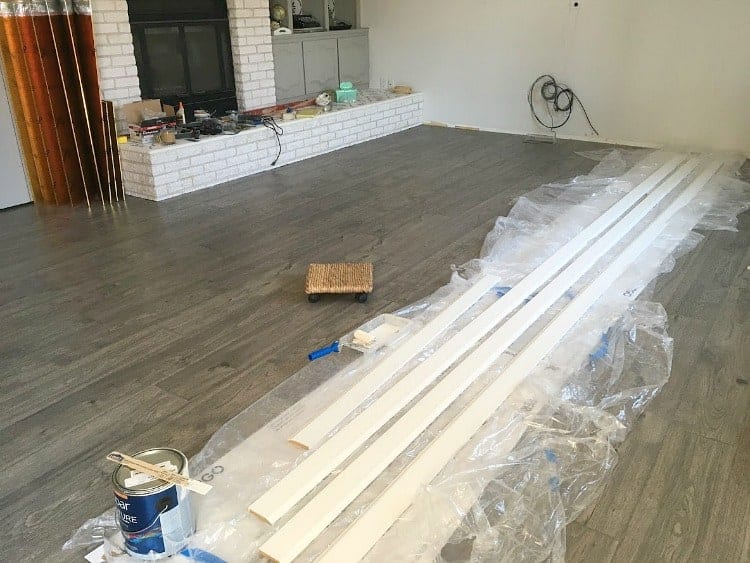
Then we cut them to size with our miter saw, nailed them in place, and ran a quick bead of white caulk along the top edge. (Check out my caulking hack to make your life easier while doing that part.)

It feels like we remodeled the whole room, just by replacing the flooring and adding new baseboards!
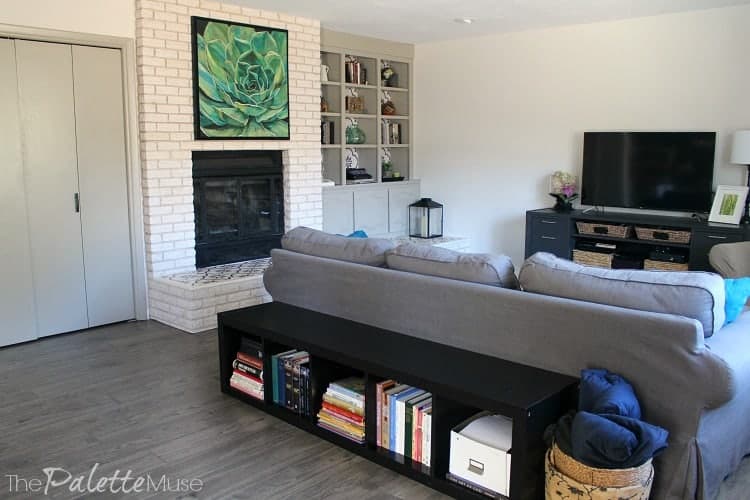
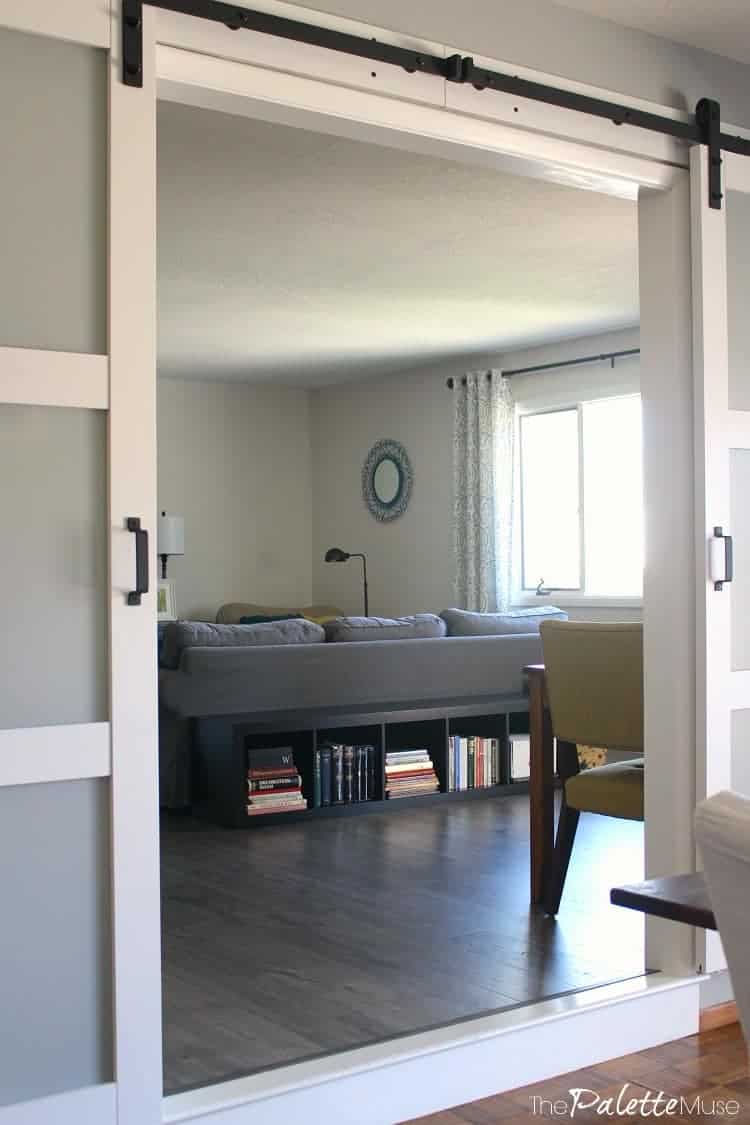
Here's the view from our dining room, through our barn doors.
Resources for Replacing Carpet with Waterproof Laminate
OK, don't be intimidated. I know this is a long list, but you probably already have some of these items in your garage, or you can use a substitute in some cases.
- Pergo Laminate Flooring - Here's the exact one we used, from Lowes. If you prefer Home Depot, here's a very similar product, also from Pergo with a slightly warmer wood tone.
- Underlayment, if needed for vapor barrier and sound dampening
- Laminate Installation Kit
- Box Cutter or knife
- Wet/Dry Vacuum
- Angle Grinder
- Baseboard
- Miter Saw
- Nail Gun and Air Compressor
- Caulk and Dripless Caulk Gun
Planning for Your New Floor
Be sure to check out my square footage calculator before you order your flooring materials. It's an easy way to figure out how many square feet your space is, and how much material to buy.
We love a good DIY project in my house, but if you don't, you can always go with professional installation. Just be sure to factor in labor costs to your remodeling budget.

A Note on Types of Flooring
You have an overwhelming number of flooring options when you are trying to decide what is the best choice for your floor makeover. Laminate planks? Hardwood flooring? Vinyl flooring such as luxury vinyl planks? Each of these could be a great option and they all have their pros and cons.
In this case, I chose waterproof laminate planks to get the best of both worlds between durability and cost effectiveness. Another good choice would be luxury vinyl planks. They are affordable, super durable, completely waterproof and easy to install.
(If you have luxury vinyl in your house and it's in need a little touch up, check out this post on how easy it is to repair LVP.)
For my house, I wanted more of the feel of hardwood, so we went with laminate. (I'd love actual hardwood in my home, but with kids and a dog, and a limited budget, that's just not realistic for us.)
Out with the Old Flooring, in with the New
This project definitely took us some time (two weekends - one for prep and one for install), and required two people for many parts. But there was no part of this that anyone else couldn't do. That's what makes it a great DIY project.
If you're thinking of replacing your carpet with laminate flooring, I say go for it! And if you decide to use waterproof laminate, then you can have a party on it afterwards. Even better!
Replacing Carpet with Waterproof Laminate Flooring
Let me show you how to replace your old carpet with waterproof laminate. These tips will also work with just about any type of laminate flooring. What a difference this makes!
Instructions
- Start by removing the carpet with a box cutter.
- Pry up an edge at the very back corner of the room.
- Tug on it until it starts unzipping from the carpet tack strip underneath.
- Cut a line from the back of the wall, about 6 feet from the edge.
- Pull on the carpet and roll it up as you go, cutting along the line as you back out.
- Repeat the same process for the padding underneath.
- Use a standard shovel to pry the tack strips loose and break them up.
- A crowbar can be used to pry out any remaining nails.
- Prep the sub-floor to make sure it's even. We sanded it down with an angle grinder.
- Clean your floor before installing the laminate.
- Vacuum it with a wet/dry vac.
- Follow the manufacturer’s directions very closely to install the laminate.
- If your baseboards are in good shape, simply reattach them. If not, consider replacing them.


Leave a Reply