Today I'm taking a break from my Flip House posts, because I'm just so excited to share this with you that I couldn't wait. We got barn doors!
Now, I know I'm not the first girl ever to put barn doors in her house, but this is something I've been wanting to do for years, and when we moved into this house, I knew just where I'd put them.
Then it was just a matter of getting a few other priorities taken care of before we could get to this project. But it's finally done, and they turned out even better than I imagined!
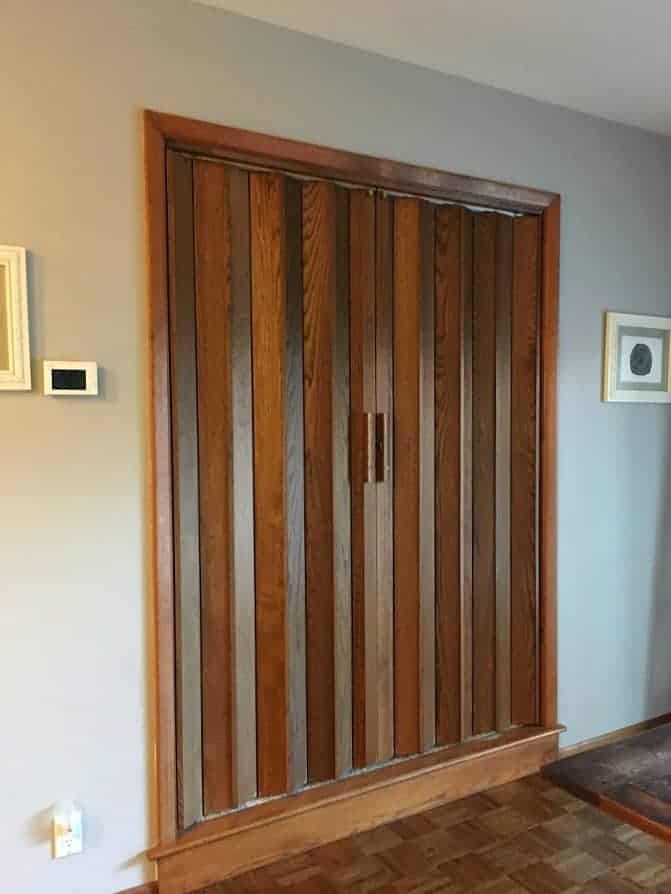
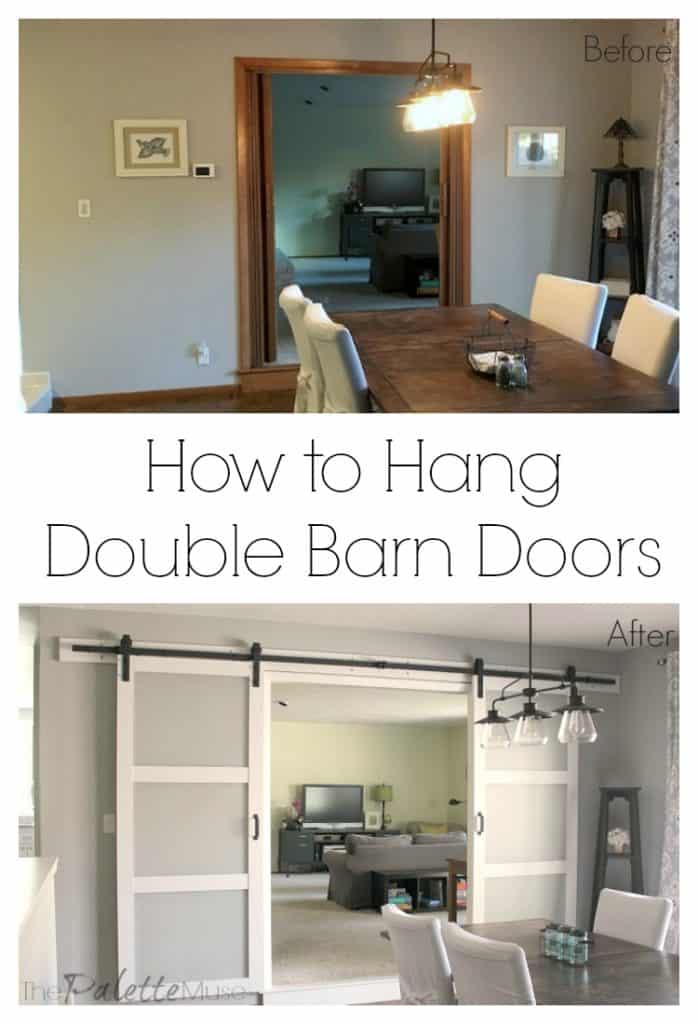
Before Barn Doors
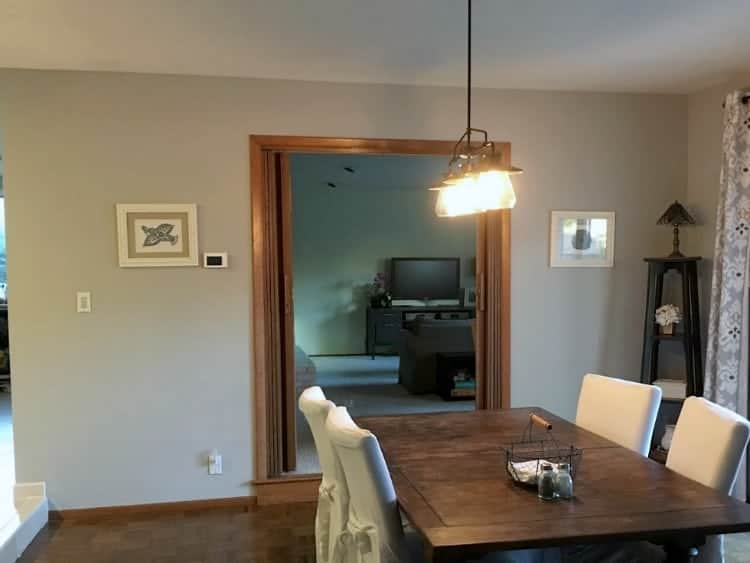
These accordion doors came straight out of the late seventies or early eighties. They served a good function of closing off the TV room, but they also felt a little(!) dated and made a horrible clacking sound whenever they opened or closed.
I have soon-to-be fond memories of my kids waking up early on Saturdays and sneaking into the TV room to watch cartoons. They thought they would close the doors to keep the sound of the TV from waking us, but inevitably we'd be startled awake by the sound of the doors clattering closed.
I could even tell which kid was up by how they closed the doors. My youngest would just throw them closed, like ripping off a bandaid. The oldest tried to be soft and quiet about it, but then instead of a big racket I'd hear clack... clack... clack... clack... CLACK. Not sure which was worse.
So the accordion doors had to go. It was surprisingly easy to get rid of them, just a few screws and they were lying in a heap on my floor. Now to figure out what to do with them...
Hanging the new doors was a little tougher, but definitely doable. I've got a few suggestions for you, if you're thinking of taking on such a project. But first, let's admire the doors, shall we?
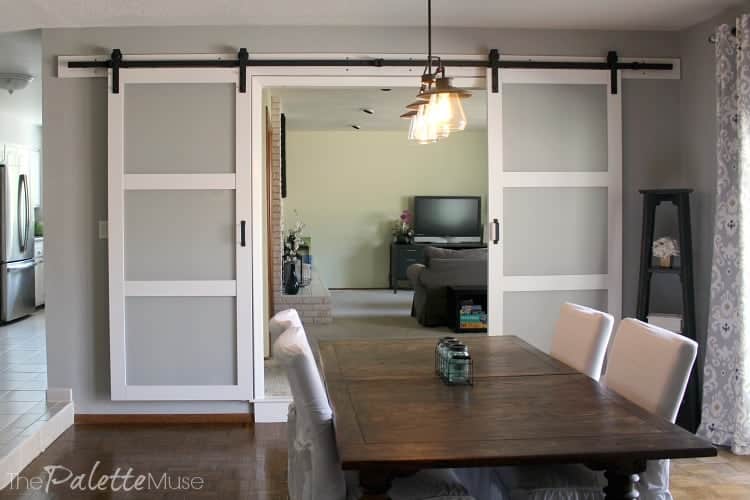
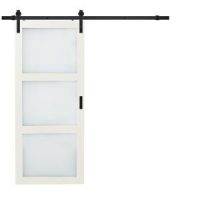
After Barn Doors
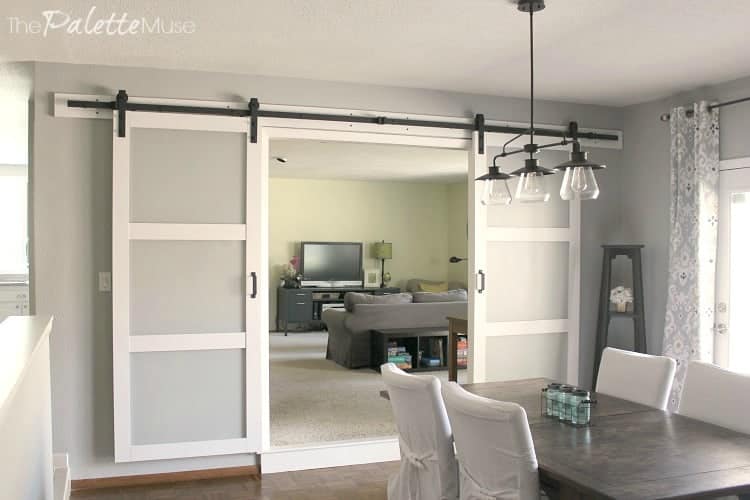
Ooooh.
Aaaah.
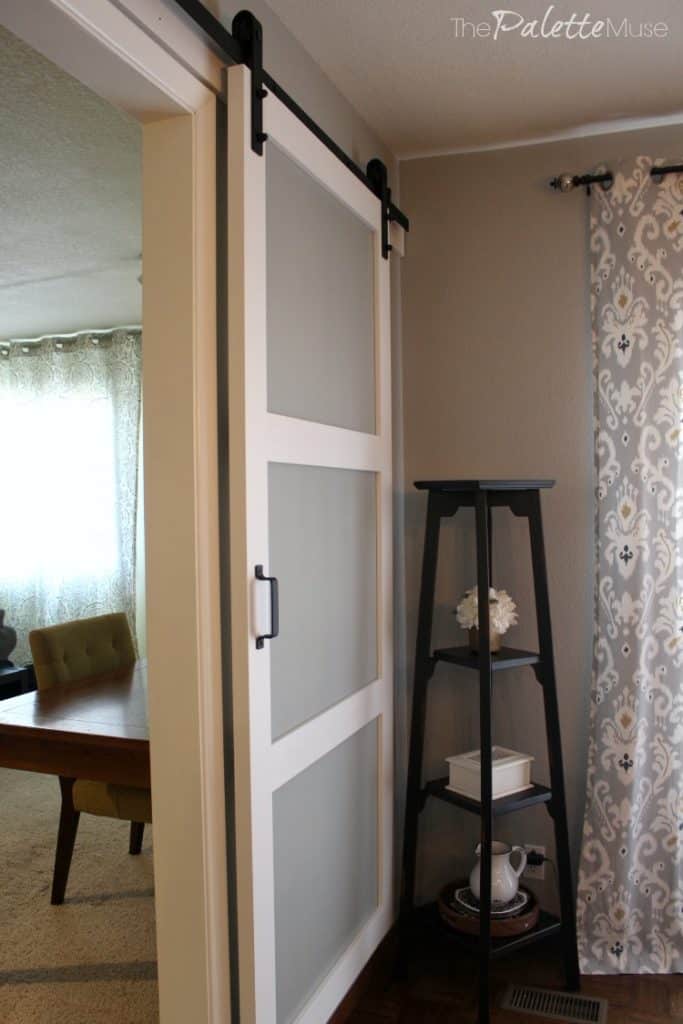
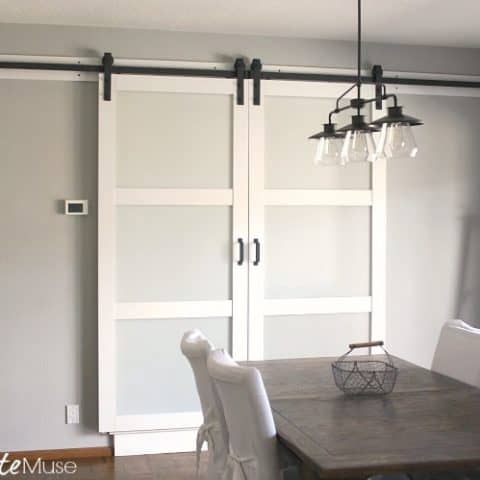
We chose a modern style door with frosted glass and traditional hardware. I wanted to be able to let light flow through both rooms, but still allow for some separation of the TV room, especially as the kids get older and will be having more movies nights and sleepovers. (I've got big plans for that room, but that's for a later blog post.)
Also, the designer in me feels compelled to add this side note. We plan on adding 6" white baseboards in this sunken dining/living area, which will help the doors feel like they're not floating in space on the wall. Design challenge solved, someday.
How to Hang Double Barn Doors
This post contains affiliate links. If you make a purchase, I may receive a small commission at no additional cost to you.
Finding the Right Fit
While we were looking for the perfect doors, we found plenty of double barn door sets, but they were out of our price range. Then we realized we could just buy two separate door kits and hang them together. It took one extra step, but wasn't difficult at all, and didn't require any additional hardware.
By expanding our search to single door sets, we were able to find the style we wanted at a price we could afford.
We got these doors from Home Depot, which included the doors and the track and hardware. If you like the idea but want different doors, try this hardware kit with a door slab of your choosing.
Keep in mind when you're picking a barn door to cover an existing door frame, the door slab will probably need to be 84" tall to cover the door and trim. Your door slab should also be at least an inch wider than the opening.
You can't take an off-the-shelf 80" door slab and convert it to a barn door unless you reduce your opening from its standard size or create a new opening from scratch.
Before Installing your Barn Doors
I recommend doing this installation in two separate parts, first to allow the door slabs to acclimate to their new surroundings before attaching them, and secondly to give yourself a little breathing room as you go through the project.
When we started this project, I thought, "How hard can it be? It's just like hanging really heavy curtains!" Well, yes and no. The idea is the same, but it turns out to be a lot harder hanging really heavy objects! Thankfully my husband was the voice of reason (as usual) and made me take it slow.
So give yourself an evening to open your hardware package, make sure you have all the pieces, set the doors in the space to acclimate, and make the initial measurements and markings. This will make it a lot easier to hang the doors on the second day.
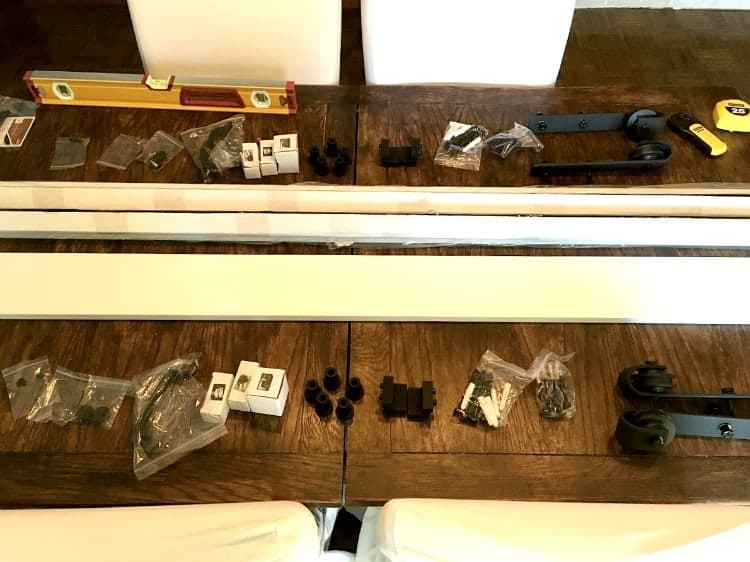
I'm not going to take you step-by-step through the instructions, as yours may vary depending on the hardware and doors you buy. Instead I'll give you the tips that we found helpful along the way, and everything I wished we knew before we started.
Barn Door Leveling Tips
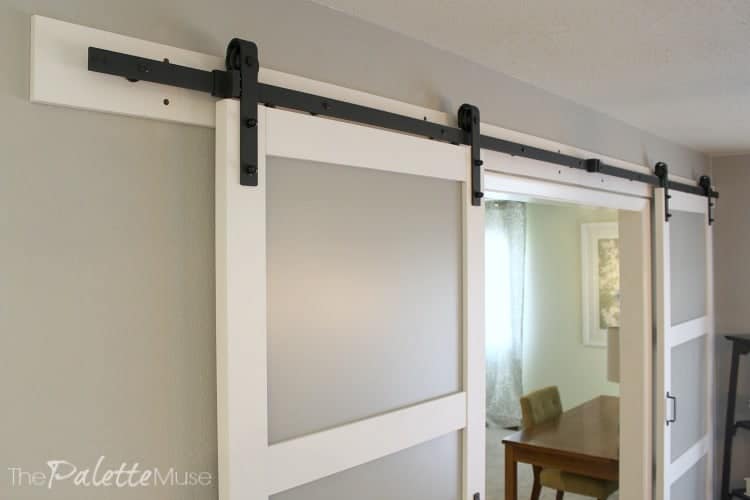
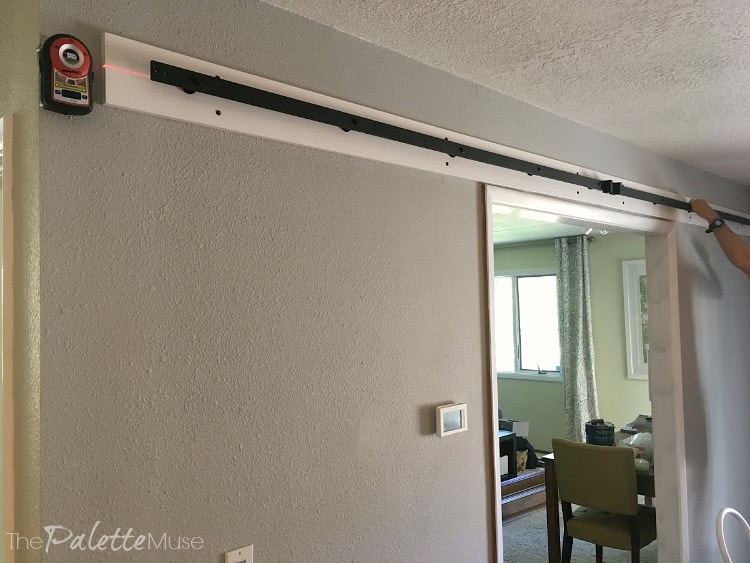
Get a good laser level that can be hung on the wall while you're working. It's so important to get everything level in this project, that you don't want to rely on a small level if you can avoid it, and you don't want to move your level around while making measurements.
After measuring, according to your instructions, for the center height of header board (if you're installing on drywall) or rail, mark that spot on the wall and attach your laser level there. Leave it in this spot for the duration of the header and rail installation.
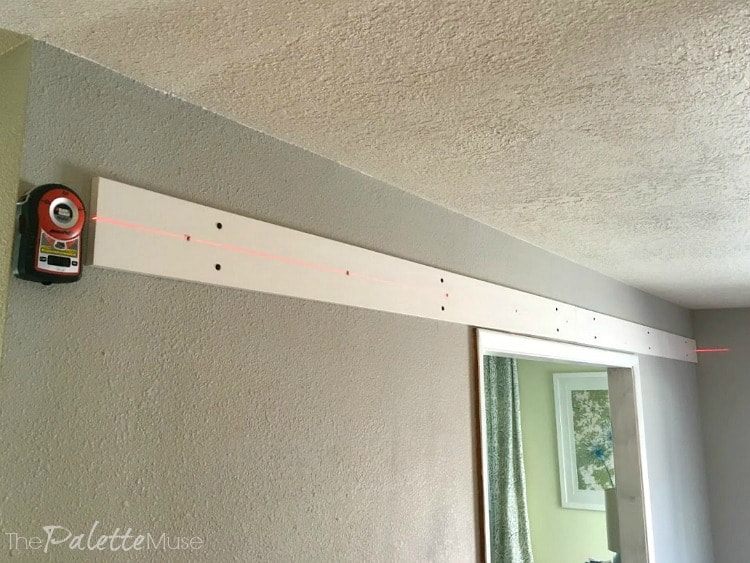
Work from the far side of the wall towards your laser level. If your level is attached at the left end of the wall, like mine, you'll want to start by hanging the right side of the header and track. This just keeps your work from getting in the way of your level's beam.
Barn Door Centering Tips
Center your barn door installation on the middle of your door opening, which will not necessarily be the middle of your wall. Measure and clearly mark the middle of your door opening so you can keep track of this as you install both headers and rails.
You do not need any additional hardware if your doors will meet in the middle of the opening. You can get a track joiner if you want your doors to slide from side to side, but this isn't necessary for a centered installation like mine. The track joiner just allows the wheels to make it over the junction between rails smoothly.
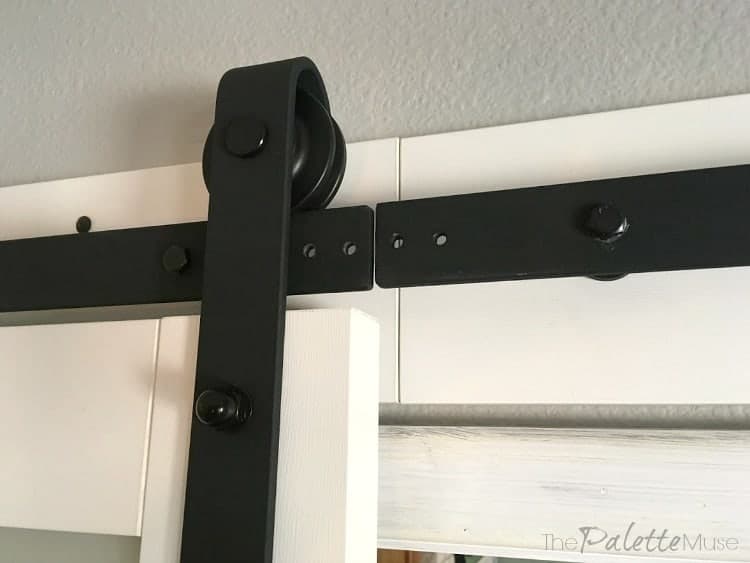
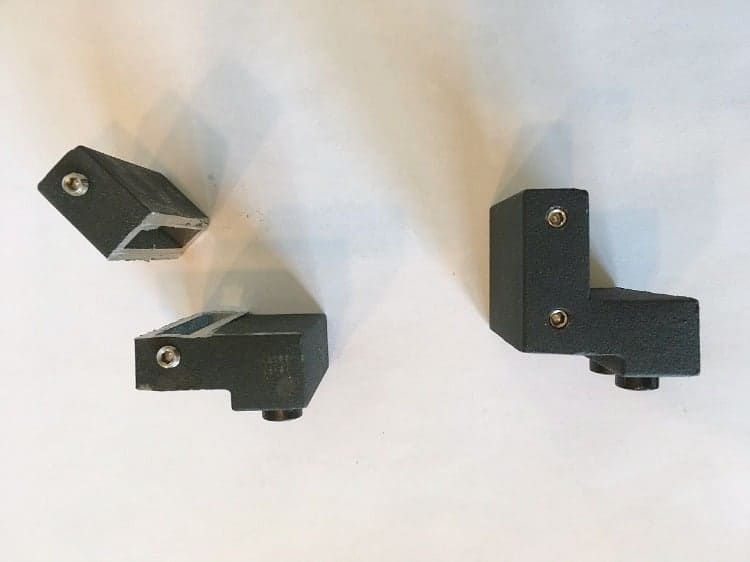
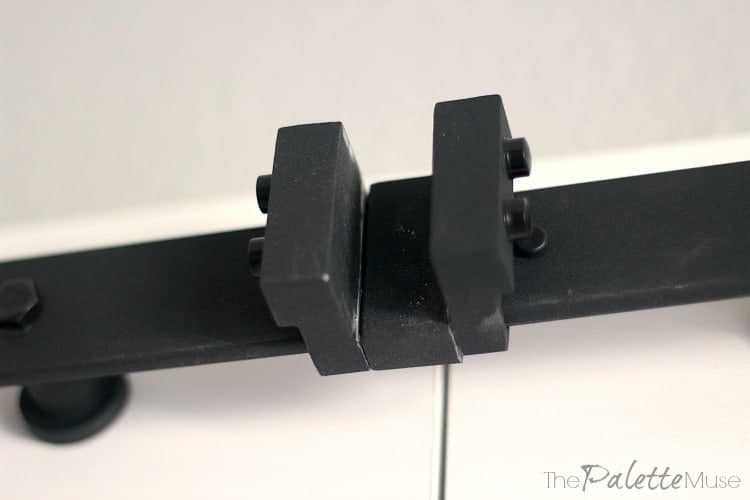
If you want the doors to stop in the middle, like mine, you'll need to apply the door stops that should be included in your hardware kit. However, these door stops are meant to keep the doors from rolling off the ends of the rail, and we found that they're not sized correctly to allow the doors to meet in the middle.
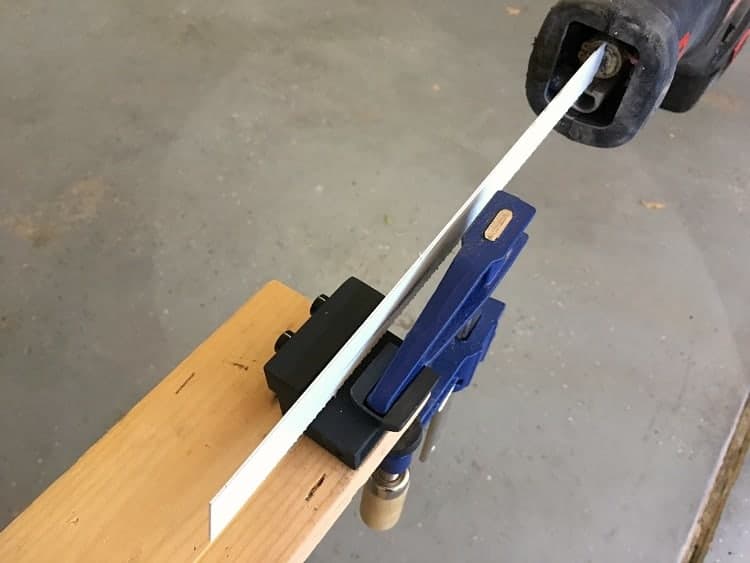
When we set both stops in place, there was a big gap between the doors, but we couldn't use just one because the back end of it ran into the wheels on the other door. So my handy hubby simply used his Saws-All (reciprocating saw) to cut off the extra metal on the flat end of one of the stops.
This allowed them to butt up together, for just the right amount of space between the hanging straps.
Now the doors close smoothly and stop with the tiniest gap between them, which is perfect to prevent slamming and pinched fingers.
General Barn Door Installation Tips
Know your Space
Be sure you have room for barn doors. That sounds kind of obvious, but it bears mentioning. You'll need at least 6" above the door frame to hang the header and rail. And you'll need at least twice the width of the door opening on each side of the door.
My door opening was a total of 65", so I needed two sets of 80" wide headers, which meant my track turned out to be almost 14 feet long!
Call in Reinforcements
This is a DIY project, but not for the faint of heart or limb. These doors are heavy, and the hardware can be a little tricky to maneuver around, especially if you have tight spaces in your house.
Get a buddy, sweet-talk your husband, or hire a handyman, but don't attempt to install these bad boys by yourself. Even reading the instructions will go better if you put two brains together!
Get Organized
Gather your supplies first. You don't want to be hanging out on top of a ladder with an iron rail half-attached to the wall and realize you need the ⅜" drill bit from your workbench in the garage.
Mirror Image
Keep in mind that when you're installing double barn doors, one set of hardware will be the mirror image of the other. This can get a little confusing when reading the installation instructions, so consider starting with the door on the same side as the one in your instruction diagrams first.
Then once you get the hang of it, it'll be easier to do the necessary conversion in your head for the opposite side.
Header or No Header?
Do you need a header? That depends on your walls. If you're attaching to drywall, you need a header board. This allows you to anchor into the studs first and then the rail attaches to the board.
If you're installing on concrete block, your kit should come with concrete anchors and you can just attach the rail directly to the wall.
Personally, I like the look of the header board, which ties in to all my white trim. Also, if your door opening already has trim around it, using the header board will ensure that the door clears the trim when it's sliding.
Resources for Double Barn Door Installation
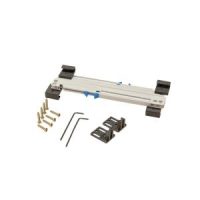
- 2 sets of barn door hardware plus doors - measure the width of your door opening to be sure you order the correct size rail. Each rail needs to be at least twice the width of your door opening. You can get my exact doors and hardware here!
- Laser level
- Saws-All - this isn't listed in the instructions, but we needed it for modifying the rail stops
- Studfinder
- Drill and drill bit set
- Socket Wrench set
- Cabinet Mounting Screws or Wood Screws for attaching the header board to the wall. These were the only screws not included in my hardware kit, and I chose to use this style with the wide black head to add to the farmhouse style of the hardware. You could also use regular wood screws and paint the heads to match your header color.
- Centering ruler - I use this thing for all kinds of crafty projects, but this is my favorite use so far!
- Measuring tape, pencil
- Patient husband, not available on Amazon.
Also, I've had a few questions about where I got my farmhouse style dining room light, so I thought I'd include the link to it here. It coordinates perfectly with the barn door hardware!
Did I miss anything? I wish I'd had this post when I was researching how to do this project, so I'm hoping it helps you. I love questions and comments, so drop me a note below and I'll be sure to get back to you!
P.S. I had so many great questions about this post that I wrote a companion piece full of Frequently Asked Questions. Check it out for all the details!
Tips for Hanging Double Barn Doors
You can easily create double barn doors out of two sets of single barn door hardware. No need to buy fancy double sets! Here's a few things to keep in mind.
Materials
- You can either buy two complete barn door sets (see below for the doors we used), or you can buy two sets of hardware and two door slabs.
- I also recommend installing "soft close" kits on your hardware. Then you don't have to worry about anyone slamming the doors!
Tools
Instructions
- First, be sure you have enough room for barn doors! You'll need at least as much space on the outside of the door as on the inside, to allow room for the door to slide out of the way. For double barn doors, you'll install two full sets of hardware, centered in the middle of the door opening.
- Once you've bought the correct size door and hardware, open the package and make sure you have all the right pieces. Gather your tools so you're not climbing off your ladder to find a screwdriver in the garage.
- Familiarize yourself with the instructions. Keep in mind that one of the doors will be hung as a mirror image of the other, so keep this in mind while reading instructions.
- Take your time making measurements and markings!
- Your laser level is your best friend! The key to barn doors that operate well is getting them exactly level. Hang your laser level on the opposite end of the wall from where you'll be working, so your hands don't get in the way of the beam.
- Get a buddy to help you with the actual installation. There are some parts that seem to require more than two hands.
- You can modify a door stop (included) to cover the gap between rails, if you prefer a seamless look. Or you can get a track joiner if you want the doors to be able to slide to either side.
- Install the soft close mechanisms before hanging the door slabs. (This step may not be included in your hardware instructions if you bought them separately.)
- Use the included floor guides to keep your doors from banging against the wall or door frames!
Recommended Products
As an Amazon Associate and member of other affiliate programs, I earn from qualifying purchases.
-
 BLACK+DECKER Line Laser, Auto-Leveling With AnglePro (BDL170)
 -
 TRUporte 36 in. x 84 in. Bright White Solid Core Rustic 3 Lite Frost Sliding Barn Door with Composite Hardware Kit-ES61-W1-BW-3TG - The Home Depot
 -
 TRUporte Easy Clip Soft Close Kit for Barn Door for Door Weight 88-132 lbs.-BDF960-4060-MB - The Home Depot


Kelly says
This is all extremely helpful! Thank you for sharing. Can you please elaborate on mirroring the doors? This is where I am struggling. Are the handle holes pre-drilled? If yes, how does this work for the 2nd door? Thanks!
Meredith says
Hi Kelly, the handle holes are not pre-drilled on this set. Which is good because you can decide where they go. When I talked about mirroring the doors, it would have been more correct to say "mirroring the hardware." I was referring to the arrangement of the header, bolts, and door stops. Especially the door stops since each will be on the outside edge of the door. The doors are basically the same, no matter which side you hang them on. And since you'll install the handles last, it will be easy to tell where those go, once the doors are hung. I hope that helps, and I'll go back and update the post with this info too. Thanks for your question!
Alicia Hursley says
Thank you so much for sharing. I'm hoping that this leads to a much smaller fight with my wife while we try to hang our door. We have a great relationship, we just have different ways of going about renovations haha
Rose says
What about weight of doors? I house sit for my friends a lot. They have been married forever. They moved last summer. Their barn door, I am not sure. It seems like the fixtures can’t hold the weight of doors. It’s a double door in to bathroom. Then they have a single one that gets stuck if closed all the way. I am thinking the stopper isn’t there or needs replaced. As for bathroom I can start to see board like they are adjust or moving. The rail on to is big but what if fixtures are not for weight limit? Any thoughts.
Meredith says
I'm not sure what to do in that situation, Rose. I would probably suggest buying the doors and hardware as a set, to make sure they work well together.
Mark H jr. says
The reason the hardware stopping the doors from hitting in the middle are correct but where the rails that slide along the track are mounted isn't. They should be brought in closer to the line or right along the lines that run vertically up from the glass. Only reason i know is because i made this mistake not once, but twice.. also the last barn doors i installed had bolts that were too long to fit the thickness of the door so double check that as well. My 2 cents 🙂
Meredith says
Thanks Mark, good to know!
Sonya says
Thanks so much! Question... My door opening looks identical to yours. However I have the same wide door opening on the left side of that same wall, except it butts up to a corner so no room to have double doors. What would I do in that case? I feel these both need to compliment each other since both openings are on the same wall. Thanks again!
Meredith says
Hmmm that's a good question. You're saying the wall isn't wide enough for one of the doors to slide out of the doorway against the wall? Is there enough room for both doors to slide to the other side?
Frankly says
Hi! I'm about to put a barn door onto a tiny hallway half-bath (I know, the privacy lock issue is being engineered right now) but I was just wondering... how did you calculate at what height to anchor your rail? Did you just eyeball it? Or pick a random offset into the header board, and decided to live with whatever floor gap would come of it?
The manual to my rail hardware said to mount it 44mm high... which would make it just under 2 inches... So that was definitely a typo!
Thanks for any insight (or secret math formulas) you can share...
Meredith says
Yes that does sound like a typo, unless they were meaning to install it that much higher than the door opening? My hardware came with instructions on how high to hang the rail, so I didn't have to do any math, but I can't remember what that height was. I would think the top of the rail should be" the height of the door, plus the height of the hanging hardware measured to the bottom of the wheel (that will sit on the rail), plus any amount you want it to be raised off the floor. I hope that helps!
Chad says
Meredith, I have been struggling with the same center stop you mentioned above. I have bought a couple and experienced the same gap issue you discussed above. I love this idea and think it is a great option. My question is what did you use for the center piece between the 2 door stops once they were cut? Do you happen to have part #'s from amazon or any other vendor. I appreciate any assistance you may provide.
Thank You, Chad
Meredith says
Hi Chad, that center piece is the little extra piece that we cut off of one of the door stops. In other words, there was room for one and a half door stops. If you still have the stops that came with your hardware, you should be able to use one whole one butted up to a half one that you cut. Does that make sense? Here is a link to a set of stops, but you'll still need to modify one by sawing off that center piece. (Why don't they make one of these?!) Also, make sure the stops linked here fit your hardware. There are dimensions in the listing. Let me know how it works out for you!
Charlene says
Wow! How handy is this? I am a firm believer and learning from others' mistakes and lessons! Thank you so much for sharing!!!
Charlene
Mike Green says
Good to know that i’m not a complete bonehead. I’ve been an interior trim carpenter for about 15 years but until today have only installed single barn doors. I wasn’t happy to figure out that the stoppers wouldn’t stop the doors centered in the opening. I thought there must be something I just don’t know if the only solution I could come up with is to do what y’all did. I was going to use a grinder to cut it but difficulty clamping the stopper, lack of sleep and still being at that job at 11pm I decided to call it for a day. May have saved me a finger or eye lol. I’m trying the sawzall tomorrow instead. Thanks for the tip 👍
Meredith says
LOL glad you still have all your fingers! Were you able to make this work with the sawzall?
ethel roth says
we are looking at 2 single barn door with hardware for a 72 inch opening. it sounds like you did the same. can you butt two rails together if doors close in middle. I think that is what you did but just want to be sure
thanks
Meredith says
Yes, that's exactly what we did!
Kayye Begay says
My husband and I just bought our first house about a month ago. We have been hard at work for the last few weeks and now it is time to finish up our latest project, our laundry room. We have updated the floors, redid the paint and now for the fun part…installing a barn door for the opening. I was wondering if the barn doors help with energy efficiency within the home. The laundry room is connected to the garage and as usual the garage gets very hot and most likely very cold. We just don’t want to shoot up our electric bill if we don’t have to. Any suggestions or feedback would be awesome!!!
P.S. I love the design you have!
Meredith says
Thanks Kayye and congrats on your first house! That's a great question, and I'm sorry to say that barn doors don't really do a great job of insulating. They don't fit directly into the door frame, so any air can go right through the sides. I've seen people adding weather stripping to the edges of the door, so if you try it I'd love to know how it goes.
Marvin says
Thanks for the tip on cutting the center door stop. I didn’t know what to do.
Meredith says
You're welcome, glad it was helpful!