Have you been thinking of painting your kitchen cabinets, but can't stomach the thought of all the mess, upheaval, and general mayhem that goes along with such a big project? Then I have good news for you!
Now there's an easier way to paint kitchen cabinets, without destroying the heart of your home in the process.
(THANK YOU to DecoArt and D. Lawless Hardware for providing supplies for this project!)
The Absolute Best Way to Paint Kitchen Cabinets
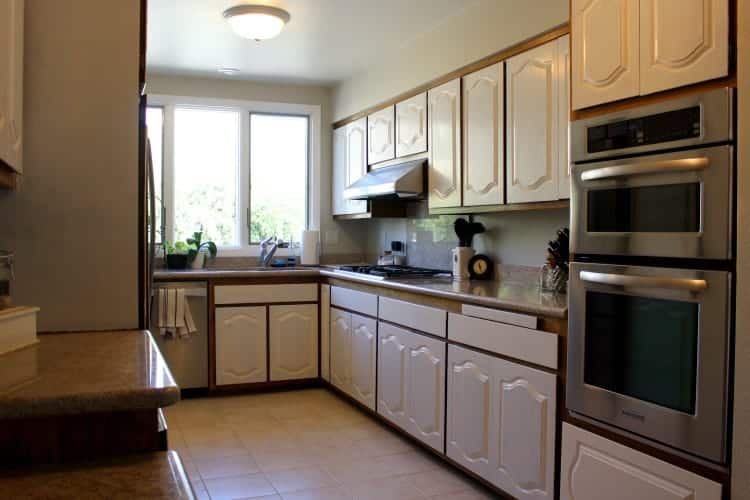
You may remember I already wrote a post on the "right" way to paint your kitchen cabinets, otherwise known as the world's longest kitchen cabinet painting tutorial. After I published my original post, the question I heard most often was "Is there an easier way?"
Well, because I love you guys, I set out to answer that question. I had to buy a new house with ugly dark outdated oak kitchen cabinets, just to satisfy your curiosity. It was a sacrifice, but one I was willing to make. Just for you, my dear readers.
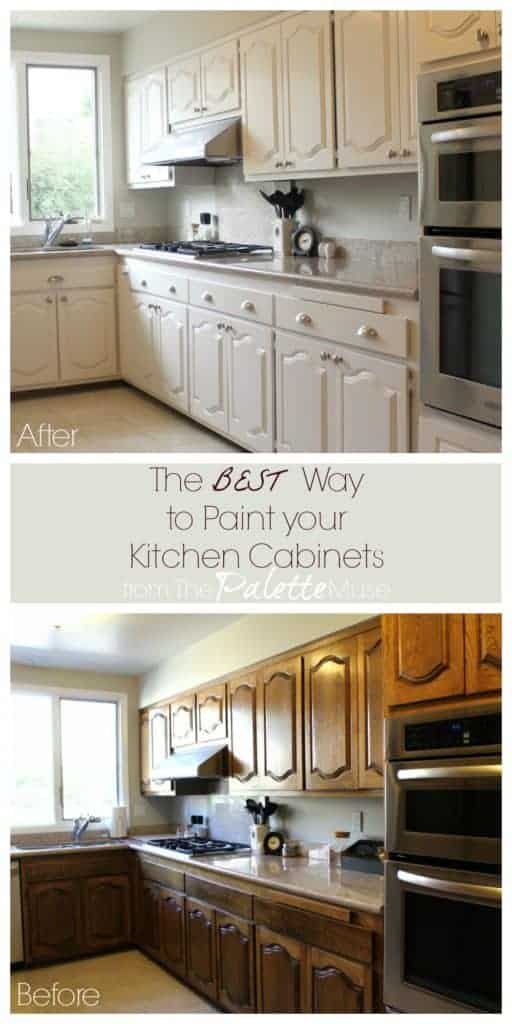
So now, after trying out a new product and a completely different process, I have the new and improved "best" way to redo your kitchen cabinets.
What makes it the best, you ask? It's faster, easier, and with WAY less mess. My previous process still works well, but if you're wanting a quicker turnaround, this will be the process for you.
Update: After living with my cabinets for several years, I've found that this new easier way holds up just as well as the previous method. So there's no reason to feel like you're taking a shortcut. I can definitely say this is my favorite way to paint cabinets now!

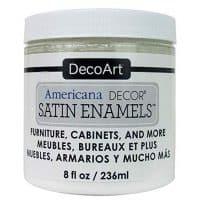
DecoArt Satin Enamel Cabinet Paint
In the past, if you wanted to paint cabinets or furniture, you had to strip, sand and generally kill yourself getting a good surface ready to paint on. Now, with DecoArt's Satin Enamel paints, you don't need to do any of that. Simply clean the surfaces, prime if needed (we'll talk about that in a minute), and paint.

Kitchen Cabinet Painting Hack
That sounds great, but here's the really great part... since you're not sanding, you don't need to remove all your items from your cabinets. That, my friends, is the key to making this project easier.
You don't have to change anything about the way your kitchen functions until you're almost done with the whole process. No more pulling everything out of your kitchen, then hunting through piles on your living room floor for that pan that you need to make dinner.
Everything stays in place, and you can cook dinner every night, after working on the cabinets during the day. (Oh wait, that doesn't sound good at all. Let's just say you could cook dinner, but don't tell your husband that, and make him take you out for dinner.)
New Cabinets in 7 Steps!
Here's the actual step-by-step process.
- Clean cabinet doors
- Prime cabinet door fronts and edges, if needed
- Paint cabinet door fronts
- Remove cabinet doors
- Clean, prime, and paint frames
- Paint edges of cabinet doors
- Reattach doors
That's it! Sounds easy, right? Well, that would be a pretty short blog post, so here's how to do it in full detail. (Be sure to read all the tips at the end!)
Clean Cabinet Doors
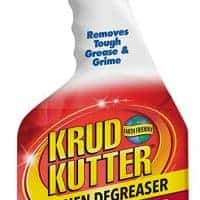
All you need for this step is a good degreaser, such as Krud Kutter, and a clean rag. If you can't find Krud Kutter in your cleaning aisle, look at the hardware store. It's a heavy duty, but non-toxic cleaner that will remove any grease buildup that can get in the way of your paint.
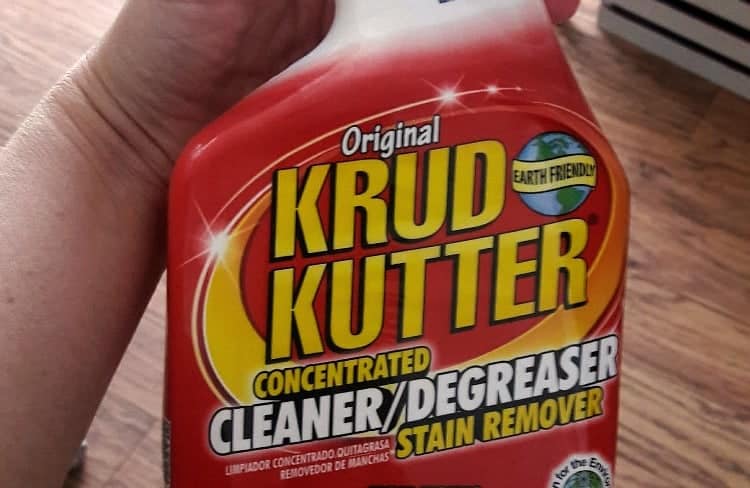
Simply spray on and wipe off with a very slightly damp clean rag or paper towel. Tougher spots may need a little elbow grease. Be sure to clean every paintable surface well so your paint will stick.
Prime Cabinet Doors - if needed
Not all cabinets will need to be primed before painting, if you're using DecoArt's Satin Enamels. Satin Enamels are formulated to adhere well to wood, and I've seen this to be true in multiple cabinet and furniture painting projects.
If your wood is old, has stains or dark knots, or seems dried out (like here in the NM Desert), it can be a good idea to prime first. Primer helps with adhesion and stain blocking, so it helps your paint stick better, look better, and go farther.
This Zinsser BIN Advanced Primer is what I recommend for painting over wood, whether it's cabinets, molding, or doors. It does the best job of stain-blocking out of any primer I've ever used.
Plus it dries in 45 minutes, so you can get on with your project quickly!
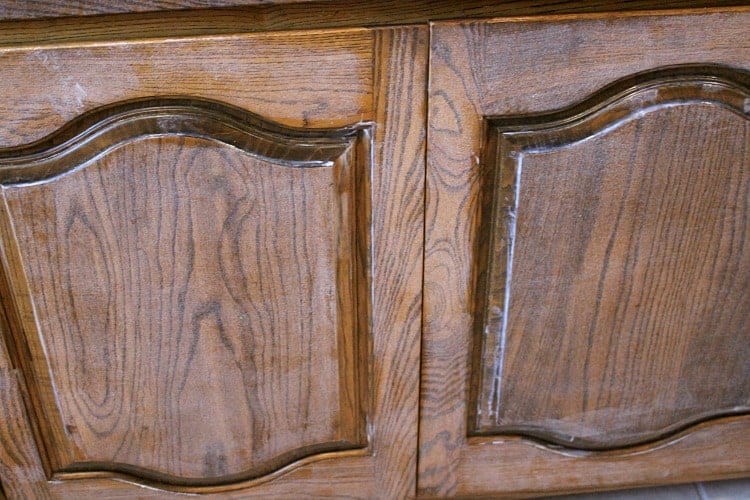
Full disclosure - when I painted these cabinets, I used DecoArt's Stainblocker, but it's not available for purchase anymore. I've use the BIN primer in several other wood projects and I know it will do the same job.
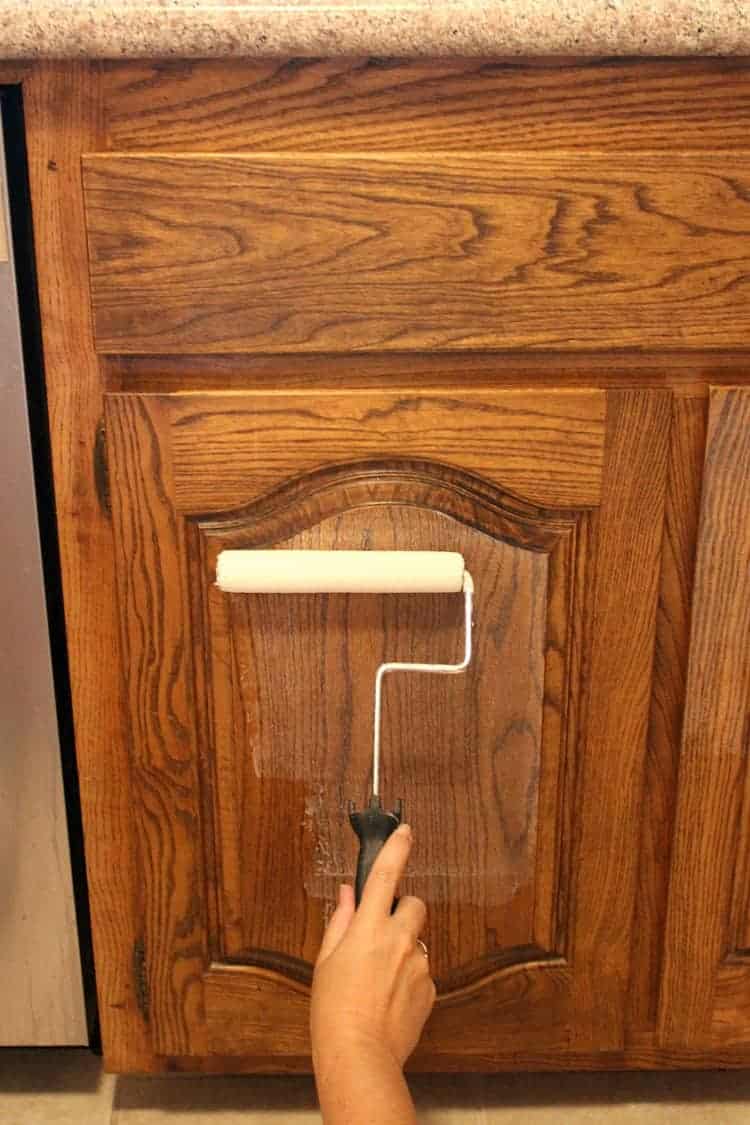
Paint Cabinet Door Fronts
I can hear you now, asking "Meredith, didn't you forget a step? Who would paint their doors while they're still hanging?" Well, I would. And you should too. It saves TONS of space, not to mention time spent moving doors around onto work surfaces.
Now, if you were using traditional latex or oil paint, I would not recommend painting vertically, due to the risk of drips. But this Satin Enamel paint holds it shape better while it's wet, which means it goes on smooth, and has the perfect drying time.
Drying time sounds like a weird thing to rave about, but it really makes all the difference in this type of project.
You need a paint that dries slowly enough that it has time to even itself out and get rid of brush strokes (we call this self-leveling), but not so slowly that it runs and drips and can't be touched for days.
Seriously, I can't say enough about how important this one property is to making this project so easy. Of course, you need to be careful to apply the paint evenly, and look out for all those corners where paint can build up and lead to drips.
The other great thing about this paint is you can re-coat as soon as it's dry, so conceivably you could do all your coats (2 to 3) in one day, if you were so motivated. I was not.
It took me a few days, but at least I didn't have to worry about my kitchen being torn up in the meantime.

One last tip about painting doors... If your doors have inlays, like mine did, paint those first with a brush before painting the large flat areas with a mohair roller or large brush.
This will allow you to be careful in all the nooks and crannies, and still achieve a good clean paint job without having to stop in the middle and do the detail work.
Removing Cabinet Doors
The absolute first thing you must do before removing your cabinet doors is LABEL them. Trust me, this is the one tip you should not skip over.
I know you think you'll remember where everything goes, but you will not. You will, however, thank me later if you label your doors clearly. I use the raffle ticket method shown below.

Now you're ready to remove the doors. For this part, you may want to find a helper. That is, unless you're unnaturally adept at holding a solid wood slab in one hand and operating a power drill in the other, all while balancing on one knee on the countertop, with the other foot straddling a sink full of dirty dishes.
As it turns out, I was not particularly gifted at this skill. Unfortunately for my knee and my dishes. Hence, no photos of this part of the process.
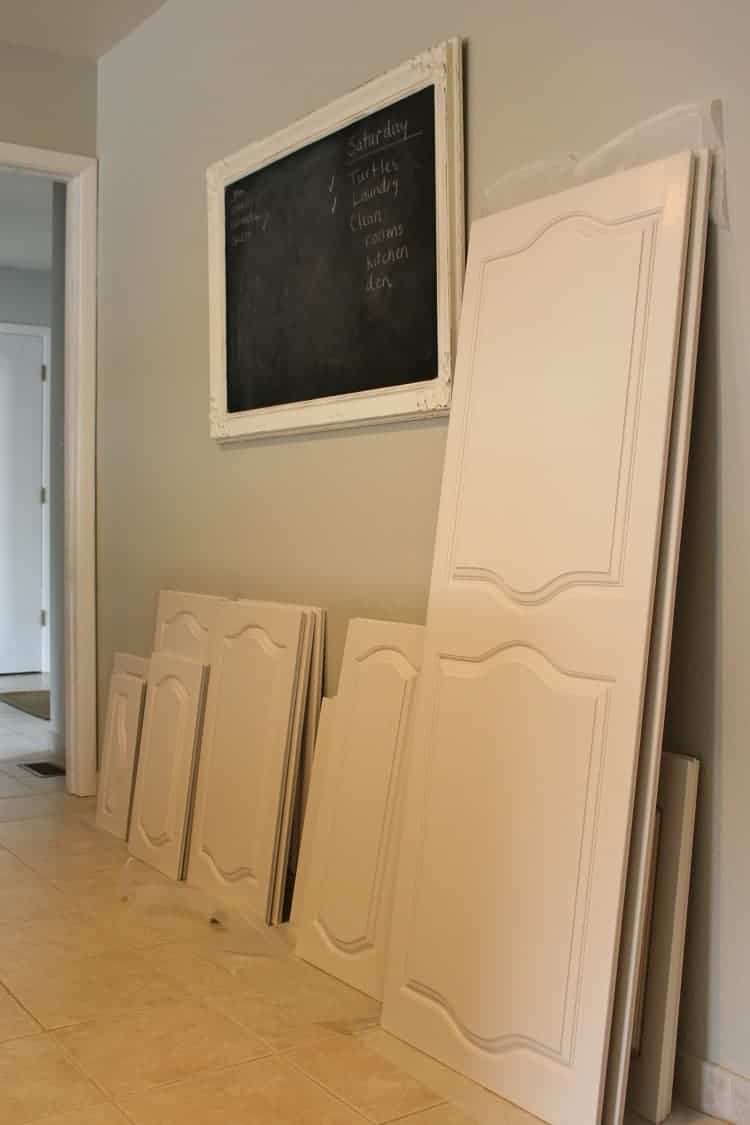
Simply unscrew the hinges and stack the doors along the wall or in your garage. If you're re-using your hinges, label them to go with the doors and save them for later.
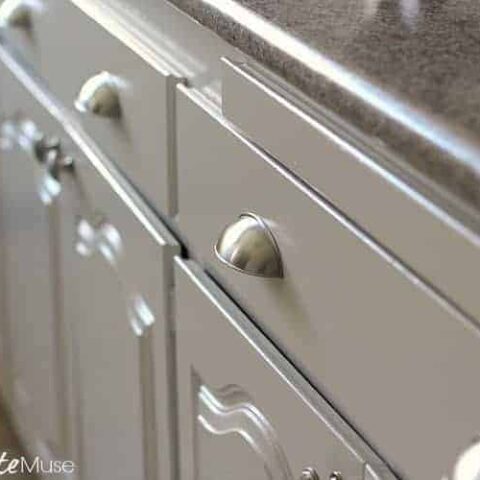
I didn't want to re-use my old dingy brass hinges. I also didn't want to call attention to them, so I went hunting for something that would disappear into the white background of the cabinets. Did you know you can buy white hinges?
That's just what I needed, and I found them online at D. Lawless Hardware. If you haven't checked out D. Lawless yet, you should. They have a great selection, at great prices, and are just the nicest folks to work with. You'll see more of their hardware in a minute.
Clean, Prime, and Paint Frames
Once your doors are out of the way, you'll repeat the same cleaning, priming, and painting process as above, just on the frames this time. It sounds like a big job, but it really isn't.
The frames don't take up much space, so they won't take you long to finish. Just make sure you tape off any edges first, to make your life easier.
Paint Edges of Cabinet Doors
While you're working on your frames and waiting through drying times, you can paint around the edges of your cabinet doors.
You want to make sure the paint is good and dry on both the frame and the doors so they don't stick to each other once you attach the doors again, so leave plenty of time for this step.
This is also the time that you'll want to pull out your drawers and paint their edges too.
At this point, you remember why you can't have open shelving in your kitchen.
Reattach Doors
Once everything is finished and it's all good and dry, then you can rehang your doors and replace the drawers. (Sounds easy but involves more contortionist moves in mid-air, so enlist a partner if you can!)
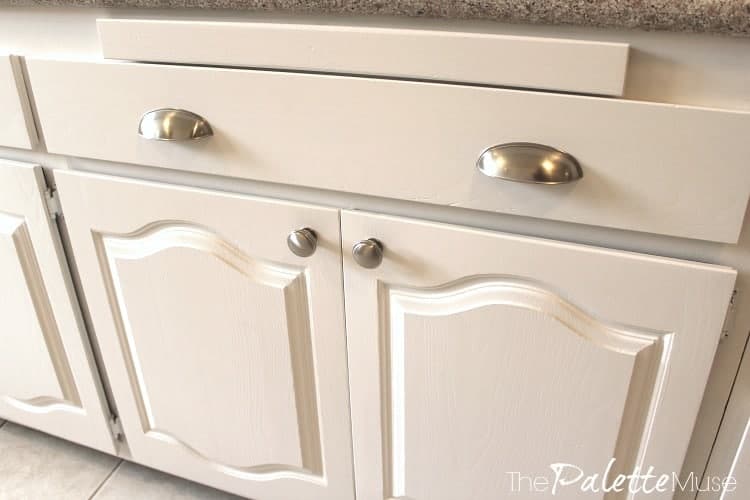
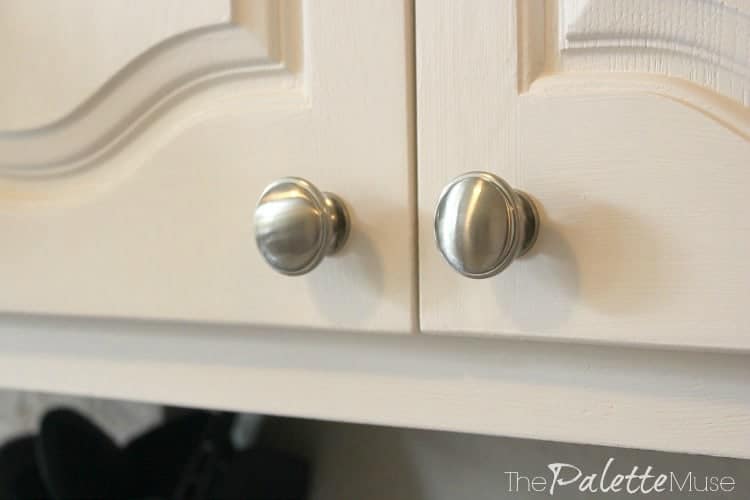
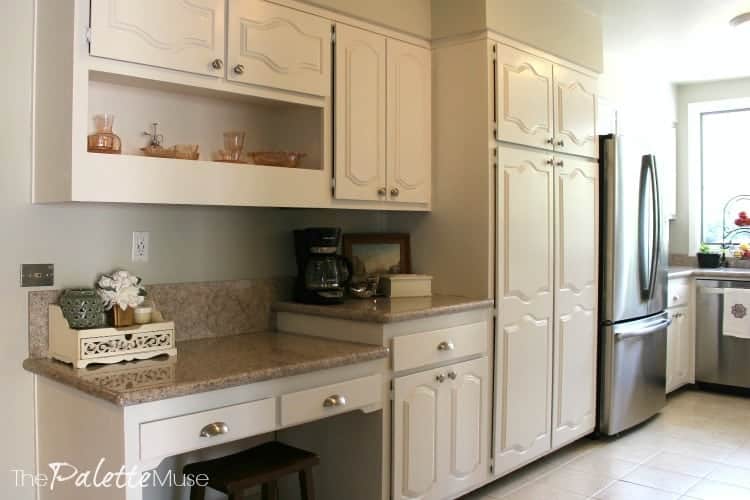
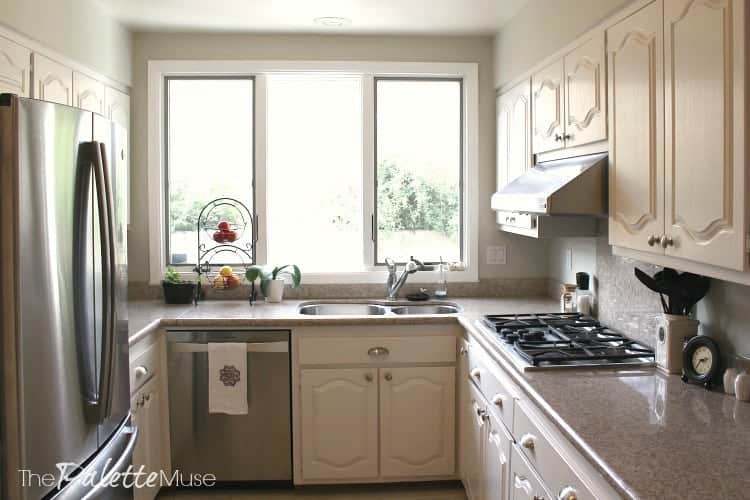
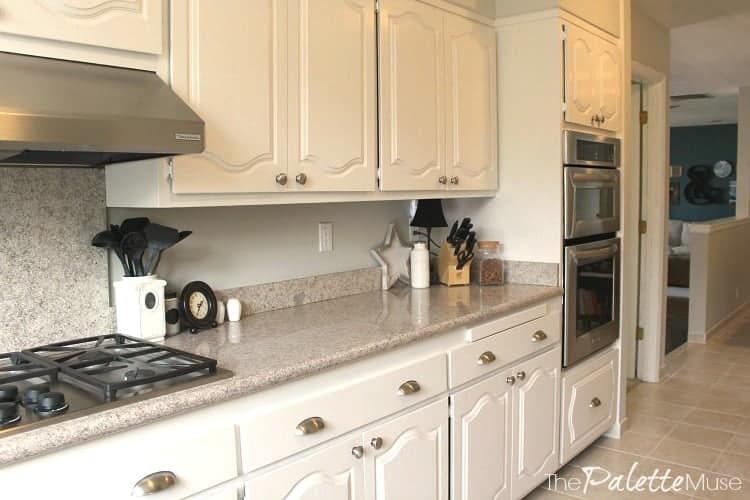
Finally, add some fabulous hardware knobs and pulls, and you've got a brand new kitchen.
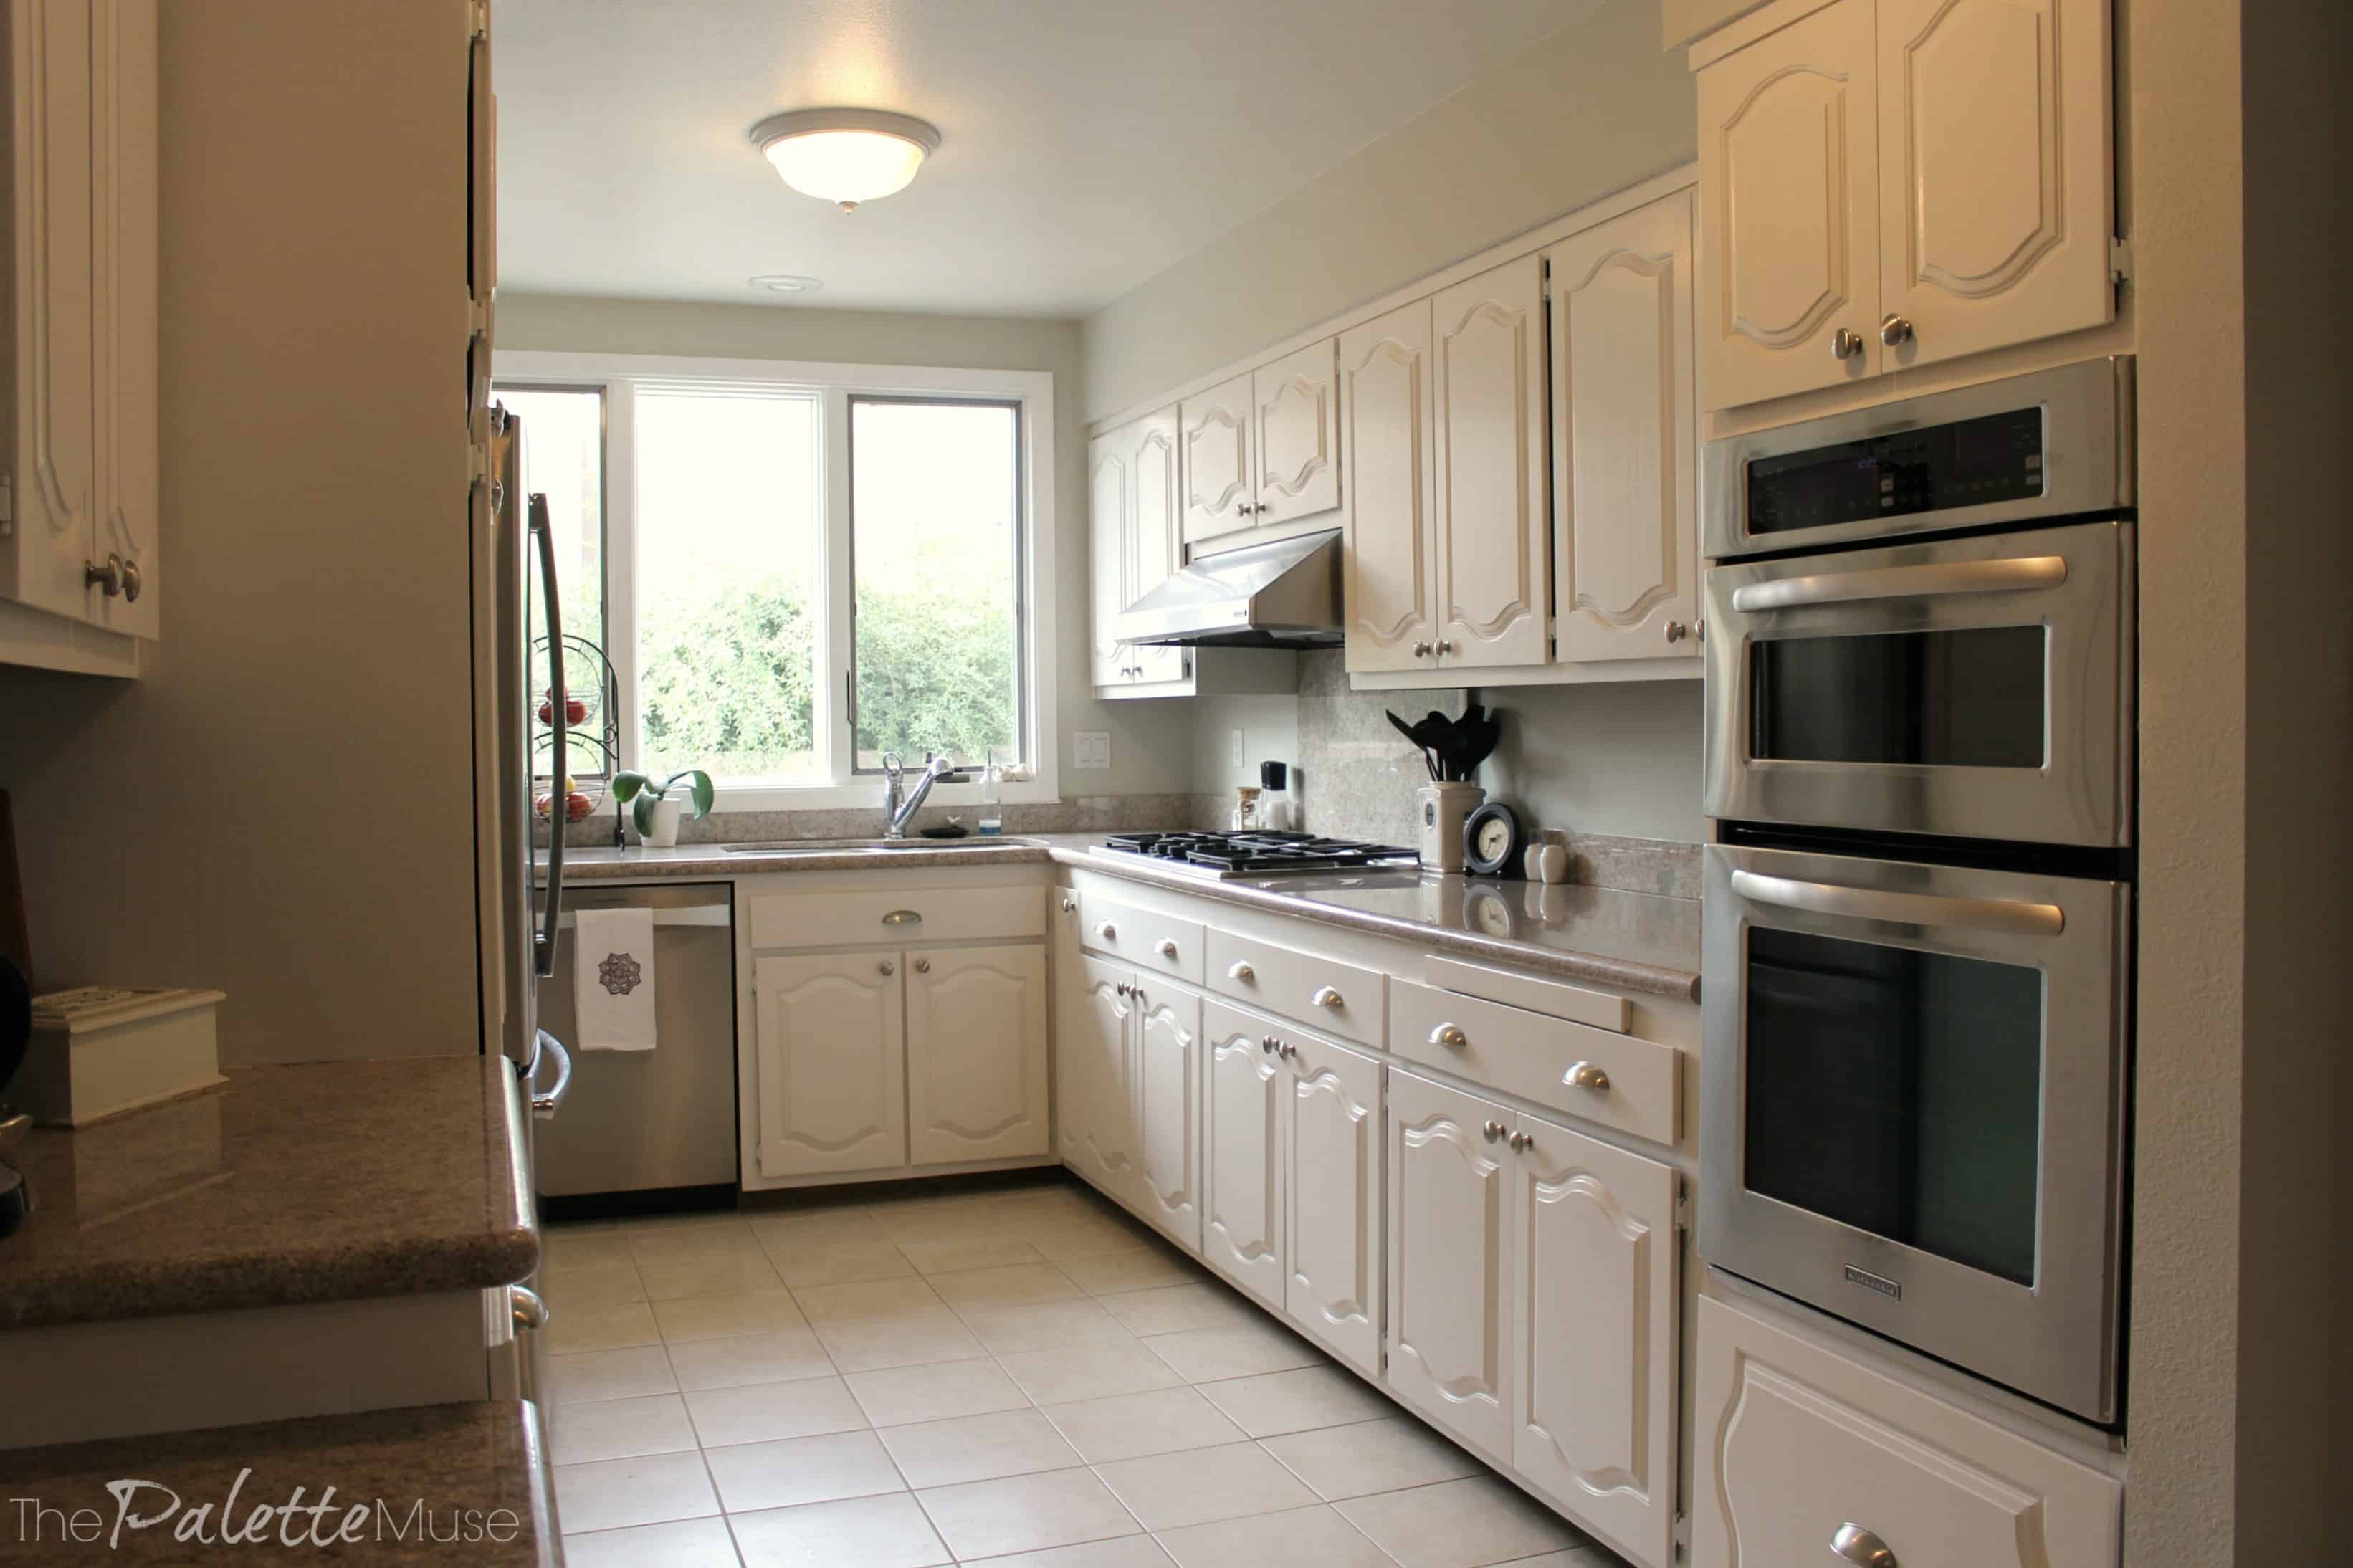
You're done! That wasn't so bad, now was it? You didn't have to remove a single dish from your cabinets, and everything got to stay in its place so you could use your kitchen as you worked little by little on it.
You didn't even have to spend a whole Saturday cleaning sawdust out of your cabinets before replacing your mixing bowls.
The family wasn't mad at their mom-induced chaos. Even your husband was impressed that all this magically happened in between meals. OK, well maybe that's stretching it a little, but you get the idea.
Resources
Note: these are affiliate links, which means if you make a purchase, I'll make a small commission at no extra charge to you.
Cabinet Painting Tips
This process absolutely works best with DecoArt Satin Enamel paint. (You can find it on their website, Amazon, or just about any craft/hobby store. I like Hobby Lobby because they always have a 40% off coupon.)
The paint's consistency and drying time allows you to work on the doors in place, and there is no sanding required. I do not recommend this method if you want to use regular latex or oil-based paint. See my earlier post if you want to do that.
Color
Don't fret if you can't find the color you want in the Satin Enamel paint. You can mix whatever color you like from the available colors in their line.
For my cabinets I used Bright White, mixed with Natural Sable. (The formula was 10 jars white, and 4 tablespoons sable.)

I wanted a soft warm white that wasn't too pure. Adding a little brown gave me exactly what I was going for.
Be sure to mix enough paint for your WHOLE project. You do not want to be trying to match colors when you run out of paint halfway through!
Brush Strokes
If you use a mohair roller, you shouldn't get any paint bubbles or roller texture. But if you do, simply drag a soft dry brush over the rolled area as soon as you're done with a section.
Move in the direction of the wood grain as you go, and any brush strokes will be almost invisible.
Hinges
If you're buying new hinges, make sure you measure your old ones accurately and check that the new hinges are exactly the same size and shape.
Small differences can add up to make a big problem in the end. If your house is older, you probably have the non-adjustable hinges that go right on top of the frames.
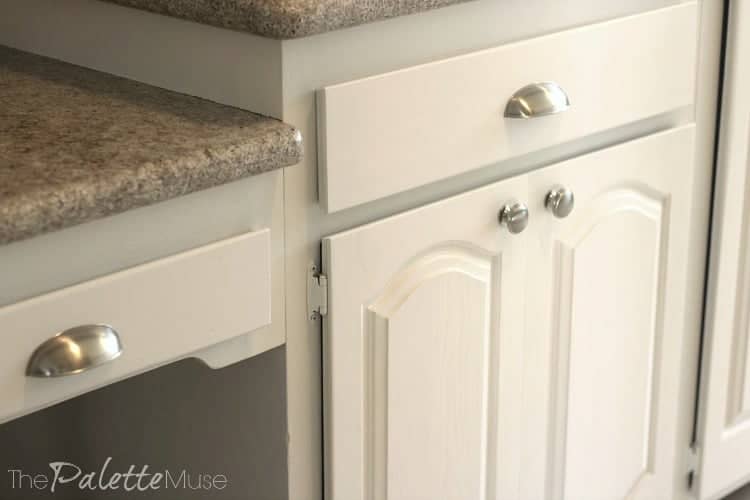
Fortunately it's pretty easy to replace these in a variety of colors. For my kitchen I didn't want the hinges to be visible, but I also didn't want to retool everything to add hidden hinges.
The solution was white hinges. They're not totally hidden, but they also don't call attention to themselves.
What About Laminate Cabinets?
And finally, does this work on laminate cabinets? Yes, with one little modification. If that's you, be sure to check out my newly updated post on how to paint laminate cabinets.
Now it's your turn... what's stopping you? And as always, let me know if you have any questions. I love to help! Well, I'm not actually going to come over and help you paint, but I'm happy to virtually help! In the meantime, here are the "After" photos for inspiration. Feel free to pin and share!
Update: I've had so many wonderful questions about this process and the Decoart and D. Lawless products, that I've written a follow-up post. Before you get started, be sure to check out the Frequently Asked Questions and How They're Holding Up post for all the details. And finally, I've also written a post on what not to do when painting cabinets about the most common mistakes and how to avoid them. Hopefully that one will save you some trouble along the way!
And finally, as if this wasn't enough information to digest, I've written a comprehensive cabinet painting ebook that answers most of the questions you'll find below and in the other FAQs post.
The biggest question is how to get the DecoArt products, which is becoming more of a problem lately. I answer that and what products I'm recommending instead in the book. If you're having trouble sourcing the right kind of paint for your cabinets, give it a read!
The Best Way to Paint Kitchen Cabinets
Painting kitchen cabinets can be overwhelming, but here's how to make it easier. You don't have to empty out your whole kitchen because no sanding is required!
Instructions
- Clean cabinet doors with Krud Kutter or hot soapy water.
- If needed, prime cabinet door fronts with Zinsser BIN Advanced Primer, using roller and paintbrush. Don't worry about the edges of the doors yet.
- Paint cabinet door fronts with Satin Enamel, using roller and paintbrush.
- Label cabinet doors and remove them from the frames of the cabinets.
- Repeat steps 1-3 for the cabinet frames.
- Paint the edges and insides of the cabinet doors.
- Reattach doors.
Notes
It may seem counter-intuitive to leave the doors on the cabinets when painting them, but it gives you a perfect work space, and this paint will not drip or run so you don't need them to be horizontal while painting. They can dry in place, all while leaving your kitchen workable during the project.
Recommended Products
As an Amazon Associate and member of other affiliate programs, I earn from qualifying purchases.


Samantha says
They look a-maz-ing!!! So much brighter! Love it!
Meredith says
Thank you Samantha! They really changed the whole look of the kitchen!
Dawn says
Hi! I am curious, upon finding your white cabinet post how long ago was this and how have they held up? I ask because I realize this is quite a project but something we are discussing. I have heard pros and cons. I am curious how yours have held up. Also, would you do it again?
Thanks! Interested reader.
Meredith says
Hi Dawn, you're right this was a big project, not something to take lightly. I've had that question several times, so I wrote a post answering it. If you'll look at the end of this article, it links to that one. Thanks!
Charmaine says
@Meredith, I am curious as well and do not see the post.
Meredith says
Hi Charmaine, here is a link to the post: https://thepalettemuse.com/painted-kitchen-cabinet-faqs-theyre-holding/
It's been a couple of years since I wrote that update, and I'm happy to say they are still holding up just as well as after the first year!
Tanya McInturff says
I have oak cabinets, too, that I have always wanted to paint, everyone says that they will look "zebra"ish with the wood grain. Any thoughts/advice on that?
Anita C. Lee says
Tanya, I personally love seeing the wood grain patterns in a solid white painted finish. I think it adds a richness to the finish. I used to have a large den paneled in that type of finish and it was my "happy place"! That's still my favorite room and that was two houses ago.
Tanya McInturff says
Thank you so much for your reply! Now I really really want to do ours. Would you be willing to send me an up-close picture showing the finish?
Meredith says
Hi Tanya, I was a little worried about that too, but I've been so pleased with these results. The paint is a little thicker than latex or oil paint, so it tends to fill in a bit of the grain, especially if you use the sealer first. You can see a bit of the texture, but it definitely doesn't look distracting or noticeable. Let me see if I can send you a close-up...
jacquiegum says
Wow! Way easier without having to empty everything and deal with sanding! Beautiful result!
Meredith says
Thanks Jacquie! I couldn't believe how great the results were, especially considering that the work really wasn't too bad!
Susan Cooper/findingourwaynow.com says
Oh my gosh, this new paint/method sounds amazing! So easy even I could do it. Makes me wish my kitchen cabinets were old and needed updating just so I could give it a try. Sounds like it makes the process so much less work and mess. Cool!
Meredith says
Believe me Susan, you should NOT wish for that! 🙂 If you have good cabinets, be thankful! This is just for us poor souls who desperately want something different and don't have a few extra thousand dollars lying around for a new kitchen! 😉
Jeri Walker (@JeriWB) says
Okay, this is amazing. So much better than needing to do the sanding like you did with the former post. The array of products on the market just keeps getting better 🙂
Meredith says
So true, Jeri! Pretty soon, maybe they'll have products that will do the whole process for you. But until then, this is a pretty good substitute! 😉
Andy says
Studies show, and experts agree, that fortifying your meals with sawdust makes it 24.71318% more likely that you will meet your daily roughage requirement. 😉
Meredith says
Hmmm, never thought of that particular health benefit! I'll have to start supplementing...
Brooke says
Looks great and I can't wait to try it! Would you mind sharing the name of the primer/sealer you used? I only see one on the website but want to make sure.
Meredith @ The Palette Muse says
Thanks Brooke! You will love this method. The primer/sealer is from DecoArt and is part of their Satin Enamels line. It's specially formulated to get the wood ready for the satin enamel paint. You should be able to find it at Michael's or Hobby Lobby. Best of luck!
Leo says
Hi, so I went on the deco art link for the primer but it still says sanding for best results... did you sand in between coats? And is this only for wood cabinets or does it also work on melamine? Thanks so much!!!
Meredith says
Hi Leo, yes I noticed that DecoArt does recommend sanding, but I must confess that I didn't do it! I suppose it might depend on what type of wood you're painting as to whether you really need to sand. I didn't touch a piece of sandpaper for any part of this project, and I couldn't be happier with the results. However in answer to your other question, this paint is usually used on wood, so I don't know if it will work on melamine. If you give it a try, could you let us know how it goes? Thanks!
Leo says
Perfect! Will do! Thank you so much for the response. Your work looks amazing! & it's for a plan on my mother's new house, I personally am not sure how the cabinets are yet, but this was such a good read before jumping into any projects. Saved tons of time! Thanks for sharing!!!
Linsey says
It looks beautiful!!! Thanks so much for sharing your tutorial how-to and pics! Makes me feel confident enough to seriously consider re-doing my kitchen cabinets too! It would almost be like getting a brand new kitchen! Yours looks truly fabulous!! Wonderful job and thanks for the great inspiration!!!
Meredith says
Thank you Linsey! I'm so glad it was helpful. You can totally do this!
Nancy says
Your cabinets are beautiful. What color is your kitchen walls? Did you use the same DecoArt Satin Enamel paints?
Meredith says
Thanks Nancy! No, the color on the kitchen walls is Benjamin Moore Sea Salt.
Lauren says
I'm very curious to know how this paint is holding up! I'm dying to paint out cabinets which look exactly like yours, only red oak toned, but we have a baby and I don't want to disrupt the house for ages while we paint. This sounds like it might be the perfect solution!
Kathy says
How many jars of sealer/primer and paint did it take? I really like this idea for painting cabinets. Great look!
Meredith says
Thanks Kathy! I used 10 jars of paint, and about 3 jars of primer.
Lisa Aschliman says
How many linear feet are your cabinets? Just to get an idea of how much paint I should use.
Chris says
I have been researching kitchen cabinet paint for a short while. I looked into Sherwin Pro Classic acrylic-alkyd and
Benjamin Moore.
I see that you tried DecoArt Satin Enamel paints, in your opinion what would you recommend out of the tree choices for looks and durability?
I have heard that BM and SW are fast drying and leave brush strokes, which would drive me crazy!!
Thanks in advance for you 2 cents.
Chris, MN
Meredith says
Hi Chris, sorry I just saw your comment! I have actually used BM Advance, which is their alkyd paint and I was very impressed. It's slower drying, which helps you eliminate brush strokes, and dries with a really strong finish that's easy to clean. (I covered that in a previous post: https://thepalettemuse.com/kitchen-cabinet-makeover-reveal/ )
I don't have any experience with SW's version. I will say that all of these products will dry faster than oil, which is what some people prefer in order to cut down on brush strokes. But I don't use oil because of the cleanup required.
In my experience, the DecoArt and Benjamin Moore are equal in terms of looks and durability. The difference is in the amount of prep work. The DecoArt Satin Enamels are so easy to work with, for just as good a finish, that I would use them the next time I'm doing this project. The only exception might be if you wanted a flat or matte finish, or a glossier finish than the satin from DecoArt. Hope that helps, and my apologies again for keeping you waiting!
Judy Maranger says
You don't mention putting on any kind of a sealer. How are the cabinets holding up without one? I am getting ready to paint my kitchen cabinets and appreciate this tutorial… thanks so much.
Meredith says
Hi Judy, you do not need a sealer with this paint. It dries to a nice hard satin finish, and you can easily wipe off any messes. The finish has held up beautifully for the 6 months that I've lived with it, and only requires an occasional tiny touch up, which is super easy.
Ann Garner says
2 questions. Can you distress the cabinets and also do you paint inside. Oh and what about the side that isn't real wood.
Meredith says
Hi Ann, this paint isn't really meant for distressing, but you could give it a try on one door and see how you like the effect. You might be wanting more of a chalk paint style look. I do think it looks better to paint the insides, but that's totally your choice. And this product is made to go on real wood, but again you could try it on the laminate and see if it holds up well, before doing the whole kitchen. Hope that helps!
Ginny says
You don't mention how many coats of paint it took to cover your cabinets anywhere in your process. How many and how long in between coats please?
Meredith says
Hi Ginny, I used two coats of paint, and it only requires a few hours of drying time in between. If you had the time and energy, you could start your next coat on the first cabinet by the time you finish painting the last cabinet!
Carol Rask says
Hi Meredith! I can't wait to try this. Your cabinets look awesome! My cabinets look similar, but I think that I might have to get the laminate paper-like stuff off them first that was glued on? Not sure. This is a 1952 built house. If I was better at taking photos, I would send out one. I also hate the old hardware. They look like they belong in a dungeon, (no kidding). I might have to wait a couple years yet, cause then I'll be retired and have all the time in the world! lol. And I might have to take the doors off, but I don't worry about offending my 3 dogs, ha ha. I've also had 5 surgeries in the past 3 years, so I no longer can climb ladders and some steps. Anyway, my son is 6 ft. 4" tall, so I guess I'll see if he wants to help. I love white cabinets, and I love the idea of re-purposing something. Thanks for your awesome instructions. I know I can do this! : ) You sure inspired me! Thank you so much for the boost of confidence you gave me!
Marie Kerwin says
Hi Meredith,
So excited to get started.
Just getting supplies to redo my kitchen cabinets but I've come to a stand still. Can you help? I've searched for 4 hours on-line and cannot find a sealer/primer made by DecoArt. (Your blog post reads, "DecoArt makes a great sealer/primer that is meant specifically for wood, so the paint will go on smoothly and adhere completely. It looks a little like glue while you’re putting it on, and it really sticks like glue.")
I'm sure I'm doing something wrong online and need your help. Can you send me a link to this item, the exact name of the item, or the UPC? I would be most appreciative of your help. Can't wait to paint!
Thansk!
Marie
Meredith says
Hi Marie, that's a great question! I'm going to update the blog post with some more information about where to find these products, but in the meantime, here's an affiliate link to buy it on Amazon: http://amzn.to/2pQikwA
You can probably find it in stores too, but check out the link so you can at least see what the bottle looks like. And let me know if you have any more questions!
Marie Kerwin says
Hi Meredith,
Thanks for replying so quickly. You are appreciated.
I found this item at Blick Art Supplies for $5.32 per 8 oz. (https://www.dickblick.com) Amazon sold it for $10.00 for same thing.
I think the confusion comes from the word Sealer. It is repeatedly both in the blog and on DecoArt webpage that a SEALER is not needed, yet this has the word Sealer in the title. I found it listed under Speciality products on DecoArt American webpage. It is called STAIN BLOCKER / SEALER on DecoArt webpage. On Blick's webpage it is called SEALER.
Thanks for helping me find it finally.
The only other piece of info I needed to purchase supplies was coverage expected (and number of coats needed) The enamel is listed as covering 20 sq feet twice. The Blocker/Sealer doesn't say.
Marie Kerwin
Meredith says
I'm so glad I could help, Marie! And that's a great price! I felt like the stain blocker covered a more ground than the paint. Maybe because only one coat was needed, and it doesn't need to be applied as carefully. I used 3 jars of blocker and ten jars of paint, if that helps.
Jessie says
Hi Meredith,
Thank you for your detailed information. I intend to paint my kitchen cabinets which are about 40 years old as current brown is tired looking 🙂
Is stain blocker same as primer?
How do you like DecoArt paint compared to Benjamin Moore satin paint you mentioned in another post? Which is more lasting?
Meredith says
Hi Jessie! Yes, the primer is called stain blocker. I can't really answer which lasts longer because I sold the house that I used Benjamin Moore on after about a year. (It held up great during that time period and BM has a reputation for very high quality and durability so I'm sure it's still going strong.) It's been about a year and a half with the DecoArt and it's holding up great too. I honestly would pick the Decoart next time again, if that helps. (Nothing against BM but the process is so much easier with DecoArt.) Good luck!
Alicia says
Hi Meredith
I luv this method and I am going to give it a try. I didn't see anything about sealing the cabinets. I's this not necessary? How do the cabinets hold up?
Meredith says
No sealer necessary! That's part of what makes this product so great. I've been impressed with how well it's held up for over 6 months now. I do occasionally have to do a quick touch up for a nick or two in high traffic areas, but that takes about 2 seconds. 🙂
Norma Perkins says
My kitchen is similar to yours. How many jars of paint and sealer did you use? How many coats of paint did it take to cover? I love the pulls and knobs you used. Could you give me the numbers or description of them. Thanks so much!
Norma Perkins says
Oops! I should have read the other comments FIRST! I see that you used 3 jars of stain-blocker and 10 jars of paint. It sounds like you did two coats of the paint? Am I right?
Jan Henderson says
Marie Kerwin could you send me a link to where you found this paint on Block Art? I can't seem to find it. Thank you!
Jan Henderson says
Sorry...I meant Blick Art http://www.dickblick.com
Marie Kerwin says
https://www.dickblick.com
The company's name is Blick Art
Marie Kerwin says
Jan,
Here is the actual URL for the page in Blick Art. It really is hard to locate. It's called Americana Decor Stain Blocker/Sealer and sells for $5.32 for 8 oz. It stretches quite far so you may only need 3-4 eight oz containers. It's like painting with oatmeal but dries very hard. The directions say to wait 5-7 days before applying paint.
http://www.dickblick.com/items/00088-1346/
Jan Henderson says
Thank you Marie! I searched their website & just couldn't find it. Wasn't sure if this was the same as it doesn't say DecoArt on the jar in the picture. Your kitchen looks amazing! I am so anxious to get started on my kitchen cabinets 🙂 Where did you buy the DecoArt Satin Enamel paint? I searched Blick Art for that also but it looks like they only carry their chalky finish paint.
Marie Kerwin says
Hi Jan,
We have a store in AZ called Jo-Anns Fabric and Craft Store. They had the best "deal". It sells for $7.99 for an 8 oz jar but JoAnns let me use a 40% coupon. (Most other websites sell it for $10.00 per jar with NO discount.) After speaking to customer service at DecoArt, I went to JoAnns and placed a "Special Order" and paid up front. It took one week to arrive at the store, they called me and I picked it up. NO shipping charges! I used a 40% coupon so got them for $4.80 each! WOW! I purchased 12 but think I will only use about 8. Didn't want to run out and I'll return what I don't use.
Here is the URL for the paint on Joanns website.
http://www.joann.com/decoart-americana-decor-satin-enamels-8oz/zprd_15031784a.html
I've attached a color chart of all the enamels but I bet it won't open because I just copied and pasted. There was no option of adding an attachment. I got the chart at DecoArt website.
Americana_Decor_Satin_Enamels_Color_Chart.pdf
The label on my Stain Blocker/Sealer DOES have the company DecoArt on the front bottom right-but it's in smaller print. This company was difficult to figure out because they call this line of paints "Specialty Paints" or Americana Decor.
http://www.decoart.com/americana-decor/satin-enamels/paint
Good luck. I hope this helps.
LaVonne says
I think it is an atrocity to paint solid oak wood cabinets...just another
money making idea from “home interior decorators”
White kitchen cabinets are used as a cheap replacement for kitchen cabinets,
because cheap wood is used and painted white!
Karen says
An atrocity? Lol...I couldn't disagree more! Perhaps if her cabinets were gorgeous walnut or natural cherry wood it might be best to leave them alone. But they are hideous builder grade, heavy grained oak. How anyone could prefer the "before" to the after is beyond me!! There is nothing wrong with painting wood, it's still wood after all. And the notion that it's just another money making idea from interior decorators is absurd. It's actually in inexpensive DIY upgrade.
I think they look fabulous Meredith, and I agree they totally enhance your granite. BTW...what is the name of your granite?
Marcus says
@LaVonne,
These are builder grade cabinets. You may need to find something else to be angry about.
Mary Jo Bonds says
How do you figure the amount of blocker and paint you need? Thanks
Meredith says
Hi Mary Jo, each jar will cover about 20 square feet, so you need to measure the dimensions of your cabinet fronts (length x width) and divide by 20 to get the number of jars needed. If it helps, my kitchen took about 10 jars of paint and 3 jars of primer.
Patti says
Can you use a glaze over this paint?
Meredith says
Hi Patti, sorry to take so long getting back to you. I wanted to get in touch with DecoArt first and see what they said. Here's the answer: The Satin Enamels does not require a top coat and they have not done extensive testing on how the paint will wear or react to additional top coats so they recommend testing on a scrap surface first. I would love to hear if you try it and how it works for you!
Debbie says
Can you glaze over this paint?
Meredith says
Hi Debbie, sorry to take so long getting back to you. I wanted to get in touch with DecoArt first and see what they said. Here's the answer: The Satin Enamels does not require a top coat and they have not done extensive testing on how the paint will wear or react to additional top coats so they recommend testing on a scrap surface first. I would love to hear if you try it and how it works for you!
Allyson says
I have recently used this on my bathroom cabinets after seeing your post and it turned out great! I also am using it on a light fixture that I didn't have the extra $ to change. I'll definitely give you a picture after the bathroom is completed. I do have a dresser that Ibpaibted previously with Valspar furniture paint. Do you think I could use this method on the dresser for good coverage?
Meredith says
Hi Allyson, I'm so glad this worked for your bathroom! I'd love to see the after pics! Yes, I do think this would work well over previously painted wood. Just make sure it's clean first, and you should be good to go.
lori says
I am trying to find that sealer / primer but all I can find is multipurpose sealer
Meredith says
Did you try clicking the link in the post? It would show you exactly what it looks like. You don't have to purchase from there, but at least you'll know what you're looking for. Let me know if you still can't find it.
Whitney says
We have chalk paint on our kitchen cabinets. Any idea how this would hold up over that?
Meredith says
Everything I've heard about painting over chalk paint says that you need to completely sand off any of the wax finish that was used before, so the new paint will adhere. If you get the wax off, then it should work great!
Sarah says
How many coats of primer did you do?
Meredith says
Hi Sarah, I only used one coat of primer. It worked great!
Sarah Fray says
I have the same hinges on my cabinets, but they are brass. What's your opinion on painting them white instead of getting new ones?
Meredith says
Hi Sarah! My personal opinion is that painted hinges don't hold up very well and it's hard to get a good clean finish on them. To me, it's worth the money to invest in new ones since you're putting in so much work to make your cabinets look brand new. But if you find a good way to paint them, let me know because I'm sure you're not the only one with this question!
Kim B Taylor says
Meredith, What is your kitchen wall color?
Meredith says
Hi Kim, sorry to take so long getting back to you. I've been away for the holidays. The wall color is Benjamin Moore Sea Salt. (Not to be confused with Sherwin Williams Sea Salt, which is more of an aqua green.) I love this one, it's the perfect gray!
Sara says
Did you paint the inside face of the cabinet doors as well, or is the 'common practice' to just paint the outside facing part of the door? Trying to decide if it'd look strange to have two different colored cabinet doors. Thanks in advance!
Reba R. says
Just realized I asked the same question just now 🙂
Meredith says
Hi Sara and Reba, no I did not paint the inside face. People have differing opinions about it, but I would say it is better to do the inside too. Especially if you think you might sell the house at some point. That's a safer option, I think. I opted for the lazy way out, and it's never bothered me, but I know it drives some people crazy. So I would say, if you have the time, go ahead and do both.
Reba R. says
They look great. Did you paint the inside of the cabinet doors after you removed them? Or just the edges?
Fran says
HELLO from Texas!
I have been searching and reading ALOT of blogs about kitchen cabinet redos over the last year. I have struggled with the idea of painting my kitchen cabinets myself or having a professional do it. Of course, the professional route is way more expensive, $1800 !!
My biggest fear in doing myself is durability.
After seeing and reading your blog about painting your cabinets with DecoArt paint, I’m excited again, and considering doing it myself!! One quick question though, how has it lasted since you first painted your kitchen ?
Thanks,
Fran
Meredith says
Hi Fran, that's such a great question that I answered it in a whole new post: https://thepalettemuse.com/painted-kitchen-cabinet-faqs-theyre-holding/
Kasey says
Hello! Thank you for your post. I am getting ready to tackle this same job on identical cabinets. Do you have a close up on the front of the cabinets? I tried to enlarge the pictures... I’m just trying to see how/I’d the oak grain shoes through. Thank you!
Meredith says
Hi Kasey, I just wrote an update, which includes close-up photos. You can check it out here: https://thepalettemuse.com/painted-kitchen-cabinet-faqs-theyre-holding/
Sharon Pack says
How many jars of the primer/sealer did you use?
Meredith says
Hi Sharon, I used about 10 jars of paint and 4 jars of primer.
Pamela Broch Wall says
I am a contractor and wanted to know if DecoArt has a color palette that I can order to use with my clients.
Meredith says
Hi Pamela, I'm not sure but I know you can get in touch with them through their website at DecoArt.com. Good luck!
Debbie M says
Planning on using the Deco art white for my top cabinets but want the bottom to be a blue gray which is not one of their choices. Any ideas on what brand I can use for that?
Meredith says
Hi Debbie, I have another tutorial if you want to use regular paint: https://thepalettemuse.com/kitchen-cabinet-makeover-reveal/
Both methods will give you great results, but the DecoArt method is easier, with less prep. Good luck!
Jennifer says
Do you know if using DecoArt satin enamels would work on pressed wood/particle board cabinets? Love your cabinets !
Meredith says
Hi Jennifer, I don't know the answer to that. I'd say try it out on a test area first and see what happens. And let us know what you find out!
Misty says
I have panelling in my kitchen that I am planning on painting the same color as the cabinets. Can I use this paint for that also?
Meredith says
Yes! You should be able to paint the paneling as well, following the same process.
Linda Ivanic says
I live in Canada and can’t find that paint. Would any enamel paint work
Meredith says
Hi Linda, I'm not sure about other enamels. I've heard mixed results from people who have tried them. There's an amazon link under "Resources" above that you should be able to use to order the correct paint. I'd love to hear back from you if you try something different!
A Well Paced Life says
so you didnt need to do any light sanding? I've read so many tutorials where you need to sand a little
Meredith says
No, that's the absolute beauty of this product! Now, I should clarify that the brand does recommend a light sanding first, so if you're up for it, a little sanding certainly wouldn't hurt. I hate sanding so I decided to skip that step, and I'll never look back. You might try both methods on one door first, just to see what seems best to you.
cheryl says
how did you manage the doorways into other rooms?
Meredith says
Hi Cheryl, I'm not sure I understand your question. Would you mind rephrasing it for me?
Sharon says
Can this method be used to paint stained molding to white paint?
Meredith says
I would think so. My cabinets were stained and finished before we painted them. I would suggest trying it on an area first to make sure, but that sounds like exactly what this paint was made to do.
Carla Maslin says
How are they holding up? When there is heat & cold or steam, does it chip off?
Meredith says
Hi Carla, they're doing great! There are two edges that frame the stove and vent, and if you look closely under there you can see a little bit of crackling. (You can't see it in the pictures, but I see it sometimes when I'm cooking.) I think it's less from the steam and heat and more because I didn't clean well enough under there where grease had been building up. Next time I would clean those edges really well with Krud Kutter and maybe sand them a little too. Other than that, no complaints!
Rachelle Spurlin says
I would like to put a chocolate glaze over the white. What kind of dealer should I put over it after?
Meredith says
Hi Rachelle, I think it would depend on what kind of glaze you use. While this paint doesn't require any topcoat or sealer, the glaze might. I would think a Polycrylic should work best, but you might check with the glaze manufacturer to see what they recommend.
Tina says
About 10 years ago I painted my kitchen cabinets (wood) with a Victorian Red latex paint and then brushed a walnut stain over it kind of giving it a Cherry look. I need to feel them but don't want to strip them. Do you think this process would work?
Meredith says
Hi Tina, I think it would, but I would test it first on one door to make sure you don't need to strip/sand. Depending on what kind of stain you used before, it might work just fine, but I wouldn't want to find out the hard way after doing all that work!
Barbara A Hanselman says
I might have missed it somewhere.... How much paint did you use per cupboard door? 8oz doesn't seem like a lot.
I'm a newbie to anything other than painting walls.
Meredith says
Hi Barbara, one little jar covers several cupboards. The company states on the jar that 8 ounces will cover about 20 square feet, and I fount that to be true.
sam says
the cabinets look great... the only thing i'm wondering... how many little 8 oz jars at 11 dollars each did you have to buy to do all those cabinets! plus the primer at ten dollars a jar (80z) must have cost a pretty penny!
as i said, lovely end result, but that would cost way too much money to do! 8 oz;s does not go very far. what 2 per door or maybe three or four?