Replacing cabinet hinges doesn't have to be intimidating or difficult. With careful preparation and a few tools you probably already own, you can install brand new hinges rather than trying to paint the old ones.
When we moved into this house, I never realized how many cabinets live here. The house was built about 50 years ago, and it was a beautiful custom home with custom built cabinets throughout.
Great for storage, not so easy for remodeling.
Back in that day, the style was to put the same cabinetry everywhere in the house. Which is fine, but that means I've slowly been painting every cabinet in every bathroom, kitchen, and linen closet. And I haven't even started on the closets and laundry room yet!
I shared my kitchen cabinet makeover here, and my guest bath, our master bath, and the girls' bath all got different paint and stain treatments.
What ties them all together now is that I hate my hinges.

On the darker stained and painted cabinets, the dark hinges blend in, but on the cabinets I painted white, they gotta go. (I do love the farmhouse style black exposed hinges on white cabinets, but my 50 year old dingy brass hinges aren't quite channeling my inner farmhouse.)
So I've decided to replace the hinges, and I'm starting in my bathroom, since I only have two doors in there.
Replacing Cabinet Hinges the Easy Way
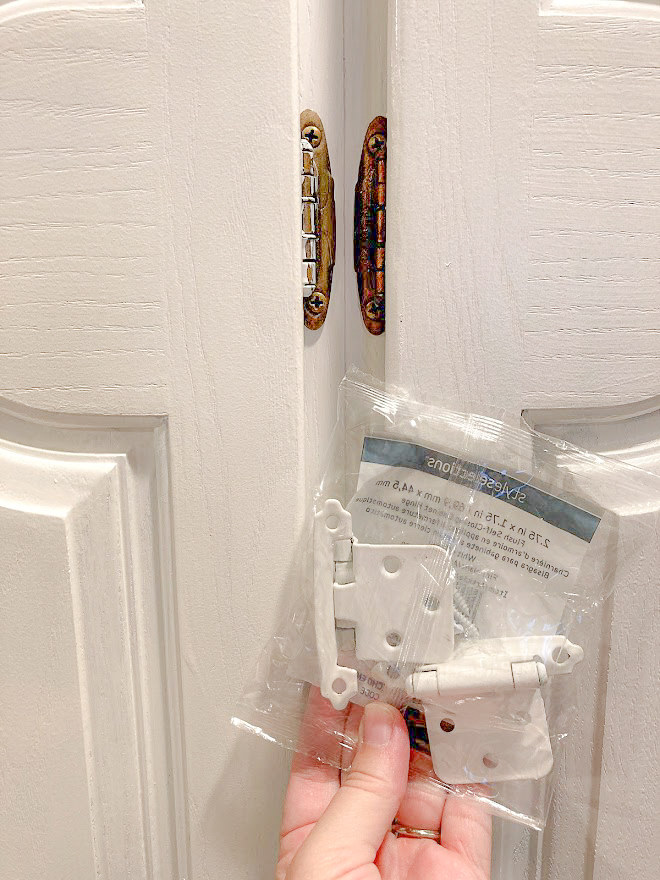
My cabinets have decorative self-closing overlay hinges. That means they are mounted to the front of the cabinet frame and the inside of the door, and you can see the decorative edge on the frame. It also means they're spring loaded to pull the door closed.
Since I painted this bathroom cabinet white, I decided to go with white hinges, and to keep them as close to the original design as possible, to cut down on changes during installation. What I found is it's nearly impossible to find exactly the same dimension hinges after 50 years, but more on that in a minute...
If you find yourself painting cabinets as often as I do, you may find you also need to update your hinges. Here's how to replace cabinet hinges for a fresh look that matches your beautiful new cabinets.

This post contains affiliate links. If you make a purchase, I may receive a small commission at no additional cost to you.
1. Choose the right new hinges
This is the most crucial step to replacing hinges the easy way. If you can find identically sized hinges to the ones you're replacing, you'll save yourself lots of heartache later.
For this project I used White Self-Closing Overlay Cabinet Hinges.
When matching the size of your old hinges to possible new ones, here are the things to look for:
- Size - Pick new hinges that are as close to the same overall size as your old ones.
- Overlay - Make sure the hinges cover the same amount of the frame, so you don't have to do as much touching up on the cabinets.
- Offset - This affects the depth from the back of the door to the face frame. Some hinges are offset, meaning there's a little step in the metal hinge between the door and the frame, and others are flush, like mine.
- Screw holes - Try to find new hinges with screw holes in the same place as your old ones.
- To get as close to the same measurement as possible, bring an old hinge with you to the hardware store and hold them up to each other.
- Finally, hold the new hinges up to the cabinet frame, and then the door to check that they fit. Be especially careful that the profile of the door matches the curve of the hinge.
If you can't find hinges with the exact same dimensions, I'll show you how to move screw holes in a minute.
2. Remove old hinges
This seems like a fairly straightforward step, but here are a few tips to help you out.
First, start with a handheld screwdriver. If you are doing several cabinets, like a whole kitchen, you'll probably want to switch to a drill or cordless screwdriver. But unscrewing a few by hand is a good way to get a feel for how your cabinets and hinges are put together.

Try unscrewing the hinges from the front, but if that doesn't work because your space is too tight, you can remove the screws inside the doors first. (Taking the door off by unscrewing the hinges from the frame makes it easier to remove the back of the hinges from the door while it's lying flat on a worktable, and there are more screws on the insides of the doors than on the front.)
Save your screws, or at least a few until you're done with the project. You probably won't need them again, but if you lose a few of your new ones (like I did) you'll have some handy to fill in as needed. Once you're done with the project, you can toss or donate all your old hinges and screws.
Enlist a helper! Unscrewing a 4 foot tall cabinet door with multiple hinges is difficult with only two hands. It can be done, but I don't recommend it, from personal experience.
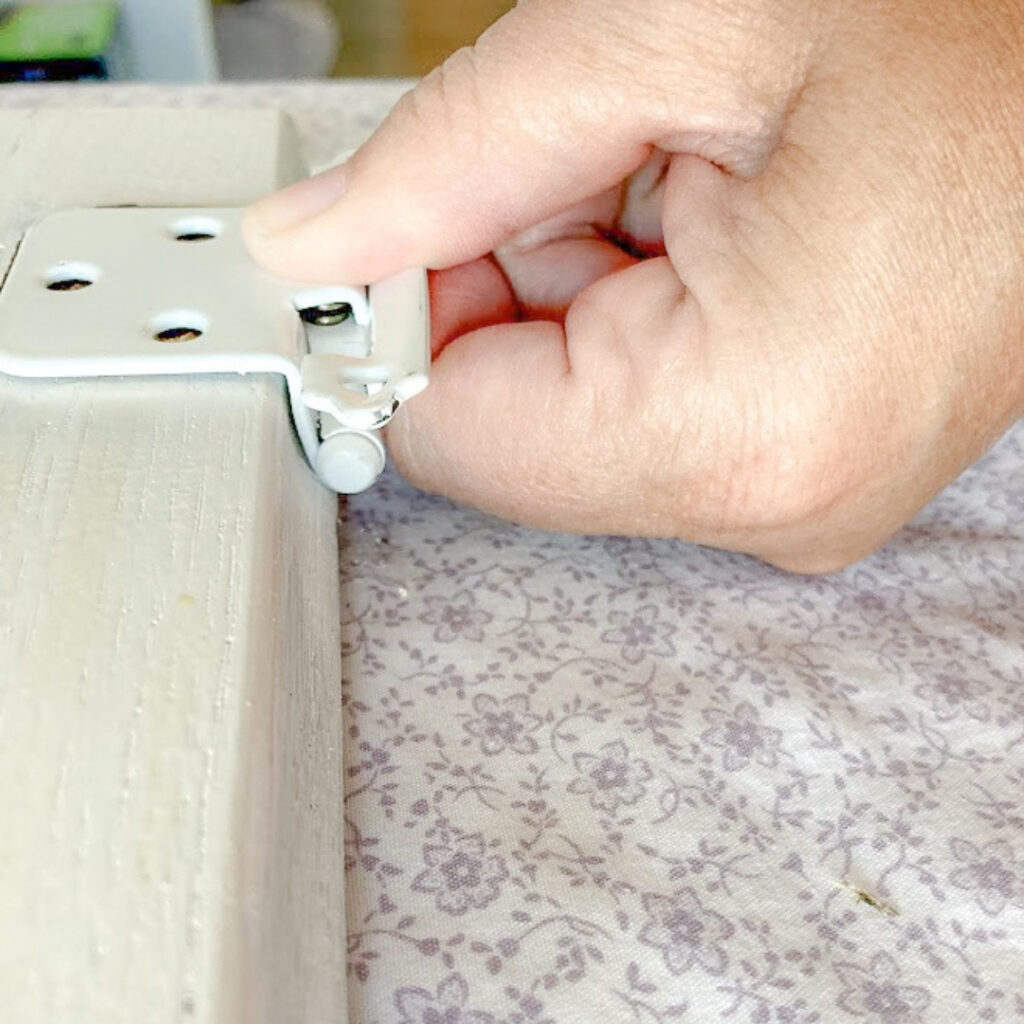
3. Replace new hinges
Once you have your fancy new hinges in hand, putting the doors back together is a snap. (And if it's not, read on to #4.) You'll basically follow the process above in reverse order.
First, attach the new hinges to the inside of the door.
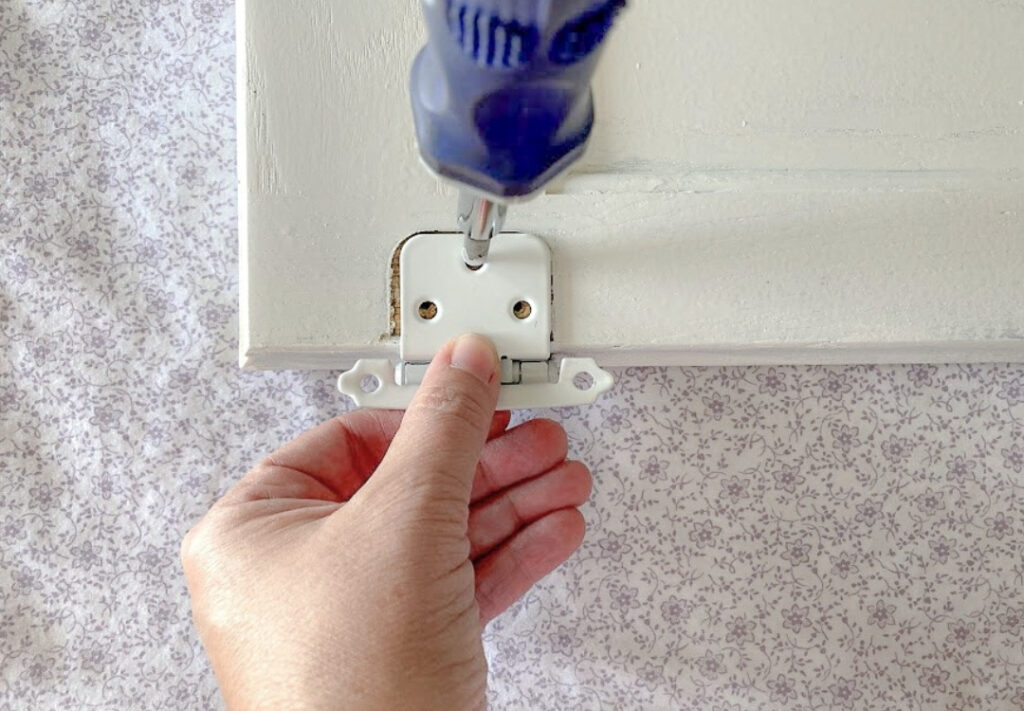
Then, hold the door in place on the cabinet frame and attach screws lightly. Do not tighten completely yet. (This is where your helper will come in real handy.)
Once the doors are all in place, go through and tighten all the screws. That way, if you have any doors that don't line up correctly, you can fix the problems without stripping any screws out.
4. Common problem when replacing cabinet hinges
I noticed once I replaced my hinges (that I thought were exactly the same as the old ones) that the doors didn't fit the same. The doors that used to line up exactly were now overlapping. What happened?! Well, it turns out that the depth of the hinges wasn't exactly the same, and the self closing mechanism on the new hinges forced the doors over by a tiny amount.

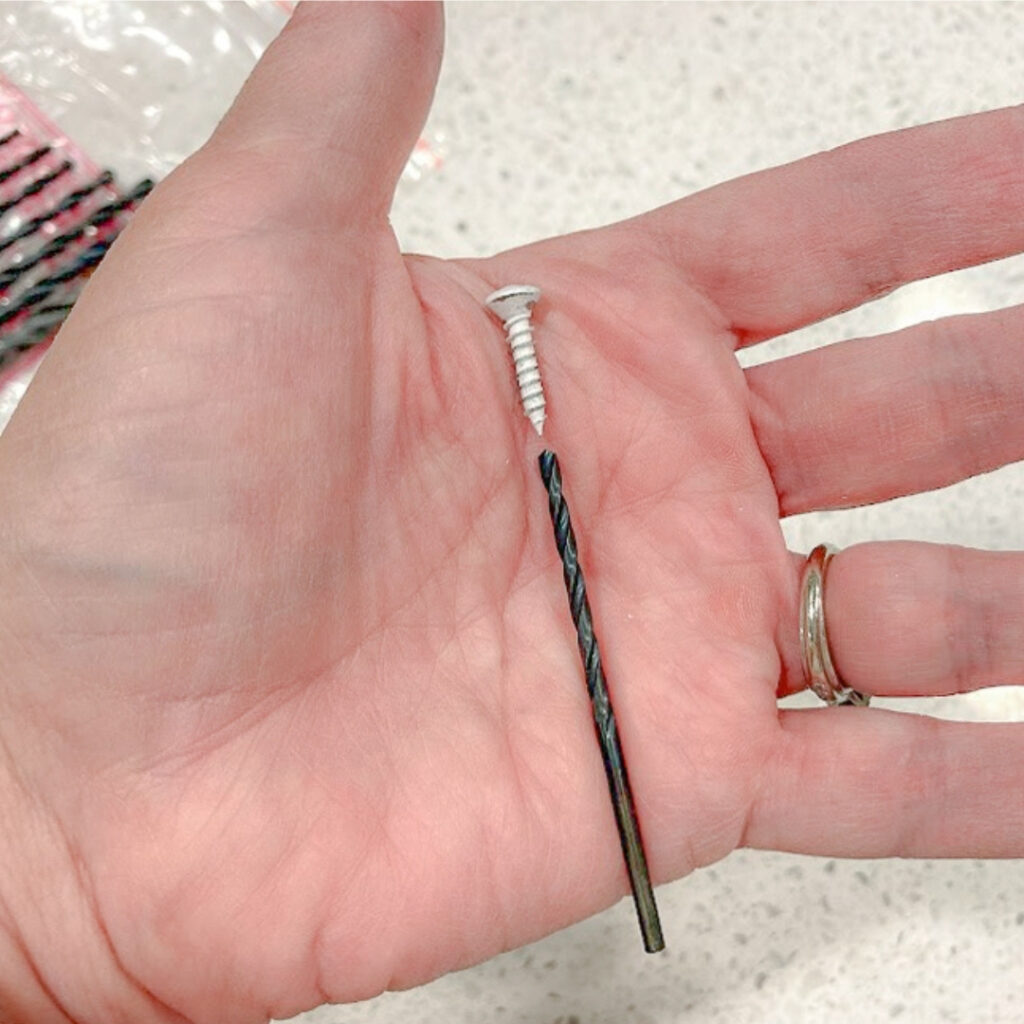
I was able to fix this by moving one of the doors over slightly. I simply filled the original holes, and drilled new pilot holes in the right place. Here's how that process works:
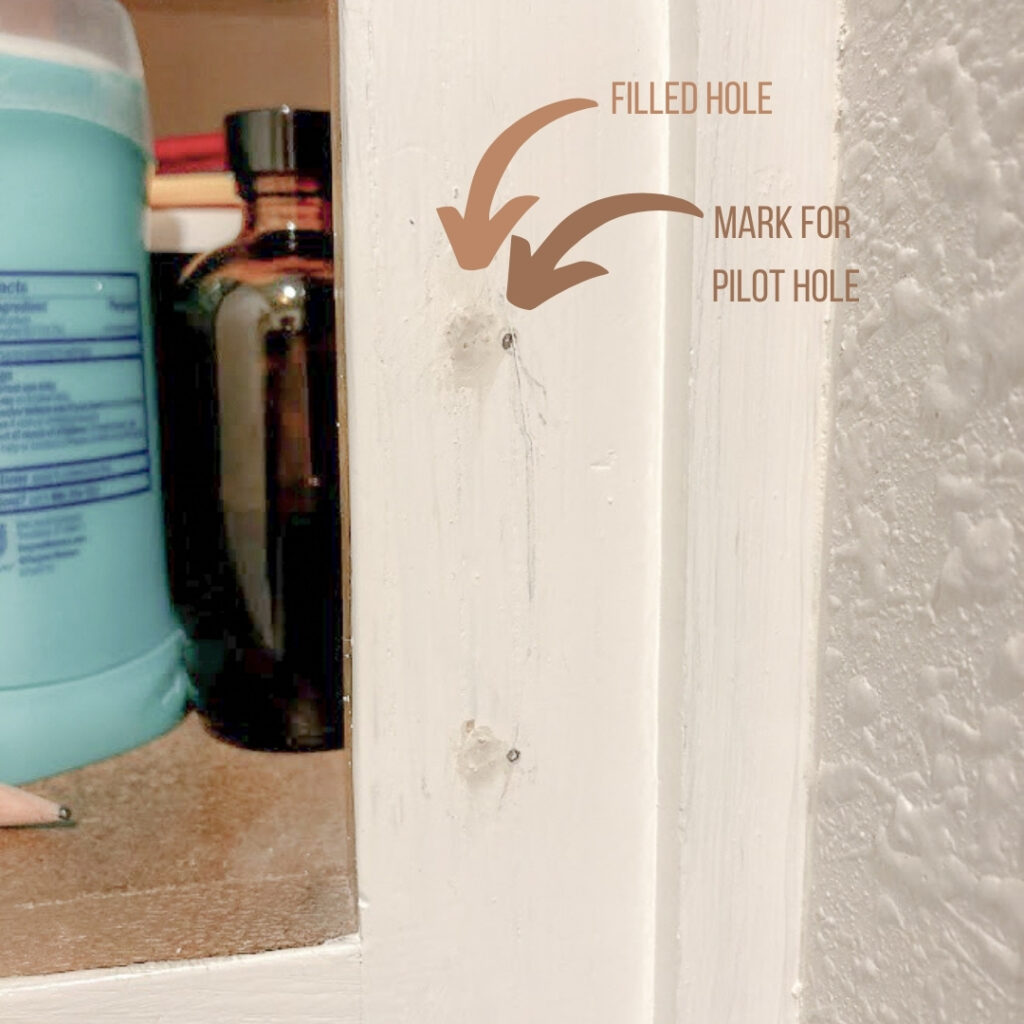
- Fill the old holes with wood filler. (My screw holes were less than ⅛" but for anything larger, I would use this process instead of wood filler.)
- Mark the new holes in the right place with a pencil.
- Drill a pilot hole for each one. You'll need a drill and a drill bit that's slightly smaller than your screw.
- Hold the door in place and attach the hinges using the new holes.
Replacing Cabinet Hinges the Hard Way
If that was the easy way, what does the not-so-easy way look like? Stay tuned - after this project, I think I've decided to replace my kitchen cabinet hinges with hidden hinges, to save myself some trouble, and give my kitchen a more modern look. I'll be sharing that project soon, I hope!
Sign up for the newsletter, and be the first to know when that post is published!


Crystal Feldmann says
I have old oil painted cabinets with painted over hinges inside and out and occasional striped screws. Any advice on how to get the cabinet doors off?
Meredith says
Hi Crystal, first a question: are you planning on painting your cabinets once you get the hinges off? Because if you remove them, you'll need to repaint around them where the new hinges don't quite match the profile. With that said, I would try using a utility knife to cut around the edges of the hinge, which will break the seal of the paint. If the screws are stripped, you may need to pry off the hinge or drill out the screw. Both those options will leave you with larger screw holes to fill and repair afterwards. Honestly in your case, I would only recommend replacing your hinges if you're ready to take on the rest of that repair project. But if you're planning on redoing your cabinets, then I say go for it!
Stephanie says
This is the closest info I’ve come across however I just need a bit more explaining when it comes to where/how do I place and mark (before screwing in) the new hinges to the frame? I had old hinges that are not made anymore and I have to put new holes everywhere on both sides, but I’m also using new hinges that seem to be close to my old ones when it come to aligning these I fear that I’ll have the problem you mentioned: being in able to open the door once all is done because the hinge wasn’t put in the proper place on the cabinet frame. How do I know where to make my original placement With my new hinges onto the frame since I cannot align the holes with the old hinges I’m replacing? You mentions that you were over a bit and the door wouldn’t open and you just moved it over after patching the old holes. In general how do you line up and mark the new hinges onto the frame to avoid being completely off? Thanks
Meredith says
That's a really good question! I reread my article and realized I didn't specify how to do that. What I would recommend is to place the hinges on the door first, as close to the original ones as possible. Once they're screwed into the door, you can hold the door up to the correct place on the frame, and mark where the holes for the hinges line up on the frame. Does that make sense? Do one door completely first, to make sure your process is working correctly, then do the adjacent door, so you can make sure they line up well. Let me know if I'm missing anything still!
Michelle says
Meredith….I am trying to look for no cup hidden hinges for framed face cabinets…would love to know if you have a source. I ordered a pair from Rockler and they were a nightmare to install…
Meredith says
Hi Michelle, have you tried D Lawless Hardware? Sometimes they have hard-to-find items. Also Lowe's and Home Depot online have a pretty good selection.