When I joined the $100 Room Challenge in January, I had high hopes for my guest bathroom remodel. I was so pleased with how much I could accomplish for $100, and surprised that we could get it all done in a month! But once the $100 was spent (with breathtaking speed), there were still a few more touches I wanted to add, to really finish off the room and complete the look I envisioned in my head.
Today, I'm so happy to bring you the finishing touches! 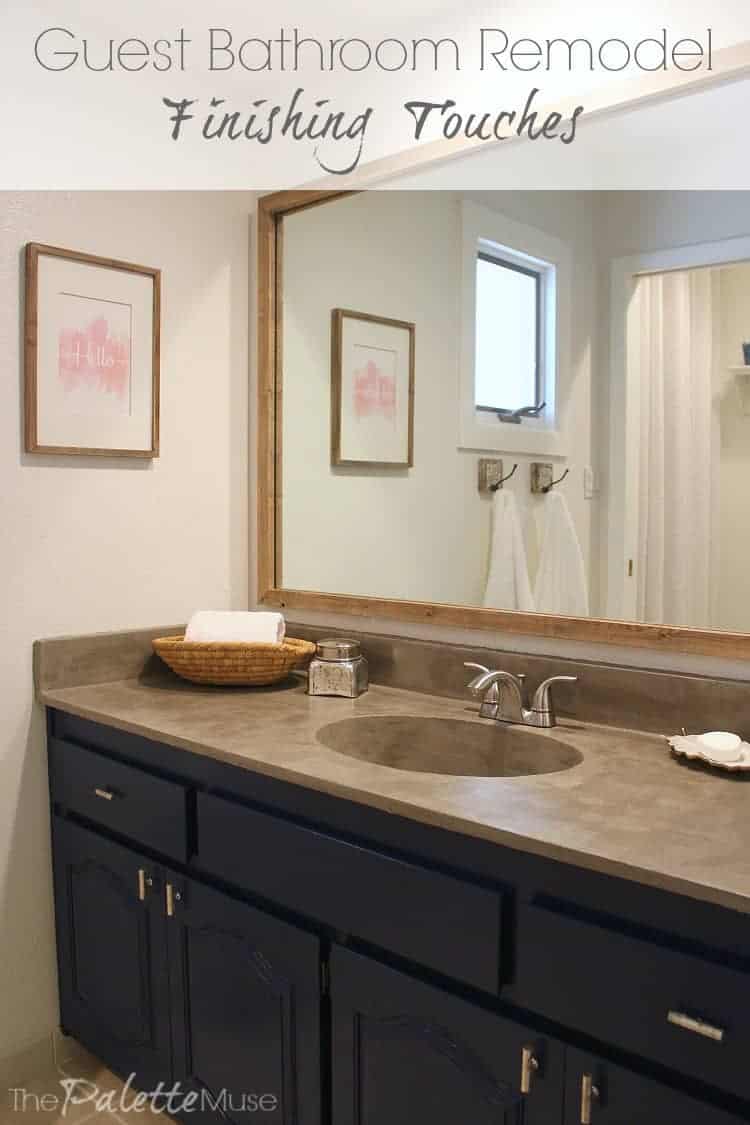
If you're interested in seeing how the majority of the remodel went, check out my previous posts:
Week 1 ~ Week 2 ~ Week 3 ~ Week 4
The main things I didn't get to finish were framing the mirror and adding pulls to the cabinet. I also ended up sealing the concrete sink and counter top, and added a couple more towel hooks to make sure this bathroom was welcoming and useful for guests.
Framing a Wall Mounted Mirror
I was inspired by this post from Jeanie at Create & Babble, and I followed her great tutorial to frame my mirror.
I decided to use thin strips of stained pine, to get a modern farmhouse look. To create the look of weathered wood, I simply used layers of Minwax stain in 
Tip: When you're selecting wood for a project like this, be sure to find the straightest pieces you can! Real wood can warp and twist, so look each piece over carefully before going to all the trouble to stain, cut, and build your frame. When I'm at the home store, I lay all the pieces I'm looking at on the ground and turn them over, making sure they are flat on each side. Don't worry if you get funny looks while you're doing this. People are probably thinking what a genius you are. At least that's what I tell myself.
Cost: The wood strips only cost about $8 total and I had the stain from previous projects.
Finding the Right Cabinet Pulls
You guys, I looked high and low to find the right pulls for these cabinets. I wanted something a little new and different, but still with a classic feel to them. I finally found these mercury glass pulls at Hobby Lobby, and they happened to be half off. Score!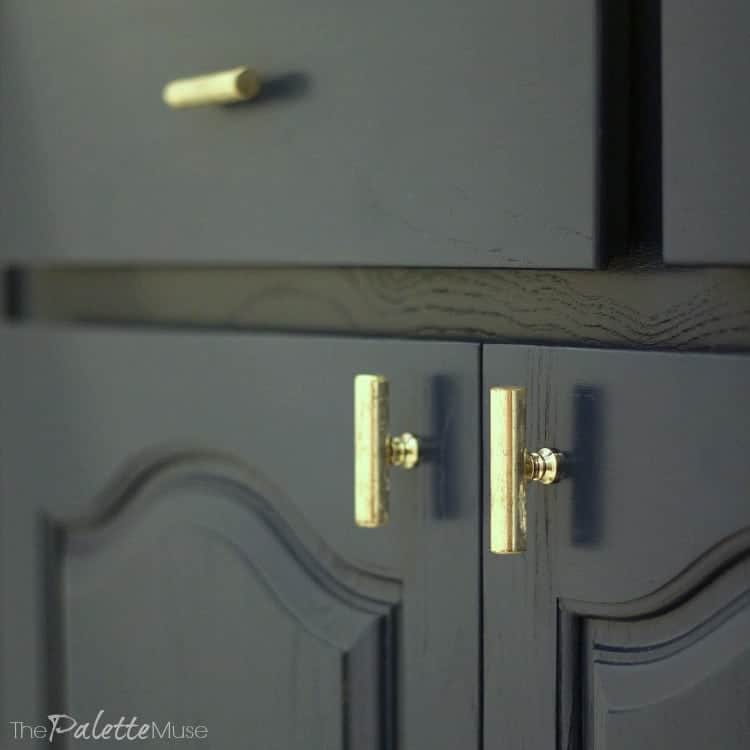
Cost: regularly $4.99 per pull, but at half price the total cost for six was about $15.
Finishing the Concrete Countertop
I realized after the sink and countertop was done that they needed to be sealed, so I used Quikcrete's Concrete Cure and Seal. I had hoped I wouldn't need to seal them because I liked the color of the raw concrete, but once I was done, I fell in love with the concrete's soft satin sheen and deeper, warmer color.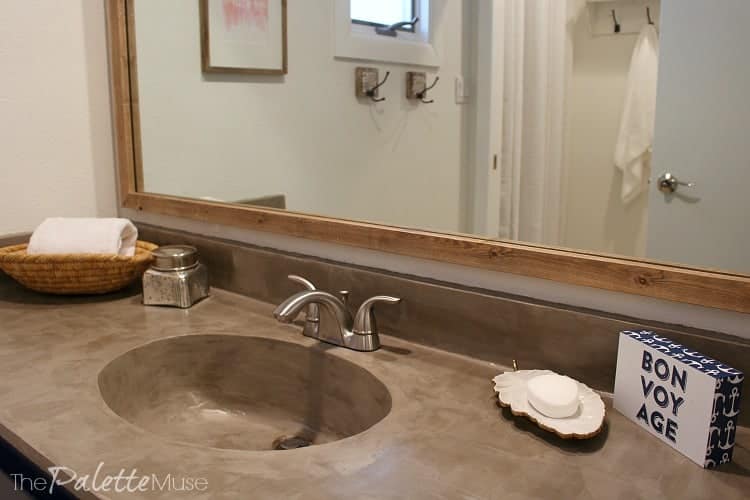
I had a moment of panic when I put the first brushstrokes on because the wet sealer looked like Elmer's glue, but then it dried clear and looked great. My advice is to do 2-3 light coats of sealer. Once the surface is sealed, more coats won't help and may turn the concrete a milky color. You can tell if the surface is sealed by lightly spraying it with water. If you get dark spots, that's where you need more sealer. If it stays the same color, you're done!
Adding Convenience with Towel Hooks
Finally, I added a couple of towel hooks that I found for $3.99 each at TJ Maxx.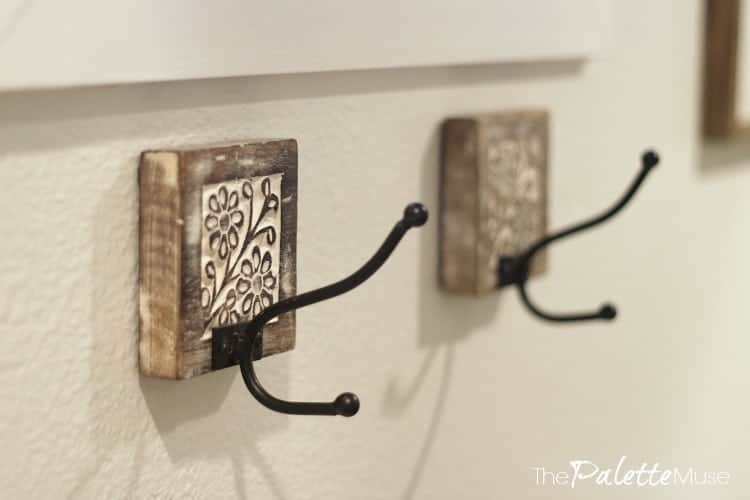 I thought they added a nice rustic touch, and I really wanted to make sure that guests have enough places to put things when they stay.
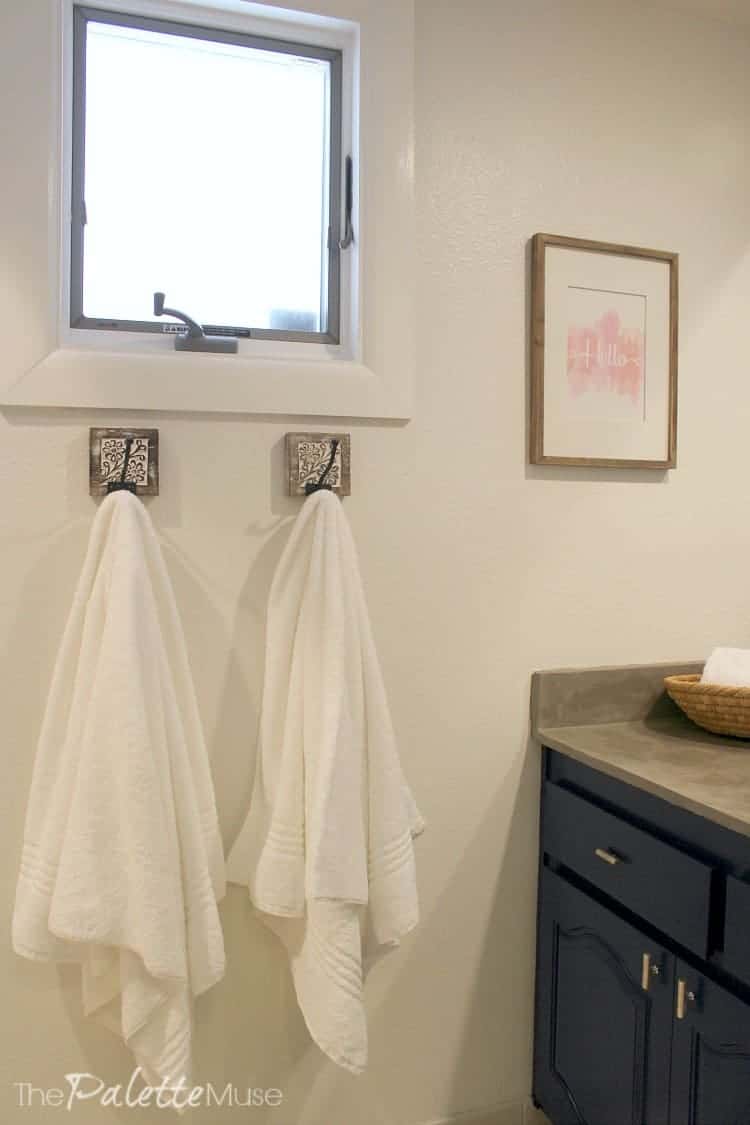
Cost: about $25 for the sealant (they only sell it in one-gallon containers and I used about 3 ounces of it. Anyone need some sealant?) and $8 for the hooks.
I love how it all turned out, and I already can't wait for the next $100 Room Challenge! Be sure to sign up for my newsletter so you don't miss that one.
Also, several of my favorite creative bloggers are currently halfway through a current $100 Room Challenge. If you're looking for some decorating, DIY, and thrifting inspiration, take a look at what they have going on. You can find all the details on my friend Erin's amazing blog, Lemons, Lavender & Laundry.
Go get inspired, and then start your own project! I know you've got a room you'd love to fix up, but don't want to spend a lot of money, and I'd love to see what you do with your own home. As always, feel free to send me questions and/or pictures of your projects!


Liz says
I love it!
Meredith says
Thanks Liz!
Anita C. Lee says
Amazing change from the original. Well done!
Meredith says
Thank you! It was a fun project!
charlestoncrafted says
I just love the colors that you have in this space. A colorful but not overwhelming pallet!
Meredith says
Thank you! That's exactly the feeling I was going for!
Lindi says
That concrete countertop is awesome! You did a great job with it!
Meredith says
Thank you Lindi!
Jeri Walker (@JeriWB) says
I've been thinking about putting a frame around my master bath mirror for some time. It's so simple and ends up looking so good!
Meredith says
You should! I couldn't believe the difference it made!
Roxanne says
I love these concrete countertops! I've been meaning to frame my bathroom mirror for years and just haven't gotten to it yet. How did you attach the wood to the mirror?
Meredith says
Thanks Roxanne! It's actually glued on with Liquid Nails. It's a permanent fix, so be sure you really want to do it before you get into it!
Sarah @ Making Joy and Pretty Things says
I love the concrete countertops and those drawer pulls are ahhhmazing!! I love when Hobby Lobby has knobs/pulls 50% off!
Meredith says
Thank you Sarah! I do too!
farmhouse40 says
What a pretty bathroom. I love those towel hooks. Everything is perfect.
Meredith says
Thank you so much! The towel hooks are already proving useful!
jessica says
I can honestly say, I love every aspect of this space. I like how you did not cover up the wood grain on the cabinet and I love the concrete countertops and the framed mirror. I really like the stain you chose on the mirror, it ties everything together nicely.
Meredith says
Thanks Jessica! I love how the Satin Enamels paint lets just enough of the wood grain show through. It always surprises me how sometimes it's the smallest detail (like wood stain) that will help pull a room together!
Via B Design says
Love how the concrete countertop turned out. The pulls are beautiful and so is the mirror frame!
Meredith says
Thank you so much! I was even surprised myself at those concrete countertops!
Leanna says
This is my first time on your blog. Beautiful bathroom decor, now I have to go find the $100 dollar makeover and see how you redid that pretty concrete counter.
Meredith says
Welcome Leanna, thanks so much for stopping by, and for your kind words!
Susan Cooper/findingourwaynow.com says
I love the colors you used in the bathroom. It really provides a contemporary feel.
Meredith says
Thanks Susan, that's exactly what I was hoping for!
Dominika says
Wow, the bathroom is really incredible! How could you make this only for 100$? It’s really skillful.
All colors are selected very precisely and are combined very elegantly. Well done!
Meredith says
Thank you Dominika!