Call it laziness, call it procrastination, call it...being a busy mom. Our master bedroom that I set out to redo last fall is finally finished! I've been sharing projects from the remodel along the way, and today I am finally ready to show you the whole thing, along with how-to's, tips, and tricks for saving money on your own decorating projects.
~ This post contains affiliate links. If you make a purchase, I may receive a small commission at no additional cost to you. ~
Here's a quick tour around the room, and then I'll get into some of the details.


Oh, and here's a quick "before" shot, just for reference.
 It wasn't terrible, but it was starting to feel a little dark and heavy for me, and I was ready for a refreshing change. I felt like there was just too much furniture stuffed in there, so I sold all of it on Craigslist, except the bench at the end of the bed, due to sentimental reasons. All I bought to refurnish the room was a media center that we use as a dresser (from HomeGoods), and a small vintage dresser that I found (also on Craigslist) and fell in love with its marble top. I gave the walls a fresh coat of paint using Valspar "Gravity," at 75% to give a light and relaxing vibe to the space. Then I got down to business.
Here's the breakdown of what went into this project.

-
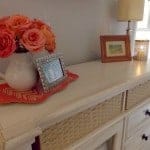
- Fresh flowers in a pitcher, collected on a fun orange tray. This seems like an afterthought, but I listed it first because there's nothing like fresh flowers in your room to make it feel like a retreat!
- An up-cycled chandelier that was brown and boring when I found it for $6 at Habitat for Humanity's ReStore. Follow the link for the full details on how to make your own.
- Can't afford a "statement piece" of art? Make your own. I did, and this post shows you how.
- This was the bench that was at the end of the bed in the "before" picture. I painted and recovered it with fabric I had on hand, for a total cost of $4 (a can of spray paint).
- Rather than taking up more room with a headboard and footboard, I used curtains from HomeGoods with twinkle lights behind them for reading lights (and ambiance!). I plugged the lights into a wireless remote switch so I can easily turn them on and off while lying in bed. Update: I've had so many questions about how to do this, that I've written a full tutorial on how to install the lights and curtains.


- I used my white covers from before, and updated the pillows with some inexpensive removable covers from Hobby Lobby. I did however splurge on the orange one with birds, from HomeGoods. I found the throw blanket at Goodwill, still in its original packaging. Did you know that Target sends their castoffs to Goodwill?
- I repainted these bookshelves that had been in another room and now we use them as nightstands. They hold a lot more than your average bedside table!
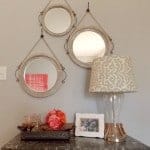
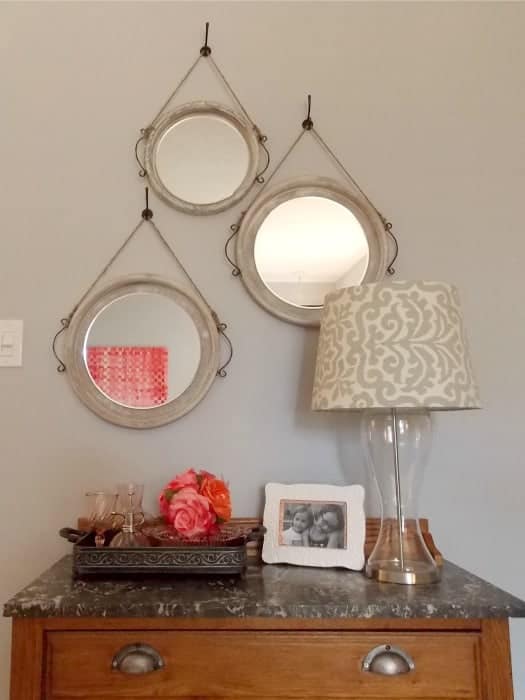
- Rather than a traditional mirror over the dresser, I found these lovely trays at Hobby Lobby and attached mirrors to them, then hung them asymmetrically, for interest. (See below for details.)
- This dresser was a great score from Craigslist. I simply changed out the hardware, and positioned it to show off its beautiful gray marble top.
- The lamp is another thrifty project. I found the base at Goodwill and the shade on sale at World Market, but I had to do a little finagling to get them to play nice together. In case you need to know how to fit a shade to the wrong kind of base, I show you one way in my Lampshade Hack post.
First, always be on the lookout for starting pieces. My motto? "Never leave 
Use some thick twine or 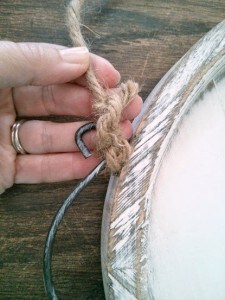
I used 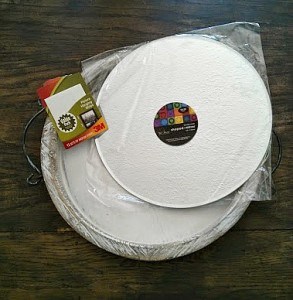
Voila! Mirror Tray. Now use iron coat hooks (also from Hobby Lobby) to hang them somewhat randomly on the wall.
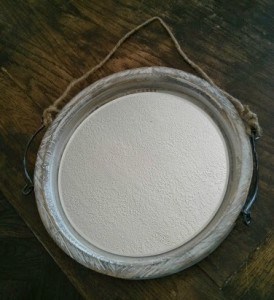
Now you have a useful and beautiful collection of nautical mirrors, for super cheap!
One last thing...did you notice my collection of vintage pink depression glass, and the picture of my two cutie pies? You gotta have things around you that make you happy.

My hubby accuses me of covering all the flat surfaces with decorations to keep him from setting down any of his stuff. I think he's on to me. But this is so much prettier than a sweaty stinky pile of used running clothes! A girls gotta do what a girl's gotta do.
I hope some of these ideas have inspired you, if you're thinking about decorating on a budget. No matter what your decorating style is, I know you can find a way to have (or make) the things you love for less money than you'd think.


Rena McDaniel says
absolutely beautiful! I wish I had you at my house!
Meredith says
Thanks Rena! The downside of having a decorator at your house is that now I'm already tearing up the next room!
normaleverydaylife says
Great job! I love budget makeovers and your trays look great!!
Meredith says
Thanks! I think even if I had a bigger budget, I'd still go for the thrifty stuff - it's just more fun!
LeAnne says
Very nice makeover! I really like of the bookshelves on either side of the bed. I'm wondering why you have the lighter color on the outside and left insides dark. Did the bookshelves come that way?
PennyWise says
so clever! I'm going to try your tray project 🙂
Meredith says
Thanks! It was a fun and easy project - hope you enjoy it!
Johanna says
love it!! tell us more about this remote switch dealio...please? 🙂
Meredith says
Thanks Johanna! The remote is pretty cool. You can find them for $10-15 at Lowe's or Home Depot in the light bulb aisle. They have a piece that plugs into the wall and that's what you plug your lights into. Then there's a little clicker with on/off button that you put wherever you want. (At Christmas, look for them with all the Christmas lights.)
Lenie says
I started on our bedroom last year - still have some painting to do and laminate flooring to put down before the extras - one of those extras (or I should say 3) are those nautical mirrors - fantastic.
Lenie
Meredith says
It's amazing how long it takes (in real life) to redo a room, isn't it!
Jeri Walker-Bickett (@JeriWB) says
How lovely! I've mentioned how I want to give my rustic pine furniture a new look, but it's hard to take the plunge when I might be moving sooner than later. I like all the ideas you post here and am filing them away for future reference. I think I might start with re-painting an old trunk. It always seems like once I get started, I won't stop. I just need to begin 😉
Meredith says
Yes, that is the risk with these types of projects - they tend to snowball! But it probably is smart to wait if you think you'll be moving soon. You never know what you'll want to keep in your new space.
kingfamily89 says
Wow! I am so inspired! I absolutely love the splash of color on the wall. And, those bookshelves posing as nightstands - brilliant! I'm so glad I've been here. 🙂
Meredith says
Thanks for coming by, and for your sweet comment!
Sandy says
I really like your tray mirrors - you have inspired me to start scoping out thrift stores!
Meredith says
Yay! A new thrift store junkie! 🙂
Arleen says
I love what you did. I was going to buy new furniture and decided to stain it a walnut color and it transformed the whole run. Our furniture was solid wood so I couldn't see buying something more expensive that has details in plastic. I can't believe what you did to your bedroom with simple touches. I also bought electric candles and it gives the room a nice look at night
Meredith says
Thanks Arleen! Isn't it amazing what a coat of paint (or stain), and a few candles can do?
Paul Graham says
Hey Meredith. Great makeover and your usual blend of flair and common sense. Really like the durable surface on the cabinet. A great detail that is often overlooked.
Meredith says
Thanks Paul! Thanks for stopping by...
Melanie says
Looks great! Now, I need to get motivated and do the same thing at my house! 🙂
Meredith says
Thanks! Sometimes the motivation is the hardest part. 🙂
Kristin Filut says
This is beautiful! My master bedroom is in need of some lovin', but it's going to have to wait until my daughter's room is updated. The mirrored trays are fantastic!
Meredith says
Thanks! I know, the master bedroom is always the last room to get any attention! My daughter's room is next on my list...
jbutler1914 says
Excellent job on the bedroom makeover.
Meredith says
Thanks! 🙂
valerieremymilora says
What a beautiful and inviting little heaven you've created! Quite inspiring.. I love the bright colors and warmth that fills the room. Lovely tips for a designer room on a budget.. I feel inspired to redo my own bedroom and invite the girls to do the same with theirs. I had no idea Target donated unsold items to goodwill. Great to know. Have a splendid day 🙂
Meredith says
Thanks Valerie! What a great way to make your girls feel special. My kids were clamoring for makeovers for their rooms the whole time I was working on mine - I guess it's time to go shopping again! 🙂
Welli says
Meredith you never cease to amaze me with your creativity. Really you are talented. Thanks for the post.
Meredith says
Thank you for the encouragement Welli!
Beth Niebuhr says
Very nice makeover. I like the orange spots among the neutrals.
Meredith says
Thanks Beth! I didn't want it to look too gray and washed out. 🙂
Christina says
I love what you did in place of the headboard. It's like you've added another window.
Meredith says
Thanks Christina, it's always bothered me that there's only one small window in that bedroom. So I faked it! 🙂
crystal Ross (@CrystalRoss55) says
You room is stunning! I sold all my furniture on Craigslist to. You can also find used furniture on Craigslist or garage sales and restore to new. You are talented and i love the color scheme. =)
Meredith says
Thank you Crystal, I'm a total Craigslist junkie!
William Butler (@wiarbu) says
Hi Meredith,
Obviously, your master bedroom makeover reflects your elegance, as it is so tastefully decorated. The triangulation of mirrors makes me think back to my Navy days looking through portholes.
Hope you're having a great week!
Bill
Meredith says
Thanks Bill! It's ironic to think how many design trends got their start in military applications...
Kumar Gauraw says
Hi Meredith,
Your master bedroom makeover is certainly absolutely looking gorgeous! Wow!
I wish I had such a detailed view of things. I still couldn't figure out why my wife likes certain things decorated in a certain way while to me, anything gray is black 🙂
Congratulations on getting this done. A job well done!
Regards,
Kumar
andleeb says
Wow . The bed room looks fantastic. I have gone through all the links sharing tutorial for all the thinks , I think I will make my diy woven painting soon.
You are really talented and creating nice things and best is that you are sharing your ideas.
I have plan to do little makeover to my bedroom. I will check this post again for help.
thank you.
Meredith says
Thanks Andleeb! Hope it's helpful, and let me know if you have any questions while you're going through the projects...
ballnchainz says
This is Jay,
And there you have it. My wife was hinting about painting the living room and our bedroom. We talked about paying someone to do the work but we kept putting it off and now that we have to do some major work to the house it looks like we are stuck doing the painting. Painting isn't so bad it is the taping that I just don't want to do. All that to say that your room looks great and you may have inspired me to do some taping and painting
Meredith says
Thanks Jay, just think how glad you'll be when it's done! 🙂
S. Kautz says
I so much enjoy viewing your unique energy and fun style. We just moved into a big new house and I must say it's like one heck of a blank canvas in the decor department! LOL! Thanks for sharing!
Meredith says
Thanks! There's nothing more intimidating than blank walls staring at you, but I know you'll get it figured out. Let me know if you need any pointers, and congrats on the new place! 🙂
Limeade Gal says
Love the transformation! Very cheerful yet relaxing...
Meredith says
Thank you - I love that description!
Rachel @ Craving some Creativity says
Absolutely beautiful! The twinkle light idea is my favorite and I really like the woven painting. Pinned both!
Meredith says
Thank you Rachel!
Greg Narayan (@gregnarayan) says
Insane amounts of personality in this room!
Thought I do like my blank white walls with paint missing and rain water stains.
Meredith says
Thanks Greg! Although it's hard to top chippy white paint and water stains. 🙂
Lea says
Hi I'm in love with your color scheme and "headboard"!I've been wanting to do this and you gave me inspiration to get it done. What kind of light are they, where did you get them?
-Lea
Meredith says
Thank you Lea! For the headboard lights I used a set of patio umbrella lights that I got from Target. Since my curtains were so light in color, I wanted to make sure I had lights on a white string, rather than green like so many Christmas lights. Also, the patio umbrella pattern made it easy to hang them without them being strips up and down. Good luck with yours! I'd love to see "after" pics if you make one of your own.
qalisis mom says
Hi i just love the whole bedroom set up just some quick questions wht length are those lights and are they mesh ,how'd you hang thm are the bulbs lg sm sorry so much i just luv it wanna make sute im getting the correct stuff ty in advance
Lauren says
That looks amazing and super cozy!! Can't wait to redo my master bedroom now 🙂
I need to find those curtains at Homegoods! 🙂 Thanks for sharing! It looks amazing!
Meredith says
Thank you Lauren! If you can't find those exact curtains, you can use any that are light colored, but not too sheer. Good luck on your transformation!
LeAnne says
Very nice makeover! I really like the idea of the bookshelves on each side of the bed and I have two questions. I am wondering why you have the outside of the shelves a light color while the inside remains dark? Did you purchase the bookshelves like this or did you paint them?
Meredith says
Thank you LeAnne! I had these bookshelves already and repainted them. They started out as a dark wood color (from Target) and I wanted to lighten up the room, so I chose white for the outside. I used the darker color on the inside to add another layer of color, as well as a little depth. Also, it hides some of the inevitable clutter! 🙂
Molly says
Hi! Love the twinkle light headboard. How did you set it up so it looks scattered and you don't see the string to the plug?
Meredith says
Hi Molly, there are three tricks. 1. Use a semi-opaque curtain. Nothing too sheer. 2. Use lights on a white string. If you use Christmas lights on a green string they will show up. 3. These are actually umbrella lights (to go on a big patio umbrella) so they fan out from the center. Mine came from Target but I think you can find them on Amazon, if they're not in season in the stores. Good luck and thanks for stopping by!
qalisis mom says
Hi i live the bedroom jst wanted 2 know wht length lights did u get,are they mesh lights in warm white or just whit and how'd u hang them ty in advance
Susan says
I'm curious if the lights are annoying to sleep next to? How do you keep the lights and curtains from getting tangled in your pillows and limbs while sleeping?
Meredith says
Great questions, Susan! I often stay up reading after my hubby falls asleep. He does complain sometimes about the lights, but usually he just goes right to sleep, even with them on. I have a little clicker by the bed to turn them off when I'm ready to go to sleep, so I don't have to reach down and unplug them. And the curtains reach to the floor behind the bed, so gravity keeps them there, although it is a little hard to sit up and lean back on a pillow, if you like to watch TV in bed. But they do stay where they are, and don't get in the way of sleeping. Hope that helps!
Monike says
May I ask where did u find ur comforter ?? I love the bed skirt and all.
Meredith says
Thank you Monike! I found them on Overstock.com. It was a while ago, so I'm not sure they still have them, but they are a great resource for affordable high quality bedding (and all sorts of other things). You could probably find something similar there.
dreamsaboutlife says
Fantastic work! I will enable nr 5 in my bedroom 🙂
Meredith says
Thanks! Glad it was helpful!
Amanda says
Im in love with the curtains with the lights! I'm just a little confused on how you made them? Thanks
Meredith says
Thanks Amanda! I'm actually working on a new blog post that will explain all about how to do the lights, since so many people have asked. In the meantime, the short version is that I used white string lights, and just tacked them to the wall behind the curtain. (Just don't push the tack through the cord!) Check back in a couple of weeks for the full tutorial!
Nancy Christensen says
Gonna do the fairy lights behind the curtain (LOVE it!!!) but I am curious about the trays. Did you get lucky and just happen to find mirrors that were the right size, or did you have to have them cut to size? Or just how does that work? I love all your delightful ideas! Thanks!
Meredith says
Thanks Nancy! That's a great question. I was able to find the mirrors in several sizes at Hobby Lobby and I just picked the ones that fit the trays best. No cutting needed! It's amazing what you can find at Hobby Lobby!
Jeanette Bybee says
Love the new "headboard" and the nautical mirrors and oh yes the bookshelf/nightstands. Would like more info on how would you use the bookshelf with an alarm clock. My husband has to use a C-Pap machine, how could this be used with the bookshelf/nightstands? And how can you use the sheer/curtains above your bed , you kind of can pull them down when sleeping with your pilliws.
Meredith says
Thanks Jeannette! I simply put my alarm clock on one of the shelves. I've been meaning to drill a hole into the back of the bookshelf for the cord, but I haven't gotten around to it yet. To set it up for a C-pap, use a drill bit that's a little bigger than the width of the plug. Then drill a hole through the back of the shelf, run the cord through, and plug it in behind the shelf. The hole will be covered by the machine so it won't look weird. As for the curtains, there is a little bit of space between the bed and the curtains, so nothing pulls or rubs against them. Hope that answers your questions!
LD says
Love your ideas! Your Bedroom looks fresh but dreamy!
Meredith says
Thank you so much!
Sharon says
@Meredith, How can I do
This project I have cement walls, how am I going to bag nails in the walls
Meredith says
I'd recommend using Command Hooks so you don't have to put nails in the walls.