The Palette Muse

menu icon
go to homepage
  • DIY
    • Home Improvement
    • Home Maintenance
    • DIY with Paint
    • DIY Decor
    • Cabinets
    • Furniture
    • Camper
    • Makeovers
    • Tips
    • Tools
    • $100 Room Challenge
  • Crafts
    • Painting Crafts
    • Paper Crafts
    • Fabric and Yarn
    • Wreaths and Banners
    • Handmade Gifts
    • Christmas
    • Art
  • Design
    • Color
    • House Flipping
    • Home Staging
    • Bathroom
    • Bedroom
    • Home Office
    • Kitchen Design
    • Home Decorating
    • Outdoor Decor
  • Organizing
    • Airbnb
    • Cleaning
    • Planners and Worksheets
    • Printables
    • Saving Money
  • Family
    • Recipes
    • Camping
    • Creativity
    • Faith
    • Holidays
    • Musings
  • Printables
    • Get the Newsletter
  • About Me
    • Work With Me
      • Affiliate Disclosure
      • Disclosures & Disclaimers
      • Privacy Policy

subscribe
search icon
Homepage link
  • DIY
    • Home Improvement
    • Home Maintenance
    • DIY with Paint
    • DIY Decor
    • Cabinets
    • Furniture
    • Camper
    • Makeovers
    • Tips
    • Tools
    • $100 Room Challenge
  • Crafts
    • Painting Crafts
    • Paper Crafts
    • Fabric and Yarn
    • Wreaths and Banners
    • Handmade Gifts
    • Christmas
    • Art
  • Design
    • Color
    • House Flipping
    • Home Staging
    • Bathroom
    • Bedroom
    • Home Office
    • Kitchen Design
    • Home Decorating
    • Outdoor Decor
  • Organizing
    • Airbnb
    • Cleaning
    • Planners and Worksheets
    • Printables
    • Saving Money
  • Family
    • Recipes
    • Camping
    • Creativity
    • Faith
    • Holidays
    • Musings
  • Printables
    • Get the Newsletter
  • About Me
    • Work With Me
      • Affiliate Disclosure
      • Disclosures & Disclaimers
      • Privacy Policy

×

Chandelier Love: an Easy DIY lighting Upgrade

Modified: Nov 15, 2024 · This post may contain affiliate links · 3 Comments

  • Share
  • Email
  • Print

This easy DIY lighting upgrade doesn't cost much or take much time, but it sure gives a whole new look to a thrifted chandelier!

I love a good chandelier: hanging over a dining room table, maybe in a master bedroom, or even above a bath tub.  When I started redecorating my bedroom, I knew I wanted a bling-y chandelier.  I quickly found, however, that I did not want to pay for such a chandelier.  

Not being one to condone shoplifting, I decided I'd have to make it myself.  Turns out it's really not hard, and is actually fun, to design your own!

This post contains affiliate links. If you make a purchase, I may receive a small commission at no additional cost to you.

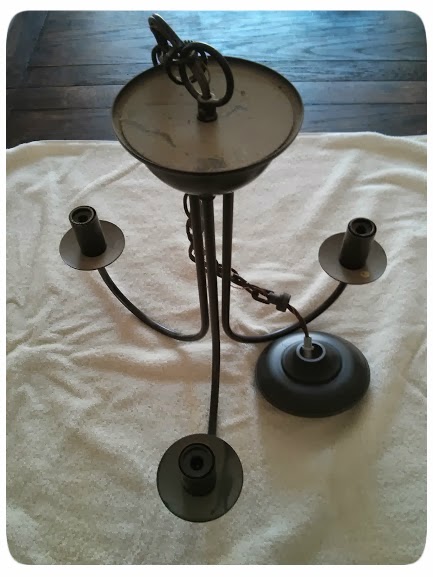
I started with a very basic brown 3-light builder grade chandelier that I found for $6 at our local Habitat for Humanity ReStore.  If you have one of these stores in your town, you NEED to check it out.  It's a treasure trove of used household pieces and parts.  I love to go in and wander around, looking for inspiration or a new project.

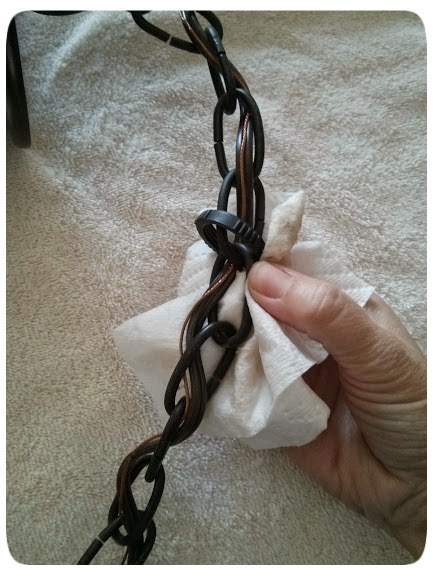
After a good cleaning, I covered the electrical components with masking tape and hung it outside to spray paint it white.  (Note: if you have a husband who takes great pride in his lawn, you might want to lay down a drop cloth and save yourself from a scolding.)

I used Rustoleum glossy white paint and made sure to layer on many light, even coats, spraying in every direction to get in all the nooks and crannies.

At this point, I was wishing I had tested the wiring first to make sure this thing was going to work once it was installed.  This is a risk you take when you buy used electronics.  Always check first, before you put in all the time and money on refurbishing.  Too late now, I must hope for the best and keep going!

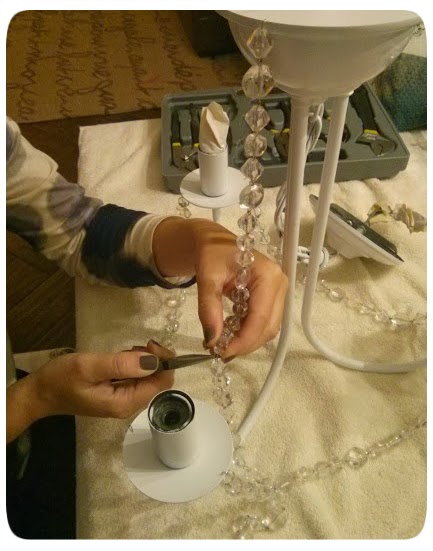
Once it was dry (and I mean really good and dry), I got down to the fun part.  I found this crystal-looking trim at Hobby Lobby and used needle-nose pliers to pry apart the pieces.  (Be sure you get trim that is threaded through metal links, rather than on string.)  

I tried out a few different designs until I got the look I wanted, then used the pliers again to make little hooks out of the metal links. These I hooked onto all the edges.  This was a tedious process with all the tiny pieces, and I tried not to think of what I'd do if the light turned out to be broken!

Finally I put a dab of hot glue (you could use epoxy as well) onto all the connections, just so they wouldn't accidentally work loose.  The glue went on top of the edges, so you can't see it from a normal viewing angle.

I sweet-talked my hubby into wiring it for me over the weekend, without admitting that I wasn't sure if the wiring was sound, and just really hoped I wasn't wasting his time.

We flicked the switch, and...

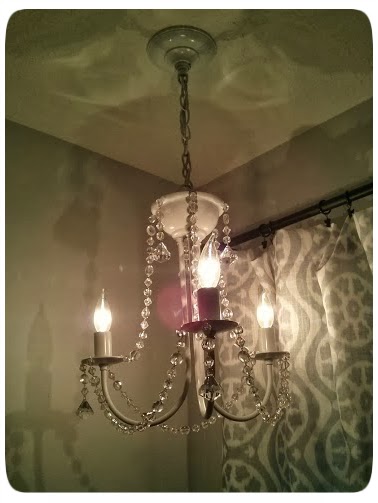
...it turned on!  Yay!

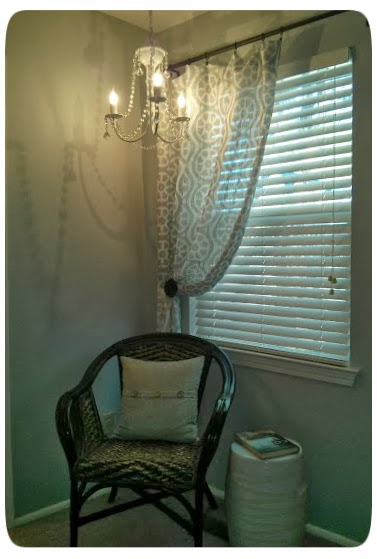
As a special touch, we also installed a dimmer switch, since the three bulbs put out quite a bit of light in our small bedroom.  Now it illuminates our reading corner, and casts a beautiful glow over the whole room.

Stay tuned to see the finished product, once I'm done with the rest of the room redo.

And in the meantime, check out this post for a different way to update an old chandelier!

More DIY

  • Under Cabinet Lighting You Can do Yourself
    How to Choose and Install the Best Under Cabinet Lighting for your Kitchen
  • Time saving trick to painting window frames and mirrors
    My Time Saving Trick for Painting Window Frames and Mirrors
  • Install long drawer pulls
    How to Install Long Drawer Pulls without a Template
  • Removable Window Film
    How to Install Window Film to Upgrade Your View

Comments

  1. Stacy Schmucker says

    September 15, 2015 at 9:57 am

    I love your idea of twinkling lights in the curtains, but I don't know how you got the lights to stay attached. Please show me how.

    Reply
    • Meredith says

      September 15, 2015 at 5:19 pm

      That's a great question Stacy. I think I'll do a whole blog post on it, since you're not the first one to ask. But in the meantime, here's the quick version. I used a string of umbrella lights (that go inside a big patio umbrella) and affixed them to the wall using thumbtacks. The thumbtack doesn't go through the wire(!), just next to it, so the wire is wedged between the head of the tack and the wall. Just spread them out randomly, and tack them up. You can rearrange as needed to get the right overall look. Hope that helps!

      Reply

Trackbacks

  1. Master Bedroom Makeover on a Budget - The Palette Muse says:
    January 19, 2015 at 2:58 pm

    […] up-cycled chandelier that was brown and boring when I found it for $6 at Habitat for Humanity’s ReStore. Follow […]

    Reply

Leave a Reply Cancel reply

Your email address will not be published. Required fields are marked *

Welcome!

I'm Meredith, the designer, crafter, and DIY-er behind The Palette Muse. I love all things colorful and creative, and I love sharing them with you. Thanks for visiting today!

More about me

Popular

  • The Best Way to Paint Kitchen Cabinets (No Sanding!)
  • What I Wish I'd Known about Double Barn Doors
  • How to Paint Laminate Cabinets
    How to Paint Laminate Cabinets without Sanding
  • How to Make Your Own Simple Chair Covers

Seasonal

  • New Mexican Hot Chocolate Recipe
    New Mexican Hot Chocolate Recipe
  • Our Latest Flip House Before and After
    Our Latest Flip House Project - Before and After
  • warm amethyst color palette with shades of purple and very faint orange.
    Warm Amethyst Color Palette
  • Refresh your home for spring with these unique etsy finds
    Give Your Home a Spring Refresh with These Unique Home Decor Finds

Footer

↑ back to top

About

  • Privacy Policy

Newsletter

  • Sign Up! for emails and updates

Contact

  • Work With Me

As an Amazon Associate I earn from qualifying purchases.

Copyright © 2025 The Palette Muse

  • Pinterest
  • Facebook
  • Email