One of the questions I often get asked on the blog is "How did you make that lit headboard in your Budget Bedroom Makeover?" So today, I'm spilling all my insider secrets to you with a full tutorial.
~This post contains affiliate links. If you make a purchase, I will receive a tiny bit of the profit at no extra cost to you. Thanks for your support!~
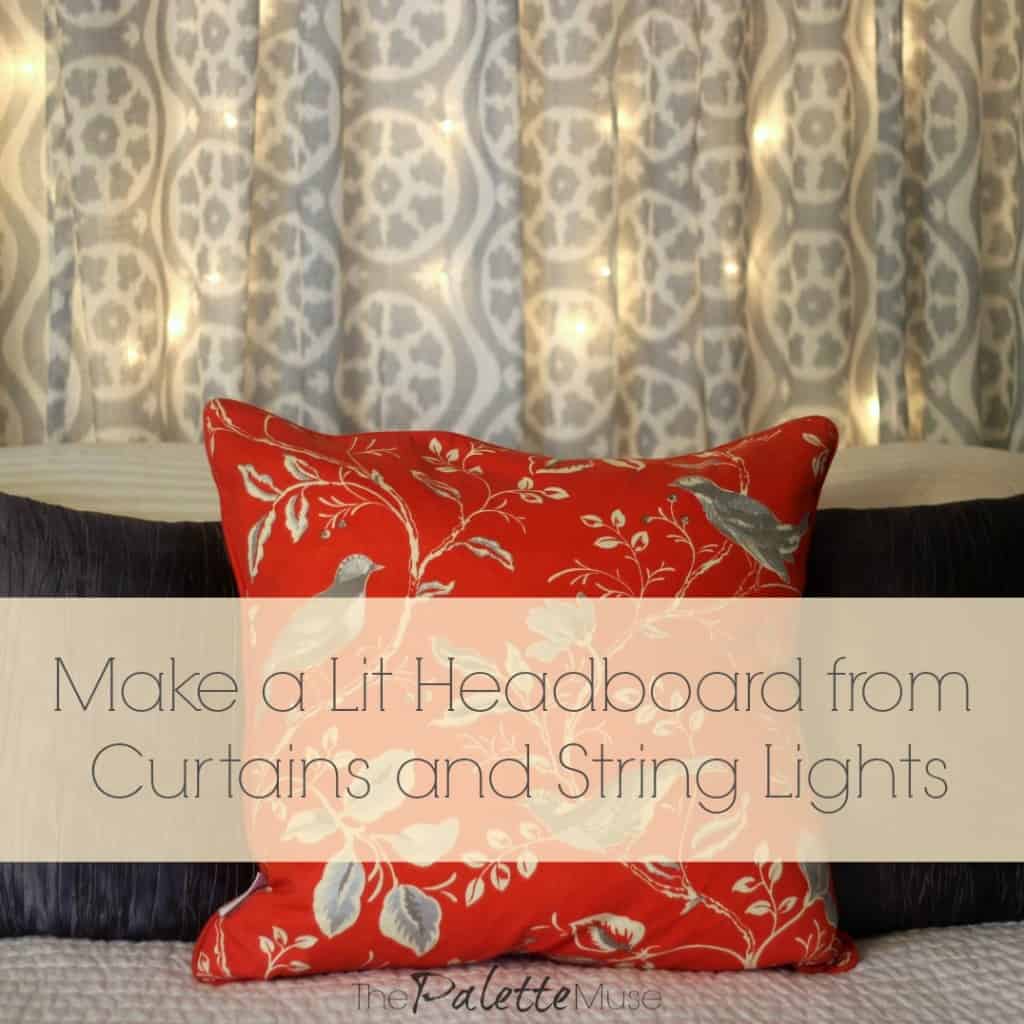
First, here are a couple of pictures to remind you what it looks like in the room, during the day:

And at night:
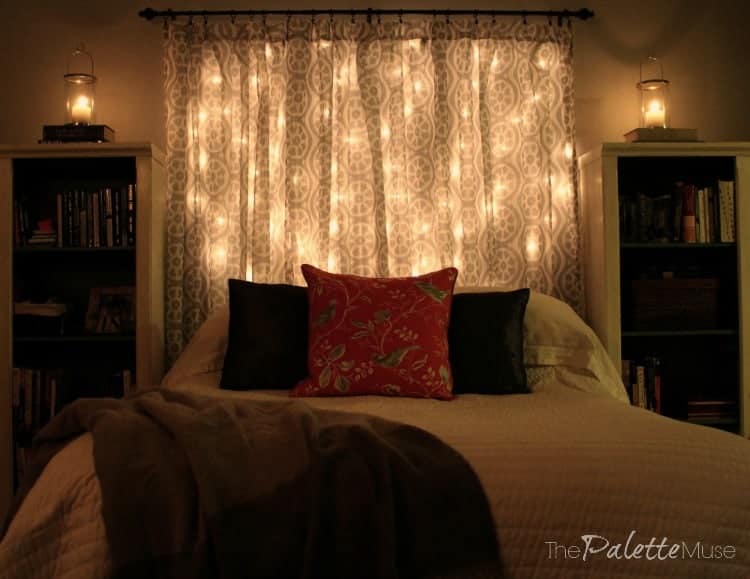
We did this in our bedroom makeover to save both money and space. Our bedroom isn't very large and our furniture felt like it was taking over the whole room. So we got rid of most of the furniture, including the headboard and footboard on the bed.
Then, to make a big statement with very little money, I designed this lit headboard out of curtains and string lights.
Make your own Lit Headboard
Making your own lit headboard is quite simple really, and very budget-savvy.
You'll need:
- A curtain rod that extends to at least 70 inches.
- 3 or more curtain panels, and curtain clips if the panels are not back-tabbed or grommet-ted.
- 1-2 strings of white Christmas lights (80-100 lights).
- Small nails or tacks and a hammer. (You could also use 3M Command hooks if you don't want to put holes in your wall.)
- Remote control plug adapter.
Notes:
Size Matters
My bed is a queen size, so if you have a king size, make sure your curtain rod will extend to at least 86 inches, and you'll probably need four curtain panels, as well as an additional string of lights.
Curtain Type
When choosing curtains, make sure you find something that isn't completely opaque or too transparent. You don't want heavy drapes, but something that will let the light through without showing the strings behind it. Most sheers will be too thin.
My curtains came from HomeGoods, but I also like Tuesday Morning, Target and Overstock.
Curtain Clips
The curtain clips are important if you are using three panels because if you use rod pocket panels (the ones where you just slide the curtain rod through the pocket that extends across the back of the curtain) you'll have a problem in the middle with the rod support.
You could also solve this problem by using four panels, so the support can sit right between the two middle panels.
String Lights
The string lights need to be on white string if your wall color is light, like mine is, or green if you wall color is dark. The string should blend into the wall as much as possible.
Also, mine are not LED but I would recommend LED's because you never have to worry about them heating up. I've never had a problem with these, but if I were telling you how to do this (which I am), I say go with LED for extra safety.
Remote Control
You can find the remote control light switch plug adapter with the Christmas lights in any hardware or home center store. The switch consists of a plug adapter and a remote.
You'll plug your lights into the adapter and plug the adapter into the wall socket. Then you'll put the remote at your bedside so you can easily turn the lights off and on from bed.
How to put your headboard together:
Measure Twice
Decide where the bed will be going. You don't want to change your mind once this piece is installed!
Mark how high you want the curtain to hang (86 inches if you you have a standard 84" curtain and curtain clips), and then measure and mark 3 inches out from each side of the bed. This is where you will hang the mounting hardware for the curtain rod.
You want the curtain to extend a couple of inches on either side of the bed, to account for the bed linens fluffing out a little. This will give you a more balanced look.
Hang your Curtain Rod
Mount the hardware for the curtain rod, as well as the center support, following the instructions included with your rod hardware. You'll probably also need a screwdriver and a level for this step.
Hang the Curtains
Attach the curtain panels to the curtain clips, and thread the clips onto the curtain rod. For a seamless look, join the edges of the curtain panels together on one clip, with the seams facing backwards to the wall. Then hang everything up to be sure it looks centered and balanced.

Remove the curtain and rod, and set aside.
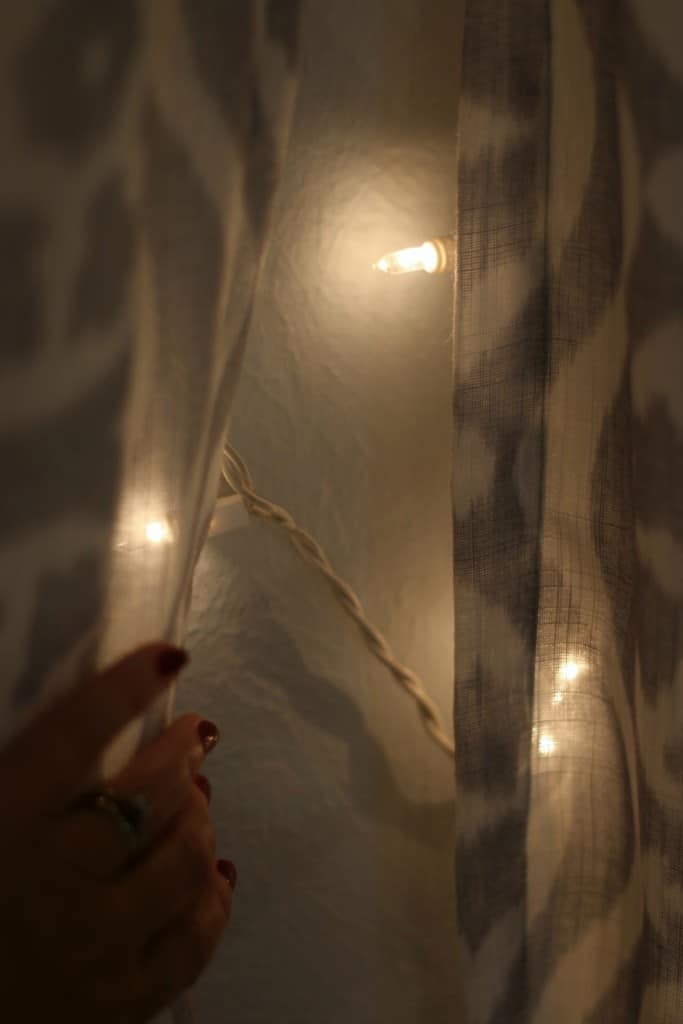
Hang the String Lights
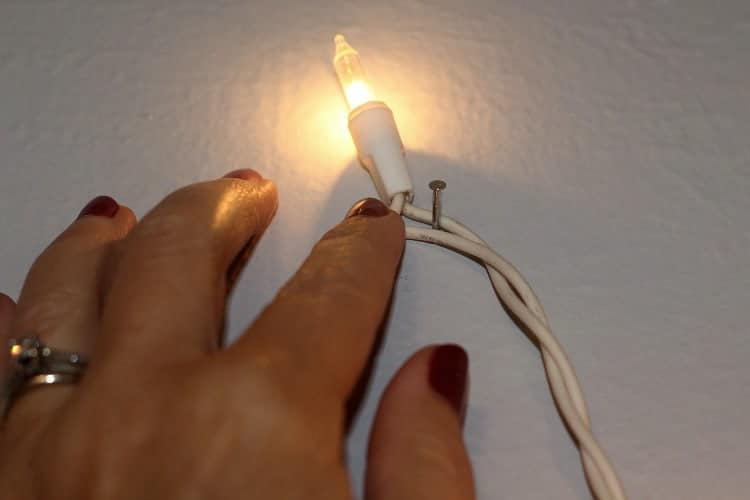
At about 4 inches below the curtain rod, nail 8 small nails or tacks into the wall at intervals of about 8-9 inches apart. (Because I'm just *that* cheap, I used a leftover unbrella light set that used to be on my patio umbrella, so my pattern looks more like a shell than a grid, like yours will.)
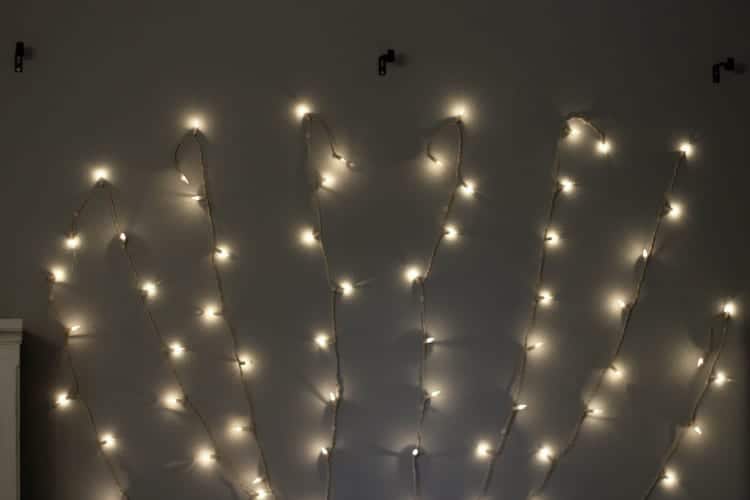
String your lights over the nails. (If you are using tacks, be sure to stick them into the wall beside the wire, not through it!) You can also use nails at the bottom of the string lights to make sure your strings line up the way you like, and stay put.
It doesn't need to be perfect (as you can see from the picture above!), just somewhat consistent.
Plug the lights into the wall to check and adjust as necessary for even lighting.
Check the Remote Control
Plug the lights into your remote control light switch. This is important so you can turn off the lights from your bed without having to crawl around and unplug them each time.

Put it Back Together
Rehang the curtain.
Get your jammies on and climb into bed with a good book! You'll have just enough light to read by, while still keeping a cozy ambiance in the room.

Check out my Budget Bedroom Makeover for more ideas, and let me know if you have any questions about this project!
Frequently Asked Questions
Speaking of questions, I've had so many that I decided to write a FAQ's post. Check out all the questions to ask yourself (or me!) before creating a light-up headboard.
Lit Headboard Update
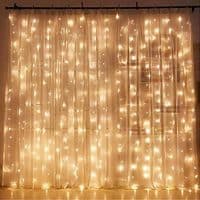
Since publishing this tutorial, I've had several readers write to let me know about curtain lights. Apparently someone thought to attach string lights to a header so they could be hung like a curtain. Brilliant!
Here's an updated tutorial, using curtain lights:

Make a Light-up Headboard from Curtains and String Lights
Making your own lit headboard is a simple and budget friendly alternative to installing a traditional headboard on your bed. With new curtain lights, this project is even easier than when I first created it!
Tools
- Screwdriver
- Laser Level
- Command Hooks
Instructions
- Hang your curtain rod centered above your bed. You'll need your screwdriver and level, along with the hardware included in your curtain rod set for this step.
- Insert the rod in its hardware, and check to be sure your curtain fits correctly. Remove the curtain and set it aside.
- Attach your curtain lights either to the curtain rod with matching zip ties, or use command hooks to hang them on the wall, just under the curtain rod height.
- Plug in the lights and set up the remote control according to package instructions.
- Hang your curtain.
- Position your bed in front of the curtain.
Notes
The original version of this tutorial (as outlined in the post above) still works just fine, especially if you already have a set of string lights you want to use. But I've had a few readers write in to tell me of these curtain lights, and they seem like an even easier approach.
Recommended Products
As an Amazon Associate and member of other affiliate programs, I earn from qualifying purchases.


Mary Kalpos says
These are so pretty. Makes the whole room look magical. And the curtains are also very nice and have just the right amount of transparency.
Meredith says
Thank you Mary! I always look forward to turning on my "night lights" now.
Cathy says
Couldn't you use safety pins to pin he lights to the curtains? Not crazy about tack or nail holes my wall are plater
Meredith says
Hi Cathy, I suppose you could, but I would actually recommend using command hooks on the wall . They are completely removable, and I think it's a good idea to keep a little distance between the lights and the fabric. If you do pin the lights to the fabric, make sure you use LED lights so they don't give off any heat.
Leslie says
I thought the exact same thing. I'm not crazy about nails in my wall but I see the concern about the lights. Command sounds like the way to go.
darlene says
we use command hoods and they are awesome and come off when you want ... no marks at all ...
Jeri Walker (@JeriWB) says
I love that effect! So cozy and soft. I've never had a headboard of any type on my bed, but this might be the direction I end up going in. Thanks for the idea.
Meredith says
Thanks Jeri! It's nice to have some alternatives to a traditional headboard for when you feel like you want something there but not an actual headboard.
Sara says
What a cozy and clever idea! Love it!
Meredith says
Thank you Sara!
Pamela Chollet says
It's so pretty I never realized there were lights behind a curtain. I thought you did some "textured" curtain thing. Is there a board behind the bed? What supports you when you lean back in bed?
Meredith says
Thanks Pamela! That's what I love about it, it's not immediately obvious what it is. I use a pillow to lean on, instead of an actual head board. We're not big TV watchers in bed and I lay flat to read so it's not really an issue.
Jacqueline Gum says
This is absolutely beautiful! Like falling asleep under the stars.
Meredith says
Thanks Jacquie! There's nothing like twinke lights for ambiance!
Donna Janked says
What a clever idea. The lights behind the curtain create a soft and romantic effect.
Meredith says
Thanks Donna! I wasn't sure it would work when I first tried it, but I'm pretty thrilled with the effect.
Susan cooper says
This is one of my favorite things ever. I just love white lights any way. They make a room feel so festive, or in this case calm and romantic. What a creative, inexpensive way to make a big statement in a room and give it that something special. Awesome.
Meredith says
Thank you Susan, that means a lot to me! Isn't it amazing that the same lights can create such different effects in a room?
Home Jobs by MOM (@HomeJobsbyMOM) says
Very cute!! I can see little girls loving this for their rooms!!
Meredith says
Yes, this would be perfect for a girl's room! Shhh, don't give my kids any ideas...
Callie says
I love this! I want to do this but we are renting our house and I don't think we'll be able to use nails in the wall. Any other ideas?
Meredith says
Thank you Callie and that's a great question! I meant to put it in the post, so I'll go back and add it now. Command Hooks are great for this application. They stick to walls or whatever, but then they peel off completely cleanly when you want to move on. You can find them in any home center or hobby store, and you probably just need the smallest size. You'll need about 10-20 though, so buy them in a large pack!
darlene says
command hooks come in the exact size with which you can hang lights ... i bought a bunch ... walmart has a large selection of hooks as does home despot and lowes ...
linda says
I just love, love,LOVE this so much. My husband passed away recently. We always had a connection with the sun moon and the stars (heaven). This is a comforting zone for me to where I can feel close to him every night! What a fantastic idea! Thank you, thank you, thank you so much!!!
Meredith says
Linda, I'm so sorry to hear about your husband. I hope this little project brings you some comfort. Blessings to you!
lenie5860 says
Meredith - love the looks of your new site and totally love this idea of the light up headboard. Thanks for the tip on the remote control lights - didn't know about that but what a great idea, not just for this project but for the Christmas tree. Super.
Meredith says
Thanks Lenie! I love the remote control lights! We have a few other sets that we use at Christmas and they just make life so much easier.
Beth Niebuhr says
What a cool idea and with your directions, it seems doable. I love how you plugged the lights into a remote switch. Who would want to have to get out of that comfy bed to turn them off! I also love the look of your new site.
Meredith says
Thanks Beth! It's a pretty easy project, the hard part is letting go of your headboard! 🙂
Megan @ C'mon Get Crafty says
Very cute idea, I love the thought of ambient light in the room! Would be great in a guest room as well. Thanks for sharing your fun idea at Merry Monday! Tweeted!
Meredith says
That's a great idea for a guest room - hadn't thought of that. Thanks for commenting and tweeting! I Love Merry Monday!
Erica says
How creative...I've never seen a headboard quite like that one. It really does make the room magical.
Meredith says
Thanks Erica!
Corinne says
Thanks so much for the tutorial! I'm hoping to use this in a new apartment to cover up my closet doors. Do you think it would work to hook the lights onto the curtain some way so that I could still slide the curtains back to access my closet? Thanks again!
Meredith says
That's a great idea! And yes, I think you could even use a little thread to tie them at the top of the curtain every few inches and then they would move with the curtain. Or just loop them over the curtain rod in between the curtain tabs or holes? Good luck!
Amanda says
I absolutely LOVE this idea! I am fixing to be moving into my first apartment and have been trying to decide how I want to decorate my new room! I love these curtains and they would match my bedding perfectly! Did you say you got them at home goods? We just had one open up here not too long ago I was going to go and search around but I doubt I will find these exact ones are the curtains very thick? Maybe I can find some out of the same material just in a different pattern!
Meredith says
Hi Amanda, yes these came from HomeGoods. (I love that store!) You can probably find some similar ones. These are what I would call a mid-weight fabric. They're not heavy like drapes, but not sheer either. When you're looking at fabrics, try putting your hand behind one layer of the fabric. If you can see the shadowy outline of your hand through the fabric, without seeing any details, that should be just about right. Good luck!
lancewakewich says
I think its a fantastic idea, but would prefer that you put a warning in this piece about using nails to retain the wiring, as the insulation can be worn down on the lights creating a potential fire. Insulated hooks (hooks that screw into the wall that have a rubber like coating on the metal), or the 3m holders would be a significantly safer choice for mounting the lights or any electrical cabling to any safe surface. I seen this shared on Facebook and I assure you, majority of the commenters do not understand that using nails or any metal item to secure an electrical cable to the wall is an unsafe and hazardous practice. I don't want anyone to die or get hurt.
Stacey says
Meredith - what a fantastic idea! I love it. I have one concern...I usually prop my pillows up against the wall to lean on them...I'm afraid I the curtains would come down? Any suggestions?
Meredith says
Thanks Stacey! I do get that question sometimes. I don't personally prop up against the wall often, but when I do there's no problem. I can see where you'd be concerned but I think as long as you hang your curtains with the correct hardware (ie. wall anchors), then you shouldn't have a problem.
Linda Abernathy says
I have a wood headboard thats lacey in the middle, Would it look ok to make this and drop the curtain to the base of the headboard (bed level) that way I could keep my headboard? The wooden lace you can see through and don't want to remove the headboard. This is an amazing idea, thank you for sharing!
Ronda R Anderson says
What if you put a mirror then hang the lights the the curtain.... I'm curious how that would look..
Krissy says
This is so beautiful. Where did you get the bookcases next to the bed? I love the idea of having more vertical space.
Meredith says
Thanks Krissy! I got the bookcases from Target several years ago. They were a dark espresso brown and I painted them. It wasn't hard to do, and I love having all the storage!
Laura Smith says
This is a great idea and it looks so lovely! I have a headboard on my bed now and looking for something different. My only problem with this is I like to sit up in bed sometimes and having the curtain/lights might interfere with that.
Betty says
What about mounting the lights on a board to stand behind bed , leaned against the wall aand then mount your curtains?
Meredith says
Yep, that would probably work too. If you're worried about putting holes in your wall, it might be easier to go with removable command hooks though.