This is my least favorite part of a new project... prepping. In week 2 of the $100 room challenge, I'd hoped to have some really cool progress photos to show you, but unfortunately we're squarely in the middle of the phase I like to call "It has to get worse before it gets better."
So instead of pretty photos, I'm sharing a bit of reality today. Here it is in all its glory...

This post contains affiliate links. If you make a purchase, I may receive a small commission at no additional cost to you.
Yikes! No one can accuse me of being one of those bloggers that only shares perfect pictures of their homes! Paint cans, towel racks, lots of tools, and several empty coffee cups are the only indication that something fabulous is happening.
It's hard to tell in the photo, but the cabinets are already painted. The doors are off as the paint cures. I used the exact same cabinet painting method I recently used on my kitchen, because it worked so well. You can check out the original post on the best kitchen cabinet painting method if you're considering painting your cabinets.
The other thing that you may not be able to see from this photo is the preparation for wall paint. The ugly old towel racks are gone, and the holes are patched.
A Word About Drywall Anchors
Speaking of patching holes, let me take a moment here to make a public service announcement about drywall anchors. Two words, people: E-Z Anchors.
Don't ever use those cheap plastic anchors that come in the packages for hanging heavy objects.
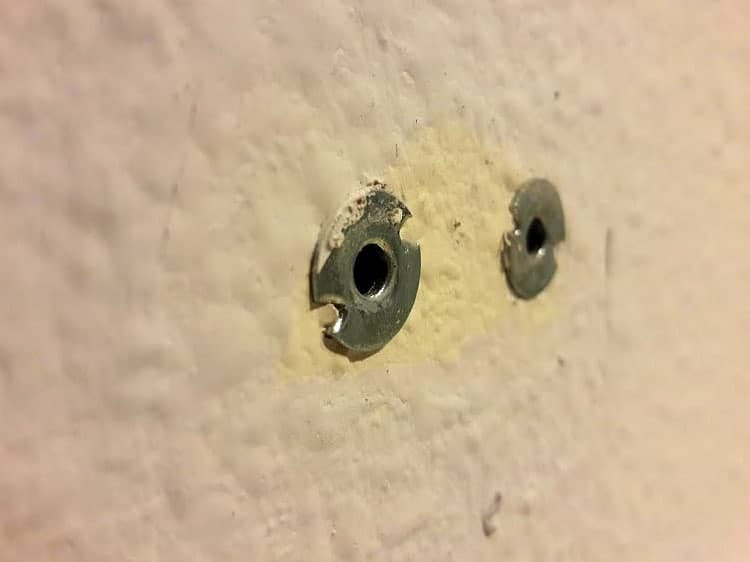
Someone someday will want to remove those anchors, and they will curse your name. And that someone may just be you, so do yourself a favor and pick up some E-Z Anchors when you buy your towel racks, curtain rods, mirrors, etc. They're easier to install, and waaaaaay easier to remove, but work just as well.
Thank you for humoring me.
Now back to the task at hand. I finally was able to remove the hideous metal drywall anchors, following these instructions from Lowes. Thanks Lowes!
Also, if you're going to do this, wear your safety glasses. I didn't even think about it until I was done and found a tiny shard of metal in the skin of my hand. Better there than in my eye! And yet another "Do as I say, not as I do" moment for me.
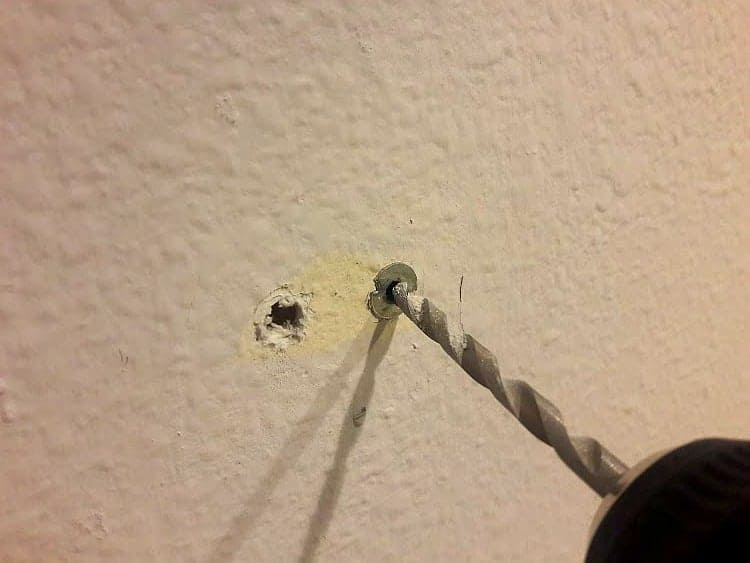
Nothing like drilling a bigger hole in your wall to remove a small hole.
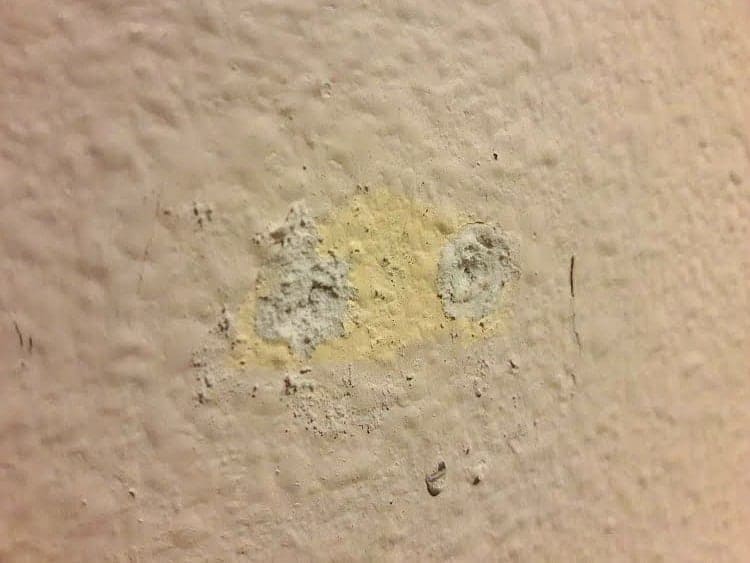
And then patching all those huge holes.

The good news is the wall already looks better without all those funky towel bars.
Imagine how great it will look with a fresh coat of paint, and some artwork!
So far I've spent about $40, all on paint. That doesn't leave me a lot of room for all the fixtures and accessories that I'm going to need, but I love a good challenge!
Next week: concrete countertops! I hope...
If you missed my first post with all my optimistic plans for this room on a $100 budget, be sure to go catch up. And check back next week for more progress, and the following week for the big reveal.
Week 1 ~ Week 2 ~ Week 3 ~ Week 4
Wait. Only 2 weeks to go? I better get back to work!


Susan Cooper/findingourwaynow.com says
Creating things be it recipe, images or room renovations is never straightforward. You should my kitchen in the middle of a new recipe creation and vetting. ?
Meredith says
Oh that makes me feel so much better Susan!
ashley@biggerthanthethreeofus says
Your reality looks exactly like mine this week! Hopefully we can get more done for next week and actually have something pretty to share!
Meredith says
Oh good, glad I'm not alone! Next week should be fun!
Carole West, Garden Up Green says
The reality of a remodel or upgrade project means progress. Looks like you're off to a great start. Looking forward to the end result.
Meredith says
Thanks Carole, I love that attitude!
simple nature decor says
Great job, you can't notice it at all! The hard part is over I think. The concrete counter tops should be fun, i love concrete.
Maria
Meredith says
I think you're right, or at least I hope so, about the hard part being over!
Maureen says
I am impressed how far you have gotten! Looking forward to seeing the concrete counter tops as I hope to persuade my hubby to adding them to our bathroom in the future!
Meredith says
Thanks Maureen! Hopefully when they're done, they'll help you make your case!
Johanna says
It really looks better already!! Can't wait to see the finished product!
Meredith says
Thanks Johanna! Any progress is better than it was before, right?
Anita C. Lee says
You're a brave woman! I'm eager to see the results. (Love the navy cabinets.)
Meredith says
Brave or crazy, there's a fine line...
Colleen Stevens says
I second those EZ Anchors! Love them!
Meredith says
Yes, they're the best!
Pinterest Addict says
I, for one, love "real" pictures of what the process is like. My laundry room is a disaster area right now! Thanks for the info about how to get those anchors out. My husband is a firm believer in using the right anchors too - but somehow he never throws out the ones that come with the package and we have thirty million of them laying around in drawers. Someday, I'll figure out a crafty thing to do with them all. 🙂
Meredith says
Haha! I'd love to see you turn those into something useful! I think I have a few hundred laying around for the same reason. 😉
Karen says
Consider your PSA a success. I've take note and will definitely follow your advice. I hate those little whimpy things that come with screw packages.
I think your progress this week is awesome and I'm eager to see what's up next. I love this series!
Meredith says
Thanks Karen, it's been one of my favorite challenges!
Natalie @ A Turtle's Life for Me says
Yep! Those "it gets worse before it gets better" moments are pretty common around here, too!! Can't wait to see it all come together!
Meredith says
Natalie, I'm glad to know I'm not alone!
Patti @ Garden Matter says
Hi Meredith,
I'm already loving your dark cabinet color and it's interesting to me to see a work in progress. Looking forward to seeing what you do next week.
Patti
Meredith says
Thanks Patti, it already looks soooo much better, even though it's all torn up.
Jeri Walker (@JeriWB) says
This brings to mind my adventures last night in my kitchen. I was in the middle of using up a ton of tomatillos I had roasted and frozen form my garden. Everything was in that it has to get worse before it gets better phase. A couple of hours later, the dishes were done and now I'm about to go put some of that green goodness in the slow cook for some yummy chile verde later today. Effort always brings reward, even if it the messy phase makes that seem like a far-off possibility.
Meredith says
Ooh I love tomatillos! They're messy, but so worth it. That's a great example of effort and reward!
Jeri Walker (@JeriWB) says
And this weekend I made 29 cups of spaghetti sauce with all the tomatoes I froze from my garden as the ripened. I'm on a roll...
Deborah says
We just ripped out a cabinet and found a surprise patch of wallpaper. It's a process that's for sure.
Meredith says
It's always a roll of the dice when you start tearing things apart, isn't it? What you see isn't always what you get, especially with older homes!
Zografia | Bisozozo says
Seems to me you have come a long way so far! I am looking forward to your concrete countertops!
Meredith says
Thanks Zografia, I am too!
Jillian says
I just moved my tv wall mount down by four inches.....I feel you on the holes in the wall 🙂 That 4 inches made a big difference though and I am so happy I moved it.
Meredith says
Isn't it amazing what a small change like 4 inches can do?
Kristen says
Love that you showed the "not so pretty" part of the makeover. We took pictures of our dropcloths, ladders and paint brushes all there too! Very excited to see your concrete countertops!
Meredith says
Those in-progress pictures are helpful when you need to remind yourself not to jump into the next project too quickly!
Erin @ Lemons, Lavender, & Laundry says
I always love a dose of reality. Let's face it, rooms that are in transition never look pretty. And the prep work, while time consuming, will make such a difference in the end.
Meredith says
You're right, it's all about the prep work when it comes to getting a good result!
Tracy S says
The cabinet looks really good painted!
Meredith says
Thanks Tracy!
Amy | Stow and TellU says
OMG love your kitchen cabinet tutorial. Saved it to reference when we do our kitchen. Lord knows, I like easy and your's looks like the easiest I've seen. It looks like you're right on track with the rest of us on the room challenge. Keep up the great work! Gonna have to try those EZ Anchors, too!
Meredith says
Thanks Amy! It really is the easiest way I've done it, and I've tried a few different ways!
Kathryn Baugher says
I wasn't thrilled to show progress this week, my kitchen definitely has a ways to go! lol I appreciate your real life pictures and can't wait to see those walls painted and the artwork!
Meredith says
Any progress is good progress, right? 😉
Angie @ Postcards from the Ridge says
It really does always get worse before it gets better, doesn't it? Although it looks like you've made lots of progress! Can't wait to see how the concrete counter turns out.
Meredith says
Thanks Angie, I feel the same way!