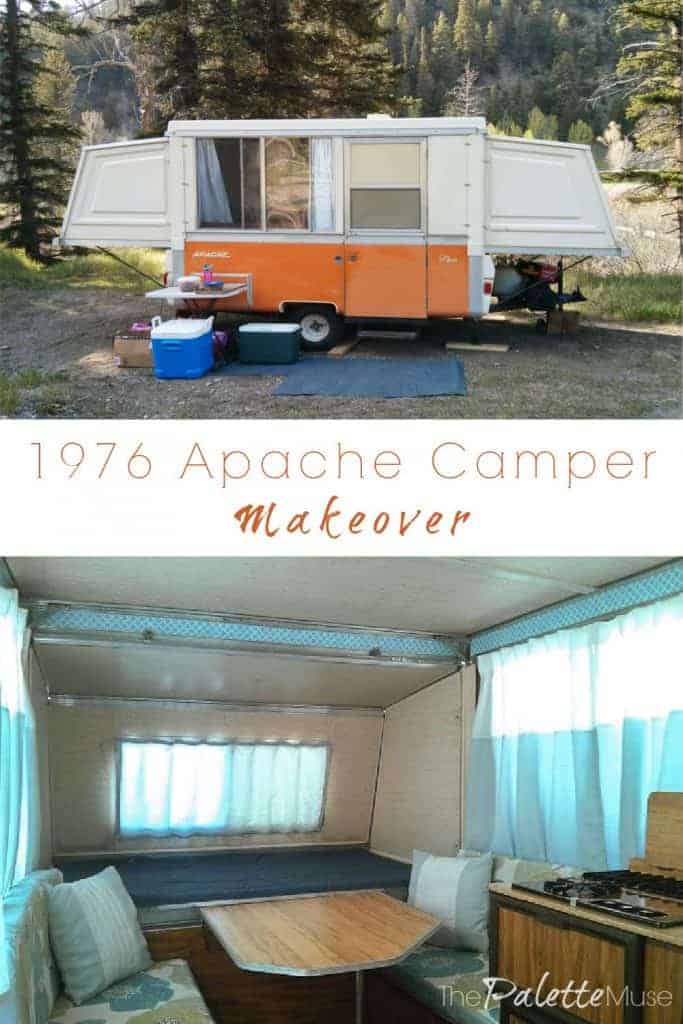
How we remodeled our vintage Apache camper, saving all the good, and updating all the bad. All for less than the cost of a single vacation!
Last year at about this time in the spring, I started getting the itch to redo something bigger than just a piece of furniture or a room. I set my sights on a vintage camper.
I wanted to do a Shasta or Airstream, but soon realized that those are in short supply and high demand. If you've ever studied economics, or simply been to a garage sale, you know that low supply + high demand = high prices (and vice versa).
But just when I began to despair of unfulfilled inspiration, we found this little Apache Mesa from 1976. It's a hard-sided pop up, which fit most of our needs, and it just needed a good cosmetic overhaul on the inside. The inspiration was back on!
Apache Camper Restoration
I wanted to keep all the character of this sweet little vintage Apache, but update all the gross parts into goodness. Here's how I did it.
This post contains affiliate links. If you make a purchase, I may receive a small commission at no additional cost to you.
New Curtains & Bedding
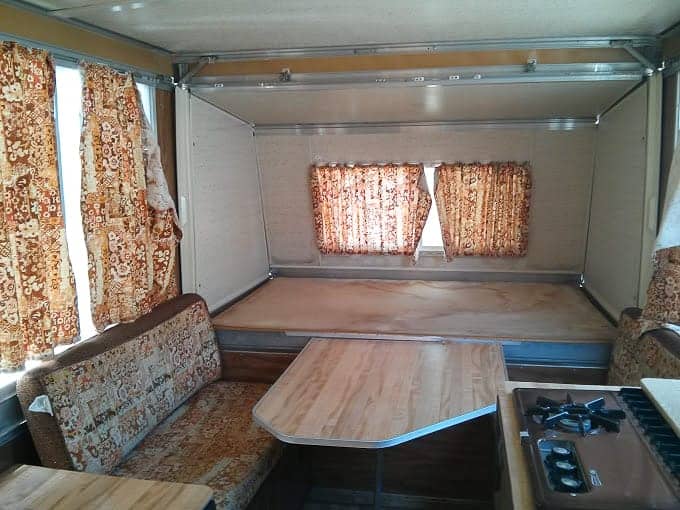
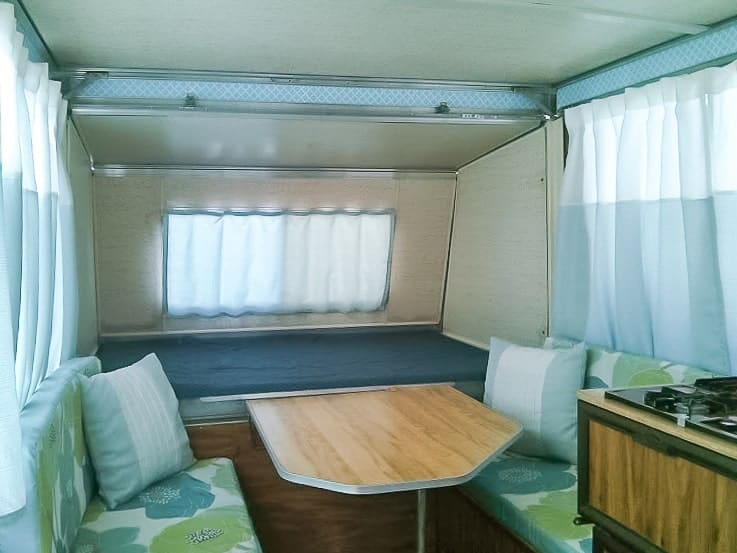
Everything in this camper was functional, but a little dilapidated. Here's a reminder of where we started.
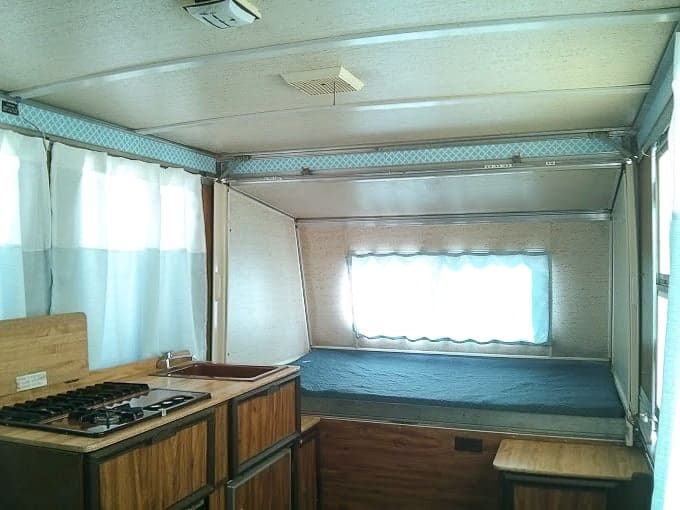
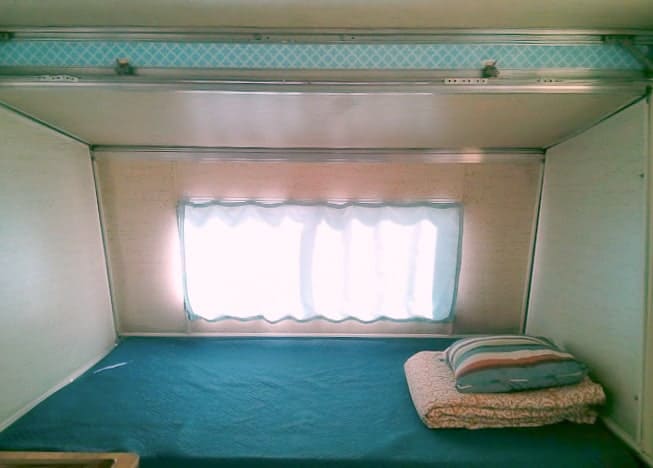
First I changed out the curtains, which was a super-satisfying makeover project in itself. You can see that post here, and more of the original before pictures here.
The bright curtains brought much-needed sunlight and color to this little space.
Then I had to decide what to do about the beds. Although the upholstery was, well, let's just call it "vintage," the cushions underneath were in perfect, clean, condition.
Rather than spending a lot of money reupholstering the beds, I just covered each of them with a large mover's blanket. They're cheap and durable, and I got mine at Harbor Freight for a whopping $4 each.
Floor Covering Upgrade
The yellow and brown linoleum was in great shape (just ugly!) so I didn't want to get into a huge project of tearing it out, which would mean gutting the whole camper.
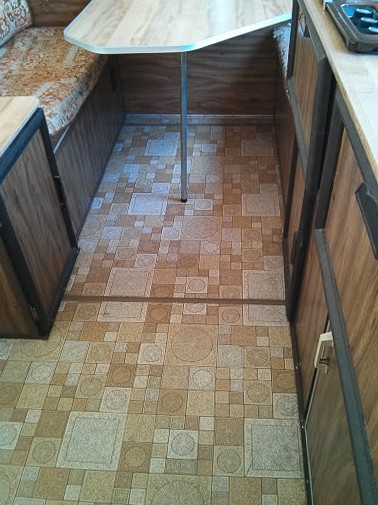
After researching a few options, I decided to use an outdoor carpet to cover the floor. They're super cheap (under $20 at Home Depot) and easy to to cut with just scissors or a utility knife..
For a template, I laid down several newspapers, taped them together, and then cut the edges into the outline of the floor. Then I laid the giant newspaper template on the carpet, traced it with chalk, and cut out the shape I needed.
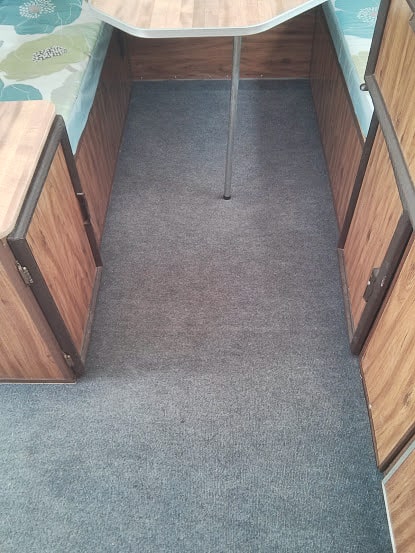
When I put it in the camper, I had to trim some of the edges just a bit, but now it's the perfect fit. And it's removable and easy to clean!
Seat Cushion Makeover
Next on my list was to re-upholster the dinette cushions and do something about the ugly orange band of plastic that ran around the top of the camper. However, those tasks got swallowed up by a summer full of fun and camping.
My little project turned into our new family pastime, and I couldn't be happier about that. Before closing up the camper for the winter, I found time to re-upholster the cushions.
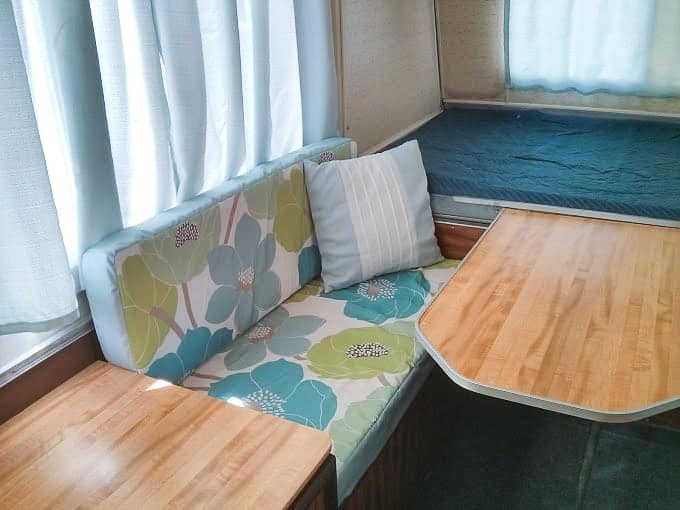
To cover the cushions, I used polyester fabric shower curtains. They're stain resistant, washable, and very strong. After watching the way my kids climbed all over them with grubby feet and marshmallow-y hands, I knew washability would be important!
Bonus: I was able to engineer the design so that the holes at the top of the shower curtain (for the curtain rings) became button holes, and I made the covers removable.

Seat Cushion Cover Un-tutorial
I wish I had thought to write a more detailed description of how I made these removable seat covers. I was just in such a hurry to get them done!
Basically, I used the foam cushions to create my own pattern. I wrapped the curtain around the cushion, sewed down one side, and sewed a flap on one end, using the button holes on the shower curtain as the edge.
Then I sewed buttons on the bottom piece of fabric to match the button holes. Now I can unbutton the flap and slip the covers off for washing.
A Clever Solution to a Design Dilemma
Finally, it came time to winterize the camper, and it bothered me that I hadn't done anything yet about that orange plastic border around the top of the camper interior! Sometimes even I have to admit that I just can't do it all, so we packed her up for the winter and I had to get over it.
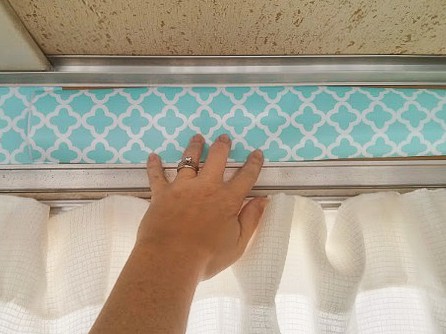
But last weekend the weather warmed up enough to open her up again, and I was ready with the answer to the orange plastic. Rather than try to rip it out, of which I had no idea what the repercussions would be, I realized I could cover it with shelf paper.
I found this adorable blue trellis pattern shelf paper at Marshalls, and knew it would be perfect for the job. I also found several similar fun colors and patterns of adhesive shelf paper online.
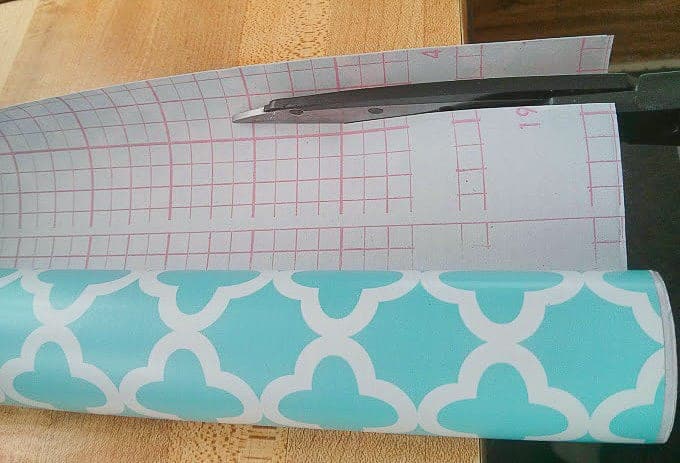
Much like wallpapering a wall in a house, I decided to apply the paper in small sections. I knew that if I cut off a 4 inch by 8 foot long section of adhesive paper, I was just going to end up in a tangled mess.
I mean, I've never even been able to use a foot of duct tape without it getting stuck to itself, and me, in several places!
Here's the process (similar to applying removable wallpaper):
1. Clean the surface well. I just used a microfiber cloth and water.
2. Measure and cut one section of paper. It doesn't need to be perfect, but it does need to be at least as big as the surface you're sticking it to. (Use the grid on the back to help you get a straight line.)
3. Before removing the backing, hold it up to make sure it looks right.
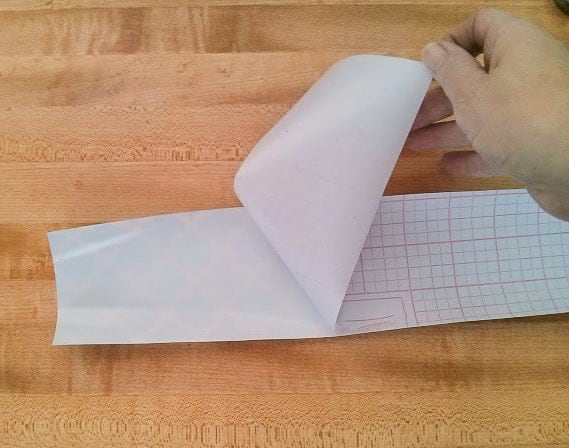
4. Remove the protective backing.
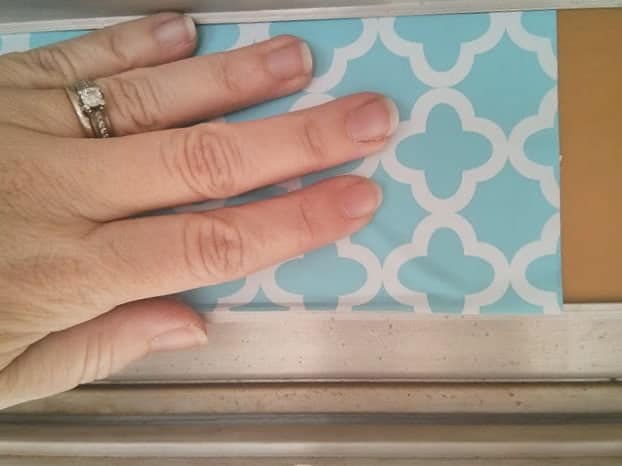
5. Carefully line up the patterns, overlapping where needed.
6. Gently press the paper onto the plastic, and make sure the edges remain straight and even.
7. If you get off-course, you can carefully pull up the paper and start again.
8. Smooth the paper out, working from the inside to the outside. Press the paper into the edges for a clean line.

9. Cut the edges off with a sharp utility knife.

10. Repeat until your arms want to fall off from holding them over your head.
Apache Camper Makeover Reveal
Finally, she's finished. I must say, the end result is quite satisfying. You don't need to have a pretty space to go camping in, but for me, it just made the whole thing more fun.
Perhaps some day I'll work up to a bigger remodel on an old Shasta or something, but this one has been a great learning experience and a fun challenge.
Unfortunately, we've been bitten by the camping bug now, and have decided to upgrade to a bigger camper that doesn't pop up. So, my sweet little old Apache is for sale. If you like her, feel free to make me an offer sold!
Update: After we sold the Apache, we bought a new (used) camper, which I also completely made over. And I did it for $100! Here's where to get all the info on our new camper transformation.


Lenie says
I love your posts and the ideas you present. I'm into DIY when I can be and have taken away some great ideas here - the fabric shower curtain cushion covers for one thing. What a great idea. I might use it to recover my lawn chair cushions.
Lenie
Meredith says
Yes, shower curtains would be great for lawn chair covers! I don't know how color-fast they'd be in direct sunlight, though. Have fun DIY-ing!
sarah says
Hi! Do you still have the original curtains that came with the Mesa?
Meredith says
I think I saved them in case anybody wanted them, but I'll have to look and see if I still have them. They were in pretty bad shape and really shrunk, so the bottom of the curtains don't quite reach the bottom of the window. Want me to see if I can find them for you?
sarah says
yes please!!! I will turn them back into useable curtains 🙂
Meredith says
Ok! Let me do some digging this weekend and I'll get back to you...
sarah says
thank you!!!
Meredith says
I found them! Shoot me an email so I can get details from you: [email protected]
Gabby says
Do you have a pattern or can you describe the way you made the cushions with the shower curtains?
Meredith says
Hi Gabby, I didn't really use a pattern, but I describe the process in a couple of previous comments. Scroll down to look for Anita and Kristin's posts, toward the end. I wish I would have taken pictures at the time so I could do a more detailed tutorial, but I was in such a rush to finish I didn't even think about it!
Jay says
Very nice.... like i said before you have a lot of patience. Now that you have the finish product it sounds like it's time fire a road trip...
Meredith says
Thanks! Yes, we're all getting excited about camping season around here...
A.K.Andrew @artyyah says
I love your practical 'how to' posts like this. What a brilliant idea to use shower fabric for upholstery covering in this context. And obviously the contact paper was inspired too. The end result is great. Thanks so much for the post:-)
Meredith says
Thanks A.K., I enjoy these the most too!
William Butler says
Hi Meredith,
After all that work, you must be a happy camper! I must say, you're very creative 🙂
My idea of camping is staying at the Westin or the Marriott.
Kind Regards!
Bill
Meredith says
LOL Bill! I actually have a sweatshirt that says "Happy (and then a picture of my camper)". I was a Holiday Inn camper before this, but I've been converted. 🙂
Max's Midway Marketplace says
Hi; thanks for sharing the remodel with us. Its obvious you are creative about being thrifty. this got me to thinking about one of the many suggestions I have received over the last year or so since i first started talking about doing a youtube show. Several friends told me a show where people refurbish old or damage amusement rides would be a big hit. what do you think. glad you got the camper ready. Its finally spring and I imagine you are itching to get it out on the road. thanks again and take care, Max
Meredith says
Hi Max, I think that's a great idea. When I was remodeling the camper, I really relied on other people's experience for certain questions I had. I bet there are people out there that could really benefit from your expertise. And youtube would be the perfect place to do that. Go for it! And thank you for your kind words.
Jacqueline Gum (Jacquie) says
You made this so beautiful yet comfy! I'm not a camper, I must admit...but I think I could do it in this! Lovely
Meredith says
Thanks! I wasn't a camper either before this project, but it's amazing what some pretty cushions and curtains can do for your attitude! 🙂
Krystyna Lagowski says
What a cool project! I love that it still has a vintage vibe, true to its roots. Also the colours are just gorgeous. Too bad that you have to sell it! Have fun camping ...
Meredith says
Thanks Krystyna! I was definitely trying to capture the vintage feel, without drowning in brown and orange! Glad you like it.
Donna Janke says
What an interesting project and a great way to update an old camper. Although I am not much of a camper, I am fascinated by campers. I enjoyed reading about you did with your.
Meredith says
Thanks Donna! I agree, you don't have to be a camper to appreciate the ingenious design that goes into these little campers. (I don't mean my own design, I mean the engineering involved in popping them up and using the space so economically.)
Paul Graham says
Very good coverage of your apache camper and certainly brought back some memories. I acquired a trailer 3 years ago that was a rather oppressive and dated mix of too much pink, brass and ugly veneer. Much paint later, much new flooring later it started to take shape and by the time I had built clean lined valances, new table, shelving etc and replaced all lights, blinds and fixtures I love my summer place on the Nova Scotia coast. Final touch was exterior paint, Didn't really want pictures of an antelope on something that is slower than me !
Meredith says
Wow Paul, that sounds like a great project! And to be able to enjoy it on the Nova Scotia coast - that's really living. Happy camping!
Susan Cooper/findingourwaynow.com says
I love the outcome. I always find so fun to see the transformation with ajust a few simple (or not so simple...LOL) touches.
On a side note: I am going through an office remodel. Unfortunately, it requires a total redo... UGH! But the end result will be amazing and will provide a much more efficient workspace. 🙂
Meredith says
Thanks Susan, and good luck with your office remodel! It will be worth it in the end...
Beth Niebuhr says
What a nice job you did. My dad redid one when I was young. I made the new curtains! I was about 10. I love the idea of the carpet. And using a shower curtain for material is brilliant.
Meredith says
Thanks Beth! It's always fun to hear from someone who's done this kind of thing before.
Arleen says
You really come up with clever ideas. I can see using the shower curtains for cushions on a boat or cushions for seats outdoors.
Meredith says
Thanks Arleen, and I love that idea for a boat too!
Jeri Walker-Bickett (@JeriWB) says
This is so awesome! About five years ago, I came into a very old camp trailer on my grandpa's property in Montana. I affectionately refer to it as my hovel, but I spent the better part of five days putting some blood, sweat, and tears into it. I painted the inside light blue to cover up the old, slightly mildewed wood. Then I made curtains out of beach towels and iron on hem material. The floor was in okay condition, but I put a few cheap throw rugs down. Thankfully, the cushions for the seat didn't need recovered. It know looks 20 times better and is 50 times better than sleeping in a tent when my husband and I drive up there 🙂
Meredith says
How fun! I love the satisfaction of taking something run-down and making it wonderful (or at least not-so-bad) again. I know, I don't think I can ever go back to tent camping. I'm spoiled now. 🙂
Laurie S Hurley says
As beautiful as this looks, I have major claustrophobia and do not think I could be in a camper. More like a suite at the Ritz! It's really cute though and I like what you did. Being a non-crafty person, it always amazes me when people like you transform something like this.
Meredith says
Thanks Laurie! Yes, a suite at the Ritz does have its advantages!
niekkamcdonald says
Meredith you need your own show! You really make me want to try and re upholster something.
Meredith says
Thank you Niekka! 🙂
the Frozen Canuck says
I would of never thought of shower curtains! Great idea! I like how you are geared more to people who don't have millions to spend on decorating - decorating on a budget.
Meredith says
Glad you liked it! Yes, I'm all about decorating on a budget. If it can be done cheaper and/or easier, then I want to know about it! (And I figure other people do too...)
Rena McDaniel says
I absolutely loved this! It brought back great memories of an Apache my husband and I remodeled many years ago and used forever before being passed down to a new young family. I love the step by step makes it easier for the non-creative people like me!
Meredith says
Yay! Another Apache family! It's nice to be able to pass ours down to a new family as well. It was hard to let it go, but I think it will be well-loved!
Karen says
You made that so cute, I don't know how you were able to part with it. I lived full time in a 34' travel trailer for 13 years. I did some remodeling from time to time to make things look like new. It is fun to redo and make something fit your own personality.
Meredith says
Yes, making something fit your own personality is exactly the reason I like to re-make old things. It was hard to part with it, but I felt like I could be proud of what I had made it into for its new family.
Christina says
That's a great tip about the removable, washable shower curtains as cushion covers.
Meredith says
Thanks! You never know where you'll find a solution to a remodeling problem, the hardware store, the shower aisle at Target... 🙂
theJenWeaver says
Wow! I'm super impressed. Great job, that's quite an undertaking!
Meredith says
Thanks Jen! That's why it took me a whole year! 🙂
andleebakhlaqkhan says
I am really impressed with this post and \I| will try this my self , as I am always experimenting with things... But this is a wonderful Idea to use shower curtains... But I must say you have a lot of patience ....
Now when you are done.. it looks great.,..and so cute
All the best.
Meredith says
Thank you! Yes, it does take a bit of patience, but it's always worth it in the end!
Lillian Chapman says
I like what you did to the camper but my idea of camping is a 4 star hotel with room service and nice staff.. Lily c Canada
Meredith says
Thank you! I don't blame you, I think I'd be the same if it weren't for my husband. This is our compromise between hardcore backpacking (him) and 4 star hotel (me).
Lillian says
I was lucky that way because my late husband didn't like camping either. We spent our time going to Circus Shows. He was a model train and model circus builder so we went to all the shows and traveled around Canada and the U'S A for the 46 years that we had before he got his cancer and 6 months later he was gone.
Meredith says
Wow, I'm sorry to hear that. He sounds like a great guy and it sounds like the two of you had a good life together. Here's to happy memories, whether by campers, circus shows, or hotels!
Matthew Kaboomis Loomis says
This is great, Meredith. I love classic campers and you've really made this one look fantastic.
Brings back memories of my grandparents and using their camper out in nature.
Meredith says
Thanks Matthew! Glad to help you remember some happy times...
Charles mills says
I have a 1974 ramada that needs the lift chains replaced still in decent condition if you know someone that would want a good deal on a project
Meredith says
Hi Charles, I don't right now, but if you're on facebook, you should check out the Apache Camper Preservation Society group page. Those folks are passionate about saving every possible Apache.
Anita says
I love this. How did you actually make the cushion cover. ( I need a step by step and can not find anything on line to help)?
Meredith says
Hi Anita, I wish I had done a more thorough explanation of that process. I'm not a great sewer so I wasn't very confident in my ability to describe the steps. Basically, I laid a cushion on top of the shower curtain and cut out around it, leaving an inch seam allowance extra on each side. Then I measured the edge, which I think was around 3 inches, and again added a one inch allowance all the way around. On the back side, I did basically the same thing, except the back panel is made up of two pieces that overlap enough to button together (shown in the picture). Then I pinned and sewed everything together inside out. Finally I turned it right side out, shoved the cushion inside and buttoned it up. It took a little trial and error, so I apologize that I don't have better details for you. Let me know if you have more questions!
journeytokimberly says
Did you use 2 shower curtains total? 1 for each of the bench cushions? Marvelous idea BTW!!!
Meredith says
Thank you! Yes, I used a total of 2 curtains, and actually got 4 cushions out of them, the bottoms and backs of each bench.
Marlene spadoni says
Hi Meredith, we have a 1977 apache tent trailer, the curtains, seats and flooring are exactly like yours. I'm starting to redecorate and I wanted to ask how you hung your curtains. Did you reuse the plastic tabs to hang them or did use do something else,
Yours looks great.
Thank you,
Marlene
Meredith says
Thanks Marlene, always great to meet another Apache owner! The answer to your question is sort of both. The part of the tab that was attached to the curtain was falling apart, but I wanted to be able to use their existing system, so I took the tabs off and glued velcro to each tab, then I sewed the other side of the velcro to the curtain. That way the tabs could run back and forth on the rails, but the curtains could be removed to clean. You can see more of that process in this post: https://thepalettemuse.com/apache-remodel-part-1/
I think you can buy more of the tab strips online if that seems easier. Try googling "Apache Replacement Parts." Also, there is a great facebook page dedicated to preserving and rehabbing old Apaches. They are a great source of information and replacement parts.
If you have any more questions, don't hesitate to ask!
Tmurdoch says
When I was a little girl in the 90's my family had an amazing orange Apache trailer. Fast forward 20 years and I can wait to buy one with my fiancé, fix it up, and tour North America together. Thanks for all the remodelling tips.
Meredith says
How cool! I didn't grow up with camping, but this little Apache totally got me into it! Such good memories with the family. Wishing you your own great memories!
thepopupprincess says
Meredith, your cushion covers are ingenious! Would you mind if I linked back to this post on my blog? 🙂
Meredith says
Thank you! And yes, feel free to link back! 🙂
Connie Slingsby says
I hope your still posting. I just found your site and I am redoing an old Apache camper, But can't figure out how to get them to fit the small rail , new curtains,I mean. Please tell me what you did. Thanks.Connie
Meredith says
Hi Connie! Yes, I'm still posting, but I don't own the camper anymore. I used the original clips so they would fit back in the rails. You can see how I did it here: https://thepalettemuse.com/apache-remodel-part-1/
Also, there's a great facebook group dedicated to the rescue and rehab of these old gems. Check it out: https://www.facebook.com/groups/201182856613333/
Connie Slingsby says
Thanks so much for your quick reply on how to hang Apache curtains. I've been up nights trying to figure this out. This is going to take some time, but I can see how this is do-able. I enjoy your blog and thanks again.
Meredith says
You're welcome! I hope you can get some rest now! 😉
boxtrailers (@centurycampers) says
You really have a a patience out there in building this camper. You do have some talent there. I like the design and the wallpapers you used.
Meredith says
Thank you! It does take a little patience, but is so worth it in the end!
Kristin Intile says
Hello! I am also rehabbing an Apache camper and came across your post. Mine came with no cushions at all and I was going to make my own. Your cushion cover idea is awesome and I was wondering if you had some more specific instructions for making it somewhere. I am not a very experienced sewer so it's not easy for me to just "wing it". Anyway, thanks so much for the tips and inspiration!
Kiki
Meredith says
Hi Kristin! I'm sorry I don't have more detailed instructions for you. Basically, you will need to measure the length and width of each seat and seat-back. (They're slightly different on each side.) Then you'll get foam (at hobby or fabric stores) and cut it to those measurements. Then you have to figure out the measurements, including the depth of the foam and basically build a box out of fabric. I know that probably doesn't help. Maybe try searching for "make your own seat cushions"? I'm sure someone more experienced than me can explain it better. Good luck!
Gail C. says
You really did a great job on the camper! You are Sooooo Smart! I like the idea of using shower curtains to redo the sitting area. Speaking of that Kohls.com is having a sale currently. I goggled "Kohl's promo codes" and ended up at retailmenot.com .... got 30% off and free shipping - no minimum with my Kohl's card and the promo codes. I picked up some shower curtains that regularly were $24.99 but are now $10.00 (less 30% with promo code). You may want to check it out? I, myself, have been known to use fabric shower curtains as regular curtains (and people never know unless I tell them ... lol). Again .... I love the redecorating you did in the camper (all great ideas) .... beautiful!
Christina says
Thanks for the great post! My husband and I are working on a 75 Ramada right now. Do you happen to remember how you recovered the mattresses? I'm struggling to find an option that is affordable and would appreciate any advice that you have! Thanks
Meredith says
Hi Christina! I have to admit, I totally cheaped out on the mattresses. I simply covered them with mover's blankets from Harbor Freight. They are the right size to just barely fit around the mattress and tuck in under the edges. So I didn't really make a cover for them, I just kept the blankets tucked around them. Hope that helps!
Hope says
I'm trying to talk my hubby into a vintage Apache Roamer. He's worried that they leak. I was wondering if you had any problems with that?
Meredith says
Yes, sadly ours was a bit of a leaker. It only leaked when it rained really hard and when it was popped up. It was nice and tight when folded down and stored. I know there are lots of ways to fix the leaks, but I never got around to it because it rains so rarely here in the desert (and dries out so quickly) that it never really caused any problems. If you want a totally maintenance free popup, this may not be the one. But come to think of it, I'm not sure there's any such thing as a maintenance free popup?
Forrest says
Wow! I just picked up a well-loved 73 Apache Mesa for my next project. I'm totally going for the indoor/outdoor carpet instead of my planned-on stick-on tile. I'll be using this for inspiration!
Meredith says
That's awesome! I hope you enjoy yours as much as we did ours!