A quick look at the many uses for my new 14-in-1 painter's tool. Plus, why I keep buying multi-tools!
This post contains affiliate links. If you make a purchase, I may receive a small commission at no additional cost to you.
I love multi-tools. I have a Swiss Army Knife, a Leatherman, and even one of those flat credit card sized tools that can do 12 different things but probably can't be legally carried on an airplane.
Today I almost bought a cute little combination flashlight/bottle opener at the checkout at Lowe's, before I realized I was already carrying both those tools on me at the time, in the form of other multi-tools.
Basically, if you can make my life easier and more efficient, you have my heart.
So when I was killing time at the hardware store the other evening, waiting for my hubby to choose between two different styles of light switch plates (this is what we do on our dates these days), I wandered into the paint aisle, my happy place.
Before long, a 14-in-1 painter's tool made its way into my hands. It seemed like the perfect multi-tool, even if I didn't have a clue about half its functions.
Some guys buy their wives flowers, mine buys me tools. They last longer, and he gets to enjoy them too. (For Mother's Day, I'm getting a new chop-saw, but that's a story for another day.)
Long story short, I batted my eyelashes at my date and a few minutes later we walked out with his light switches and my new multi-tool.
When I got home with my treasure, I realized there was nothing on the packaging to tell me how to use this miracle of efficiency. So I did what any savvy DIY-er would do, I googled it. I couldn't believe how little information I found. I guess this is one of those things that, if you don't know how to use it, you shouldn't be buying it?
So I did a little more digging and found out what all the little pieces of this tool do, and I'm passing my research on to you so you won't feel as left out as I did, if you decide you need one of these.
So what does a 14-in-1 painter's tool do?
Everything except actually paint.
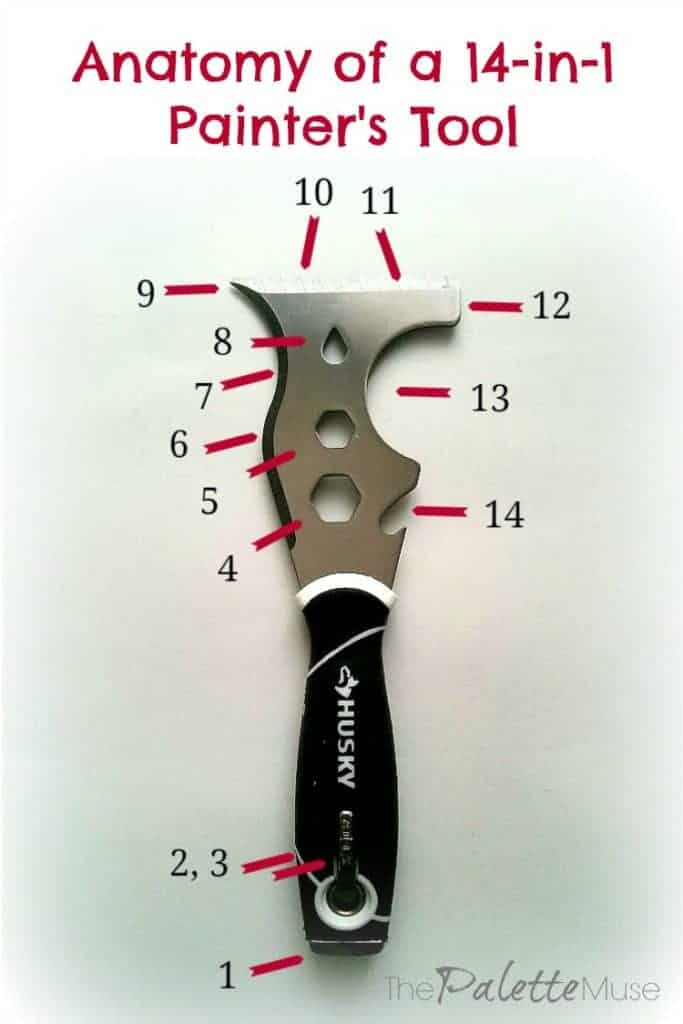
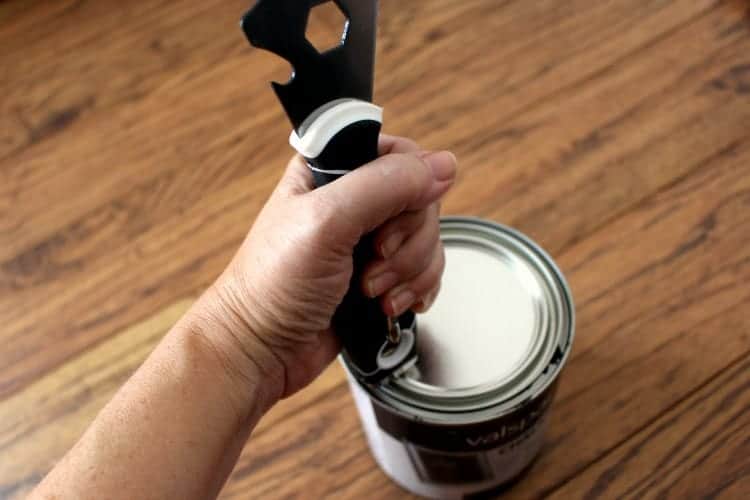
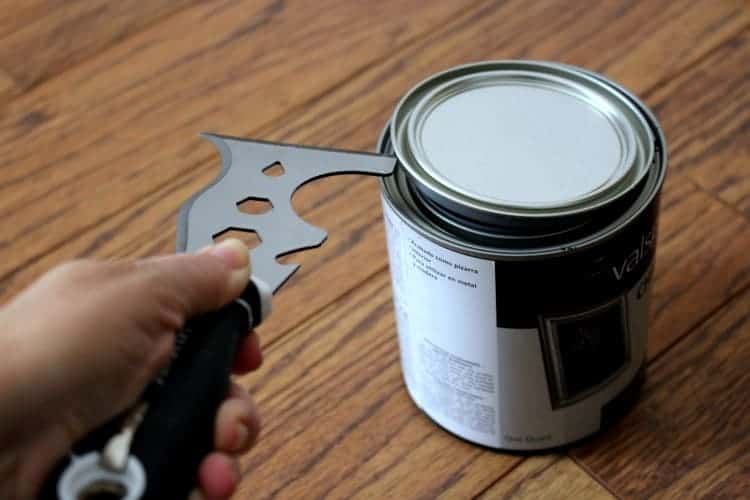
1. Hammer - perfect for pounding the lid back on the paint can. (I can't tell you how much paint I've ruined because I forgot this crucial step.)
2. Flat Screw Bit - for unscrewing plate covers like light switches and plugs.
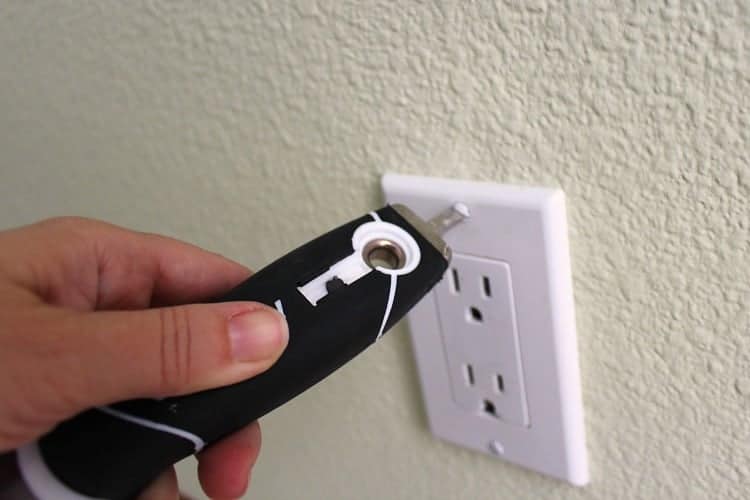
3. Philips Screw Bit - every time I paint a room, it never fails that one plate cover uses Philips instead of flat.
4. Large Hex Nut Wrench - supposedly the nut wrenches are sized to fit those commonly found on paint sprayers.
5. Small Hex Nut Wrench - same deal, just smaller.
6. Convex Scraper - great for scraping paint off curvy molding.
7. Concave Scraper - every curve has an equal and opposite reaction. Or something like that.
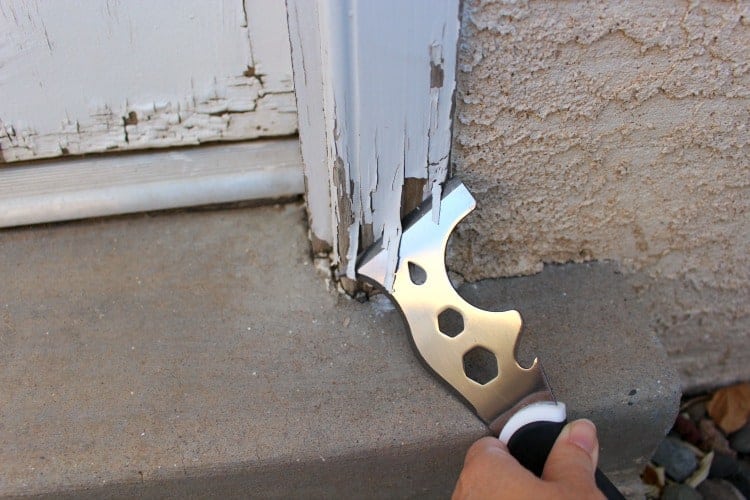
8. Nail Puller - there's always that one nail you missed when you were prepping the room for paint.
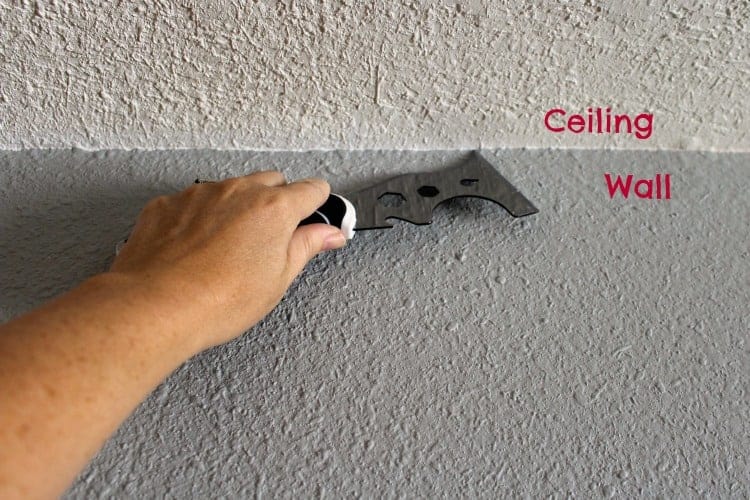
9. Crack Opener - ever wondered how to get a clean edge around your ceiling, without taping? Simply run this end along the edge where the wall meets the ceiling, and you'll create a little trench for your paint brush to safely follow, without overlapping onto the ceiling.
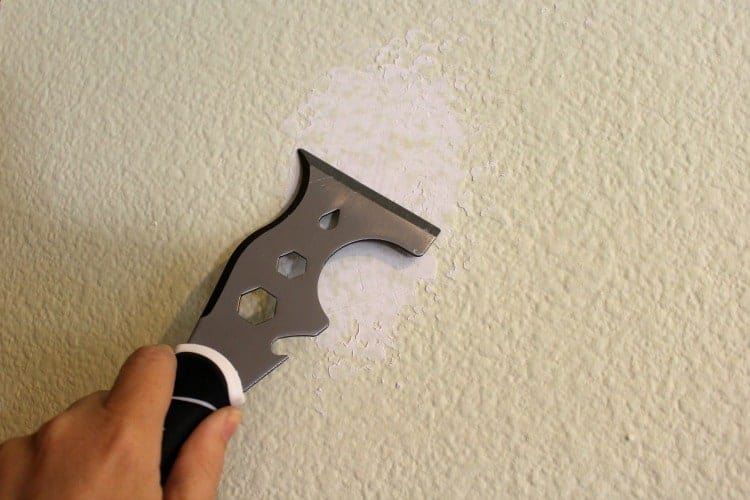
10. Chisel - this sharp edge is for scraping off flaking paint.
11. Spreader - flip the tool over to the dull side and this edge is great for applying spackle while prepping the walls.
12. Paint Can Opener - no more searching for a screwdriver or that little pry key when you're itching to get started.
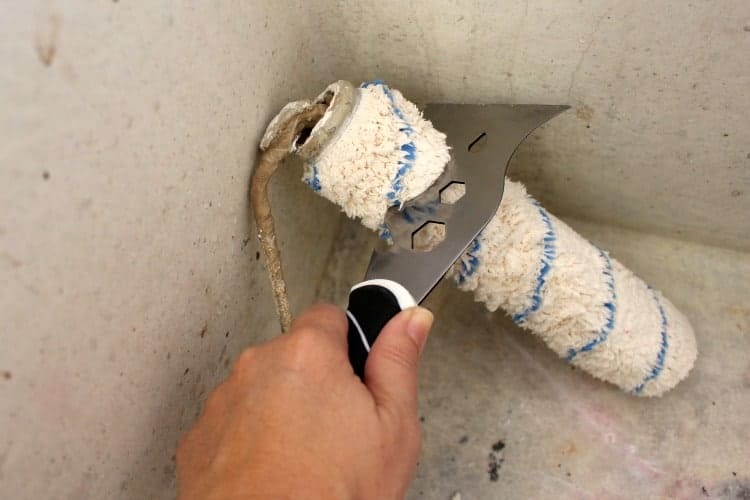
13. Roller Cleaner - you can save a lot of paint, and clean-up time, by scraping any remaining paint off your roller before washing it.
14. Bottle Opener - and last but certainly not least, this one's pretty self explanatory at the end of a long day of painting.
There are probably plenty of other uses for this tool, but this is as far as I've gotten. Now it's time for me to put this baby to work. I've got some scraping, screwing, hammering, cleaning, and (let's not forget) painting to do!
Even More Painter's Tools
For more painting tips, check out my post on making painting easier with the right tools!


Mary-the boondocks blog says
I had no idea these things even existed. And for someone like me who is always painting it would be a pretty present. Meridith, I hope you can join us at a new link party we are hosting, Sweet Inspiration. It runs Friday till Tuesday.
Meredith says
You would love this little tool, Mary! And I've missed your party for this week, but I'm putting it on my calendar for Friday!
Susan Cooper/findingourwaynow.com says
Hi Meredith, First I was laughing at you for buying a tool without knowing what it did exactly. Now I'm laughing at myself as I run out to buy one after quickly reading your bullet points. Cool!!!
Meredith says
Ha! I never thought about it but I guess that is a funny way of buying tools! Oh well, it really worked out in this case. 🙂
Kelwinkwel says
@Susan Cooper/findingourwaynow.com,
I’ve been using it all week for our spring home projects and painting. I couldn’t figure out all it’s uses but awesome!!
Anita C. Lee says
What a clever tool! Now will you come over to my house and put it to use?
Meredith says
Sure! As soon as I'm done with my own list of projects...
Paulette Lee says
Your blogs are always so entertaining! I know I'd never use half those functions, but after reading this, I'm fighting the urge to put it on my next amazon prime order!
jacquiegum says
Okay...now this is genius:) Truly!
Meredith says
That's exactly what I thought Jacquie!
C.D. Loken says
Now this is a tool I MUST have! I too have ruined so much paint by not making sure the lid is closed! And the paint roller cleaner-GENIUS!! Of course, hubby would buy it just for the bottle opener!! We just purchased a new grill and guess why he just had to have that specific one! 🙂
Meredith says
That's hilarious CD! Oh well, I guess these companies really know their target audience! 😉
Jeri Walker (@JeriWB) says
Okay, I am love with this painter's tool and love is not a word I use wisely. My toolbox was recently stolen from my garage when I left the door open overnight, so I may very well end up buying one of these now that I have some tools that need replacing.
Meredith says
Oh no, I'm sorry to hear that Jeri! It can get really expensive to replace all those tools. Hopefully this will help a little.
satrntgr says
Wow, that tool is amazing - might have to get one for my husband for Christmas. Thank you for sharing this with us at the #HomeMattersParty
Meredith says
Yes, it would be the perfect Christmas gift... or Father's Day gift! 😉
Jennifer says
I LOVE THIS TOOL SO MUCH! I’ve had a 5-in-1 for years so when I saw this little guy I couldn’t resist. Just the other night I had to keep correcting my boyfriend for repeatedly calling it a 5–in-1. So naturally he says “okay smart pants what are the 14 tools?” ?? “Hmmmm .. I’ll get back to ya on that one” haha So thank you, thank you, thank you for post this!!!! You saved me. I will school him this evening. Haha
Meredith says
That is awesome! I'm so glad I could help set the record straight! 😉
TMc says
I never even knew this tool existed until the other night while watching a home makeover show. Guy whipped this gadget out of his tool belt to cleanly rip off the end of his painters tape in a nice straight line by using the sharp chisel end (#10 on your diagram above) against the tape and the wall. That was one thing I hated about masking was the corners and getting straight line in those creases. Between this tool and clear paintable caulking....I'm gonna go into the painting business Ü Thanks so much for all those tips!
Meredith says
Wow, I never thought to use the blade that way, thanks for sharing! That always bugged me about the painters tape too!
Michael Allen says
The hammer on the end is also for hammering the wall to push in holes before filling them so the edges are smooth and no paper from the wallboard sticks out
Meredith says
Yes that's an important step and makes a big difference in the overall outcome!
Ca says
Thank you for the thorough explanation! Shame on Home Depot for not including this in their description. Great job on your end!!!! 🙂
Meredith says
Thank you! ? I thought maybe the was no explanation because whoever buys these already knows what they're for. But I knew I couldn't be the only one wondering...
Robert Lee Verble says
Thank you - I was keen on learning what your research found GREAT JOB!
- I might add to those: BBQ grill scraper and hot grill lifter, spatula, prybar, spacing gauge, box cutter, whittling blade, planting tool glazing tool, grout repair tool, and by all means it is a Very sharp tool on two edges - snake killer in the right hand
We keep one with the paint kit, one in Vicky's car kit, and one in my kit and one in my workshop
I attest to their worthiness - should be in every kit you have
One firm warning: Do Not Underestimate how easy you hand holding the grip can slide off and slice the small finger or edge of your hand quite handily
Meredith says
Yike, that's a great warning! Thanks for sharing!
poolsupply4less says
Great job with pictures to explain. Thank You.
Meredith says
Thanks! And thanks for commenting!
Lori says
I have a tool like this and glad to know what’s its all for. Thanks
Meredith says
You're welcome, hope it's helpful!
Laura Adams says
You are a woman after my own heart! (Just found your blog.) I asked for a chop saw for Mothers Day about 15 years ago, and I've added to our tool collection along the way, and my husband feels just fine about that! I've built lots of furniture over three years, and now that he's retired, we're building things together (sometimes fun /sometimes not.?) Anyway, I bought one of these 14-in-1 tools a while ago, and got it out yesterday, trying to figure out what it was all about. Couldn't figure out some of them, so I ended up at your blog. Thanks for posting this info. Now I'm gonna go look at your projects!
Meredith says
I'm so glad to be of help! It's always great to meet a fellow DIY-er!
Bob says
This scraper is an absolute must have for anyone who moves into a new house. I’ve used this tool more times than I can count. Also the pointed end cuts the cover on 5 gallon buckets then flip it over to pop the lid off.
And in lunchtime desperation it cuts pizza !!
Meredith says
Lol! I think pizza cutter might be the most creative use I've heard yet!
Brian Spence says
Thanks I had one already but I did not know all of the uses for it. Some I had figured out already which is not bad for an old Canadian fart I don't think
Meredith says
For sure! That's more than I knew when I got mine!
Bob Dumlao says
This is obviously a very late reply. I came across your site while browsing around. I've been prepping and painting houses as well as cars for many years. May I offer some "corrections." You should never use the "hammer" end to close paint cans. In fact never use anything hard, such as hammers, because it damages the lid and can cause the seal area to leak. Always, use something soft, even the end of a "wood" hammer handle is better. The metal end is the tool is for "tapping" popped out nails beck into the wall as you're prepping it. Also, you should always try to use the paint can lid opener. The bent end slips under the lid and lifts it straight up to prevent damage to the lid seal area. Using a screw driver or the edge to the 14-in-1 tool can damage the seal area by deforming it. Otherwise, it was a very well written explanation of the tool.
Meredith says
Good insights Bob, thanks for sharing!
Tyler says
It's now a 15-in-1. Please update .
tommyboy says
@Tyler, 1 more use & a very important one, after opening your new paint can use the pointer to pierce 3 or 4 holes in the paint can ridge to allow the paint to drain back in the can, this allows the lid to an air tight seal instead of the paint curing in the ridge. a good lid seal important to preserving the unused paint from curing in the can....
Jacob Bighley says
I have a few decades of construction experience. Over time I have figured out most of those functions. It has always been one of those instinctual things, learn by experimenting, or something passed down from journeyman to apprentice. Something those in the trades don't realize is not common knowledge and we don't think to share. This is the first and only actual comprehensive description of the multi tool options I have seen. Option#9 was a new idea for me as well. Well done. Thank you.
Meredith says
Thank you Jacob, that makes my day to hear that!
Darlene says
Hahaha, what! You mean I can stop using my round part between my finger and thumb to clean paint rollers?! ! And no more lining up a row of Q-tips to clean the rim of paint cans. Fantastic! That's the neatest tool I've seen in a loooong time. Yes, I must own one of these. Appreciate your info. Thanks so much.
Darlene
Meredith says
Yes you need one of these! And I'm impressed you've been cleaning your paint cans with Q-tips!
Tommy Bell says
I remember when I was working in a hardware store back in the 60’s , paint thinner came in a bottle you opened with a bottle opener (like a soft drink). Maybe that’s why #14 is an opener.
Meredith says
Oh that makes sense! Thanks for sharing!
Jo says
Thank you so much!
Have seen them around and thought they looked useful but didn’t know for what exactly 😂
Meredith says
You'll be amazed at how many uses you find for yours!
Arturo says
I've had mine for years. Still goes in the back right pocket of my painter pants. 😉 Great tool indeed.
Ron Mottola says
Number 1 can also be used to flatten and create an indent around a nail holes so the spackle with number 11, will go on better.
Meredith says
Yes, good point!
Shirley S. says
Who needs to hire a repairman when you have a tool like this? I just bought three. My two brothers will love these