How to create a linocut block print, part one: drawing the design and carving the block.
Do any of you fellow crafters out there remember linocut block printing from the 70’s? I wasn’t born yet when this art form was in its heyday (in fact my mother blames my arrival for the demise of her budding linocut career), but I remember learning about it in art class.
Without delving into too much art-historical detail, linocut is the evolutionary pinnacle of centuries of block printing developments. It’s a block of wood, covered in a layer of linoleum, which is easy to carve and inexpensive to use. It dates back to the turn of the century, but experienced an awakening of sorts as it became readily available to even casual crafters by the 60’s and 70’s.
While linoleum in most of its forms is usually considered passe these days, I am seeing lots of fun block prints showing up all over the place.
Remembering how much fun it was to carve into these little blocks, I set out to try it again for myself. I’m no Albrecht Duhrer, for sure, but the results have been fun and very artistically gratifying. You get to draw, then carve, then print in bright colors. What more could you ask from an art project?
If block printing sounds like fun to you, I thought I’d share with you this step by step guide to make your own. It’s a simple, but rather long process, so I’ll be breaking this into two posts.

This post contains affiliate links. If you make a purchase, I may receive a small commission at no additional cost to you.
Linocut Block Printing Part 1: Drawing & Carving
First, gather your supplies.
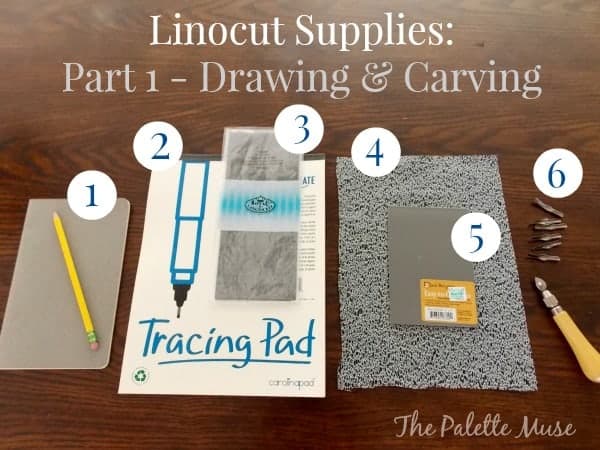
You’ll need:
- Pencil and paper for sketching designs
- Tracing paper
- Graphite or carbon paper
- Lino Grip or another grippy material so your block doesn’t slide all over the place while you’re carving
- Linocut block
- Gouges and carving tools
You can get every one of these supplies at your local craft store, for about $30. I snitched mine from my mom’s 40 year-old set. Thanks Mom!
Drawing:
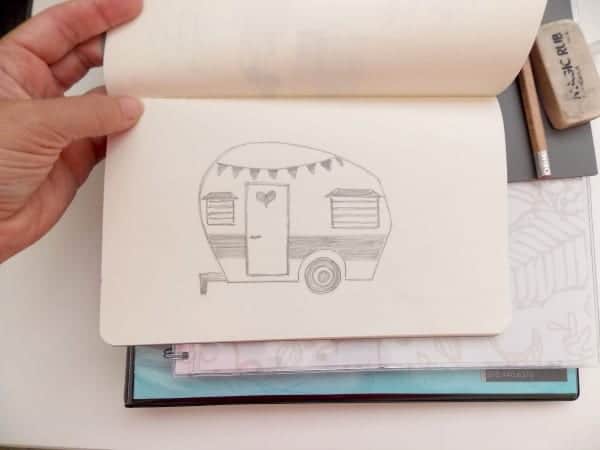
First you’ll need to come up with a design. I keep a sketchpad for drawing exercises and sketching out ideas. I decided that a retro design was the way to go with this project, so I sketched out a cute little vintage camper, one of my current obsessions.
When you’re sketching or choosing a design to print, it’s important to think about which parts will be printed, and which parts will be left white.
In block printing (a form of relief printing), you carve out the white part (or negative space), and the part that’s left is what will print. This can be a little tricky, so it’s good to start with bold designs where you can easily see the patterns.
Transferring:
Next, you’ll need to transfer your drawing to your block. There are various ways to do this, but to me the most straightforward is to trace the image onto tracing paper. Then lay your tracing paper on top of a piece of graphite paper, which is laid on top of the block.
Using a stylus or pencil, trace over the outlines on your tracing paper and it will transfer those lines through the graphite paper onto the block.
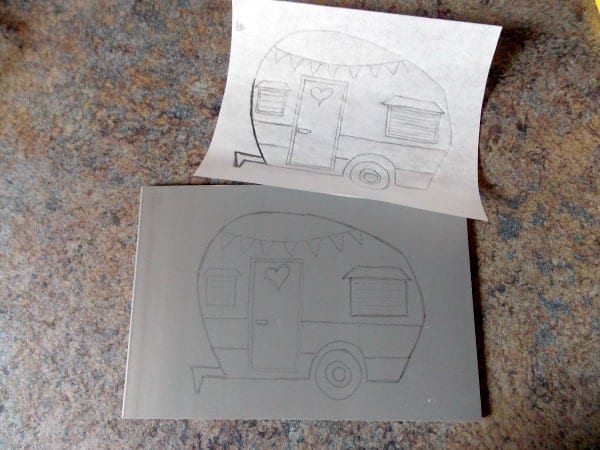
Once your image is transferred to the block, you are ready for carving.
Remember! Your image will print as a mirror image of how it looks on the block. Be sure to transfer it on backwards if the direction matters.
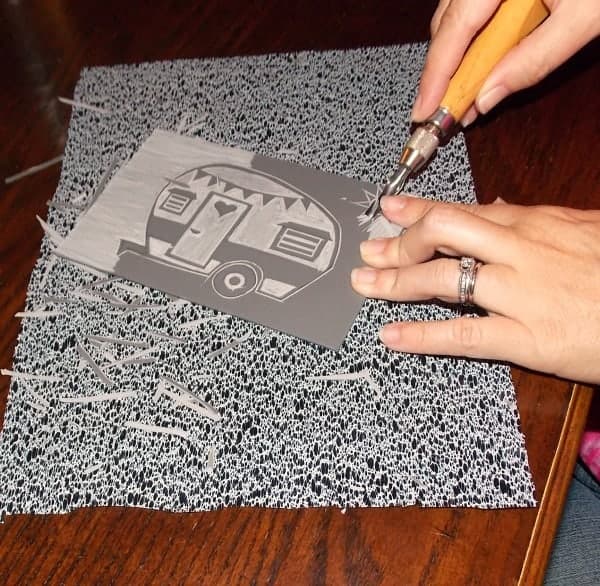
Carving:
Cover your work surface. This is important to help keep your block from sliding all around, and it protects your table from errant carvings if (or when) your gouge slips off the block. I use 3m paper, which is grippy on both sides. They also sell a similar material at Hobby Lobby, called Lino Grip. Or, you can duct tape over a piece of cardboard for the same effect.
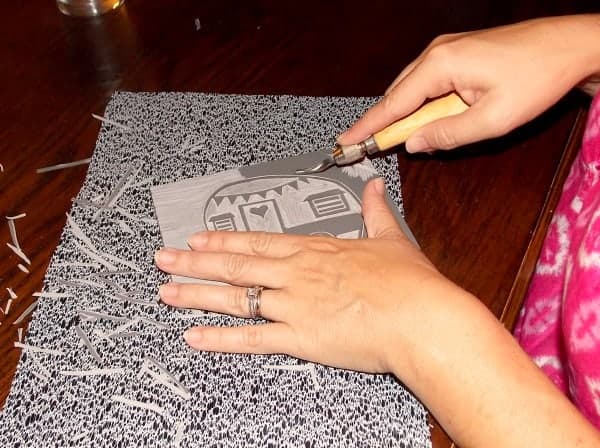
Fit the smallest gouge blade onto the handle. Start by carving the outlines.
Carving Tips:
- Carve away from yourself, and keep your fingers out of the trajectory of your gouge.
- Use your non-dominant hand to steady the tip of your gouge.
- Start carving lightly, with shallow grooves. You can always go back later and take out more material, but if you carve too much, you’re stuck.

Once your outlines are in place, use the larger blades to carve out the rest of the negative space. You should be left with a block that looks like this:
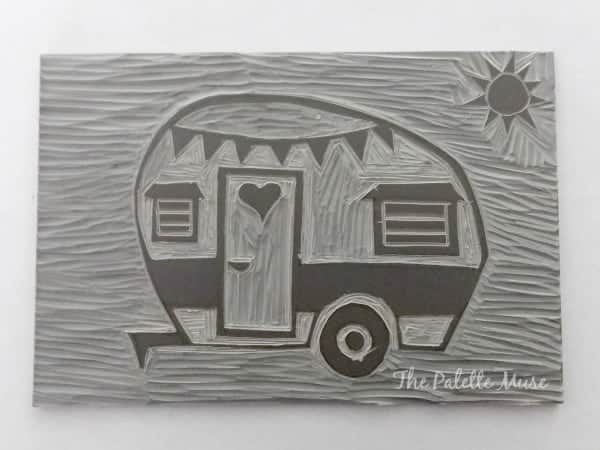
I love all the patterns made by the blades! I think this is a very cool piece of art in itself, but we’re only halfway there. Join me in next week’s block printing tutorial as I show you how to print from your block onto the finished product.
Hang in there with me – it’ll be worth it in the end!
Two Uses Tuesday Link Up 24 | Sarah Celebrates
Monday 13th of April 2015
[…] from The Palette Muse shares the lost art of Linocut Block Printing (bottom, […]
Smart Girl
Tuesday 7th of April 2015
This is so cute. Found your post on Two Uses Tuesday. Glad I did. :)
Meredith
Thursday 9th of April 2015
Thanks so much for visiting!
Linocut Block Printing Part 2 - The Palette Muse
Monday 13th of October 2014
[…] of Linocut Block Printing! I hope you’ve had fun drawing and carving your block. Check out Part 1 if you need help with that part of the process. Today we pick up where we left […]
New Adventures and an Etsy Shop - The Palette Muse
Friday 10th of October 2014
[…] a few weeks ago, when I posted a two-part tutorial on block printing? I realized about halfway through writing the second part of the tutorial that most of my regular […]
Amanda @ The Kolb Corner
Thursday 28th of August 2014
I remember learning about this technique in an Art History class I took in college. I was fascinated by it at the time, and now after reading your tutorial, I want to give it a try myself! Thank you for sharing at the Merry Monday Link Party! See you again next week!
Meredith
Saturday 30th of August 2014
Thanks for stopping by Amanda. It's really fun and challenging - you should give it a try!