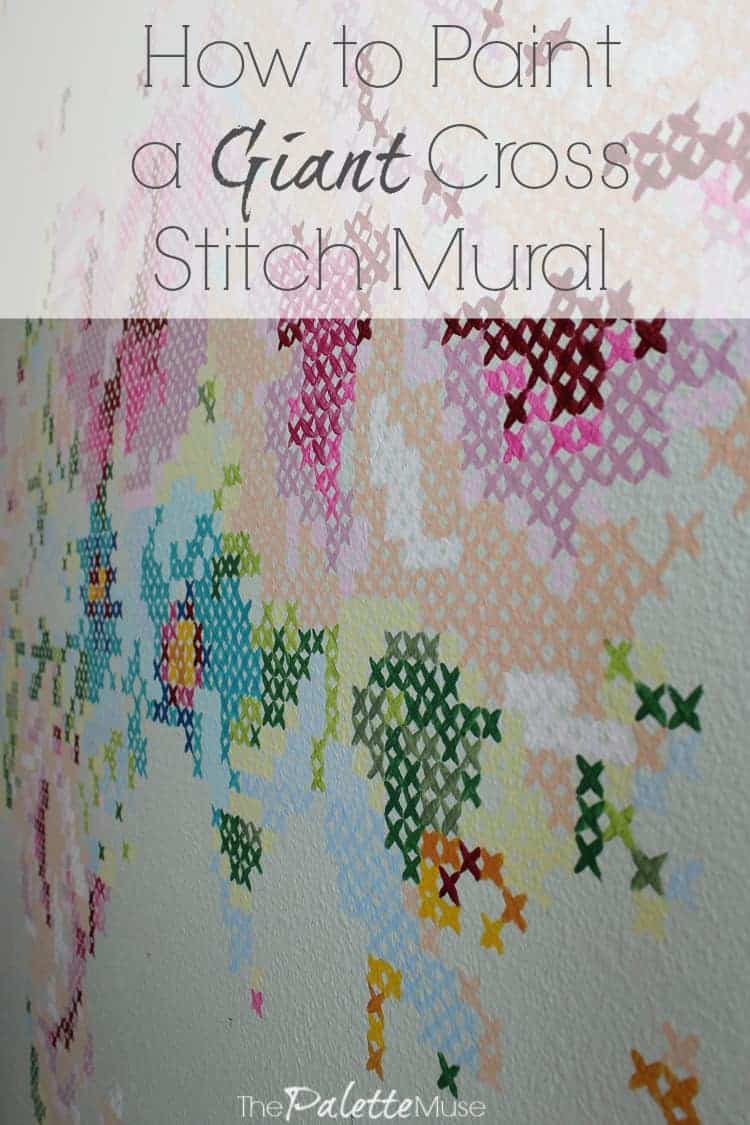
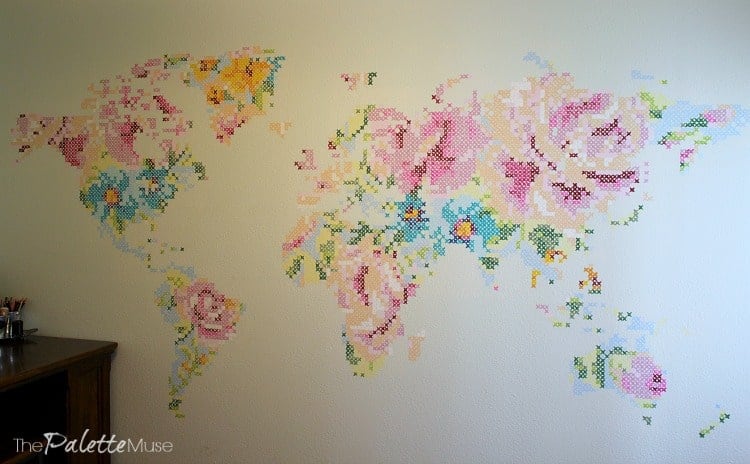
My studio is finally finished, with the addition of this colorful mural of a cross stitch map of the world in flowers! Before I get into the pictures and how-to's, let me share this quote that sums up many of my bad decisions:
"The risk I took was calculated, but man am I bad at math."
(If you know who said this, I'd love to give credit to the person who understands me so completely.)
This is the story of a labor of love that began with an innocent miscalculation and ended with one of my favorite projects ever.
~This post contains affiliate links. If you make a purchase, I’ll receive a small commission. Thanks for supporting The Palette Muse!~
If you've been following along, you may remember that I recently repainted my studio and added a new DIY wreath for inspiration. While I loved the changes, I still had a big blank wall that needed some attention. And by attention, I mean "Giant Statement Piece."
So I decided to paint a mural in the form of a cross stitch floral map. Sounds fun, right?
I found a pattern for just what I wanted on Etsy, and set about figuring out how to transfer the skills of needlework (with which I have almost no experience) to the tools I understand, like paint and brushes.
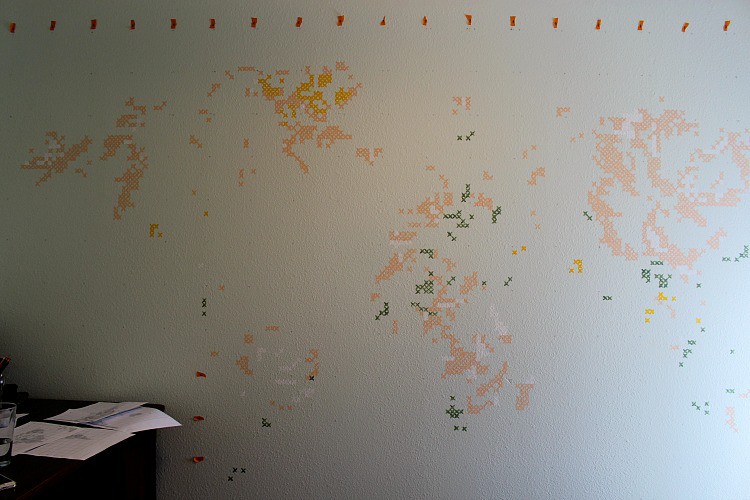
Here's where I went awry. This pattern is 100 by 200 stitches. In my mind, I thought, "OK 2,000 stitches isn't so bad." It wasn't until I was deep into the project many hours and several days later that I realized the math actually comes out to 20,000 stitches. I was only off by a factor of ten.
This is why I do art and not math. This is also where my dad is allowed to laugh at me for all the times in high school I tearfully complained "I'm going to be an artist, so why do I even need to study math?"!
Luckily I was too far along to give up, and the only way to go was forward. I finally finished the mural and couldn't be happier! Here's how to make your own cross stitch mural, if you ever choose to do so.
Cross Stitch Mural Tutorial
First, gather your supplies. You'll need:
- Cross Stitch Pattern
- Craft Paints - I like Americana by DecoArt
- Small Paintbrush(es)
- Level - preferably a laser level like this one
- Masking Tape, sharpie, pencil
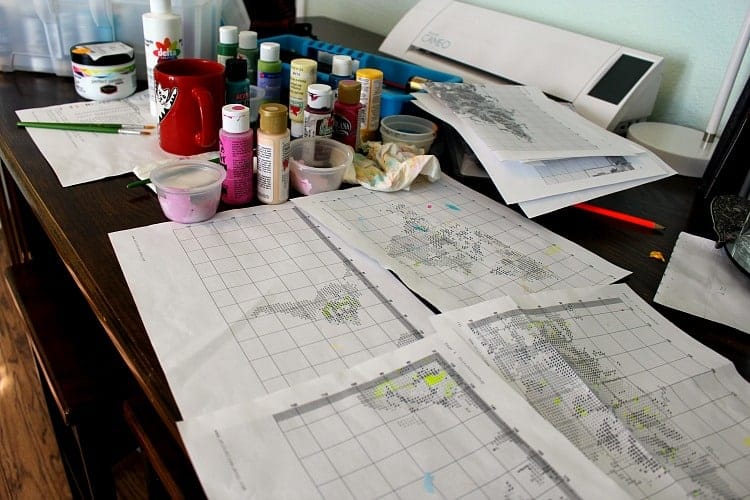
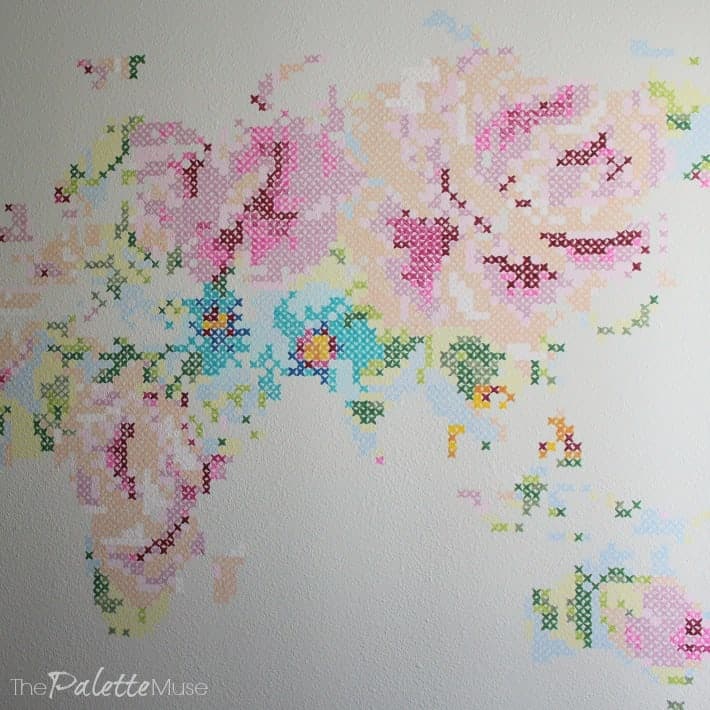
Pick your pattern first. That's the fun part! You can find oodles of ideas online on Pinterest and Etsy. Once you have your pattern, it will give you a chart of all the embroidery thread colors that are used in the design. You'll need a color of paint to match each one of the thread colors.
I used colors I already had in my toolkit and mixed the ones I needed, but it might be easier for a beginner to just buy one of each color in the design. You won't need much paint for each color, so a 2 oz. bottle per color is plenty. Be sure to write down on your chart which paint color matches which thread color!
The paintbrushes should be rounded tip, about ⅛ - ¼ inch wide. If you get a brush that's too small, it will be difficult to load enough color on it. And too big will just be hard to manage.
Next, lay out your grid on the wall.
Cross stitch charts like this one are laid out on graph paper, with 10x10 grids. That means each grid has 100 stitches in it. This is a good thing to keep in mind when you're deciding how big and complex of a pattern you want to try. #lessonslearned
Brace yourself: here comes some more math. Now you have to figure out how big you need each stitch to be on the wall. To keep things simple, you might want to make each stitch one inch wide, if you have enough space. I didn't, so I had to do some fancy calculator math.
It took three tries between me and my sweet, patient friend Jana to come up with our scale: 1 stitch = ⅝ inch. That meant that a 10x10 square would be 6.25 inches tall and wide. (Whew. I'm tired just writing it out.)
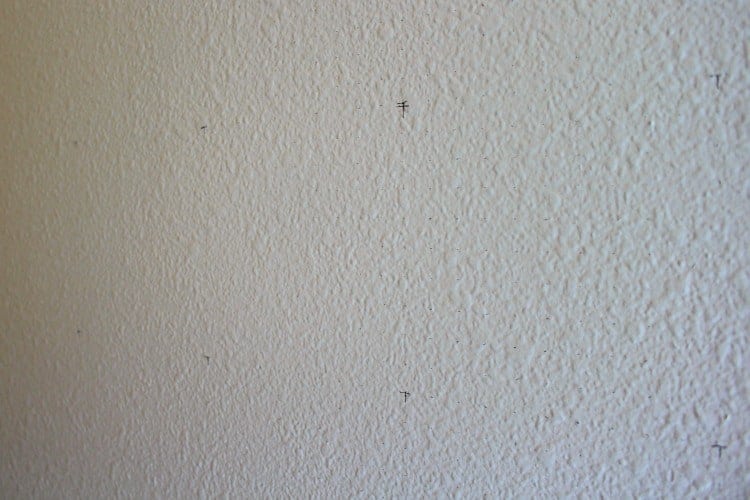
To mark your basic grid on your wall, attach your laser level to the wall at the first point (uppermost left) and point the laser to the right. Then, use your pencil to mark a cross or "T" at each 10x10 intersection. (For me, this was every 6.25 inches) Work your way from left to right until you've reached the far right side of the pattern.
Then move your laser level down to the top of the next 10x10 grid. (Again, for me this meant moving it down 6.25 inches.) Repeat the step above.

Do this for as many 10x10 sections you have on your pattern.
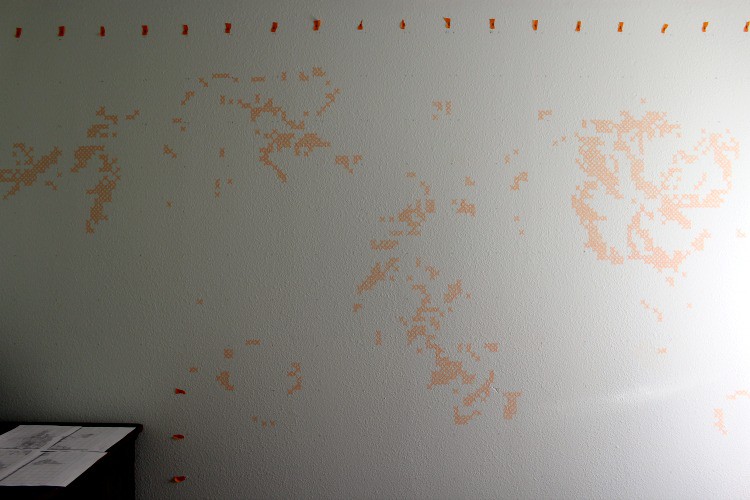
But wait, there's more! Now you need to mark the 100 squares within each of the 10x10 grids. (Only do this for areas that actually have stitches. In mine, I had some large areas that were blank, so I skipped this step for those areas.)
This is easier to do if you make yourself a ruler template. Fold a piece of copy paper to the length of your grid and divide that length into 10 equal sections. (Mine were each ⅝ inch, so I marked 10 sections of ⅝ inch.) Now you can use your personal ruler to make tiny tick marks on the wall at each mark on the page.
Hold your page vertically between the two left crosses or "T"s and make ten marks, then between the two right crosses and make ten marks. Then hold your ruler horizontally between each of the vertical marks and fill in along the ruler.
This is BY FAR the most tedious part of this whole process, and I'm sure there must be a fancier way to do it, but this is what I came up with, given the tools I had to work with.

Finally, use pieces of masking tape to mark each grid along the top and side of your wall with the same numbers as you have on your chart. You'll be looking up and down between the wall and your chart, so you want to be able to easily find which grid you're working on.
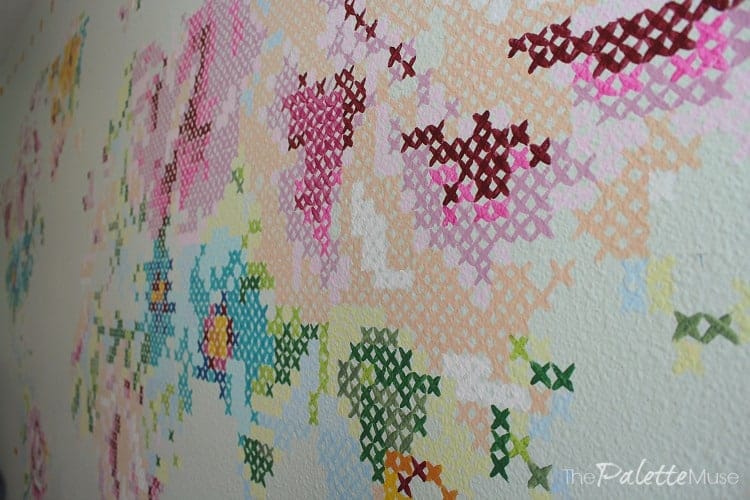
Now, paint lots of X's.
If you've ever done an actual cross stitch, this section needs no explanation. But if you're like me, with no experience in the needle arts, let me give you a few pointers.
I found it easier to follow the chart if I did all of one color at a time. Simply pick a color, locate the symbol on the chart that matches that color, and start painting an X wherever that symbol shows up on the chart.
Be sure the tips of your X reach all the way to their corners, so they'll all look connected when you're done.
I also found that I missed a whole bunch of stitches. Any cross stitchers out there feel my pain? No problem, I would just highlight them on my chart as I found them, to remind me to go back later and fill them in.
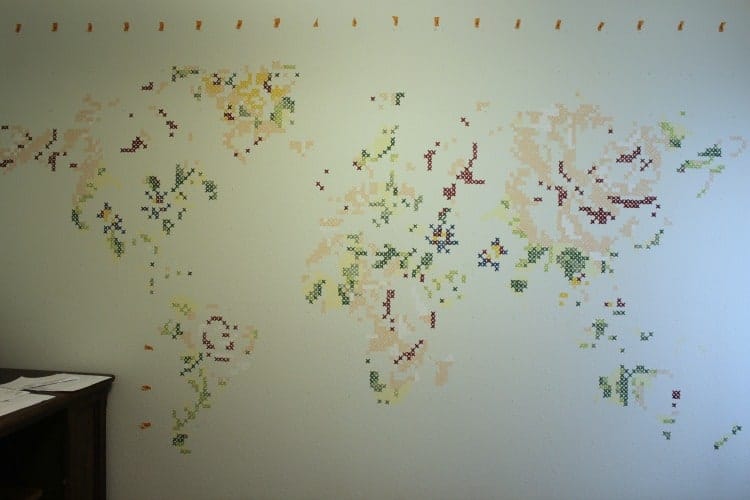
After many days, and 17 colors of paint, my mural was coming together and I was almost done. I went back and filled in and fixed all the missed stitches, and that was it!
Finally, for the cleanup.
The last thing to do is remove your grid from the wall. Take down all the masking tape and either erase or cover over all your leftover pencil markings. I thought I would erase them all, but in the end I found it much quicker and easier to just paint over them with the base wall paint.
Admire your artwork.
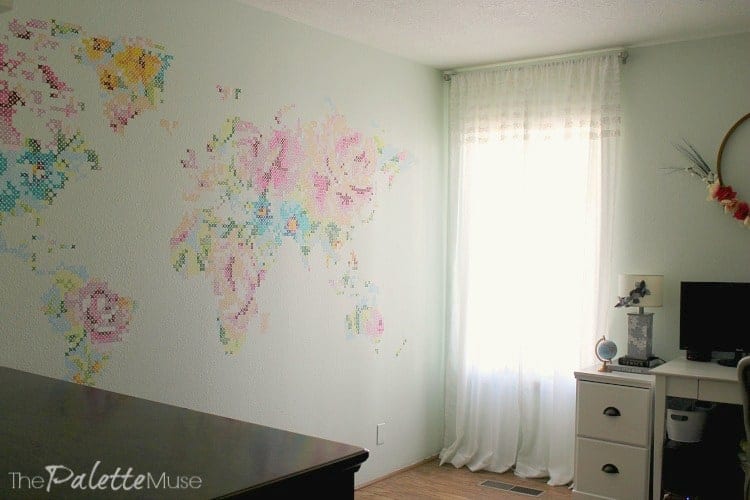
I can't stop looking at this whenever I walk down the hall. I think it added the perfect colorful floral touch, and tied in the global map theme that I started earlier in this space. Now I'm inspired to work in here and make more pretty things!
I realized through this LOOOONG process that we creative types have a tendency to get caught up in our work, and we may have the next several ideas in our head before we finish the one we're working on.
This can make it hard to experience to joy of creating, because we have so many unfinished, unfulfilled projects weighing on our minds.
So I'm trying to remember to take a minute and enjoy a finished project and an inspiring piece of art. It's OK to pat ourselves on the back when we make something beautiful. Otherwise, why do it?


Paulette Lee says
Meredith, this is stunning! I'm overwhelmed just reading the instructions. I can't begin to think about taking it on. It would certainly be one of those projects I began & never finished. I've seen quite a bit of your art, but this compares with a Cirratt (I'm certain that's misspelled, but I can't look it up 'cuz I'm on my phone.) I'll bet you know the artist I'm referring to. Simply stunning!
Meredith says
Thank you Paulette! That's a high compliment and I know exactly who you mean. You made my day!
Alana says
It's goregeous!!!
Meredith says
Thanks Alana!
Natalie says
This is so amazing! It's so beautiful, fills the space perfectly, and ties in so well with the rest of the room. Nicely done!!
Meredith says
Thanks Natalie! It was a challenge to find just the right thing for the space, so I'm glad this worked!
Jeri Walker (@JeriWB) says
I love it! 20,000 stitches is a lot of stitches. I've thought about doing some sort of mural before on my own office wall since getting rid of a big pine bookcase, though I'm not sure what way I'm leaning as of yet.
Meredith says
Thanks Jeri! I guess it makes sense that covering a whole wall would be a lot of work. 😉
Sandra says
Meredith, I hope you don't ever plan to move! That's first thing that came to my mind after "wow this is amazing". It would brake my heart to leave this wall lol
Meredith says
Thanks Sandra, that thought has crossed my mind a few times too! Definitely not planning on going anywhere for a while!
Sandey G. says
This is amazing! I love how it ties in to everything else in the room. An enormous undertaking that turned out beautifully! Way to go, Meredith!
Meredith says
Thank you Sandey! All's well that ends well, right? 😉
rachel621 says
Wow, Meredith, this is awe-inspiring! What a creative concept for wall art. It is so impressive and I totally believe you that it took hours and hours, but I bet it was worth it.
Meredith says
It was totally worth it! I have to admit, a couple of times through this process I thought of you and your never ending wall stenciling project! The things we get ourselves into...
Carole says
This is amazing and genius, I'm not sure I would have the patience to complete something like this but I bet it will inspire you for years to come as it's a wonderful accomplish which means you can do anything you set your mind to. Completely Awesome!
Meredith says
Thank you Carole! If I had known how much patience I'd need, I'm not sure I'd have taken it on either! 😉 But it does feel nice to finish such a big undertaking, like proving something to yourself.
Erika says
You are so stinkin' creative!!!! Grat job! I can't wait to see it!
Meredith says
Thanks Erika! Come over for coffee and I'll show you!
Shavanah says
This is beautiful! You did a wonderful job!
Meredith says
Thanks Shavanah, great to see you here!
Samantha says
This is SO cool! I've never seen anything like it! I love the pattern and the colors. It turned out gorgeous!!!
Meredith says
Thank you so much Samantha! That's what drew me to this pattern - all the colors!
susan says
I watched this come together on Instagram and it's even better on the big screen. And I hear you on the math. Of course, if you are like me, then had you got the math right to begin with, you might not have ever taken on the challenge.
Meredith says
Thanks Susan! That's how I felt when it was finished too. The process was fun, but the finish was even better. And you're absolutely right, had I known what I was getting into, I wouldn't have even started!
Sarah in Georgia says
Beautiful! And I love the idea--I used to cross stitch and love the look.
And this:
"I realized through this LOOOONG process that we creative types have a tendency to get caught up in our work, and we may have the next several ideas in our head before we finish the one we’re working on. This can make it hard to experience to joy of creating, because we have so many unfinished, unfulfilled projects weighing on our minds."
I've been dealing with this a lot lately. Thank you for articulating it so I don't feel so alone.
Meredith says
Thank you Sarah! I'm so glad I'm not the only one who feels this way! 🙂
Johanna says
Meredith, this is simply stunning. I'd definitely be distracted every time I saw it and would admire it for sure! I love it! Not sure if I'll ever tackle something quite so large, but it's going to be in the back of my head as inspiration for sure! Thank you!
Meredith says
Thanks Johanna! It's funny the way inspiration works - you never know which of those little files in your brain are going to inspire a completely different project down the road...
Janet says
This is soooo beautiful but I can't get the link for the pattern to work!
Meredith says
Oh no! So sorry about that! I've fixed it, but let me know if you have any more trouble. Thanks for letting me know!
Andy says
Meredith, did you have Lite-Brite when you were growing up? It occurred to me that each 'cross-stitch' (painted X) in your mural is like an individual Lite-Brite peg (or a computer screen pixel, to use a more modern analogy).
Meredith says
I did! It was always one of my favorite toys. What a great analogy!
Susan Cooper/findingourwaynow.com says
What a great tutorial etc. I have a wall something like that would be great. Now, I just need to find the time.
Meredith says
Yes, Susan, time is definitely the biggest problem with this project! And patience... 😉
Swaloven says
Hi Meredith
i read your article and really enjoyed it, your tips about cross stitch floral map are awesome
Thank you for sharing
But i want to know can i apply on all walls ?
Meredith says
Yes, you should be able to do this on any wall. My wall is lightly textured and it worked fine. Just make sure you have a clean dry surface to work on and you should be good to go.
Jeannette Paladino says
Nicely done Meredith, it looks gorgeous as you have filled space brilliantly.
Meredith says
Thank you Jeannette! Great to hear from you!
Bronwyn says
I love it so much. I love cross stitch (although I don't do it - I just admire it in others) and so super sized cross stitch is just more to love. Laughed (like your Dad did) at the math struggles, and also would like to offer this advice for next time.... the metric system. 🙂
Meredith says
Thank you Bronwyn! And I completely agree about the metric system!
Stephanie Akindumila says
Was the wall being textured hard to work with?
Meredith says
Good question! It really wasn't difficult since the x's are pretty small. The hardest part was getting the grid set up, but not because of the wall texture, just because there were so many squares!
Heather says
@Meredith, absolutely love this. How did you covert the numbers to figure out what size you needed each stitch to be. The rest of your tutorial made perfect since but I’m stuck on how to figure out the size.