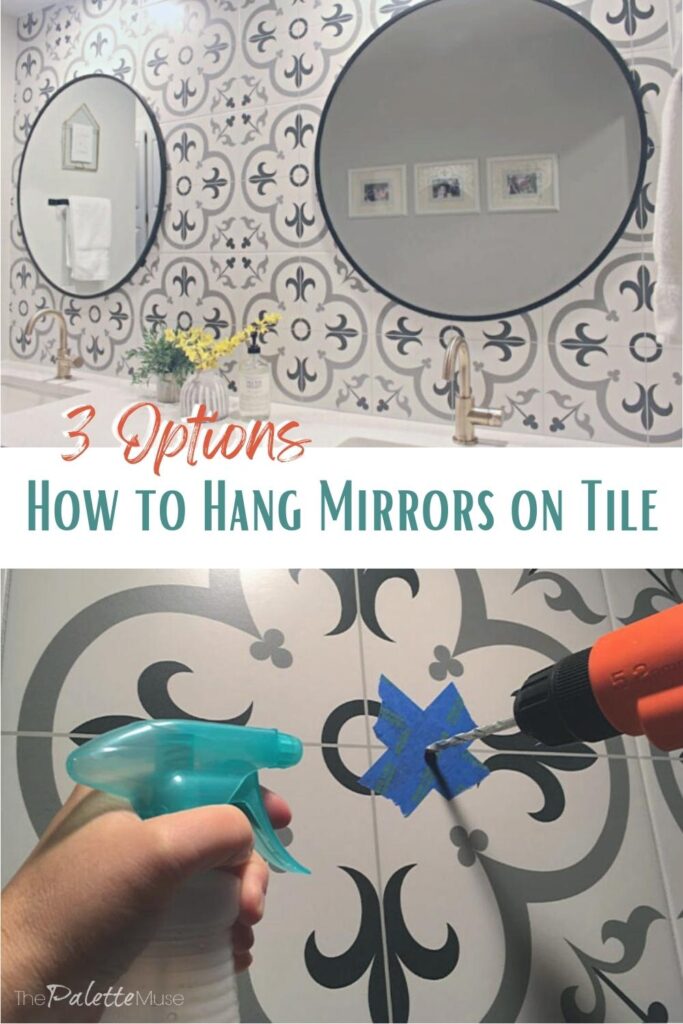
How to hang mirrors on a tile backsplash and drill through tile safely. Here are the best ways to hang heavy objects like mirrors or shelves on a tile wall, including a bonus renter-friendly option.
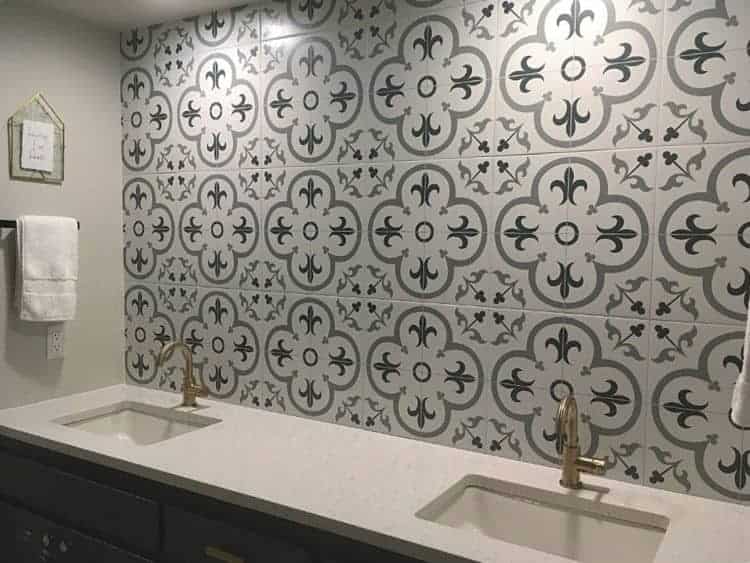
So you have a gorgeous new tile backsplash in your bathroom, but now you need to hang your mirror and you're terrified of breaking the tile? Or the mirror? Or both! Don't worry, you're not alone.
As I stood in my brand new master bathroom, admiring my patterned tile backsplash, I wondered if people really even need mirrors.
I mean, who loves rolling out of bed in the morning only to be greeted by a zombie in the mirror who looks vaguely like you but with scary bed head and a few more wrinkles than yesterday?
Maybe I should skip hanging the mirrors altogether, and just continue to enjoy my tile wall.
But in the end, my husband convinced me that it would be helpful to see the skin he was shaving, so we bit the bullet and figured out how to hang our mirrors without breaking the tile backsplash.
No tiles were harmed in the making of this tutorial.
This post contains affiliate links. If you make a purchase, I may receive a small commission at no additional cost to you.
How to Hang Heavy Things on a Tile Backsplash
After talking with our contractor and trying a few things ourselves, we found three different options for hanging our mirrors: a masonry bit, a dremel, and a third no-drill option.
Read on for the full tutorial of each method.
Method 1: Drill through the tile with a masonry bit and use wall anchors
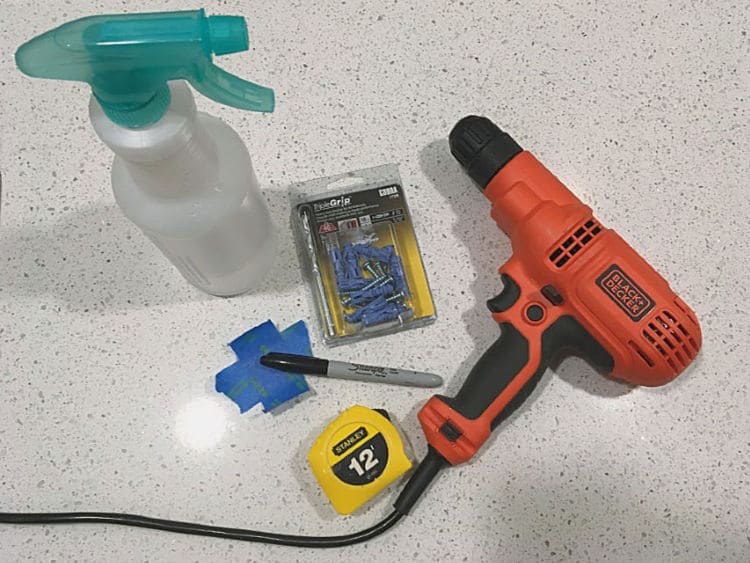
This method is the contractor version of drilling through tile. To do it, you'll need a power drill, a spray bottle with water, and a set of wall anchors with a matching masonry bit. You'll also need masking tape and a marker.
Start with the Wall Anchors
Wall anchors come in all shapes and sizes. For drywall applications, I always use EZ Anchors. But since you'll be going through tile before drywall, in this case you'll need to use masonry wall anchors.
I like the kind that come with their own masonry bit, sized to match the anchor.
First, choose the size of wall anchor you'll need, based on the weight of the object you're hanging. Remember, if you're hanging a shelf, add in the weight of the objects that will go on the shelf.
(If they are decorative objects, you probably don't need to add much weight. If they are books or dishes, they'll be a good bit heavier and you may actually want to weigh them.)
My mirrors only weigh about 12 pounds each, so I chose the smaller anchors that are rated for up to 46 pounds.
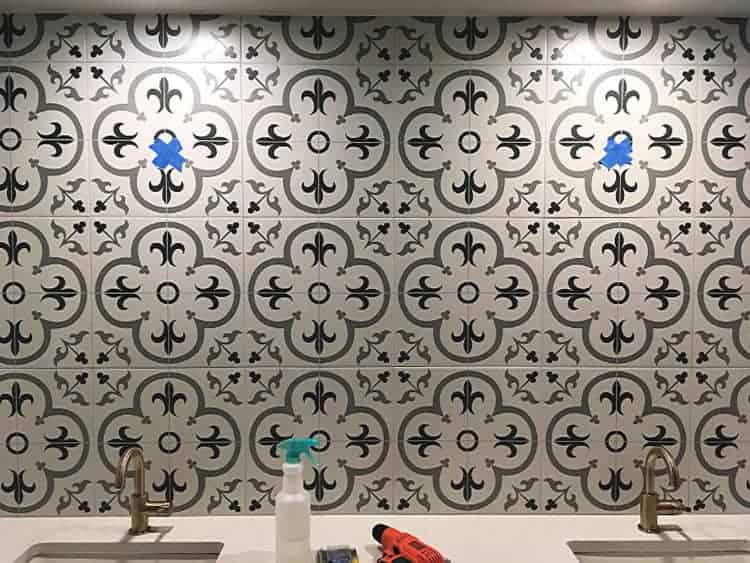
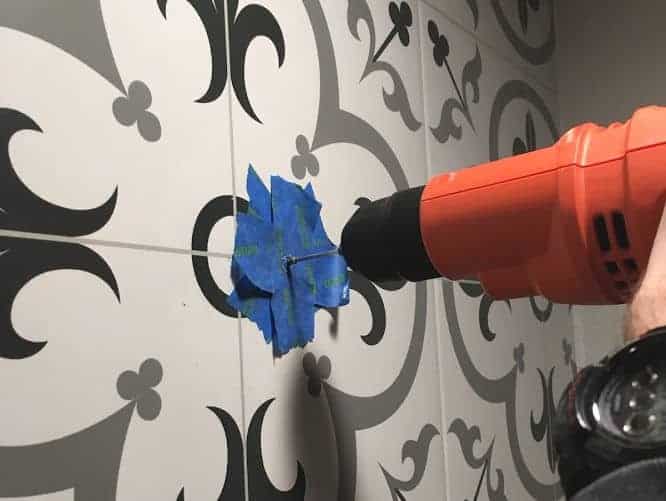
X Marks the Spot
Next, take two pieces of masking tape, about 2 inches long, and place them in a cross, like an X. Use your marker to mark a spot in the middle of the X.
Now place the X where you think you want to hang the mirror and hold the mirror up to make sure it's in the right place. Adjust the tape as necessary.
If you're hanging two mirrors, use a laser level to align a second tape X in the correct spot over the second sink. (Also use the level if you're hanging shelves or frames that have more than one point of contact.)
The tape serves two purposes here. The first is to allow you to move your mark repeatedly until you get it in the right spot. The second is to give your drill bit a soft place to "bite" into the tile so it doesn't go wandering around, scarring your beautiful new tile.
Drill Holes Using Masonry Bit
Now for the really scary part: drilling holes into your tile. Don't worry, the worst that can happen is you break your tile and have to replace it. Not the end of the world, but we definitely want to avoid it if at all possible.
The trick to not breaking the tile, according to my contractor, is to drill slowly while lightly spraying with water to keep the drill and tile from getting hot. For that, you'll need a helper. Or a lot more coordination than I have.
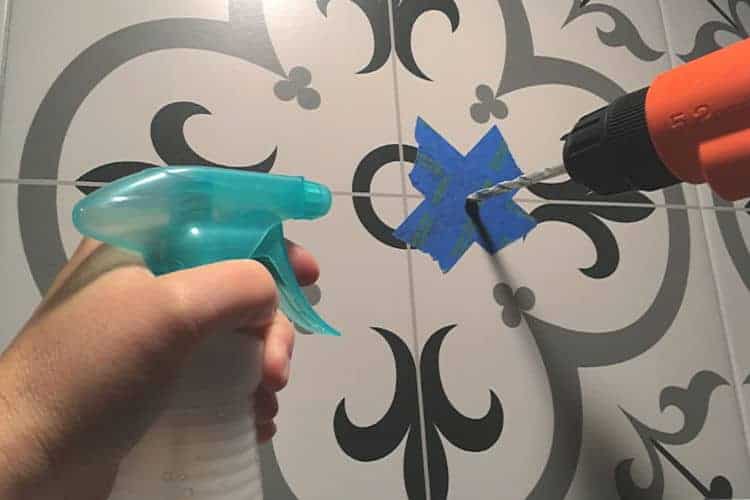
Align the tip of your masonry bit to the mark on your tape X and start drilling slowly. Have your partner spray a little water every few seconds, right where the tip of the drill meets the tile.
Keep drilling slowly, while applying gentle pressure and light water spray, until your bit clears the tile and goes through the drywall behind it. You'll feel the difference when the drill bit gets to the drywall.
Finish with the Anchor
Using a hammer or rubber mallet, gently tap an anchor into the tile, until the lip is flush with the face of the tile. Then screw in the screw that comes with the anchor. (You might hear it pop or crack as it opens inside the wall. Don't worry, that's normal.)
Hang your mirror on the screw and take a deep breath. You did it!
Method 2: Same Anchors, Different Drill Bit
We found it difficult to apply enough gentle pressure on the masonry bit to get it to go through the tile, without worrying that we would break the tile. So we switched to this second method for the second mirror.
For our second try, we scrapped the masonry bit in favor of using the bits from our Dremel set:

They have a diamond tip which basically sands through the tile instead of drilling through it.
Then we used increasing sizes of all-purpose drill bits to open up the hole to the right size, one step at a time.
For this method, you'll still need the anchors from the first method, and you'll mark your spots the same way. But instead of using the masonry bit to drill the hole, you'll be using several smaller bits and working up to the size of the anchor.
Start with a Dremel Bit
First, attach a pointed Dremel diamond bit to your drill. You'll set the hole with this bit. That means you'll make a small guide hole with this bit so the next bits will have somewhere to start, without chipping or marring the tile.
Once you've got a small dent in the tile, move to a larger ball bit. This will help open up the hole even further. Keep working up to the next size of bits until you run out of larger Dremel bits.
Continue with All Purpose Bits
Then you can switch to all purpose drill bits. Use the next size larger and keep increasing bits until you get to the full size of the anchor whole, which in our case was 5/16".
Now you can continue with the same instructions above for setting the anchor and hanging the mirror.
Method 3: Forget Drilling, Glue it on
The other option our contractor suggested was to use Silicone caulk to adhere the mirrors to the tile. He said our mirrors were pretty light and could be glued right to the wall.
We decided not to use this option, basically because I'm afraid of commitment.
If you glue your mirror onto the tile, you probably will not be able to remove it without breaking the mirror, and leaving a lot of glue residue on your tile. While this is a perfectly fine and normal option, I was afraid I might want different mirrors at some point, so I opted for a less permanent option.
If gluing your mirrors to your tile backsplash sounds easier than drilling, and you're happy to commit till death (or remodeling) do you part, then this is the right method for you.
For the glue method you'll need: a caulk gun, Liquid Nails or Silicone Caulk, and masking tape. (While my contractor recommended silicone, I feel better recommending Liquid Nails, especially if your mirror is on the heavier side.)
Once you've marked where your mirrors go, use the caulk gun to squeeze a large glob of Liquid Nails in 3-4 spots on the tile where the mirror will hang.
Hold your mirror up to the wall and gently press it into the globs of glue, until it sits flush against the wall.
Hold the mirror in place while a helper attaches long strips of tape at several points around the edge of the mirror to keep it in place until the glue dries. You can remove the tape the next day.
Bonus Method 4: Command Strips!
Now here's the crazy part. If what you are hanging on tile is not too heavy, I would say skip all of the above and just hang it with Command Strips!

This method would work great for pictures, small decorations, and even mirrors if they're not too heavy. Just make sure you know how heavy your object is, and how many Command Strips you'll need to hold it securely.
These 16 pound Command Picture Hanging Strips could have totally handled the weight of my 12 pound mirrors and I'm trying not to think about how much easier it would have been to skip the drilling, anchors, and/or glue and just stick them on the wall!
While Command Strips may not be the contractor-approved way of hanging objects on tile, I think they're great for all sorts of applications, especially if you need the items to be removable some day. (Renters, I'm talking to you!)
Yes, you can hang things on tile!
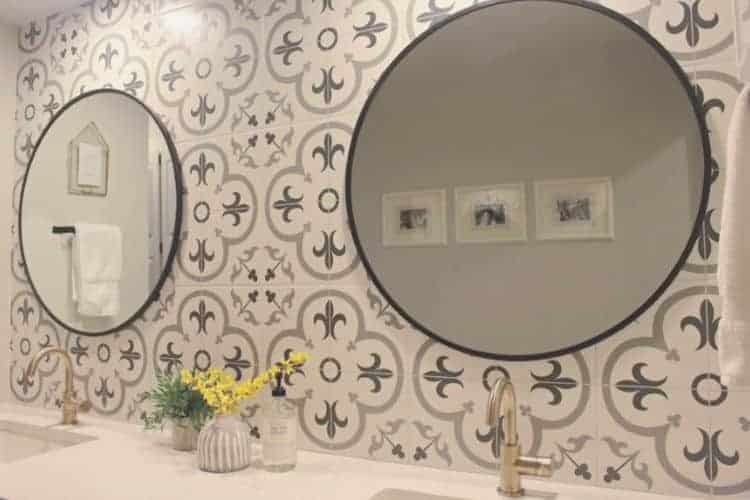
Don't be afraid to hang those mirrors or shelves or art on your tile wall! There are plenty of ways to do it yourself, safely and securely.
Just give a little thought first to how permanent you want the installation to be for your home and your needs. Then pick the right method, and go for it.
And if you're remodeling your bathroom, check out my post on installing cabinet hardware.
As always, drop me a comment below if you have questions along the way.
Happy drilling! Or gluing. Or sticking...

How to Hang Mirrors on Tile: 3 Ways + a Bonus
Let me show you some simple tips on how to hang mirrors on tile without breaking it. I have three different methods to share., plus a bonus method.
Materials
- Wall Anchors
- Masonry Bits
- Masking Tape
- Marker
- Painter's Tape
Tools
- Power Drill
- Laser Level
- Dremel
Instructions
Method 1: Drill through the tile
- Choose the size of wall anchor you need, based on the weight of the object you’re hanging.
- Take two pieces of masking tape, about 2 inches long, and place them in an X.
- Mark a spot in the middle of the X.
- Place the X where you want to hang the mirror. Hold the mirror up to make sure it’s in the right place.
- Adjust the tape as necessary.
- Use a laser level to hang more than one mirror.
- Drill holes with the masonry bit.
- Drill slowly while lightly spraying with water to keep the drill and tile from getting hot.
- Align the tip of your masonry bit to the mark on your tape X and start drilling slowly.
- Spray water every few seconds.
- Apply gentle pressure and light water spray, until your bit clears the tile.
- Use a hammer or rubber mallet, to tap the anchor into the tile.
- Screw in the screw that comes with the anchor.
- Hang your mirror on the screw.
Method 2: Same Anchors, Different Drill Bit
- Attach a pointed Dremel diamond bit to your drill.
- Set the hole with this bit.
- Move to a larger ball bit to help open up the hole even further.
- Continue working up to the next size of bits until you run out of larger Dremel bits.
- Continue with the same instructions above for setting the anchor and hanging the mirror.
Method 3: Forget Drilling, Glue it on
- Mark where your mirrors go.
- Use the caulk gun to squeeze a large amount of Liquid Nails in 3-4 spots on the tile where the mirror will hang.
- Hold your mirror up to the wall and gently press it into the glue, until it sits flush against the wall.
- Hold the mirror in place while a helper attaches long strips of tape at several points around the edge of the mirror.
- Let the glue dry overnight.
- Remove tape the next day.
Bonus Method 4: Command Strips
- If your mirror is not too heavy, skip the drilling, anchors, and/or glue and stick them on the wall with command strips.
- Make sure you know the weight of your object and how many Command Strips you’ll need to hold it securely.
Recommended Products
As an Amazon Associate and member of other affiliate programs, I earn from qualifying purchases.
-
 Scotch Painter's Tape T9372090 ScotchBlue Original Multi-Surface Painter’s Tape, 1.88 inches x 60 Yards, 2090, 1 Roll, 1.88" Width, Blue
 -
 Liquid Nails Heavy Duty Construction Adhesive (LN903), 10 oz
 -
 Dripless 10oz Cradle Hex Rod Caulk Gun
 -
 BLACK+DECKER Line Laser, Auto-Leveling With AnglePro (BDL170)
 -
 3M 17206 Command Large Picture Hanging Strips, 16 lb, 48 Strips


Amanda Fron says
If you have a plain beveled mirror without hardware on back how do you use the first method ? What do I need on the back of my mirror ?
Meredith says
Hi Amanda, plain mirrors are usually hung with brackets (those little clips that go on the sides) or glued onto the wall using construction glue. You can use the first method for brackets. If you want to go bracket-less I'd suggest getting a framed mirror instead so you can use the hanging hardware on the back. Or it might be possible to use heavy duty glue to attach hanging hardware to the back of the mirror, but just test it well first, to make sure the glue will hold the hardware on under the weight of the mirror.
Jason H. says
Thanks for this helpful tutorial. We’re going to take on this little project after having our big round mirror rest on the vanity countertop for three years. In the phots it appears you are drilling in the grout lines, not into the tile. Is this the necessary approach, or can you go through the tile itself?
Meredith says
Ha! I have projects like that all over my house, where I set something pretty much where it goes until I can get around to permanently hanging it. And then I blink and it's three years later. Yes, you can drill directly through the tile, which is actually what we did. I didn't realize the photos make it look like we were going through the grout lines. Just take your time and don't force it, and you can drill through the tile itself.
Rhonda says
What great info on hanging my mirror. I’m putting up glass mosaic tile in my bathroom, can I use those same suggestions. And could you also tell me how to hang the light fixture above the mirror. Or, I haven’t tiled yet so should I install the mirror and light fixture first. Thanks so much.
Meredith says
Hi Rhonda! Yes, I believe you can use these same methods on glass mosaic tile. (Full disclosure though, I haven't tried it myself!) However, if you know exactly where you want your mirror and light fixture to go, you could install the hardware for those first, then tile, then hang the mirror and light on the existing hardware. Hope that helps!
david says
I tried drilling, but when it came time to hammer in the anchor, that's when all hell broke loose. I may try again or just glue. The previous mirror (that I removed) had been glued. I was able to remove it with breaking the mirror.
Meredith says
Hi David, sorry to hear that! Yes, it sounds like glue might be the best option for you. It's more permanent, but so much easier than dealing with broken anchors and tiles.