How to install cabinet hardware the right way so you don't mess up the lovely finish on your new cabinets.
You're standing in front of your brand new or freshly painted cabinets. You know you want gorgeous drawer pulls and cabinet knobs to complete the look, but there's only one thing standing in the way...
Installation.
If you're going to get those fabulous pulls onto your cabinets, you're going to need to drill holes in them.
But they're so pristine, so beautiful, so unblemished.
Just the thought of putting holes in that unmarred surface gives you second thoughts and you start wondering if you really need hardware at all, or if you should hire a pro to save you from yourself.
Can I install my own Cabinet Hardware?
You can totally do this yourself. It can be scary drilling holes in your brand new cabinets, but don't let a little intimidation stand in the way of fulfilling your vision. You can drill those holes, and the cabinets will be even better for it.
You just need a few tips to get you started in the right direction and give you the confidence you need to attack this project. Only a few nerve-wracking minutes separate you from the completion of your whole project!
This post contains affiliate links. If you make a purchase, I may receive a small commission at no additional cost to you.
Installing Cabinet Handles without Wrecking your Cabinets
This was me last week, putting the finishing touches on our master bathroom makeover. Instead of replacing the vanity, I painted it a dark gray (Valspar Crucible) and the finish looked so smooth and pretty.
I had a drill in one hand and a package of the prettiest brass handles in the other, and it took everything I had in me to drill that first hole.
Why Install Cabinet Hardware?
It can be really scary drilling holes in your brand new beautiful cabinets. Whether you painted old cabinets or got brand new ones, you don't want to do anything to disturb the untouched finish.
To add hardware to cabinets, or not to? That is the question.
As you stand there gazing upon your new vanity or kitchen, you're probably asking yourself, "Do I even need hardware?"
The answer is: It depends. On style, preference, and usability. In the end it's totally up to you, but here are a few things to consider when trying to decide.
Function
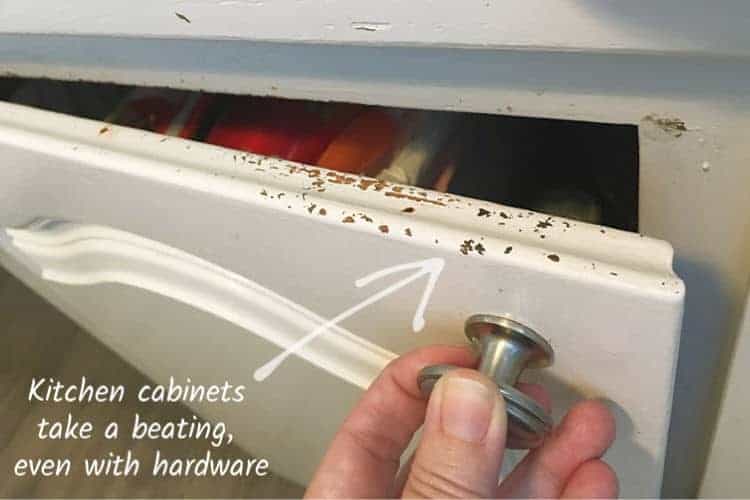
Cabinet handles keep your finish from getting nicks and dings from frequent use. This is especially helpful for painted cabinets.
No matter how good your paint job is, it will probably pick up a few blemishes over time, especially in high traffic areas, where everyone is opening and closing that cabinet a million times a day.
In my experience, not everyone is as careful with my masterpiece, I mean my cabinets, as I am. Here's my kitchen trash cabinet, which is due for a touch-up:
Form
Hardware also calls attention to the design of the cabinets. When you update a kitchen or bathroom, the cabinets make up a big chunk of your design style.
Once they're installed or updated, you want the biggest bang for your design buck, so you pick something pretty to bring out the effect of the lines and curves of the cabinets.
If you are NOT trying to emphasize your cabinets for some reason, or if their style doesn't lend itself to knobs and pulls (like a super-sleek mid-mod design), you might want to skip the hardware.
Fun
Finally, the most fun reason to use hardware is the same reason we decorate birthday cakes - to celebrate. It's like jewelry. You can have a great outfit, but it still needs a little something before you walk out the door to that dinner party.
Like cabinet knobs.
Hmm, maybe that's a new earring trend. No? We'll just stick to putting them on the cabinets then.
But you get my point. Sometimes the smallest details can bring out the look of the whole room and finish it off with the perfect amount of bling.
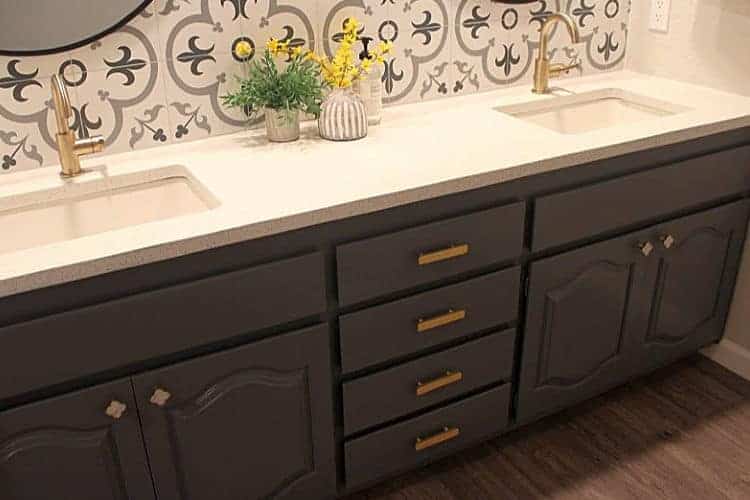
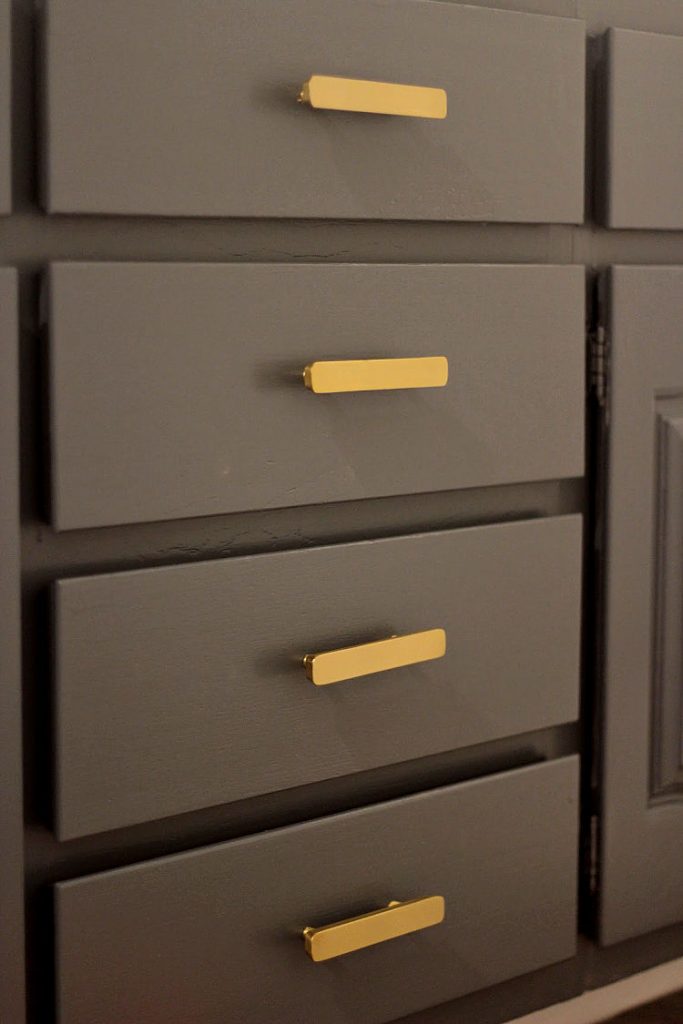
Like my brass pulls that match my new sink faucets. They make the touches of gold make sense and stand out just the right amount against the dark finish of the cabinets.
Personally, I always vote in favor of adding hardware to cabinets. It's the perfect meeting of form and function, providing a service while elevating the style of your space.
By the way, I got these drawer pulls and cabinet knobs on final clearance from Target, but if you're looking for a larger selection or specialty pieces, I always recommend D. Lawless hardware. (That's not an affiliate link, I just think they're great.)
Easiest Way to Install Cabinet Hardware
Use a Template!
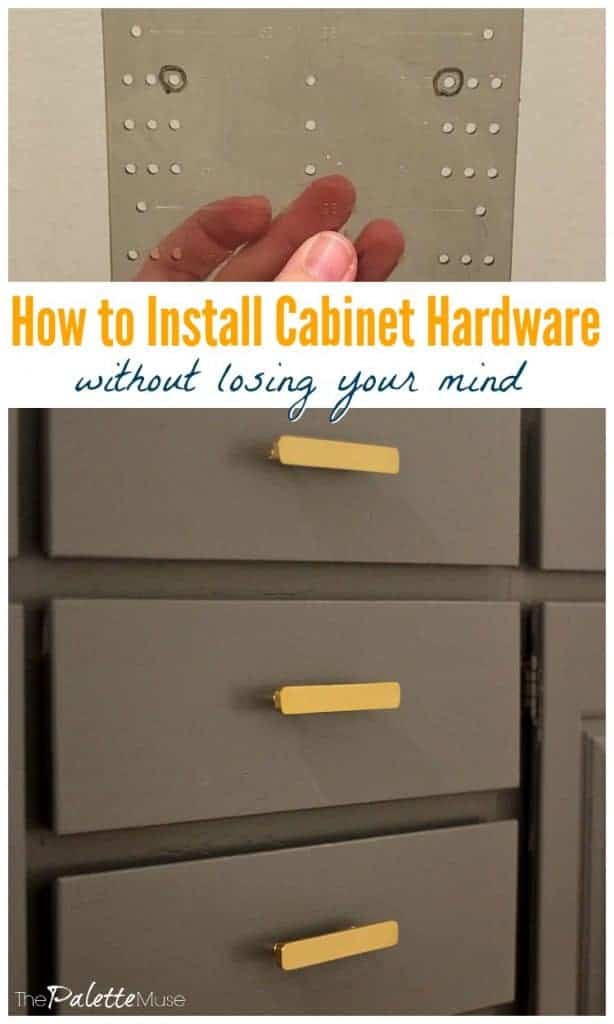
To install your cabinet hardware correctly, you'll first need a template. This can be a plastic template designed exactly for this purpose, or a simple cardboard template that you make yourself.
I do this kind of project often enough that I decided to buy one instead of making one each time. Even if you're only doing one kitchen, the little plastic templates are so handy, and cheap enough that it's probably worth picking one up.
If you decide to make your own cabinet hardware template, simply hold up a piece of cardboard to the location of your first knob, with the edges lined up to the edges of your cabinet and drill a hole through the cardboard. That will be where you mark all your other holes on each cabinet.
You'll need a different template for drawer pulls. You'll make it the same way, but with a hole for each drawer pull screw.
Measure Twice, Drill Once
Measuring for cabinet and drawer pulls can be a little intimidating. This is definitely one time you'll want to measure twice, cut once.
First, decide where you want the hardware to go on each door and drawer. This decision is totally up to you, but I like to center everything, meaning I measure the same distance from the top of the cabinet as from the side.
Design Tip: Make sure that your door pulls look nicely balanced when a pair is lined up together. You don't want them too close to each other, which could look crowded. So if you have larger pulls, you might want to separate them a little.
Once you've figured out the look you want, hold your template up to a cabinet door, and settle it along the edges of the door. Use a Sharpie to mark a circle around the hole you'll be using.
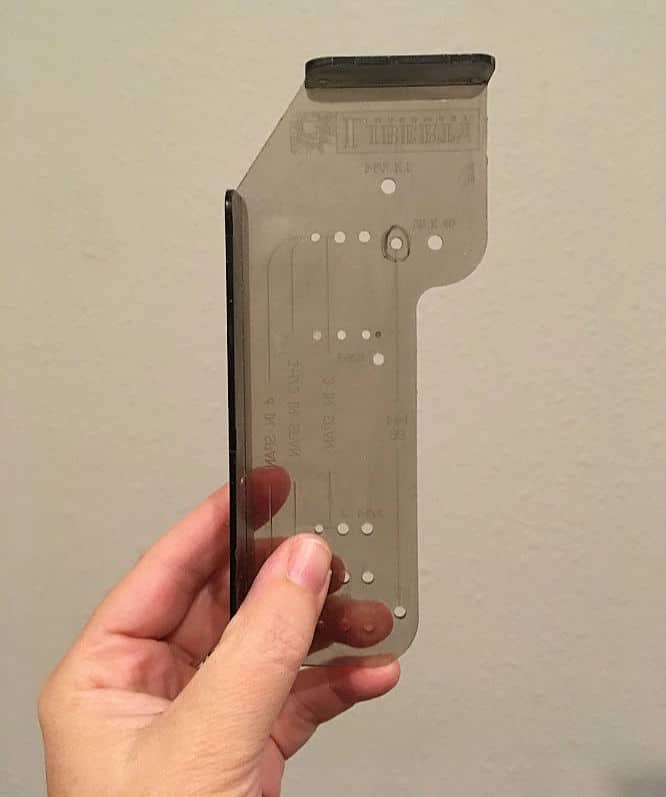
Also use your Sharpie to mark a dot on the door, inside that hole on the template.
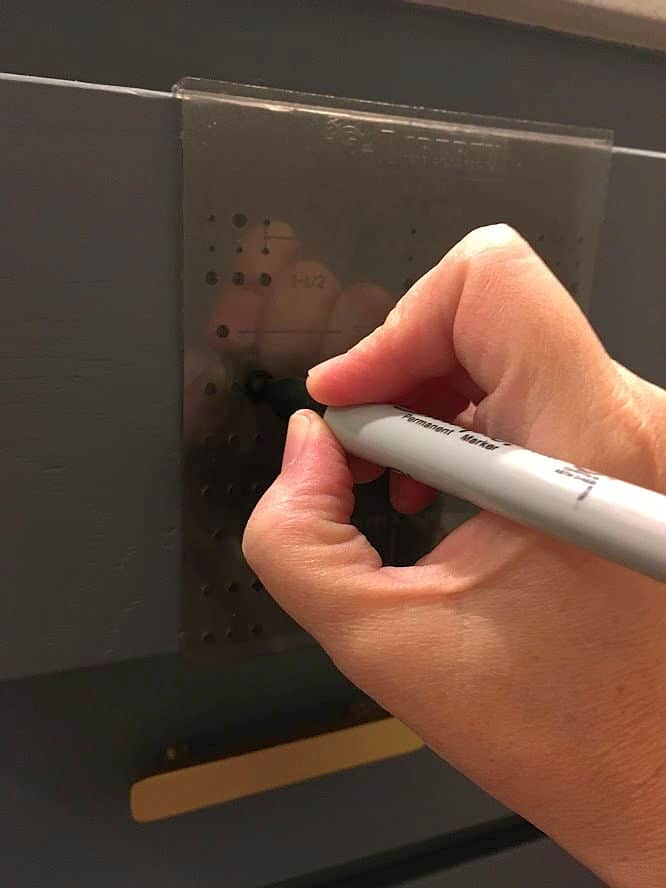
Flip your template over and mark a matching dot on the cabinet door that meets the first one, so you have a matched pair.
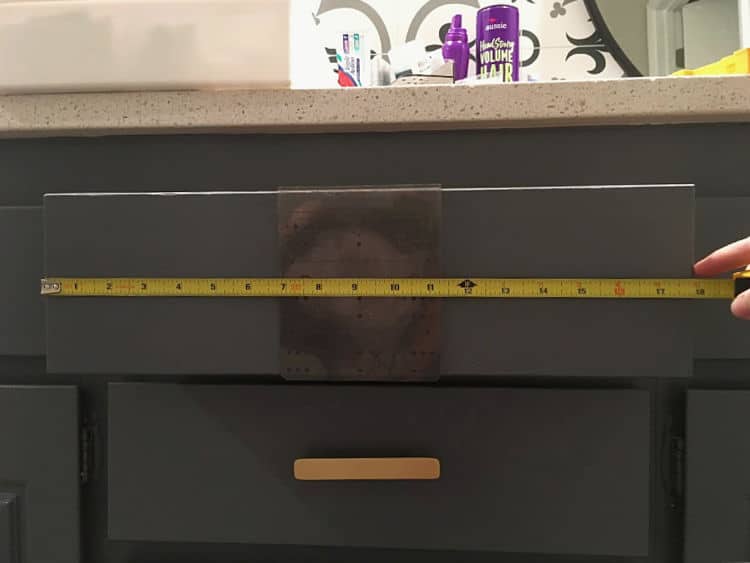
To mark the drawer pulls, line up the template in the middle of the drawer, with the edge of the template overlapping either the top or the bottom of the drawer.
To find the center of the drawer, take the total measurement of the drawer front from left to right, and divide that number in half. (My drawers are 18" wide, so the halfway point is 9".) Line up the center mark of the template on this halfway number.
Now stand back and eyeball the dots. Make sure they line up together and look balanced, centered, and level. If anything seems off, now's the time to fix it!
(You can remove Sharpie marks with alcohol, but always test this first on the inside of a cabinet door, to make sure it doesn't mess up your finish. If your cabinets are white or light colored, you could use a pencil instead of a Sharpie.)
Drill Fearlessly
Once you've marked where you want the hardware to go, it's time to drill that first nerve-wracking hole. Don't worry, you got this!
Fit the correct drill bit into your drill. This is usually a 3/16" for standard cabinet hardware screws, but check yours first to make sure that's the correct size.
Line your drill bit up to the hole you marked on the front of the cabinet door. Holding the drill as level as possible, slowly start drilling a hole. Keep the drill level to help your hardware line up correctly.

Drilling from front to back will keep the wood from splintering on the front of the door. The back may splinter a bit as the drill comes through the back of the door, but this will mostly be covered by the head of the screw, and it won't be visible from the front anyway.
If you want to be extra cautious with the finish on the front of your cabinets, use tape to keep the wood from splintering as you drill. Simply put a small piece of tape on the front of the area you're drilling, and mark your holes on each piece of tape. Once you've drilled the hole, you can remove the tape before applying the hardware.
Add Cabinet Hardware
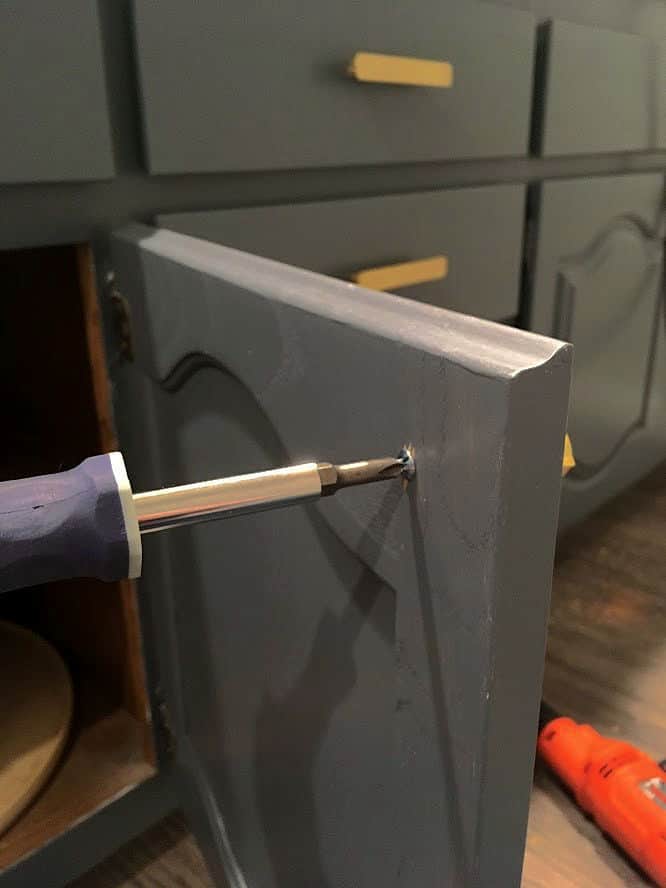
Now for the fun part! Grab your cabinet knob and screw, and put the pretty on.
When you're adding the hardware, it's a good idea to hold the knob to the front of the door, and tighten the screw at the back.
If you're like me, you'll want to hold the back screw and twirl the front piece onto it. But as it twists onto the wood, it could mess up your new paint finish at the very end.
Not fun.
Simply hold the front with your fingers and screw from the back. You may need a screwdriver to tighten the last bit.
Cabinet Hardware Installation Problems Solved
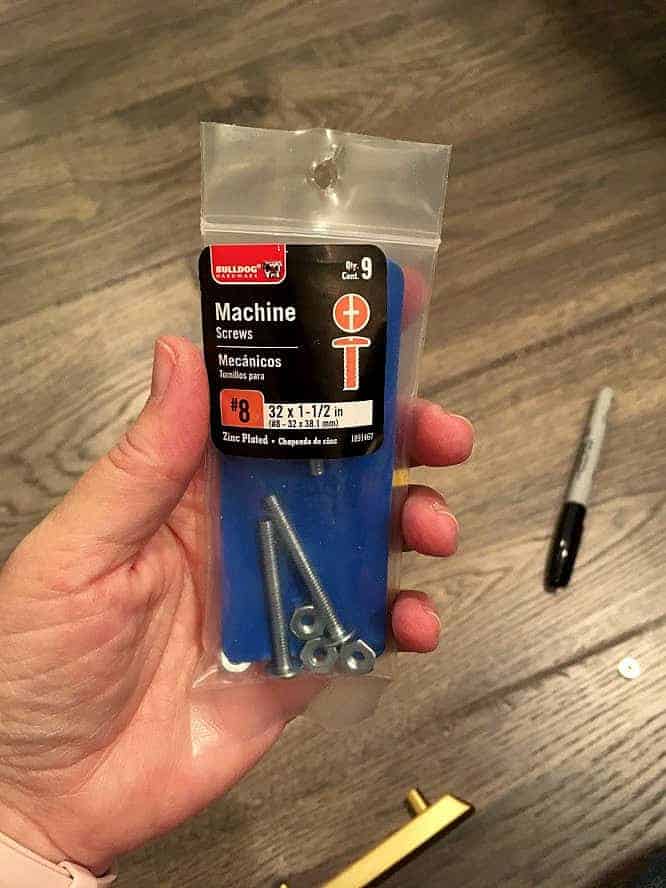
Wrong Screws: On my custom cabinets, I found that the drawer fronts are thicker than standard drawer fronts, so the screws that came with my drawer pulls weren't long enough.
After a moment of panic, I realized I just needed to get longer screws to fit. I found that machine screws #8 were just the right diameter to fit the standard hardware I had, and they come in several lengths. Problem solved.
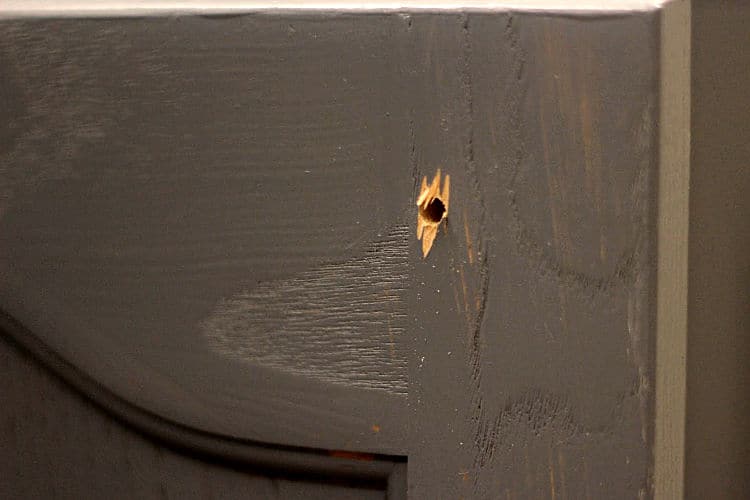
Wrong Holes: If you did happen to put a hole in the wrong place, first of all you'd be in good company. Been there, done that. It's not the end of the world, although it might feel like it for a minute.
Simply fill the hole with wood filler. Once it's dry, sand lightly. Then you can repaint or re-stain the area to match your cabinet finish.
Finished Hardware Makes a Finished Project
Since installing drawer pulls and door knobs is usually the last step in a cabinet installation, you're probably done now! That wasn't so bad, was it?
You triumphed over your fear of drilling that first hole, and now your cabinets are prettier and more functional than ever before.
I love the look of fresh, clean, just-finished cabinets with pretty hardware all lined up in a row down the wall of my bathroom or kitchen. It speaks to the part of me that loves symmetry and order.
Next week I'll share with you the process we used for drilling holes in our tile backsplash wall to hang our mirrors. It was even scarier than drilling holes in our cabinets! Sign up for the newsletter and I'll let you know when that post comes out.
I hope your cabinet hardware brings you as much joy as mine does. Let me know if you have any questions about the process. Also, see my posts on replacing cabinet hinges, and hanging mirrors on tile for more bathroom remodeling tips!

How to Install Cabinet Hardware
Don't be scared to put holes in your brand new or newly painted cabinets for the drawer pulls and cabinet handles! With a little know-how and the right tools, you can easily install your own cabinet hardware.
Tools
Instructions
- Decide where you want to put your drawer pulls and cabinet knobs. I recommend centering them on the drawer fronts, and in the corner of the cabinets, but you could choose alternate placements too.
- Measure where those placements end up on the templates by holding the template up to the door/drawer and circle the corresponding hole on the template with a Sharpie.
- For cabinet doors, line up the template along the edge of the door front and mark through the correct template hole onto the door. Then, if you have two doors that meet in the center of a cabinet, such as a sink base, flip the template over as a mirror image to mark the matching door.
- For drawers, find the center of the drawer by measuring from one edge of the drawer front to the other edge and divide that number in half. Align your template with the center line on that half number measurement, and the edge of the template hanging on the top (or bottom) edge of the drawer. Mark the holes that correspond to the width of your drawer pull.
- Stand back and check that all your dots line up correctly and look balanced. If needed, remove the Sharpie marks with rubbing alcohol and re-mark the corrected spots.
- Attach a drill bit that matches the size of your hardware screws to your drill.
- Drill at the marks from the front of the cabinet to the back. (Keep drill as level as possible.)
- Hold the pulls to the front of the door and screw the bolt in from the back of the cabinet or drawer. Try to avoid spinning the knob against the front of the door, to keep your finish in pristine condition.
Notes
If you're concerned about your drill marking up the finish on the front of your cabinets, you could put a piece of painter's tape at the location you want to drill, then mark on the tape rather than on the door. Drill right through the tape, and remove it before attaching the hardware.
Recommended Products
As an Amazon Associate and member of other affiliate programs, I earn from qualifying purchases.


Emma says
Hi! What would you suggest if someone drilled the holes in the wrong place and was able to use wood filler/sand/repaint but now needs a new hole to actually put the pull in the right place (asking for a friend…). Should I just super glue the pulls to the wood, or is there a way to drill a new hole that overlaps with the old/wrong hole without busting through the wood filler? Thank you!
Meredith says
Hi Emma! Let your friend (wink, wink) know that she's not alone in her experience. If your new holes will overlap with the old ones, you may need to remove the wood filler and fill in the original hole with a small wood dowel and carpenter's glue. (You can find tutorials on this with a quick youtube search.) But first I would try drilling the new hole and just see what happens. Best case scenario, the wood filler holds up and you're good to go. Worst case, you'll be back to the dowel rod solution. I wouldn't think that superglue would hold up well over time, but I guess it's worth a try too! Let us know what you decide...
Ssndra Decarle says
We received our bathroom vanity but the salesman forgot to tell the manufacturer to drill the hardware in. So i am just wondering if we should have the hardware drilled and installed prior to or after the plumber installs the vanity? The showroom is going to try to send someone over to do it. Just wondering about the ideal order of things?
Meredith says
Great question - you can do that in any order. Neither should get in the way of the other, so I would say go with however they can schedule you.