The Palette Muse

menu icon
go to homepage
  • DIY
    • Home Improvement
    • Home Maintenance
    • DIY with Paint
    • DIY Decor
    • Cabinets
    • Furniture
    • Camper
    • Makeovers
    • Tips
    • Tools
    • $100 Room Challenge
  • Crafts
    • Painting Crafts
    • Paper Crafts
    • Fabric and Yarn
    • Wreaths and Banners
    • Handmade Gifts
    • Christmas
    • Art
  • Design
    • Color
    • House Flipping
    • Home Staging
    • Bathroom
    • Bedroom
    • Home Office
    • Kitchen Design
    • Home Decorating
    • Outdoor Decor
  • Organizing
    • Airbnb
    • Cleaning
    • Planners and Worksheets
    • Printables
    • Saving Money
  • Family
    • Recipes
    • Camping
    • Creativity
    • Faith
    • Holidays
    • Musings
  • Printables
    • Get the Newsletter and Free Printables
  • About Me
    • Work With Me
      • Affiliate Disclosure
      • Disclosures & Disclaimers
      • Privacy Policy

subscribe
search icon
Homepage link
  • DIY
    • Home Improvement
    • Home Maintenance
    • DIY with Paint
    • DIY Decor
    • Cabinets
    • Furniture
    • Camper
    • Makeovers
    • Tips
    • Tools
    • $100 Room Challenge
  • Crafts
    • Painting Crafts
    • Paper Crafts
    • Fabric and Yarn
    • Wreaths and Banners
    • Handmade Gifts
    • Christmas
    • Art
  • Design
    • Color
    • House Flipping
    • Home Staging
    • Bathroom
    • Bedroom
    • Home Office
    • Kitchen Design
    • Home Decorating
    • Outdoor Decor
  • Organizing
    • Airbnb
    • Cleaning
    • Planners and Worksheets
    • Printables
    • Saving Money
  • Family
    • Recipes
    • Camping
    • Creativity
    • Faith
    • Holidays
    • Musings
  • Printables
    • Get the Newsletter and Free Printables
  • About Me
    • Work With Me
      • Affiliate Disclosure
      • Disclosures & Disclaimers
      • Privacy Policy

×

Chair Rescue with a Little Paint and Upholstery

Modified: Nov 15, 2024 · This post may contain affiliate links · 10 Comments

  • Share
  • Email
  • Print

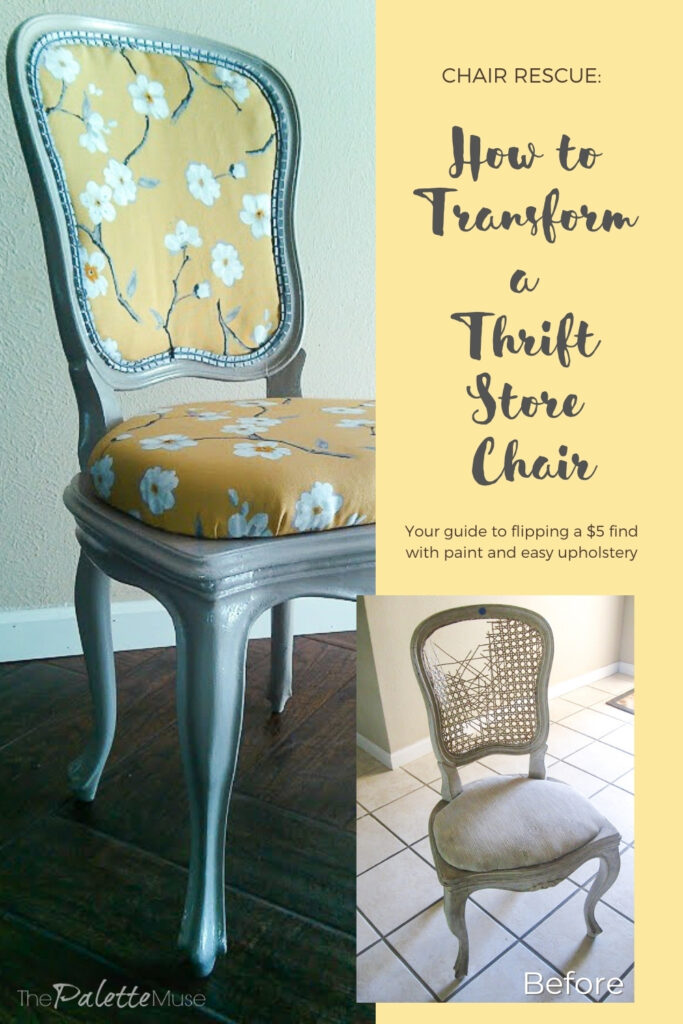
With a few basic paint and upholstery tricks, you can turn a $5 thrift store find into a gorgeous new design piece for your home.

I know chairs don't have feelings, but when I see one fallen from its former glory, sitting forlornly in the back room of a thrift store with a $5 tag on it, I just can't help but feel sorry for it.  Some people bring home stray pets.  I bring home stray furniture.  This one just needed a good home and a bit of grooming.

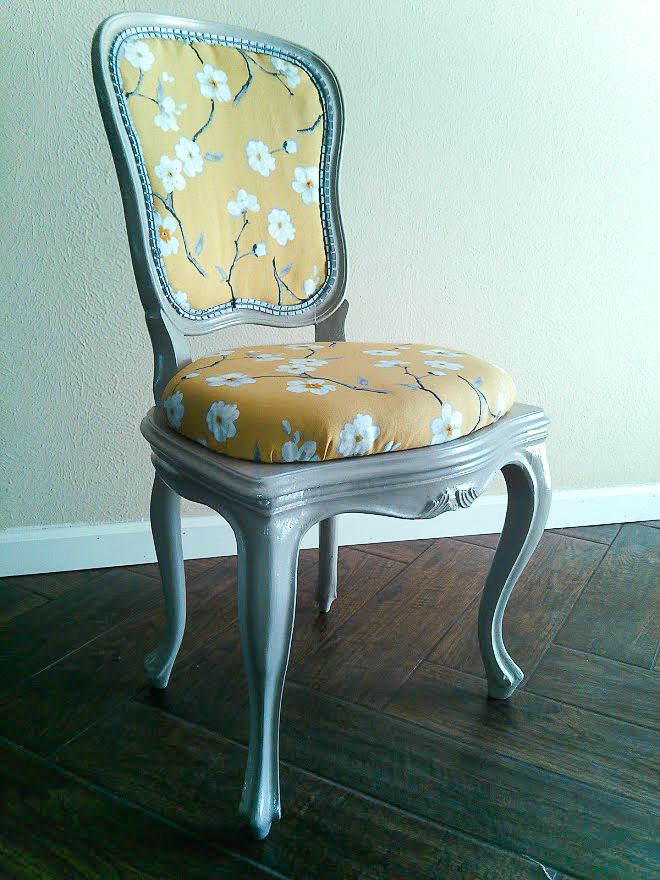
I knew this chair could be beautiful, and at $5 there was no reason not to bring it home for a little (or big) makeover. After a good cleaning, a fresh coat of paint, and some fun fabric, it's as good as new!

Gray paint and yellow upholstery fabric gave this chair new life

This post contains affiliate links. If you make a purchase, I may receive a small commission at no additional cost to you.

How to Makeover a Thrift Store Chair with Paint and Upholstery

If you want to rescue your own chair, here are my step by step instructions.

1. Take "before" pictures.  Believe me, when you're done you'll wish you had documentation of where you started.

A broken, dingy and dirty thrift store chair in need of a makeover

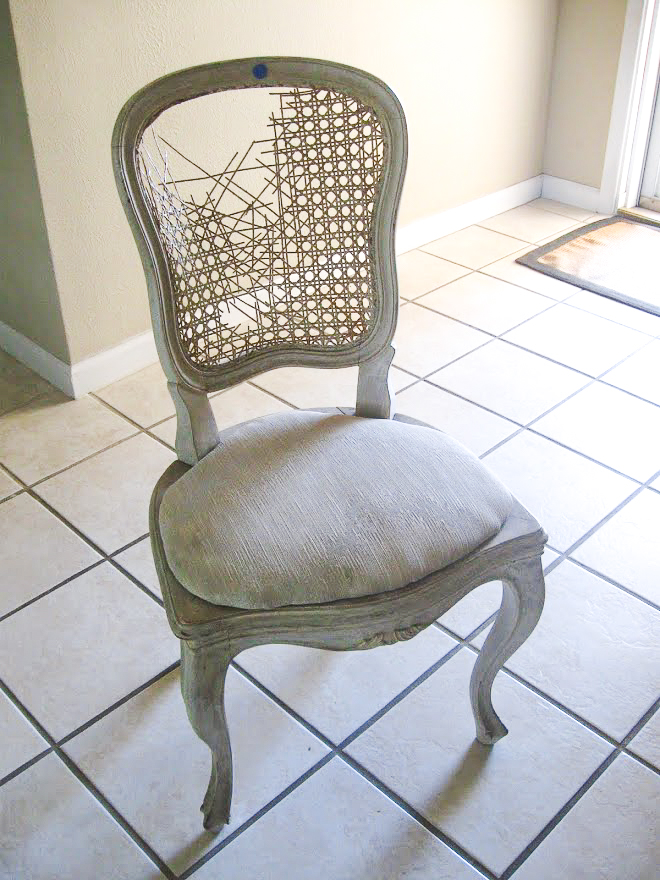
This poor chair had definitely seen better days. The caning was falling apart, and the seat was dirty and dingy. Other than that I liked its lines and knew it would be perfect for my office.

(Speaking of "before" pictures, this one was taken before we finished our herringbone wood tile floor makeover.)

2. Take it apart, gently.  In this case, I separated what was left of the caning from the back and pulled up the seat. 

Removing the caning from the chair back by cutting it off with a knife

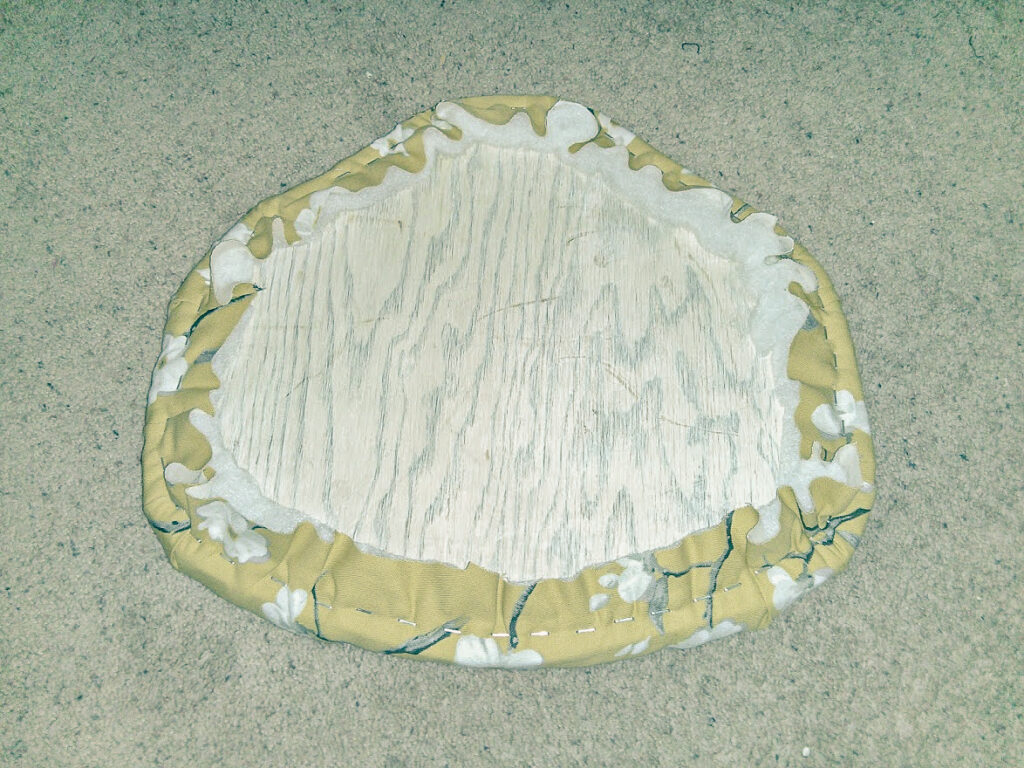
I wanted to reuse the seat board, instead of sourcing and cutting a new board, so I carefully removed the staples and upholstery.

Removing the old upholstery from the chair seat

3.  Sand, prep, and paint the frame.  Be sure to completely sand first, or use a good primer.  Otherwise you'll get bubbles in your new paint and it will be hard to get a good finish.  Especially with glossy paint, you need a good clean surface.

Empty wood frame of the chair with no seat or back

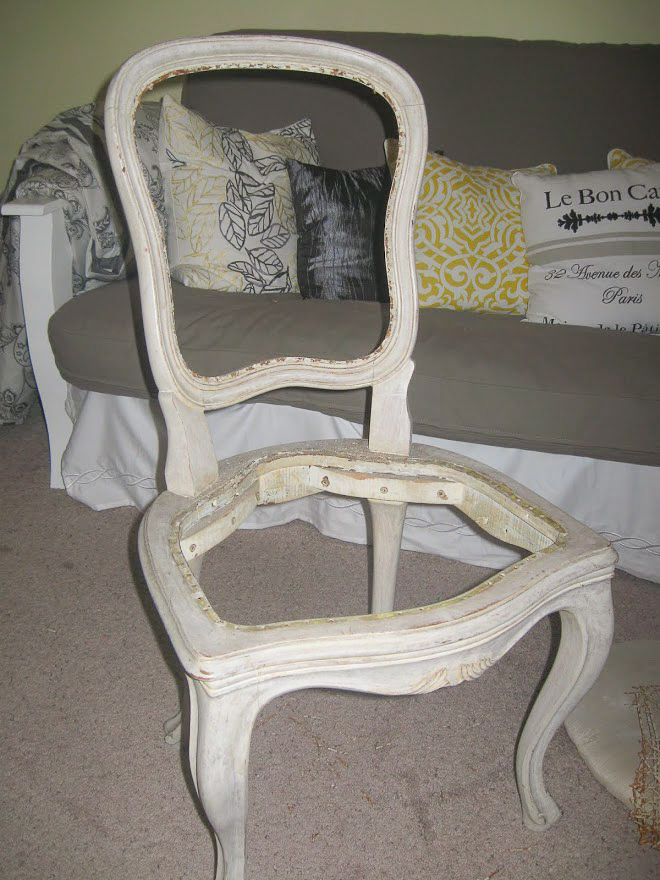
Somehow I forgot to take a picture of the painted frame, but here's what it looked like after prep, before paint.

If you need a little more detail about this step, check out my post on everything you need to know about painting cabinets and furniture.

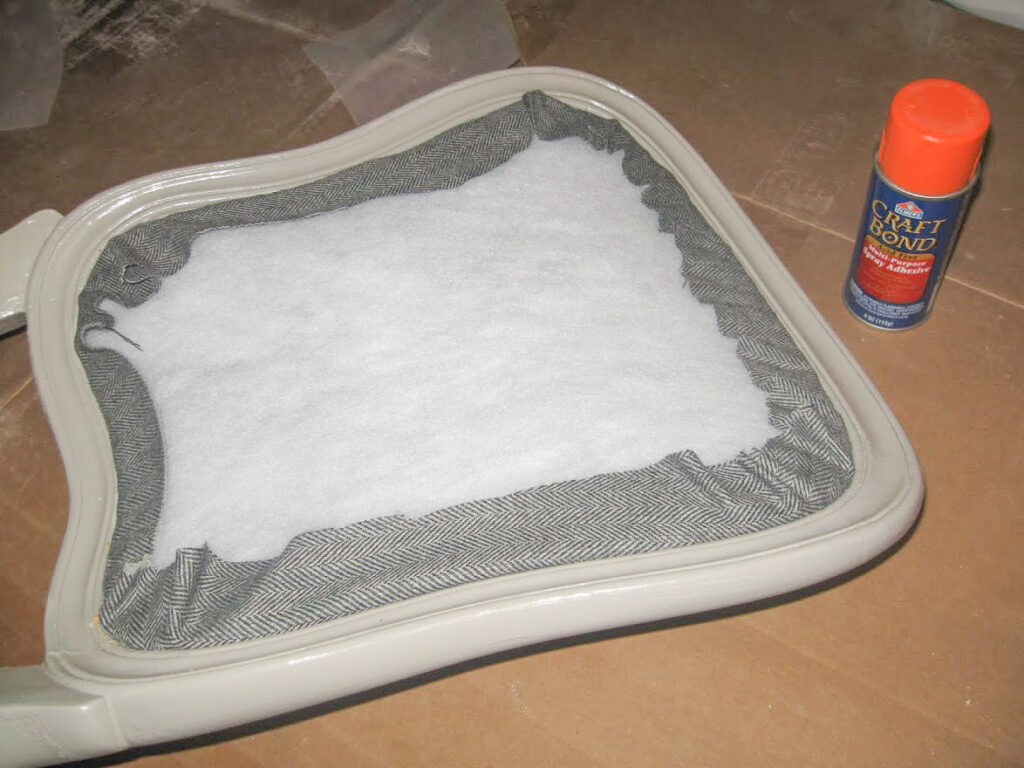
4.  Allow paint to dry thoroughly.  This should take at least a day or so.  In the meantime, you can re-cover the seat cushion.  I used 2" craft foam to make it nice and comfy.  Then I wrapped that in quilt batting and stapled on the new fabric.

A view of the bottom of the reupholstered seat cushion

Check back to my Intro to Upholstery post for more details on using a staple gun and basic upholstery methods.

5.  Now add the main upholstery.  Carefully stretch and staple the first (back) layer of fabric to the back frame, using a staple gun and ¼in. T50 staples.  Here I chose a contrasting fabric to add interest.

New gray paint and upholstery on the chair back

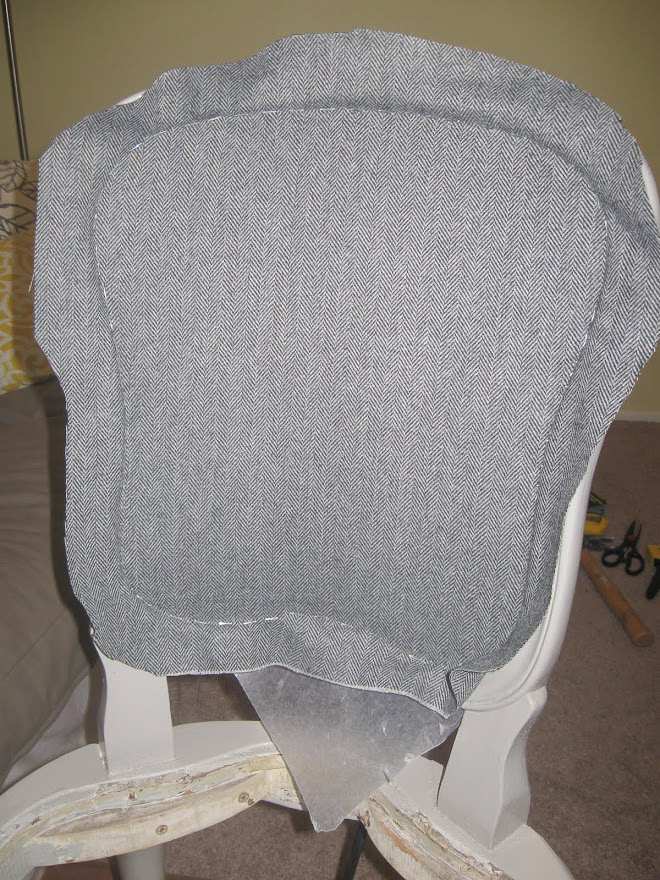
To do this, you'll need to lay the chair down on its back, and staple the fabric from front to back, along the inside of the frame that used to hold the caning.

Then fix the frame where you (oh wait, that was me!) stapled through it with a wayward staple gun.

A view from behind the chair while it's being repaired and reupholstered

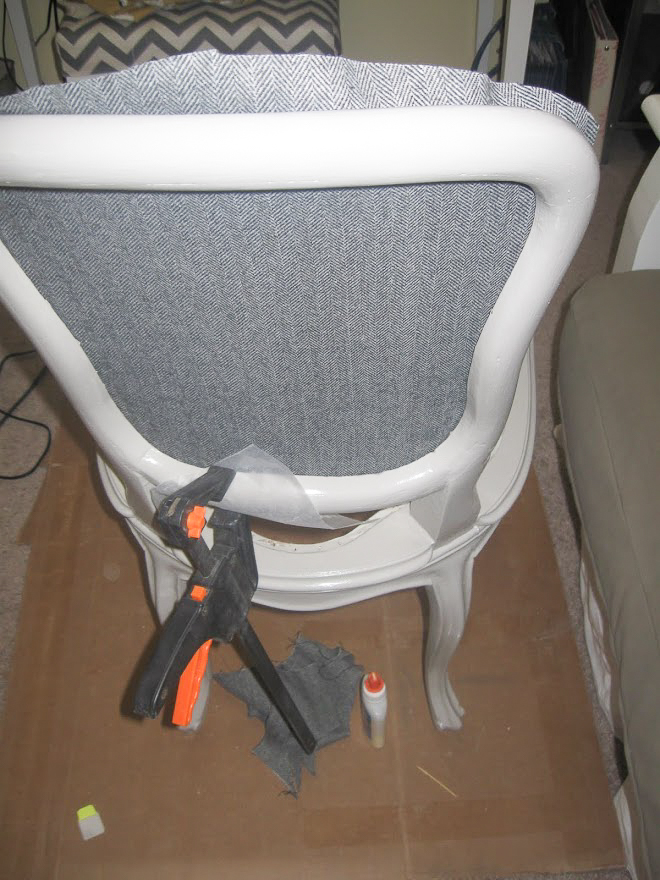
Now add a layer of thin batting, and use spray adhesive to hold the batting in place while you're getting ready attach the front fabric piece.

Adding batting inside the upholstery of the chair

Then staple (even more carefully) the front fabric to the frame. 

Once the layers of fabric are stapled in place, you'll need to clip the edges as closely as possible, but not so close that they'll pull free from the staples.

6.  Cover the staples and edges by gluing on decorative trim.  This looks like a small detail on the finished product, but is actually a critical part of the project. 

Detail view of the gray ribbon trim on the new chair upholstery

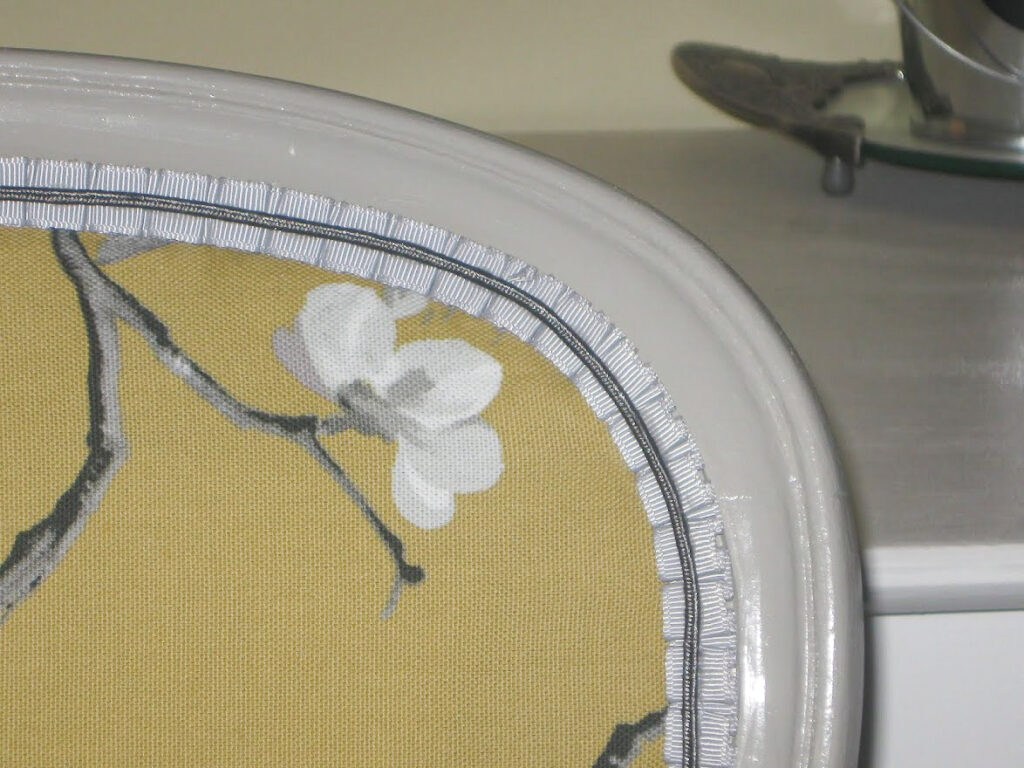
I used Elmer's Craftbond Tacky Glue for the trim rather than a hot glue gun.  I find it easier to control, without any sticky globs or strings.

7.  Give your rescued chair an honored place in the family.  I'm using mine as I write this post!

Reupholstered and repainted chair at the desk in an office decorated in yellow and gray.

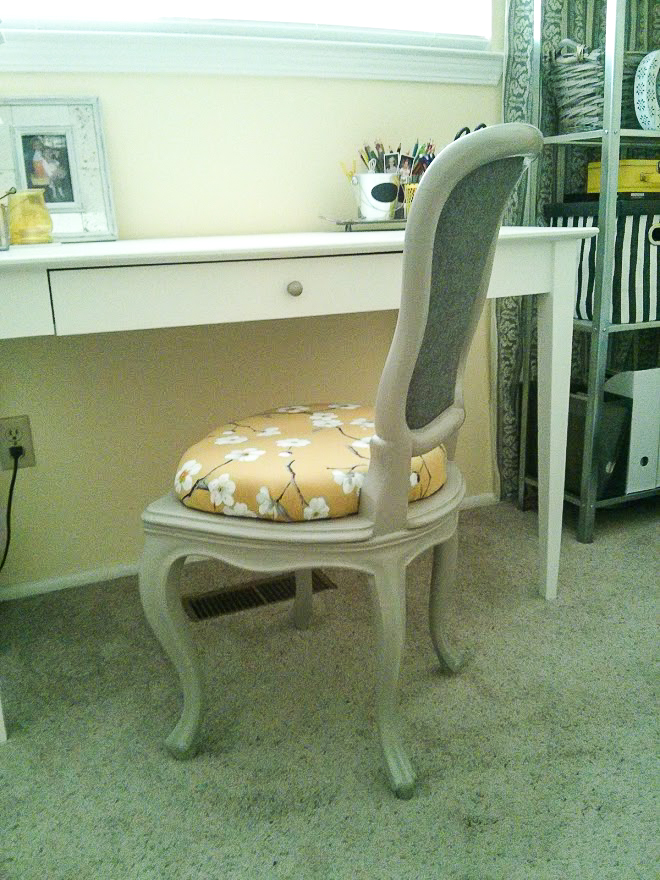
Here's a quick pic of my office/guest room. Stop by and visit me sometime!

Sunny home office and guest room with yellow and gray decor.

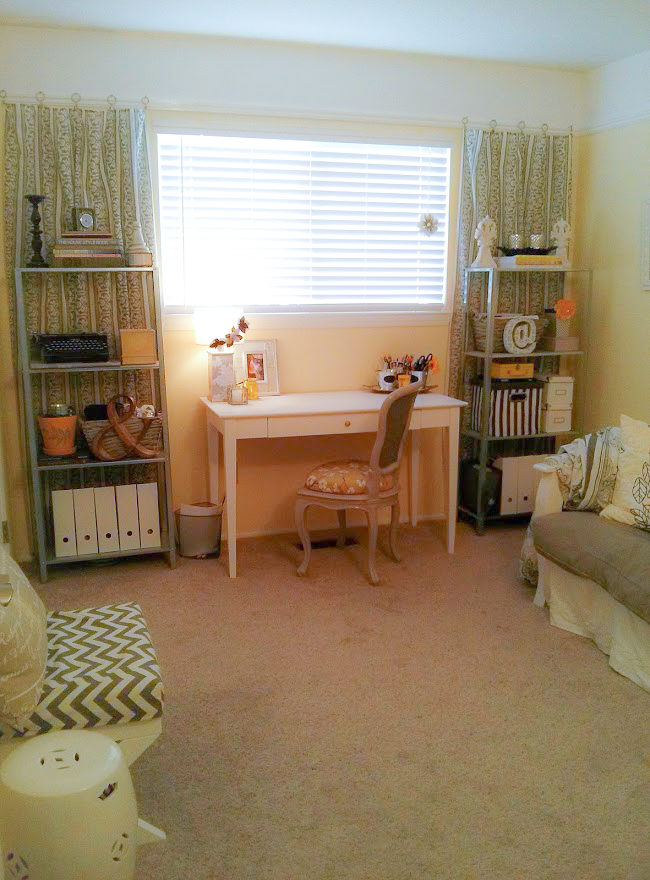
I'm so happy with how this chair turned out, after a little sprucing up! It adds the perfect touch of whimsy to my desk, while still being functional enough to use every day.

How to Transform a Thrift Store Chair with Paint and Upholstery

P.S. If you have a different type of chair that needs a slipcover, learn how to make your own simple chair cover here!

More DIY

  • Under Cabinet Lighting You Can do Yourself
    How to Choose and Install the Best Under Cabinet Lighting for your Kitchen
  • Time saving trick to painting window frames and mirrors
    My Time Saving Trick for Painting Window Frames and Mirrors
  • Install long drawer pulls
    How to Install Long Drawer Pulls without a Template
  • Removable Window Film
    How to Install Window Film to Upgrade Your View

Comments

  1. Heidi says

    March 24, 2015 at 10:36 pm

    Meredith, you left a comment on my website about your office colors and office chair, so I got curious and had to jump over here and have a look. What a beautiful chair, love what you did with it! Great colors in your office too.

    Reply
    • Meredith says

      March 25, 2015 at 11:46 am

      Thanks for visiting Heidi! I appreciate you stopping by to take a look! 🙂

      Reply
  2. Terry says

    October 08, 2015 at 5:02 pm

    Your chair turned out so pretty! I love the color choices and the fabric! The trim for the chair really caught my eye ... it's all in the details and you really nailed it! You did a lovely job! I would be so happy if you would share this at Making Broken Beautiful. It goes every week from Thursday to sunday. Love your work and I hope you will join in inspiring us all!
    Smiles!

    Terry
    http://thecuratorscollection.wordpress.com

    Reply
    • Meredith says

      October 13, 2015 at 8:20 pm

      Thank you Terry! I was out of town this weekend, but I will definitely stop by this week and link up to the party. Thanks for the invite!

      Reply
  3. slipcoverstudio says

    October 18, 2015 at 2:18 pm

    Much prettier chair now, and great tutorial! One of these days, I'll have to tackle something like that 🙂

    Reply
    • Meredith says

      October 22, 2015 at 8:06 pm

      Thanks! It was a lot of fun, and so worth the effort!

      Reply
  4. aschulth says

    October 30, 2015 at 7:21 am

    Beautiful job on this chair! Love your choice of fabric...it is so pretty!

    Reply
    • Meredith says

      November 04, 2015 at 8:04 pm

      Thank you so much! The fabric was my inspiration!

      Reply

Trackbacks

  1. Making Broken Beautiful Furniture Party |No. 10 | The Curator's Collection says:
    October 22, 2015 at 6:03 am

    […] Meredith from The Palette Muse Shared this awesome chair rescue tutorial.  You should really check out the before.  I love the color choices and her attention to detail with the unique trim.  Love, love, love it! […]

    Reply
  2. 39 Gorgeous Gray Furniture Makeovers - or is it Grey - 2 Bees in a Pod says:
    March 17, 2017 at 3:02 am

    […] Chair Rescue […]

    Reply

Leave a Reply Cancel reply

Your email address will not be published. Required fields are marked *

Welcome!

I'm Meredith, the designer, crafter, and DIY-er behind The Palette Muse. I love all things colorful and creative, and I love sharing them with you. Thanks for visiting today!

More about me

Popular

  • The Best Way to Paint Kitchen Cabinets (No Sanding!)
  • What I Wish I'd Known about Double Barn Doors
  • How to Paint Laminate Cabinets
    How to Paint Laminate Cabinets without Sanding
  • How to Make Your Own Simple Chair Covers

Seasonal

  • Turquoise and terracotta complement each other in this Southwestern inspired turquoise color palette.
    Turquoise Color Palette
  • New Mexican Hot Chocolate Recipe
    New Mexican Hot Chocolate Recipe
  • Our Latest Flip House Before and After
    Our Latest Flip House Project - Before and After
  • warm amethyst color palette with shades of purple and very faint orange.
    Warm Amethyst Color Palette

Footer

↑ back to top

About

  • Privacy Policy

Newsletter

  • Sign Up! for emails and updates

Contact

  • Work With Me

As an Amazon Associate I earn from qualifying purchases.

Copyright © 2025 The Palette Muse

  • Pinterest
  • Facebook
  • Email