Today I'm taking a break from my Flip House posts, because I'm just so excited to share this with you that I couldn't wait. We got barn doors!
Now, I know I'm not the first girl ever to put barn doors in her house, but this is something I've been wanting to do for years, and when we moved into this house, I knew just where I'd put them.
Then it was just a matter of getting a few other priorities taken care of before we could get to this project. But it's finally done, and they turned out even better than I imagined!
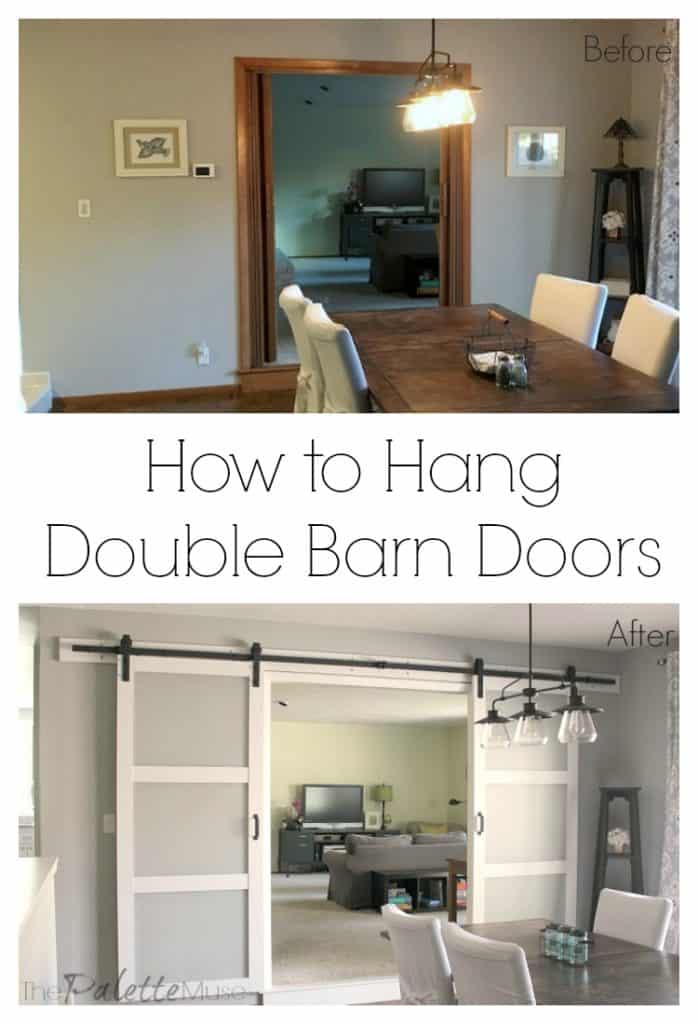
Before Barn Doors
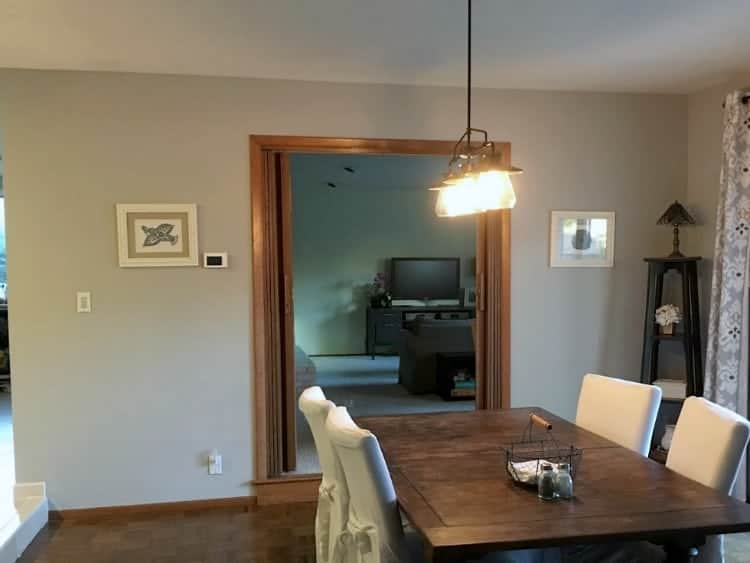
These accordion doors came straight out of the late seventies or early eighties. They served a good function of closing off the TV room, but they also felt a little(!) dated and made a horrible clacking sound whenever they opened or closed.
I have soon-to-be fond memories of my kids waking up early on Saturdays and sneaking into the TV room to watch cartoons. They thought they would close the doors to keep the sound of the TV from waking us, but inevitably we'd be startled awake by the sound of the doors clattering closed.
I could even tell which kid was up by how they closed the doors. My youngest would just throw them closed, like ripping off a bandaid. The oldest tried to be soft and quiet about it, but then instead of a big racket I'd hear clack... clack... clack... clack... CLACK. Not sure which was worse.
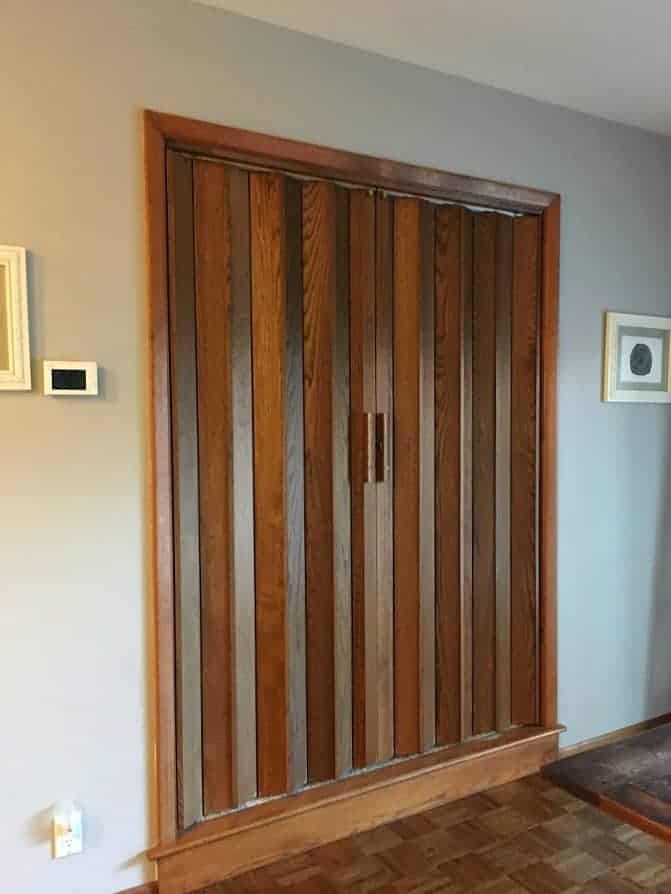
So the accordion doors had to go. It was surprisingly easy to get rid of them, just a few screws and they were lying in a heap on my floor. Now to figure out what to do with them...
Hanging the new doors was a little tougher, but definitely doable. I've got a few suggestions for you, if you're thinking of taking on such a project. But first, let's admire the doors, shall we?
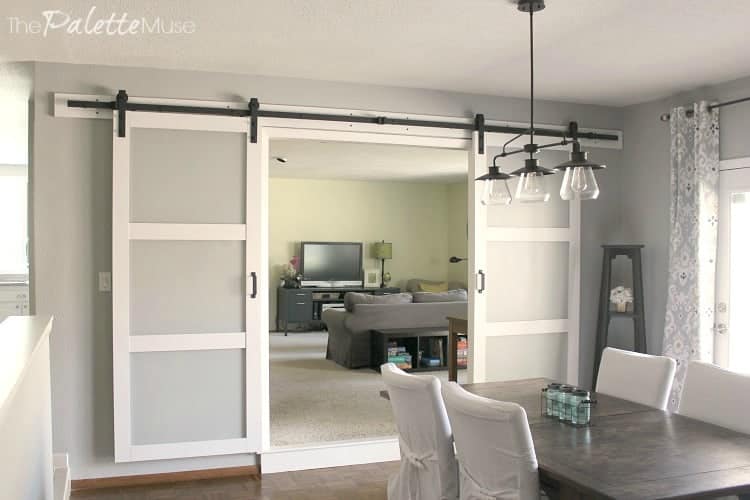
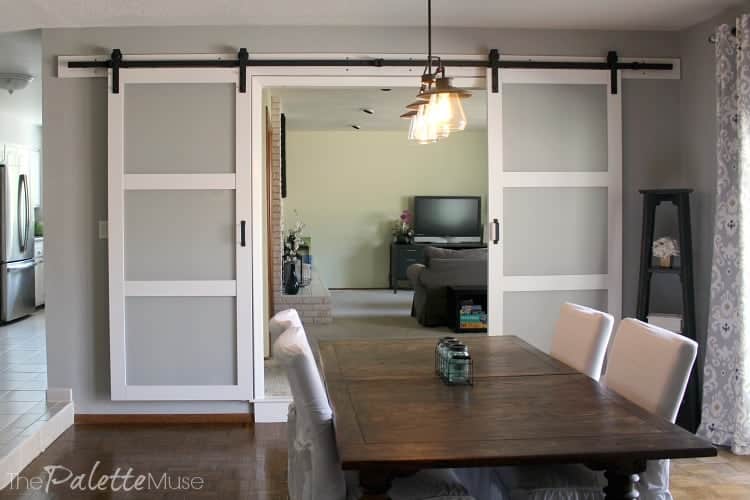
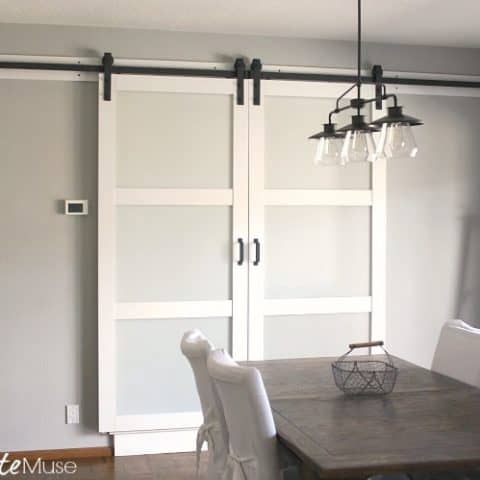
After Barn Doors
Ooooh.
Aaaah.
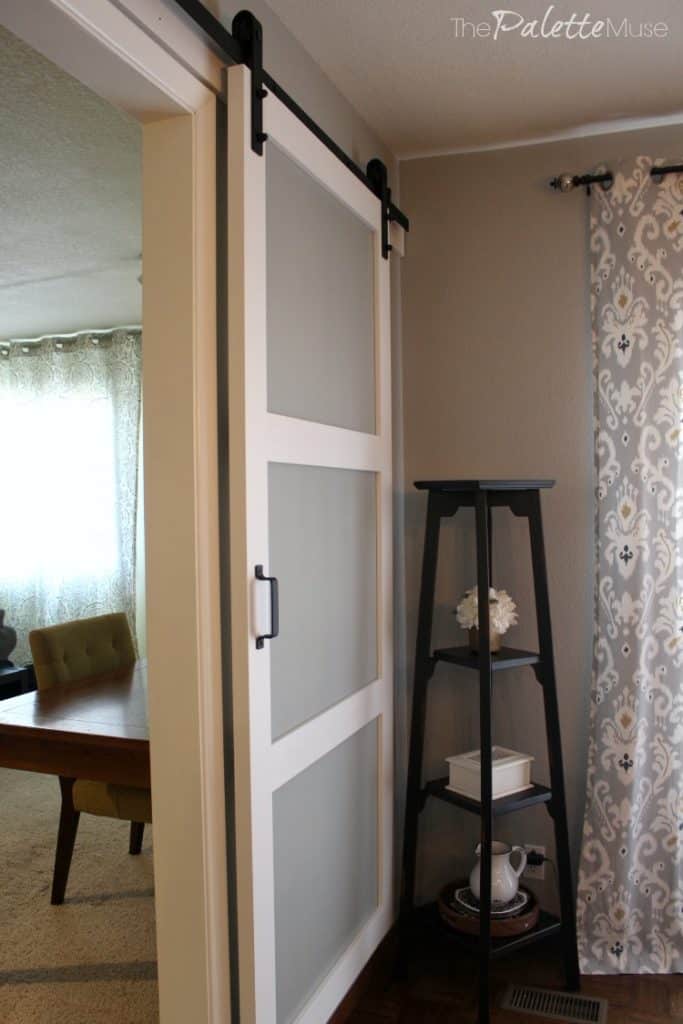
We chose a modern style door with frosted glass and traditional hardware. I wanted to be able to let light flow through both rooms, but still allow for some separation of the TV room, especially as the kids get older and will be having more movies nights and sleepovers. (I've got big plans for that room, but that's for a later blog post.)
Also, the designer in me feels compelled to add this side note. We plan on adding 6" white baseboards in this sunken dining/living area, which will help the doors feel like they're not floating in space on the wall. Design challenge solved, someday.
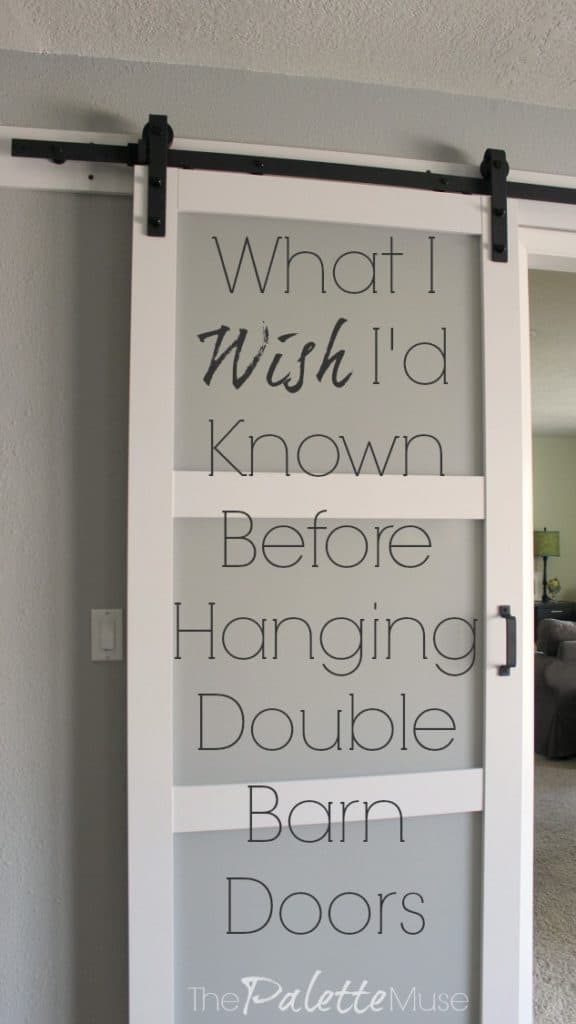
How to Hang Double Barn Doors
This post contains affiliate links. If you make a purchase, I may receive a small commission at no additional cost to you.
Finding the Right Fit
While we were looking for the perfect doors, we found plenty of double barn door sets, but they were out of our price range. Then we realized we could just buy two separate door kits and hang them together. It took one extra step, but wasn't difficult at all, and didn't require any additional hardware.
By expanding our search to single door sets, we were able to find the style we wanted at a price we could afford.
We got these doors from Home Depot, which included the doors and the track and hardware. If you like the idea but want different doors, try this hardware kit with a door slab of your choosing.
Keep in mind when you're picking a barn door to cover an existing door frame, the door slab will probably need to be 84" tall to cover the door and trim. Your door slab should also be at least an inch wider than the opening.
You can't take an off-the-shelf 80" door slab and convert it to a barn door unless you reduce your opening from its standard size or create a new opening from scratch.
Before Installing your Barn Doors
I recommend doing this installation in two separate parts, first to allow the door slabs to acclimate to their new surroundings before attaching them, and secondly to give yourself a little breathing room as you go through the project.
When we started this project, I thought, "How hard can it be? It's just like hanging really heavy curtains!" Well, yes and no. The idea is the same, but it turns out to be a lot harder hanging really heavy objects! Thankfully my husband was the voice of reason (as usual) and made me take it slow.
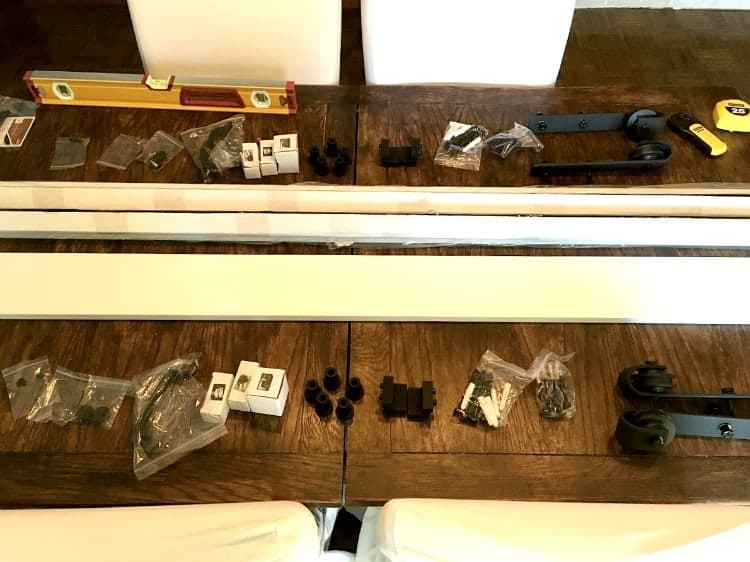
So give yourself an evening to open your hardware package, make sure you have all the pieces, set the doors in the space to acclimate, and make the initial measurements and markings. This will make it a lot easier to hang the doors on the second day.
I'm not going to take you step-by-step through the instructions, as yours may vary depending on the hardware and doors you buy. Instead I'll give you the tips that we found helpful along the way, and everything I wished we knew before we started.
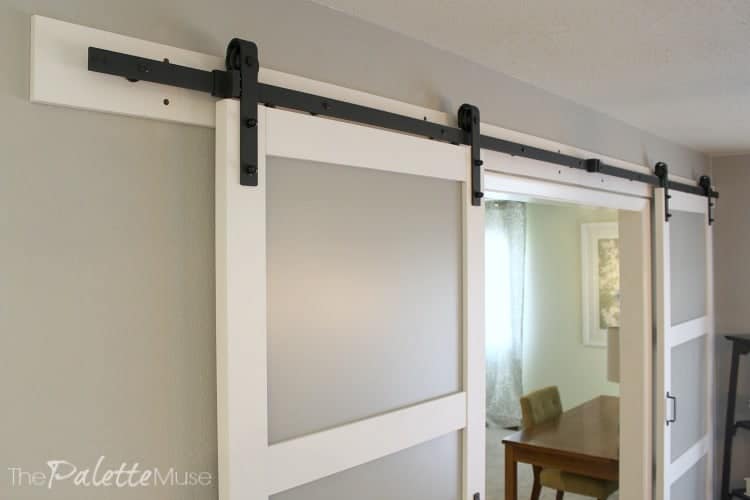
Barn Door Leveling Tips
Get a good laser level that can be hung on the wall while you're working. It's so important to get everything level in this project, that you don't want to rely on a small level if you can avoid it, and you don't want to move your level around while making measurements.
After measuring, according to your instructions, for the center height of header board (if you're installing on drywall) or rail, mark that spot on the wall and attach your laser level there. Leave it in this spot for the duration of the header and rail installation.
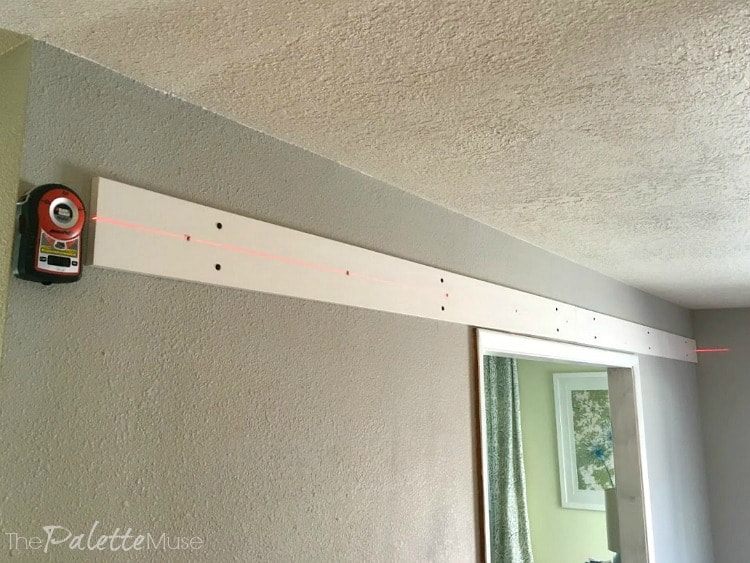
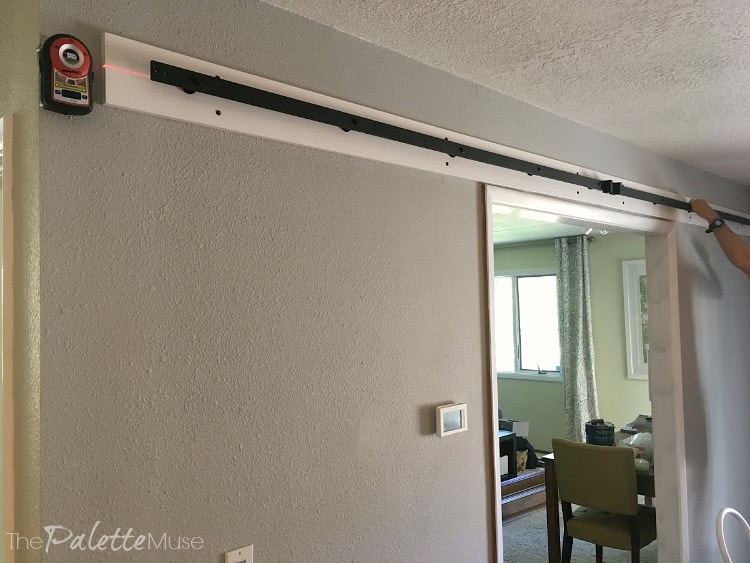
Work from the far side of the wall towards your laser level. If your level is attached at the left end of the wall, like mine, you'll want to start by hanging the right side of the header and track. This just keeps your work from getting in the way of your level's beam.
Barn Door Centering Tips
Center your barn door installation on the middle of your door opening, which will not necessarily be the middle of your wall. Measure and clearly mark the middle of your door opening so you can keep track of this as you install both headers and rails.
You do not need any additional hardware if your doors will meet in the middle of the opening. You can get a track joiner if you want your doors to slide from side to side, but this isn't necessary for a centered installation like mine. The track joiner just allows the wheels to make it over the junction between rails smoothly.
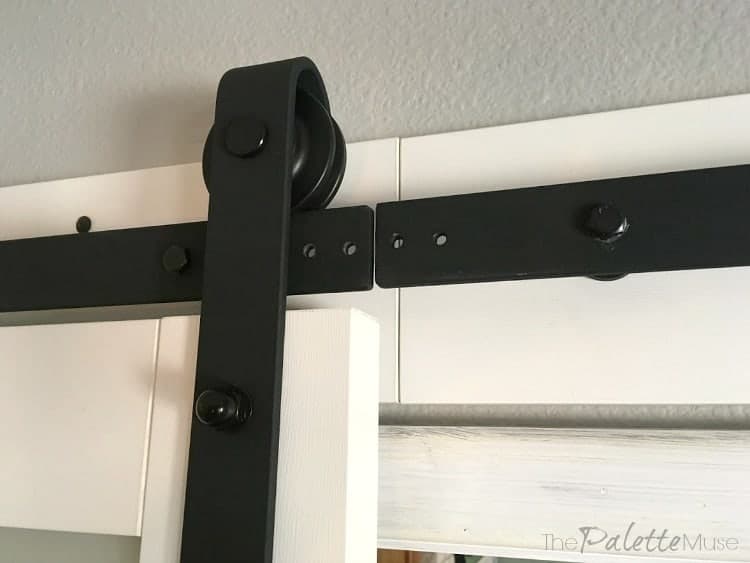
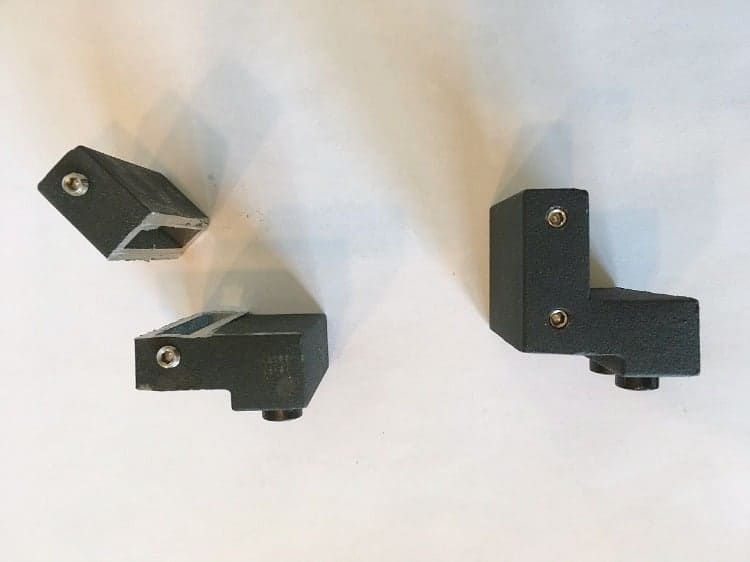
If you want the doors to stop in the middle, like mine, you'll need to apply the door stops that should be included in your hardware kit. However, these door stops are meant to keep the doors from rolling off the ends of the rail, and we found that they're not sized correctly to allow the doors to meet in the middle.
When we set both stops in place, there was a big gap between the doors, but we couldn't use just one because the back end of it ran into the wheels on the other door. So my handy hubby simply used his Saws-All (reciprocating saw) to cut off the extra metal on the flat end of one of the stops.
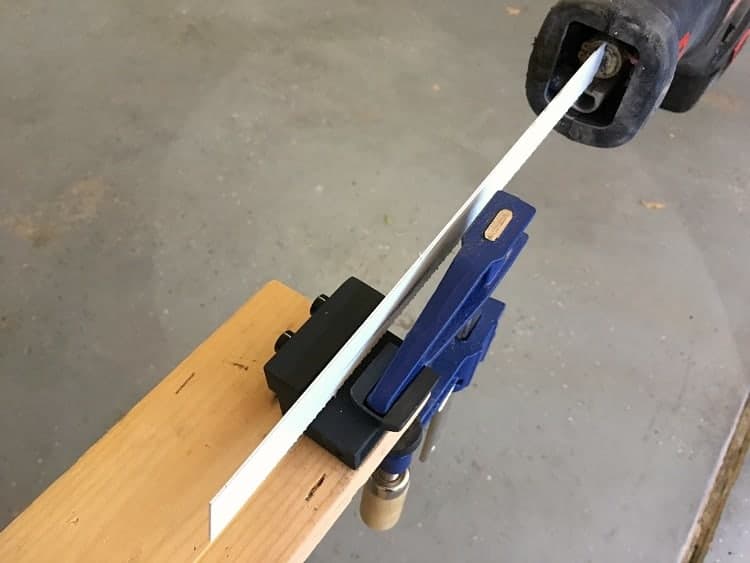
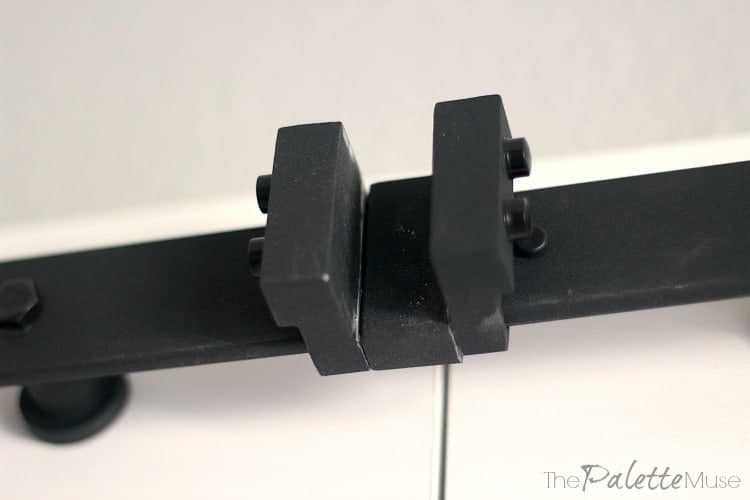
This allowed them to butt up together, for just the right amount of space between the hanging straps.
Now the doors close smoothly and stop with the tiniest gap between them, which is perfect to prevent slamming and pinched fingers.
General Barn Door Installation Tips
Know your Space
Be sure you have room for barn doors. That sounds kind of obvious, but it bears mentioning. You'll need at least 6" above the door frame to hang the header and rail. And you'll need at least twice the width of the door opening on each side of the door.
My door opening was a total of 65", so I needed two sets of 80" wide headers, which meant my track turned out to be almost 14 feet long!
Call in Reinforcements
This is a DIY project, but not for the faint of heart or limb. These doors are heavy, and the hardware can be a little tricky to maneuver around, especially if you have tight spaces in your house.
Get a buddy, sweet-talk your husband, or hire a handyman, but don't attempt to install these bad boys by yourself. Even reading the instructions will go better if you put two brains together!
Get Organized
Gather your supplies first. You don't want to be hanging out on top of a ladder with an iron rail half-attached to the wall and realize you need the ⅜" drill bit from your workbench in the garage.
Mirror Image
Keep in mind that when you're installing double barn doors, one set of hardware will be the mirror image of the other. This can get a little confusing when reading the installation instructions, so consider starting with the door on the same side as the one in your instruction diagrams first.
Then once you get the hang of it, it'll be easier to do the necessary conversion in your head for the opposite side.
Header or No Header?
Do you need a header? That depends on your walls. If you're attaching to drywall, you need a header board. This allows you to anchor into the studs first and then the rail attaches to the board.
If you're installing on concrete block, your kit should come with concrete anchors and you can just attach the rail directly to the wall.
Personally, I like the look of the header board, which ties in to all my white trim. Also, if your door opening already has trim around it, using the header board will ensure that the door clears the trim when it's sliding.
Resources for Double Barn Door Installation
- 2 sets of barn door hardware plus doors - measure the width of your door opening to be sure you order the correct size rail. Each rail needs to be at least twice the width of your door opening. You can get my exact doors and hardware here!
- Laser level
- Saws-All - this isn't listed in the instructions, but we needed it for modifying the rail stops
- Studfinder
- Drill and drill bit set
- Socket Wrench set
- Cabinet Mounting Screws or Wood Screws for attaching the header board to the wall. These were the only screws not included in my hardware kit, and I chose to use this style with the wide black head to add to the farmhouse style of the hardware. You could also use regular wood screws and paint the heads to match your header color.
- Centering ruler - I use this thing for all kinds of crafty projects, but this is my favorite use so far!
- Measuring tape, pencil
- Patient husband, not available on Amazon.
Also, I've had a few questions about where I got my farmhouse style dining room light, so I thought I'd include the link to it here. It coordinates perfectly with the barn door hardware!
Did I miss anything? I wish I'd had this post when I was researching how to do this project, so I'm hoping it helps you. I love questions and comments, so drop me a note below and I'll be sure to get back to you!
P.S. I had so many great questions about this post that I wrote a companion piece full of Frequently Asked Questions. Check it out for all the details!
Tips for Hanging Double Barn Doors
You can easily create double barn doors out of two sets of single barn door hardware. No need to buy fancy double sets! Here's a few things to keep in mind.
Materials
- You can either buy two complete barn door sets (see below for the doors we used), or you can buy two sets of hardware and two door slabs.
- I also recommend installing "soft close" kits on your hardware. Then you don't have to worry about anyone slamming the doors!
Tools
Instructions
- First, be sure you have enough room for barn doors! You'll need at least as much space on the outside of the door as on the inside, to allow room for the door to slide out of the way. For double barn doors, you'll install two full sets of hardware, centered in the middle of the door opening.
- Once you've bought the correct size door and hardware, open the package and make sure you have all the right pieces. Gather your tools so you're not climbing off your ladder to find a screwdriver in the garage.
- Familiarize yourself with the instructions. Keep in mind that one of the doors will be hung as a mirror image of the other, so keep this in mind while reading instructions.
- Take your time making measurements and markings!
- Your laser level is your best friend! The key to barn doors that operate well is getting them exactly level. Hang your laser level on the opposite end of the wall from where you'll be working, so your hands don't get in the way of the beam.
- Get a buddy to help you with the actual installation. There are some parts that seem to require more than two hands.
- You can modify a door stop (included) to cover the gap between rails, if you prefer a seamless look. Or you can get a track joiner if you want the doors to be able to slide to either side.
- Install the soft close mechanisms before hanging the door slabs. (This step may not be included in your hardware instructions if you bought them separately.)
- Use the included floor guides to keep your doors from banging against the wall or door frames!
Recommended Products
As an Amazon Associate and member of other affiliate programs, I earn from qualifying purchases.
-
 BLACK+DECKER Line Laser, Auto-Leveling With AnglePro (BDL170)
 -
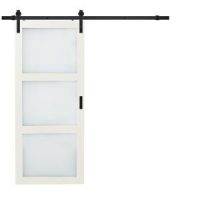 TRUporte 36 in. x 84 in. Bright White Solid Core Rustic 3 Lite Frost Sliding Barn Door with Composite Hardware Kit-ES61-W1-BW-3TG - The Home Depot
 -
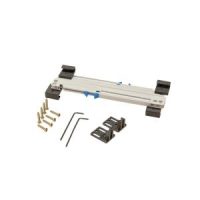 TRUporte Easy Clip Soft Close Kit for Barn Door for Door Weight 88-132 lbs.-BDF960-4060-MB - The Home Depot


Susan Cooper/findingourwaynow.com says
I really like the look of those doors. If we ever need something like that in the future I will definitely keep these in mind. ❤️?
Meredith says
Thanks Susan! We're loving them too. Now I want to put barn doors everywhere!
Jay says
Than you for the info, the new look is great the only thing I would add is the safety part of the job, I believe homes built prior to 1978 should be tested for asbestos or leaded paints . Especially on cabinets that have been painted before. Lead was used to help the paint "flow" or "self level" and could have been present in paints prior to 1978. Always use a respirator or at least a damp bandanna to catch the airborne particles that will develop when sanding. On a side note, some species of wood are toxic as well. Please protect yourself.
Kelly says
They look gorgeous! I've always loved this look and definitely plan to do this someday. Thanks for the tips!
One question ... do the swing a lot with the bottoms detached? I never though of that until my mom mentioned something recently
Meredith says
Hi Kelly, thanks! There are actually little guides at the bottom of the doors, that are attached to the wall. They would definitely swing and damage themselves or the wall without those guides. (You can buy the guides separately if they don't come with your hardware.)
chris says
so helpful!! I am going to hang barn door on the same wall , for different places!! one for my closet-one for my bath. thanks!!
Meredith says
I'm so glad! Best of luck on your project, and thanks for commenting!
Shar says
@Meredith, can you show a picture of the guides? We have barn doors and they go in towards the wall at the bottom!
Meredith says
Sure! I included that picture in my Frequently Asked Questions post. You can see it here: https://thepalettemuse.com/barn-door-frequently-asked-questions/
Sherry Darlington says
Love them! I added barn doors to an awkward area where 3 doors opened in a corner. Now one door can cover 2 openings. Saves space not having 3 doors open into a room.
Meredith says
Thanks Sherry! That's a great idea. They're perfect for saving space, especially with that many doors!
Anita C. Lee says
They're beautiful. I love all that white trim!
Meredith says
Thanks! Now I just need more white trim... in the form of baseboards. The projects never end...
Vanessa says
Are you trying to add on the bottom or top the baseboards?
Johanna says
These look amazing! I really appreciate that you clarify that the patient husband is not available on Amazon. 😉
Meredith says
I'm always careful about accurate advertising. 😉
Jeri Walker (@JeriWB) says
I love it! My friend's husband recently finished an addition to their small ranch house. The finishing touch will be barn doors to separate the new area from the rest of the house when needed.
Meredith says
Ooh perfect! I love that they can be functional and beautiful too. That makes my designer heart happy. 😉
Francine says
It's lovely. I actually love the gray paint color you have in the room! Would you tell me what it is called? Thanks!
Meredith says
Hi Francine, thanks for your comment and sorry to take so long getting back to you! The gray wall color is called "Gray Owl" from Benjamin Moore. We've loved it!
Carmen says
I love, love, loooove this post!! I found you because I want to replace my in-suite bathroom's French doors with barn doors like yours and for the same reason, you know... so we can share a bit of light and none of the rooms feels too closed.
Loved your comment on the first pictures about admiring your doors LOL you are amazing.
Thank you, thank you SO much for sharing your experience. It really helps a lot when you really like to do things around the house and are looking for some advice.
People like you who take a part of their time to post pictures and details are a real treasure!
I've found a website where you can buy unfinished barn doors and there is where I'll head up.
Thanks again, you really made my day!
Meredith says
Thank you for your sweet comment Carmen! I'm so glad this was helpful. I know your doors will look beautiful!
j says
Love the doors!
Have you thought about raising the dining room floor? I would do that and make all the flooring hardwood through out the living, dining and kitchen so the space feels larger and flows.
But then again I love hardwood floors, floors all on one level and very open spaces. I remodeled my first home at age 17 so been doing it a long time, lol. The house we have now has dropped floors in some rooms and I hate them everyone else loves them. In our new home we will have no dropped floors and that makes me so happy.
Happy redesigning.
Meredith says
Thanks! Yes, I would love to raise the floors, but they go throughout the dining room and another living room, so I've decided to embrace them. 🙂
Judy says
As a Certified Living in Place Professional, I would suggest that a contrast between the door and baseboard is more of a good thing, as it is less of a trip hazard. So I would leave the baseboard as it is.
Judy
Meredith says
Good point Judy, thanks for weighing in!
Kenya Rae says
Carn doors are a goal of mine! Yours look fabulous! I am truly inspired and can not wait to get mine up, but I have other priority projects first... UGH. priorities! Pinning this for later reference!
Meredith says
Thank you! I know what you mean about priorities. You'll get there and you'll be so glad!
Alfred Neuman says
The doors look great. I would like to do something similar for my kitchen/dining room. I have a few questions. Is there a track at the bottom to guide the door and keep it from pushing out? Is there something to stop the door from jumping off the track if it's shut too hard? I noticed your thermostat on the left side that would be behind the door when it is open. Thermostats usually run off of ambient air temperature. Does being behind the door restrict the air flow to it and does it affect how your heating/a.c. performs? Would it be possible to post photos of the closed doors from the other side (tv room)? I think it would be interesting to see how they look from the other side. Thank you, Al.
Meredith says
Hi Al, those are great questions! Yes, there is a small guide that runs through a groove on the bottom of the door. This kit came with both a floor guide and a wall mounted guide. I used the wall guide since my doors don't reach the floor. And there are bumpers at the top that keep the door from lifting up and jumping the track, as well as the stoppers on each end to keep it from rolling too far. We were concerned about the thermostat too, and were prepared to move it to the other side of the wall, but it hasn't changed how our HVAC functions at all, so I think we'll leave it where it is. And I'll go in and add a photo from the other side at the end of the blog post, so scroll up to check that out. Thanks for all your thoughtful questions, I'm sure you're not the only one wondering these things!
Michael says
YES! The guides on the bottom, that was left out of the story. When you use two singles as a double that becomes an issue! As does the stops at the top, as pointed out.
In order to get the guides on bottom to work correctly they need to be placed pretty much perfectly so they dont come out when the door is at full open, or at full close and actually the trick shown in shortening the stops is how to do it, you just need to make sure that the stops are adjusted spot on to keep the bottom guide fro coming out. I did the same thing in cutting the upper guides but I'm still looking for a creative alternative, as shown in the photo I don't like eliminating one of the two support screws.
marliese says
Gorgeous! and informative! Love the transformation
Meredith says
Thank you Marliese!
Reenie says
I am obsessed with barn doors and have been trying to add them somewhere to one of our houses. We are now on our third house and I finally have hubby convinced! Our master bath is smaller in this house and with the door opening inward it reduces space. I just saw a barn door style similar to your's at Home Depot with the frosted glass - that's the one! This project is on the list. 🙂
Meredith says
That's the perfect spot for a barn door! Good luck with yours, I know it will be beautiful!
L.P. says
Thanks for pointers! They have definitely come in handy 🙂
Meredith says
I'm so glad to hear that, thanks for commenting!
Stacey says
Great post! Found you via Pinterest! I scrolled through but didn't see a breakdown of cost....care to share?
Meredith says
Hi Stacey, thanks so much for dropping by! I didn't think about including costs, but I totally should have! Mine came as all one kit, which cost me about $700 for both doors and all the hardware. I think you could do it cheaper by buying the hardware kit and using cheaper doors, but I fell in love with these and had to have them!
Anna says
This is a great article. You talk about installing the stop after the rail is installed. Please ensure the stop is slid onto the rail before it is installed. I can only reiterate the importance of making sure the rail is level. If it isn't, then the doors will drift on the rail. I made two barn doors out of pine for $174 (hardware not included). However, I love the doors in this article. Thank you for sharing. Ann
Meredith says
Thanks Ann, you make a really great point about installing the stop first. We didn't do that, so we had to unscrew the supports to add the stops and then reattach them. It wasn't a big deal, but would have been easier to do it your way. Live and learn!
Linda says
Nice to see barn doors that are not the rough barn wood finish. This look is cleaner/more dressed up. Love it! Thanks for sharing.
Meredith says
Thanks Linda! I love both styles, but in our home I knew we needed a more modern touch. We've been so happy with these. Thanks for stopping by!
Lisa Darragh says
I have the same barn door. I used it for a downstairs bathroom.Love it. One question. There is not a handle on the other side of the door. What would you do so that one does not have to slide the door using the wood slat? We get finger prints on the wood and glass. Also would love to be able to lock it somehow. Any suggestions?
Meredith says
That's a great question! I've been wanting to put one of these in my bathroom as well, but haven't figured out how to solve both of those problems. I'll be sure to let you know if I come up with anything!
Melissa C. says
This is exactly my problem. I have finally talked my husband into closing up a weird cases opening into our master so our bathroom HAS a door!! I’m going to look into some sort of recessed handle. Maybe something for a pocket door. How much room do you think you have between the wall and the door? Or would the stops take care of that?
Meredith says
There's about 1 1/4" between the wall and the door, and the guides keep that space constant as the door slides. Does that answer your question? I'm not sure if I'm correctly picturing what you're asking. Sounds like you're on the right track to a solution, I can't wait to hear what you come up with!
Panashe McKee says
There are recessed handles that are used for pocket doors that should work to open your doors from inside. There is also locks that should work. We have them installed on our pocket doors that go into our bathrooms. We purchased them at Lowe's.
Techmom says
Beautiful!! I’m getting ready to do a very similar set up. I’ve been looking around at hardware, so many options and price points! I’ve been looking at this very set. How does the hardware slide? Does it glide easily? Mine will be doors to the master bedroom, so they will be open/closed a lot! Wanting to get a good set that lasts!
Meredith says
I've been so impressed with this set! It sides completely smoothly and silently. It feels heavy and solid, like it will hold up forever. I did it for how it looks, but have been surprised at how well it works too!
CaptnDon says
Great presentation...I am currently installing double doors also. Just as important to the hanger bar being absolutely level is marking and drilling the roller hanger bars on the door. Unfortunately our doors are not solid core so the vertical styles are very narrow. I would suggest not using a tape measure to lay out the hanger holes. Use a flat steel ruler and when you have the hanger bars in place, clamp them in place and use the bar holes as a guide template. You can use a pilot drill bit then drill out to the bolt size. Also make sure the long bar has no horizontal wave. One can add washers on the back side to compensate.
Could you post the procedure you used to mount the hangers to the doors. I'm finding that is/was more difficult than the long bar.
Meredith says
Wow, that's something I hadn't even thought of! Since I bought these as part of a whole set, the hanger holes were already pre-drilled in the doors. Thanks for commenting and hopefully helping out a fellow DIY-er!
Cheryl says
I am about to do barn doors in our bathroom. What is the width and depth of the header board you used?
Meredith says
Hi Cheryl, my header boards are each 80" long, and 3/4" by 5 1/2" deep and wide. There are two of them hung side by side to make up the whole span. Hope that helps!
larry says
if your two header boards are 80 each that's 160 inches of wall space you only need. why did you say 16 feet finished?
Meredith says
OOPS! I misspoke. (Math has never been my strong suit.) I just re-measured everything and the 80" per header is correct, so that would be a total of 160" or 13'4". Thanks for catching that, I'll go back and edit it now!
Anne says
I love what you have done. I am curious about the light over your table. Would you be able to share where you bought it and/or the name or style number?
Meredith says
Thanks Anne! You're not the first to ask that, so I've included the link above, right at the end of the "Resources" section. It's on sale right now for even less than I bought it for!
Greg says
Your doors look great. It looks like there's a thermostat on the wall that would be behind the door when it's open. Has that affected the heating/cooling in your home?
Meredith says
That's a great question Greg. We had planned on moving it to the other side of that wall, but then we found that it doesn't seem to be affected at all by the door hanging in front of it, so we never got around to moving it. We haven't noticed any change in the temperature of the house since installing the door.
Connie says
Hello. I am also interested in the barn doors. What is the sound quality when the doors are closed? I'm curious.
Meredith says
Hi Connie, that's a great question! They do help cut down on noise between rooms, but if you're wanting something more sound-proof, and standard door that latches in a door jam might be better. Honestly, they are better than I was expecting!
roomin8r says
Excellent post! I remember those accordion doors, the ones in your picture look exactly like what we had. We had a set between my and my brother's room in a house my dad built in 1972. Made for a large play space. They are still in my mom's house, brings back good memories when I go to visit and hear them move... 😉
Thanks for the tips, and the wit! I have a home office my wife would like to "hide" from view (it tends to get messy), and we've come across interior barn doors as a possible answer. Yours look great!
BTW - what did you ever do with those accordion doors?
Meredith says
Ha! We donated them to Habitat for Humanity's ReStore, where hopefully they found a good home with someone who has similar fond memories!
Lucinda says
Thanks for your article. My husband and I recently installed double barn doors we purchased from Lowe’s and we love them except that they don’t meet at the top. We can’t figure out where the issue is since everything seems level. Any suggestions on how we can get them to come together?
Meredith says
Hi Lucinda, do they meet at the bottom, but not the top? You may have a slight rise in your rails as they come together. In other words, they may be level on either far end, but higher in the middle. It wouldn't take much to cause that.
Kat says
very nice!
Meredith says
Thanks Kat! ?
Shaleya says
Hello! I love the way these turned out! Great job!
I'm hanging a sliding door in my downstairs rental unit's bedroom. (I redid the unit a couple summers ago, and someone in my family purchased one of those accordion sliding doors for in there...did you know you can still buy them?!?! Ewww.) But the doorway is raised with a step up similar to yours. So I wanted to know where you put the floor guides for your doors? I thought I wouldn't need them, but I'm concerned now because I realize that without them, theoretically the door can be pushed off the track. Similarly, I made a mini pantry for my kitchen a couple years ago with sliding doors, and because the door float, they've actually become a bit warped and are no longer totally square or flush with each other.
Thanks in advance for any insights you have!
Meredith says
Hi Shaleya. sorry to take so long responding to your comment! We put our guides on the wall, since they wouldn't work on the floor. (I've written a follow-up post to this one that shows a picture of them. Search "barn doors" on the blog and it's the FAQ post.) Our hardware kit came with both types of guides, but you can also order the guides separately.
ksgulley says
This is absolutely gorgeous! You guys did a fantastic job! We are getting ready to do a 1st floor renovation and are planning on putting a sliding barn door in part of it. I think we are only going to do one door, but it is going to be a bit wider than one of your doors. My question is this...Is the wall that the door slides over usable to hang anything on? We don't want to waste wall space, especially since it will be a rather large piece of wall. I would welcome any of your advice or input!
Thanks so much!
Meredith says
That's a great question! We didn't hang anything on our walls because 90% of the time the doors are open, so the doors are kind of their own artwork. But you could if it was skinny enough. There's about an inch or so of clearance between the door and the wall, so if you had something pretty flat that would totally work!
Damian Golden says
Hi.
Writing to you from Pembrokeshire in Wales UK.
Great piece and tips thank you as very timely as we are embarking on this project. Collecting oak doors tomorrow and ordered hardware.
Will let you know how we get on. What can possibly go wrong? Lol
Damian
Meredith says
That's awesome Damian! I know you'll love them. I'd love to hear how it goes. You got this!
Laura M Mann says
Do you happen to know the manufacturer of your doors? They are exactly what I have been looking for. Your post stated that you bought them at Lowes's but that they are not available right now. I am hoping that I could track them down with the manufacturer name. Thank you. They are beautiful!
Meredith says
Hi Laura, yes the doors are made by Renin. Here's a link to the actual product: https://www.homedepot.com/p/TRUporte-36-in-x-84-in-Bright-White-Solid-Core-Rustic-3-Lite-Frost-Barn-Door-with-Composite-Sliding-Door-Hardware-Kit-ES61-W1-BW-3TG/302117325
Brenda Dowdy says
Love the ideas for center door stops and wall guides instead of floor guides. I might like to use wall guides (which I did not know existed) as I have tile floor. I am going to order 30" doors for my 48" opening because of cost and availability so my doors will hang over wall 6" on each side. my problem is the 2 hanging rails are 72" and I do not have that much room on one side of door. Can the hanging rails be cut shorter? and if so and I cut them to 60 or 65" would I half to drill for stops or can you move stops to where ever you want them on the rail?
Meredith says
That's a great question Brenda! The stops simply slide onto the rail wherever you want them, and then you tighten them down with two little screws on top. So no need to drill any holes. Sounds like you've got a good handle on what you need to do; best of luck with your project!
Mary says
Hi, These directions are GREAT. I did not look through to see if this was asked, so sorry if it was. I wonder with a single door on the back side ( the side without the hardware). HOW do you open the door from that side? Anyone know? Thank
Meredith says
Thank you Mary! The doors slide so easily that just a little pressure against the back side of the door is enough to open and close them. No hardware needed!
CC says
This is lovely! Where did you get the barn doors? Thanks!
Meredith says
Thank you CC! I got mine from Lowes, but I don't think the have them anymore. Here is a current link: https://www.homedepot.com/p/TRUporte-36-in-x-84-in-Bright-White-Solid-Core-Rustic-3-Lite-Frost-Barn-Door-with-Composite-Sliding-Door-Hardware-Kit-ES61-W1-BW-3TG/302117325
Elisabeth Crago says
I love this post! Beautiful job and beautiful room. I've been in love with barn doors forever and first installed some back in 2010. People thought I was a bit odd then (which I was) but I love how now they are the rage. I'm about to do it again but this time the project is tricky. I have a tiny bedroom with 2 doors toward each end of a 12' wall (one to a bathroom and one to a closet). My plan is to install one long track so that the doors can both slide to the middle when they need to be open at the same time--sort of like your installation if there were 2 openings on either end with solid wall in the middle. Do you see any issues with my plan? I'm thinking I'll ante up for one long track to make sure the doors slide smoothly. Your doors have inspired me to search for doors with frosted glass. Are your doors MDF or wood? Thanks for the great post.
Meredith says
Thanks Elisabeth! Yes, I totally think that would work and look great, and the long track will definitely help if you can find the right size. I believe these doors are composite of some kind, but they're really solid, so I could be wrong. They're from Renin, so check with them to see if they have the style you're looking for. Good luck!
Janet says
Do you mind posting a picture of how the door looks on the other side of the room? I want to do this exact thing between my family room and my living room. There are French doors between the rooms currently. I love the fact that I won't have to accommodate space for swinging doors in the Living room which gives me more options with my furniture selection.. The track and doors will be installed on the Living room side. I want to know what the doors will look like on the Family room side. I notice no one ever shows how the other side looks! lol
Meredith says
That's a great question and you're not alone in wondering the same thing. I even wrote a follow-up post where I posted that picture: https://thepalettemuse.com/barn-door-frequently-asked-questions/ (Scroll down toward the end of the post and it's the picture right above the resources section. Hope that helps!
Carlyle says
The social media tags floating on the left side of the site obscure the left side of all your text. It's pretty annoying. Consider moving your text over a bit to the right or getting rid of the tags. (They are obscuring this text box as I type.)
Meredith says
Hi Carlyle, thanks for letting me know! Would you mind telling me what kind of device you are using? Those tags are only supposed to be displaying on full size screens, like desktops, where they won't interfere. I've tried moving them to the right instead. Hopefully that helps. Thanks again!
gina fonseca says
Thank you! Thank you! Thank you for taking the time to share your knowledge. Im just about to embark on this project and I don't know how much time, money and trips to home depot. im the DIY gal in my house so this is wonderful, thank you. And yours look beautiful 🙂
Meredith says
Thank you Gina! I wish you the best of luck, and the fewest home depot return trips possible! 😉
gillian says
Do you think we would be able to install the two doors so that they both open to the same side, not one on each side?
Meredith says
Yes, I believe you can do that! Just make sure the header is long enough to accommodate both doors. And instead of installing the stops in the middle, you can get a joiner piece so the doors slide smoothly over the seam, if there is one.
Susan says
I am going to hang one barn door for a guest closet and leave the other side open and paint the wall with chalk or dry erase paint so my grandkids can play in half the closet . I might hang a curtain inside the closet. Haven’t decided. Hope it comes out good. Have you seen the barn doors for windows? Omg. They look awesome.
Meredith says
I love the idea of chalkboard or dry erase paint on the wall for the kids! The possibilities are endless with barn doors!
Robin says
Amazing what just a change of doors and trim can do! The rooms just pop now. Thank you so much for sharing this.
Robin says
Amazing transformation! and just by adding barn doors and white trim! Just brightened everything up and made the rooms pop! Love it!
Meredith says
Thank you Robin! I would have done it a lot sooner if I'd realized what a big difference it would make!
Wendie says
Looks amazing!!! I just recently hung a sliding door. I haven't put my guides on yet at the bottom. Did you mount these to the wall or the floor?
Meredith says
I mounted mine to the wall since my doors hang quite a bit off the floor, to clear the threshold. The guides that came with the hardware package could be mounted to either floor or walls. Check out my FAQs post (linked to at the end of this post) for more info!
Deborah Schulteis says
I love your barn doors. I would like to add a barn door for the door in my master bedroom leading to the master bath. I have a question. There is an outlet on the wall where the door would slide. I assume the outlet would have to be moved to farther down the wall so it would not be covered by the door when it is open.
Meredith says
Yes, if you are planning on using the outlet, you will need to move it. If you don't need to plug anything in there, then there's no need to remove it because the door will easily clear it when it's open.
Bevin Daly says
Hi there! LOVE this so much. Just curious- did you buy a double one from Home Depot or did you buy two singles and put them together? Thanks again!
Meredith says
Hi Bevin, thanks! We bought two separate single door kits and hung them together.
Amy Johanson says
A comment earlier on inquired about the look of the barn doors from the adjoining room, with the doors closed. I did not find the picture referenced. This is exactly the look we plan to install with the same opening size. My concern with the 36” door width is that when closed, from the other side the doors are not equal in terms of how much frame is seen. Stayed another way, when closed, each door meets in the middle, with the full frame to the frosted glass. However, the left and right sides respectively would show a smaller frame. I hope I am making sense.
Meredith says
Hi Amy, yes that does make sense, and you're not the only one to ask that question! In my follow up FAQS post, I included a picture of the backside of the doors when closed. Scroll down near the bottom of this post to see it: https://thepalettemuse.com/barn-door-frequently-asked-questions/
James says
I love sliding Barn Doors. It reminds me of our actual barn doors when I was growing up. Thank you for sharing your awesome information.
Regards
James Williams
Daniel says
They look great. We're moving to a new house and want to put doors on a room we're turning into an office. Right now there are no doors, just an open space. We were initially thinking of French doors, but really like the look of barn doors. A couple of questions from your experience.
1) How much noise do you get if you're in the TV room and also outside the TV room with the doors shut?
2) Does the hardware squeaks a lot when you open/close the doors?
3) How much light goes through the frosted glass?
Thank you!!!
Meredith says
Hi Daniel, thanks! 1. I would say these doors cut the noise by about half. They definitely are not sound proof but they do help some. 2. The hardware doesn't squeak or make any noise, just a soft rolling sound from the bars. 3. The glass lets most of the light through but none of the detail. You would be able to see that there's a TV on by the blue light, but not what's on the TV. Hope that helps!
Bob Mac Leod says
I just installed double wooden doors on one of our kids' closets, and after finishing my wife said, "Maybe we should have just gone with a curtain...". She said that because we both thought it would be easier. This pair of double doors was not side-by-side like yours but one in front / one in back ("bypass doors"). This is because the opening was about 80", but there was only 12" of wall on each side of the closet opening (previously covered with a pair of bi-fold doors.)
Made two big mistakes:
(1) Apparently mis-read the instructions on the first track. It was a single track for two doors and the correct width (or so I thought); the hardware was reversed on each door to allow them to by-pass each other. And it fit the opening... but once the wheels were on, we lost six inches of door so when both doors were "closed", there was still 6" of closet exposed. And when fully open, only about 30" of closet was accessible. Instead--we discovered--we needed a double-track so both doors could slide freely the complete width of the opening. This track set was significantly more expensive and nothing compatible with the first one, so I needed a new header board etc.
(2) When assembling the wooden doors themselves, I had one of the boys helping me assemble and stain it (it's his room, after all! I wanted him to have some ownership!). We stained it after assembly, thinking that would be easier since staining 38 individual boards was a bigger project than I wanted to tackle at the time. I should have tackled it... when the doors were assembled, the interior slats shifted a bit, exposing unstained wood in several of the cracks. WORSE: The 'pre-sanded wood' was not consistent on the diagonal decorative pieces, so in each case (two doors, two sides), I put the nicer side out. Ooops. Did not realize I needed them to match with the opposite door--or the "arrow" on the door would not point correctly when hung. (Incidentally, there is no 'correct' pointing, as a search for doors will show both "both to the middle" (>< looks like an X when closed) or "both away from the middle" ( looks like a Diamond when closed). But it SHOULD at least be one of the other instead of two <> which is what we ended up with.
And of course when I bought the second track from the same company as the first, the new holes for the rollers did not match the holes for the first pair of rollers. Fortunately, the new pair's bracket was longer, so the lost hole was hidden behind the bracket. Still, just one more frustration as I had to drill two new holes in each door.
All that to say, I am a real handyman and do almost all of my own house projects. But this project ended up taking a LOT longer than I expected. I think overall, including staining the doors, cutting and painting two different header boards, etc. etc., it probably took me about 30-40 hours. I had expected about a tenth of that time.
In the end, it was worth it. It looks good and everyone's happy. I guess if every once and a while a project goes awry, it's not the end of the world. Just more memories, eh?!
Christine says
Can you use a 80” door and go over the door frame vs above?
Meredith says
You sure can! Just make sure you've measured everything carefully, and that your door trim is not thicker than the inch or so of clearance you'll need between the door and the wall.