Fun FAQ's - Double Barn Doors
Because sometimes a DIY tutorial raises more questions than it answers, I thought I'd spend the month of February going back and doing a series of Frequently Asked Questions posts about some of my most popular DIY projects.
Now that it's halfway through March, I'm finally ready to finish the last post in the series! So, what I intended to call "February FAQ's" has now been changed to "Fun FAQ's" because FAQ's are really year-round, and also, I can't stick to a schedule to save my life.
(If you haven't already, check out the updates on my kitchen cabinet makeover, my concrete countertops, and my lighted headboard.)

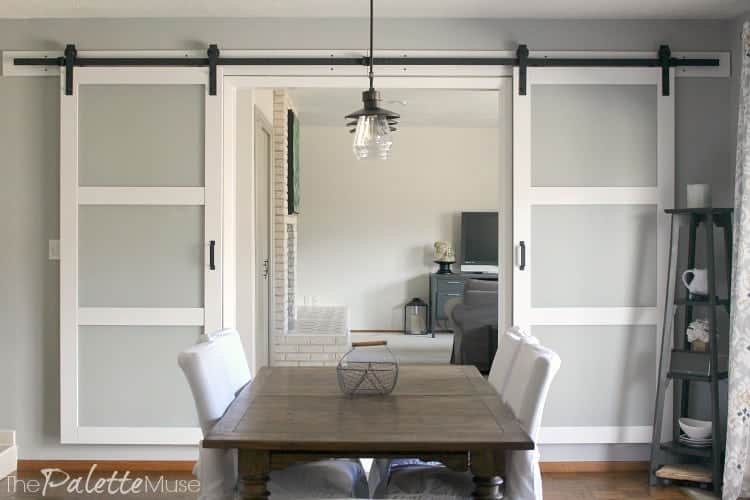
Anyway, today's post is all about my barn doors. This was one of my favorite projects, in terms of maximum impact with a manageable amount of work. Today's FAQ's are all in response to the Barn Door post I wrote a few months ago.
I won't go into the details of the tutorial here, but I do want to answer the questions that I've heard since then, as a companion piece to the tutorial. If you haven't read the tutorial yet, start there and then come back here.
~ This post contains affiliate links. If you make a purchase, I may receive a small commission at no extra charge to you. Thanks for supporting The Palette Muse! ~
Double Barn Door Installation Frequently Asked Questions
First, if your question is "Where do I get those barn doors?" here is the link to the same door that I used. Now let's dig right into the FAQ's.
Do I need to buy a double door kit, or can I put two single doors together?
You can definitely put two single doors together! That's what we did and it worked out great. The only thing is you need a way to account for where the doors meet in the middle. We wanted ours to stop in the middle, so we did not buy a track joiner.
A track joiner simply allows the rollers on the doors to glide smoothly over the small gap in between the header rails. I wanted these doors to stop in the middle, so we used the included door stops. Read on to the next question for more info about that.
How do you close the gap between the double barn doors?
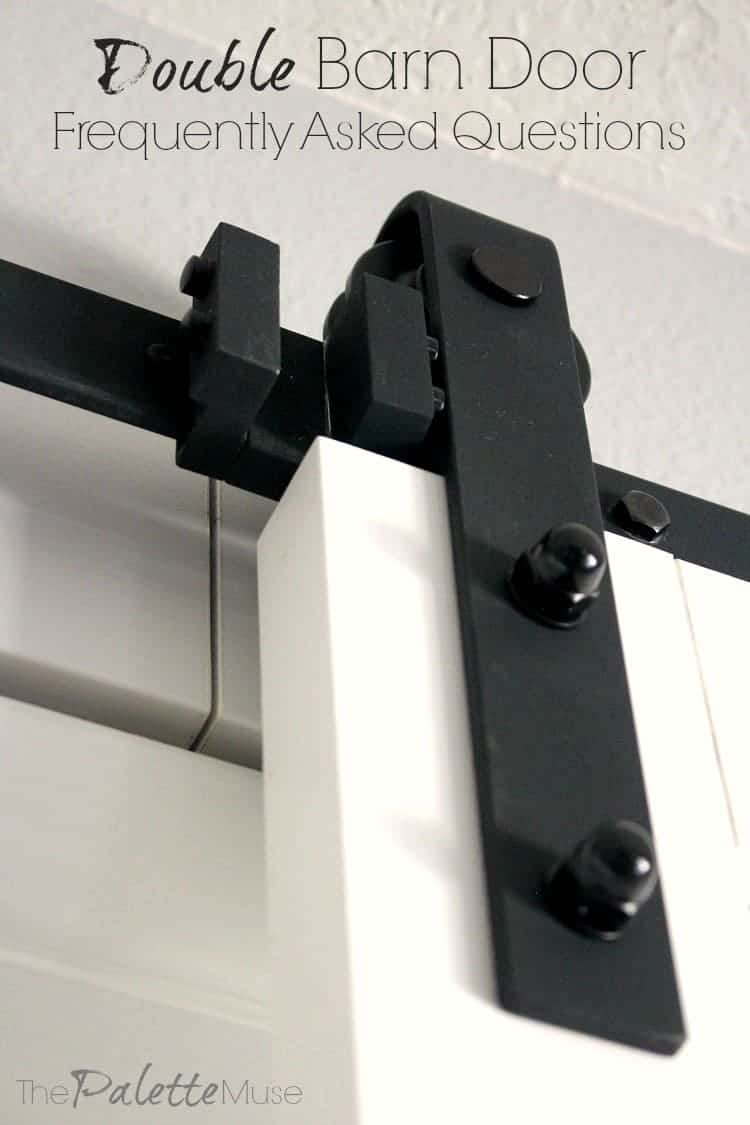
The door stops that come with the hardware are meant to be used on each end of a single door, to keep it from running off the rails when it's opened or closed too hard. However, you can't just install the stops on the middle of the header rails, or they will leave an opening of about an inch between the doors.
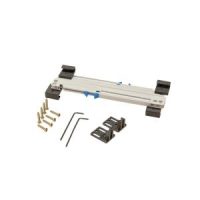
I feel like the hardware companies should have solved this problem by now (and maybe they have by the time you're reading this) by offering an optional part that is like two stops fused together, but I wasn't able to find such a thing, so we made our own by modifying the door stops with a saw.
I outlined the process in the original tutorial, so be sure you check it out if you're converting two single barn doors into a double. Here's how it looks close-up:
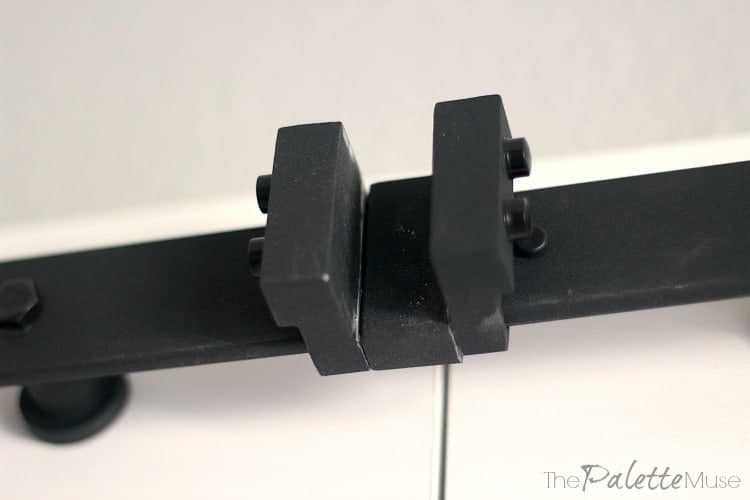
We've been using the barn doors happily for months now, and this fix has stood the test of time and rambunctious children!
Do they swing out from the wall when you're opening/closing them?
No, there is a small guide that runs through a groove in the bottom of the door. Mine is attached to the wall, but if your doors are flush with the floor (as probably most are) the hardware kit also includes a floor-mounted guide.
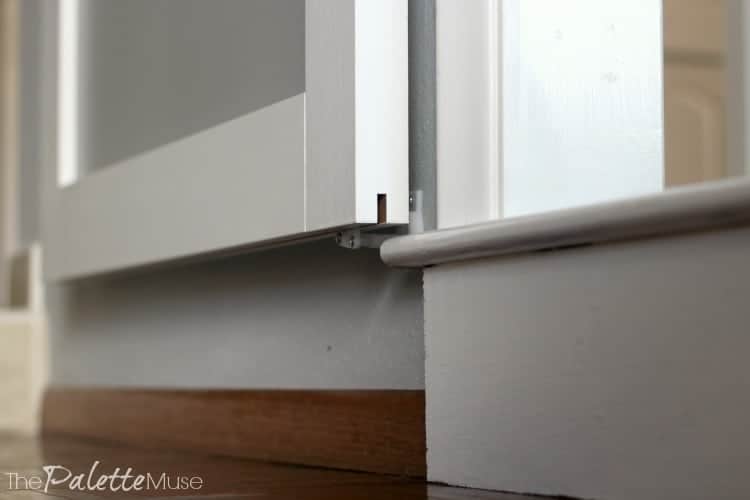
This keeps the door from swinging in and out as it rolls, and possibly damaging the door or baseboards or wall.
If you are converting a standard door to a barn door, I'd recommend routering a groove in the bottom of the door rather than letting it swing free. (To me, that's kind of a major DIY project, so I recommend buying doors that are already meant to be barn doors so you don't have to take that extra step.)
Can you attach handles on the other side of the doors?
As far as I know, there is no standard answer to this question. You can't install regular handles onto the backs of the doors because they will hit the door frame and wall when they open. We've found that it's super easy to gently slide the doors open from the inside, and no handles are necessary.

Can you attach a lock?
One of my readers wanted to install a barn door in her bathroom and asked both the handle and the lock question. While I didn't have a good answer for either, I had another reader recommend a pocket door handle and lock to solve both problems.
I think that's a great solution, but just make sure that your door will allow for the installation of such hardware. This will require routering the holes into the doors, so I'd make double sure that you know what you're doing before trying this route.
Update: here is a new barn door lock set that is made for this exact purpose!
Otherwise you could install a simple hook and eye latch, but just be aware that once the lock is locked from the inside, there's no real way to open it from the outside, which might be a hazard if you have kids who may lock themselves into the bathroom. (I speak from actual, frustrating, experience but that's a babysitting story for another day.)
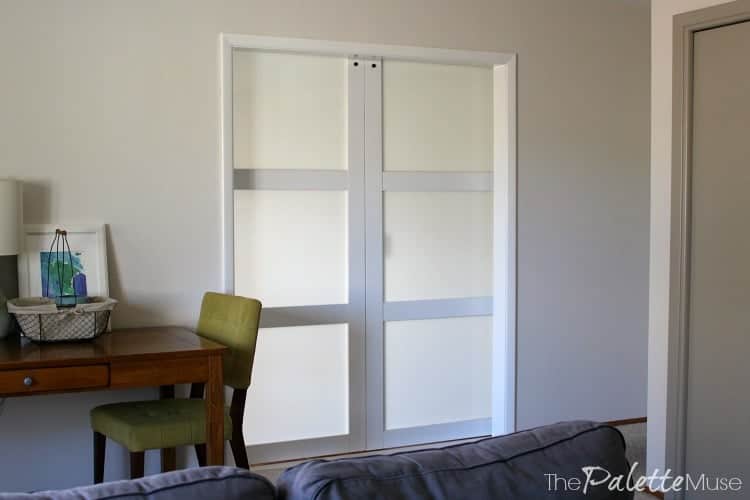
What color are your walls?
What a fun question! They are Gray Owl by Benjamin Moore. When the doors are open, it looks like the glass is clear because it just happens to be the same color as the walls behind it.
What keeps the doors from jumping the tracks?
The door hardware has stops on both ends, as well as a little stop on top, so no matter how hard you close or open the doors, they won't jump their tracks or fall off the ends. This is why I think it's better to buy a good brand of barn door hardware, rather then trying to build it yourself.
Is your thermostat impaired by hanging the door in front of it?
We were planning on moving the thermostat that hangs on the wall right behind the left door because we assumed it would lose its accuracy being in that small space. But then we didn't get around to it immediately, and soon found that we didn't need to.
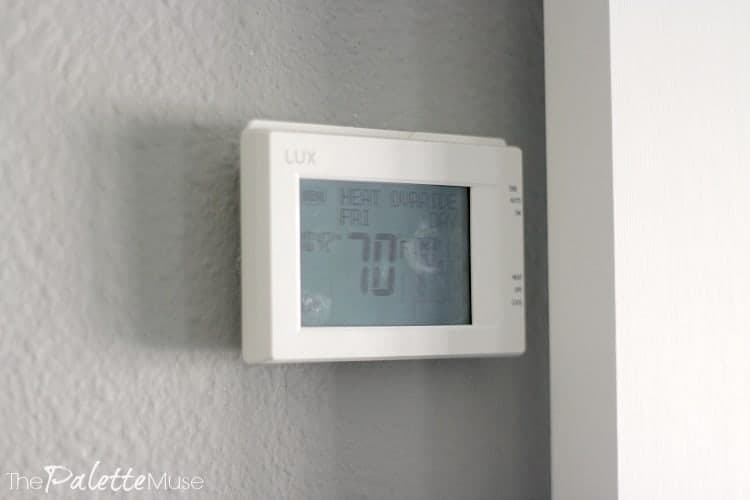
The temperature didn't seem to change at all, either in summer or winter. I guess it gets enough airflow back there to still get a good reading.
We do have to slide the door closed to access the panel, but our heating and cooling is set up on a schedule so we don't need to use the panel much. Now we plan on leaving it right where it is.
Do they slide easily?
These doors are a dream! They are so quiet and smooth when they open and close that someone in the next room wouldn't even know it was happening.
Do they cut down on noise?
I feel like these doors definitely help cut down on the TV noise from the den, and we like to hide in here and close the doors when my daughter practices piano in the other room. (Don't tell her I said that!)

They probably don't cut down on as much noise as regular doors that fit in a door frame, but they sure help!
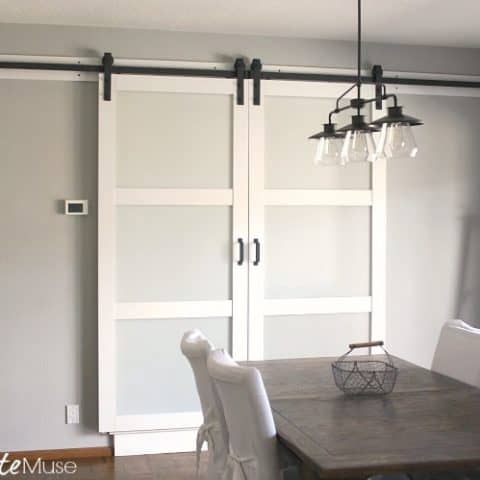
In case you're wondering, here's how they look from the other view, in our family room.
We've been so happy with our barn doors, both for how they look and for how they operate. If you're ready to start your own barn door project, here's what you'll need.
Double Barn Door Resources
- 2 sets of barn door hardware plus doors – measure the width of your door opening to be sure you order the correct size rail. Each rail needs to be at least twice the width of your door opening. Here are the actual doors I used (I bought two sets and hung them side by side).
- Laser level
- Saws-All – this isn’t listed in the instructions, but we needed it for modifying the rail stops so the doors would meet in the middle
- Studfinder
- Drill and drill bit set
- Socket Wrench set
- Cabinet Mounting Screws or Wood Screws for attaching the header board to the wall. These were the only screws not included in my hardware kit, and I chose to use this style with the wide black head to add to the farmhouse style of the hardware. You could also use regular wood screws and paint the heads to match your header color.
- Centering ruler – I use this thing for all kinds of crafty projects, but this is my favorite use so far!
- Measuring tape, pencil
I know this seems like an intimidating list, but you may already own some of these tools. The whole project took us a couple of days, but that's because we found it easier to break it up into smaller segments, rather than trying to do it all at one time.
It's not a small endeavor, but the end result is so worth it. I'm just a normal girl with a pretty handy hubby, so I know if we can do this you can too! Also, be sure to go check out the original Barn Door post for lots more info.
I love hearing your questions! Please let me know in the comments if I've missed something you're still wondering about these double barn doors.
In the meantime, here's a quick recap of tips for hanging your barn doors:
Tips for Hanging Double Barn Doors
You can easily create double barn doors out of two sets of single barn door hardware. No need to buy fancy double sets! Here's a few things to keep in mind.
Materials
- You can either buy two complete barn door sets (see below for the doors we used), or you can buy two sets of hardware and two door slabs.
- I also recommend installing "soft close" kits on your hardware. Then you don't have to worry about anyone slamming the doors!
Tools
Instructions
- First, be sure you have enough room for barn doors! You'll need at least as much space on the outside of the door as on the inside, to allow room for the door to slide out of the way. For double barn doors, you'll install two full sets of hardware, centered in the middle of the door opening.
- Once you've bought the correct size door and hardware, open the package and make sure you have all the right pieces. Gather your tools so you're not climbing off your ladder to find a screwdriver in the garage.
- Familiarize yourself with the instructions. Keep in mind that one of the doors will be hung as a mirror image of the other, so keep this in mind while reading instructions.
- Take your time making measurements and markings!
- Your laser level is your best friend! The key to barn doors that operate well is getting them exactly level. Hang your laser level on the opposite end of the wall from where you'll be working, so your hands don't get in the way of the beam.
- Get a buddy to help you with the actual installation. There are some parts that seem to require more than two hands.
- You can modify a door stop (included) to cover the gap between rails, if you prefer a seamless look. Or you can get a track joiner if you want the doors to be able to slide to either side.
- Install the soft close mechanisms before hanging the door slabs. (This step may not be included in your hardware instructions if you bought them separately.)
- Use the included floor guides to keep your doors from banging against the wall or door frames!
Recommended Products
As an Amazon Associate and member of other affiliate programs, I earn from qualifying purchases.
-
 BLACK+DECKER Line Laser, Auto-Leveling With AnglePro (BDL170)
 -
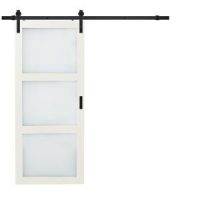 TRUporte 36 in. x 84 in. Bright White Solid Core Rustic 3 Lite Frost Sliding Barn Door with Composite Hardware Kit-ES61-W1-BW-3TG - The Home Depot
 -
 TRUporte Easy Clip Soft Close Kit for Barn Door for Door Weight 88-132 lbs.-BDF960-4060-MB - The Home Depot


Jeri Walker (@JeriWB) says
Thanks for the update. I'd love to be able to work a barn door into my house plan, but it's an open plan and there is no place to put one really.
Meredith says
Yeah, they're not always a solution, but I was so happy to finally have a place to use them!
cdloken says
We will be remodeling two of our bedrooms in the near future and I was seriously thinking about replacing the outdated shutter closet doors with barn doors! Thank you so much for all of your tips. You answered a few questions I had, and now I'm off to read your original post on this subject because somehow I missed it!! Hugs!
Meredith says
That's a great idea! I don't know how the cost would compare to just replacing the shutter doors, but I know they would look great!
Kelly Mahan says
I always had similar questions too, this is a great post idea! Thanks for the answers!
Meredith says
I'm so glad this helped, Kelly! Thanks for commenting!
Shyidah says
Hi, I’m sorry if you answered this and I missed it but where did you get your actual barn doors from? Did you purchase them or create? They’re beautiful.
Meredith says
Hi Shyidah, I'm so sorry to take so long getting back to you! We purchased ours as a complete kit. Here is the link: https://www.homedepot.com/p/TRUporte-36-in-x-84-in-Bright-White-Solid-Core-Rustic-Barn-Door-with-Sliding-Door-Hardware-Kit-ES61-W1-BW-3TG/302117325
Jess says
Can you tell me the grey color you used on your walls and doors? I'm looking for something like that now
Meredith says
Yes, It's Gray Owl by Benjamin Moore. I love it!
KellyMM says
You mentioned in your post at the barn door rail would need to be double the size and length. My barn doors are 60 in wide total. I was looking at purchasing a 10-foot track. Is that going to be long enough I assumed it would be since it's double the size of the doors. Is that the correct way of looking at it? Appreciate your help.
Meredith says
Hi Kelly, I'm so sorry to take so long to reply! Yes, you're exactly right, you would need at least a 10 foot track.
Darryl Dawson says
I’m getting ready to do this barn door project myself. One concern/question I have, Is there an issue with the doors not hanging straight down, do they tilt in or outward without the floor guides?
I would like to not have the floor guides if possible but not a show stopper.
Thanks,
Darryl
Meredith says
Hi Darryl, if you hang them properly they shouldn't lean in or out. The problem would be when someone slides the doors, they could accidentally put pressure on them and cause them to scrape the wall or baseboard. You could definitely try it without the guides, and add them later if you have problems.
Joey says
You didn't mention your header in either of your supplies lists...is it part of the kit or did you just get a basic 1X piece of lumber? Also, I am wondering if getting a single rail and 2 doors separately would work? We are also considering bypass doors.
Thanks!
Meredith says
Hi Joey, yes the header came with our kit. (It was actually two kits hung side by side.) You could probably do a single rail if you can find one long enough, and then just put two doors on it. What I love about this project is how versatile it is, as long as you kind of have an idea of what you want.
Bypass doors are nice too, depending on how you'll use them. We always want ours to meet and stop in the middle, rather than both going to one side, so that's why we didn't use bypass doors.
Thanks!
Allan Magnuson says
Hi Meredith,
I can’t believe I just found this post and the other about how to hang double doors thank you for sharing that with us.
My name is Allan Magnuson and I’m the owner of a small business in Southern California called Rustic Renovations. I’ve been building and installing barn doors for clients for a little over 2 years now and when ever I would build a double door set, I would either make the styles (vertical sides) of the doors wider than usual to allow the hangers to be centered on the styles and still use the stops. After seeing what you did I figuratively slapped my forehead and said “duh, why didn’t I think of that before”... okay maybe literally. Anyways, now I have another option for my clients.
If you haven’t found a flush pull for the inside of your doors yet you should take a look at “Tibres 7” flush pull” on Amazon. If my clients choose a handle that doesn’t come with a flush pull this is what I order.
I look forward to hearing back from you and reading some more of your blogs.
Allan
I don’t have a website, however we do use Facebook and Instagram. Here are our links:
Facebook: https://www.facebook.com/rusticrenovations2/
Instagram: @therusticbarndoor.
Meredith says
Thank Allan, glad to be of help! I will definitely check out that flush pull. Thanks for the tip! Heading over to check out your IG....
Michele says
How do you seal the gap between the wall and the door on each end so no one can peek in?
Meredith says
There's no way to seal the gap. That's why you need to get a door slab that overlaps the doorway by a little bit on both sides. If the door overlaps the sides by a couple of inches, there will be no way to see into the room, even though it's not totally sealed.
Melissa Goris says
i had a barn door installed in the master bedroom to separate the bathroom. However, the door will not stay open and
closes on its own. How can I fix this issue?
Meredith says
Hi Melissa, it sounds like maybe the bar that the rollers go on is not exactly level, so they want to roll downhill. If this is the case, you'll need to reinstall the bar. You can check by setting a level on the top edge of the bar and see if the bubble is exactly centered.
Mrs Thomas says
How do you keep a barn door from bouncing back open after I slide it shut? I'm always in a hurry. lol
Meredith says
That's a great question, and I'm currently working on a blog post that answers it! In the meantime, the short answer is you need soft close hardware, like this one: https://amzn.to/2U4nWnz
I recently installed soft close kits on mine and we LOVE them. No more banging or reopening doors!
Mrs. Thomas says
Great! I will show my husband. This could be the answer we were looking for. Thanks so much!!
Beth Jensen-Wolosz says
I have an interior barn door on my hallway laundry room. Something has gone wrong. It started to get stuck when closing and opening. Now it gets fully stick only inches when starting to close it. How do I adjust the door so it opens and closes like it did before
Meredith says
Hi Beth, I'm not an expert in repairs, but it sounds to me like you might have something on your rail or in the wheels that's getting stuck, or possibly one of the wheels isn't spinning freely. Have you tried taking the door off and looking at the wheels? You should be able to lift it off the rail, after rotating the anti-jump pieces on the top of the door. Or you could have someone lift up a little from the bottom of the door and see if you can spin the wheels. Good luck!
Kris says
I am looking into barn doors in place of french doors. The thing is, I don't have ample room for them on either side of the 6-7 foot width open area. I am fine with having only clearance for one door (one slid behind the other...on a double track I suppose) 99% of the time, but just wondering if its easy to take them off track should you need more clearance. Or would it be a major pain?
Meredith says
It's not too difficult to take the doors off. There are little "anti-jump" brackets on the top edge of the door. You simply loosen them with a screwdriver and rotate them out of the way, and then you can lift the door off the track. Just, be careful, the doors are a little heavy!
Patty Morton says
Is it easy to remove a barn door from the track temporarily and put it back on again?
Meredith says
It's not too bad (see comment above) but just be aware they're a little heavy, so get some help if needed!
Marcy Hendrickson says
Hi there, We replaced a set of french doors entering into our family room with a set of double barn doors. They were purchased from BarnDoorz.com. They are unfinished knotty alder vertical planks, trimmed in metal and are only an inch thick. I plan on finishing (staining/glazing) them myself but was waiting for the weather to warm up a bit since I need to do them in the garage... Anyway, my question is the doors do not meet in the middle exactly when shut. One of the doors is hangs out about an inch from the other door at the bottom. They look great at the top, but terrible at the bottom. I suppose I could put some kind of something that when closed they are joined at the floor, but I'm sure what ever that would be would get tripped on repeatedly when the doors are opened. Our installer said the door is torqued and offered no solution. Do you have any thoughts on this problem?
Marcy Hendrickson says
Oops, I meant to say that one of the doors "hangs out" about an inch...etc. 😉
Meredith says
Hi Marcy, I'm sorry to hear that! I think if I were you I would contact the BarnDoorz customer service number and let them know that one of the doors was shipped to you in that condition. They should replace the door for free. (In my opinion.) Then you simply lift the old door off the rail and set the new one on the rail. (The hard part about installing barn doors is getting the railing right. Once that's done it's fairly easy to replace a door.)
Marcy Hendrickson says
Hi Meredith,
Thank you for your reply; I appreciate your time. I will give it a try.
Thanks again,
Marcy
Meredith says
You're welcome Marcy! I'd love to hear how it turns out. Best of luck!
Mary says
As I understand it, these doors are covered in a type of vinyl wrap, so you don't (and can't) paint them or stain them. Have you found this covering to hold up well, or has it scratched, etc? I like your door style with the glass, but other options allow you to paint or stain actual wood. Thanks for all your helpful info! i was especially looking for pictures of the guide attached to the wall, and your blog is the only place I've found that!
Meredith says
Yes I've been so impressed with the finish on these doors. It's extremely durable and easily cleaned, but looks just like painted wood. So glad I got these instead of trying to paint them myself! And I'm so glad you found this post helpful!
Joel Hadlich says
I just hung double barn doors that meet in the middle. Something weird, over night they separated by about 1/2 inch leaving a gap between them. At this time, there is no mechanism to keep them attached together. Do you have any ideas? I was thinking some sort of magnets that can be easily pulled apart when opening them up.
Looking for more ideas before I move on.
Thanks for all of the information.
Joel
Meredith says
Hi Joel, yes I do actually have an idea how to solve that! They're called soft-close mechanisms. They're designed to prevent the doors from slamming, but they also work to keep the doors in place when they're closed. You can install them right onto your existing doors. Here's an example: https://www.amazon.com/skysen-Upgrade-Sliding-Mechanism-Hole-Free/dp/B07WR6JV5V
Krista says
We are going to attempt a single barn door installation but i have 2 questions. The instructions that came with the kit are too vague for us newbies. How much of gap do you need between the top of the door and the roller when attaching the brackets to the door? And how do i know if i need a header? Any info you could share would be greatly appreciated. Thank you.
Meredith says
Hi Krista, great questions! (And I agree about the instructions.) I'm not sure how much space your kit will need between the door and the roller, as each set probably has different dimensions. I would recommend placing a roller on the bar and measuring how much space is left hanging. That should give you an idea of where to attach the rollers to the door. As for the header, you only need one if you have a hard time anchoring into your wall, or if you like the look of the header. We liked how it looked, and it made it easier to get all the screws into the header than anchoring each one into the drywall or finding a stud. I hope that helps, let me know if I've created more questions than I've answered!
Megan says
Thank you so much for sharing all these amazing tips! You mention that when using two single doors to create the double, the second will be installed as a mirror image. In the case of doors that have a particular pattern (i.e., )https://www.lowes.com/pd/ReliaBilt-Off-white-Prefinished-K-frame-Mdf-Barn-Door-Hardware-Included-Common-36-in-x-84-in-Actual-36-in-x-84-in/1001002186), will the pattern be a mirror image, too, or are their often pre-drilled holes that would mean two separate "K" pattern doors vs a diamond pattern when converting to the mirror image?
Meredith says
If they are selling them as a set of double doors, they should have already designed them as a mirror image, so you should be fine. It might be worth double checking first though!
Robert M says
Hi. I have read all the comments with great interest. A very good article!. My problem is the rollers that attach to the doors ( I have 2 barn doors together) were not screwed with exactly vertical spacing, so the doors do not hang straight. About 1/ inch gap between top and bottom. How an I realign them so the bolts are still tight? Any suggestions would be welcome. Thanks. Robert
Meredith says
Hmm that's a great question Robert. First I would check that your header and bar are completely level. If that's not the problem, then you may need to fill and redrill the holes to get them to line up correctly. I'm sorry I don't have a better answer for you!
Davide says
Mr. Robert I have the same problem with my double Barn door. Please let me know how you fix your problem. THANK YOU.
Stephen Scott Micklo says
Hi
I have an interior barn door that is sagging on one side so that when the door slides closed, it is scraping on the bottom. What is the best way to fix this? Is there a better way than removing the door and the track and raising it up 1 inch?
Meredith says
Hmm that's a tough one. I suppose you could cut the bottom inch off the door but if it were me I'd probably rehang the door track like you mention.
Mike Fattibene says
I have an interior single barn door on my master bedroom bathroom. It occasionally decides to experience friction that stops it from freely floating closed (it rubs and stops in the last foot of closing). Then a week later it decides to flow freely again. Why is this intermittent problem happening?
Meredith says
The two places I would check are: the rollers and rail at the top, and the groove and floor guide at the bottom. I would think something is probably getting hung up in one of those spots, maybe due to expansion from humidity and temperature changes.
MacLean Wade says
Great tutorial. One question, If you cut the door stop to make the center stop for double doors, what did you use on the ends for a stop? I'm curious if you had to buy extra hardware when you did that or how you worked that out. Thanks
MacLean Wade says
@MacLean Wade,
I just realized I read it wrong!!!! I understand now. Perfect solution. Sorry thank you!!
Meredith says
I'm so glad you found the answer, let me know if there's anything else!
Daniel Romano says
If installing soft door close/open mechanism how do you install the close part? There is a lag bolt in the way of the space where the door stopper was altered to make the gap between the closed doors smaller.
Meredith says
Hi Daniel, that's a good question. My soft close mechanism fit right on the side of my lag bolt. Did your soft close come with your kit, or did you buy a separate one? If it came with the kit, I'd contact the manufacturer to see what they recommend. The other option would be to move the lag bolt, but that seems like a lot of work! Perhaps a different soft close kit would fit better? I'm sorry I don't have a better answer for you!
Nancy says
I want to put up a barn door in my bathroom. It would slide between the wall and toilet. How many inches do I need between the wall and toilet. Thanks
Meredith says
Hi Nancy, mine takes up about 3" (door + space behind) but I would double check the size of the door you are ordering to make sure.
Don says
I love my ban door but, now when I open the door the latches will not stay open soI have to open the latch every time. I open the latches and slide the door and it closes fine. Then when I Open the door it opens fine but then the latch closes. I have tried adjusting
The brackets on the door to no avail. The door worked fine for the last year. Please help.
Meredith says
Hi Don, I'm not quite sure what you mean by latches. I would recommend contacting the manufacturer of the door hardware to see if they can help you.
William says
Do you think i can trim/ cut the bottom of engineered wood of barn door to fit the height or it is not advisable?
Meredith says
Hi William, you could but I would be careful of that for two reasons. First, if it's not a solid door, it might be difficult to get a good edge on it. Second, if it was designed to be a barn door it should have a little groove in the bottom for the floor guide to slide in. If you cut off the bottom, you'll likely lose that function.
Adibah Ali says
Hi..can these 2 tracks combine for one big single door? Can the door pass thru the joining part at the middle?
Meredith says
Yes, you could leave off the stoppers and joint in the middle and the doors would roll freely from side to side. You'll see a small gap between the tracks, but the doors will just roll right over it.
Lisa Castanzo says
Hi - question about the separator that you are using to keep the barn doors closed... where did you get it, did you make it yourself?? We need that piece.
Meredith says
Yes, you can see how we made it in the original article. The pieces came with our hardware kit.
Bees outdoor says
Hoping you have some insight. Have an odd issue. Hanging two doors to separate a bedroom and walk in closet. Doing a rough install of the header and using the laser level, we noticed there is about at least a one inch difference. So when looking at the header on the wall is looks crooked. Then there is the challenge with the doors. How do you get everything level and not look like a fun house, lol?
Barnyard door envy.
Meredith says
Oh dear, that is a pickle! The header and bar must be exactly level or the doors won't operate correctly. You might need to have your opening reframed if it's noticeably off. Sorry I don't have a better answer for you!
stephanie a beverungen says
Mine make noise as they bump over the placed were screws hold bar. Why??? Can I fix. One is ok, the other bumps and isn't smooth
Meredith says
Is the door hardware hitting the screws? I'm not sure what would cause them to bump like that, but I would check the level of the bar and make sure all your bolts are tight.
Lisa J VanHorn says
Ok so I just hung my barn doors...followed the instructions exactly so when I put door on the track the door is to high.....and suggestions on how to fix this besides having repairs holes in drywall
Meredith says
I'm sorry Lisa, I'm not aware of any other way to fix that, other than rehanging them at the right height and patching the holes.
Judy elliott says
My barn doors on my island won't stay closed. How do I fix?
Meredith says
It might be that your track isn't quite straight and level. You could try affixing a small hook assembly to the doors and hooking them together.
Lyndie says
Hi, I have a no level home and want to install barn doors downstairs but one of my walls is a little further back then the other. It’s not noticeable but when measuring we saw it’s almost an inch. Is it still possible to do?
Meredith says
Hi Lyndie, that would definitely make the installation more difficult. I suppose you could shim the header so it's the same depth all the way across, but I'm afraid you'd be able to see that. As long as the doors can clear the opening and trim, it should work, but if it were me I'd probably have a pro come and take a look before committing to the project.
Oliver says
Thanks for sharing, did you use hydraulic door damper or other dampers? I bought brand new wooden doors setting in my rooms. I chose soft close type dampers and hinges to fix. By the way, what color do you recommend if I need to paint the wall?
Elaine says
We just finished our basement, and our contractor hung our barn doors (look very similar to yours) but now I'd like to paint them, but am unsure I I need to remove them to do so, or is there a trick to do the small portion that overlaps with the wall when they are closed?
Meredith says
Hi Elaine, I do think it would be easier to paint them if you removed them first. You should be able to lift them up and out because the wheels on top are just sitting on the rail. (They're heavy so get a helper!)
leslie perletz says
Thanks for this helpful article. We have a non square opening to the bathroom from the bedroom. (mid-90s architecture) so there is no door frame. Therefore there would not be a solid piece of wall to put a header or any other piece on. Would it still be possible to figure out a way to use a barn door? Thanks for your help!
Meredith says
Hi Leslie, the idea of the header is so that you can anchor it to the wall studs and then the header serves as the structural part for the barn doors to hang on. In other words, it's meant for installations where you might not have studs in the right places for the barn door hardware. As long as you have studs inside your wall, this method should work for you. Does that help, or did I misunderstand your situation?
Deborah Lewis says
Would love to replace French doors in formal area with decorative double glass sliding doors. Do you think the same concept could be used in buying 2 single doors? Would want the sliding rails covered and not exposed. Ae they really considered “barn” doors if they are glass?
Meredith says
That sounds beautiful! I'm not sure about how to cover the railing, and how to work with glass doors though. It would probably be a good idea to talk to the supplier before trying this on two single glass doors.
Susie Hernandez says
Hi,
I'm looking for a barn door for sale on Offerup and found some doors and then some hardware separately. Wondering if it's standard hardware that fits any barn door and also wondering if the hardware for a double barn door will fit a single barn door set-up. Is it just twice the hardware you need; is that the only difference? I'm a bit confused. I also want to be sure I get the right size door for my space. What considerations should I be thinking about aside from making sure there's enough room for a track? Thank you, Susie
Meredith says
Hi Susie, I can't say for sure about the hardware being compatible with any barn door. I think they are all pretty similar, but you'd need to be sure it fits first, or be ready to make customizations. I used two separate sets of single door hardware and put them together, which worked well, but I'm not sure if you could separate a set of double hardware in the same way. As far as size, you'll just want to be sure the door covers the opening on all sides, as well as allowing room for the track above the doorway.
Jan Lege says
I installed double antique doors for my master bath. I love them, They open fine and stop because of the side stops. However sometimes when closing one may go too far and come out of the floor guide. Do they make a center stop that will stop this from happening. Jan Lege
Meredith says
Hi Jan, I used side stops in the center as well, to keep that from happening.
Don says
I outlined the process in the original tutorial, so be sure you check it out
"if you’re converting two single barn doors into a double. "
The bove link poits to the same page.
Kecia Slob says
Hi Meredith,
We are wanting to install barn doors but want the two doors to slide to the same side as we do not have room on the other side of the opening. Can this be done with two doors?? Or should we just stick with one 4ft door covering?
Meredith says
Hi Kecia, I've never tried to do that before, but I believe it could be done if you use the right hardware. Make sure you don't install stoppers at the middle so the doors can both slide to one side. And if you're using two sets, you'll need to make sure the doors can roll over the break between the rails. Sometimes you can get a connector piece for the rails to make that easier. Just be sure to do your research on the hardware before you buy, and let us know how it goes!
Victoria says
Hello Meredith
Are you aware of any issues with removing a barn door and its track? Other than the door being heavy (single door). We will be wallpapering that particular wall, once done will be re-installing the track and door.
Meredith says
Hi Victoria, I'm not aware of any issues doing that. Just make sure that when you reattach the door hardware to the wall, the bolts fit tightly into the studs again. (Sometimes when you unscrew and re-screw things too much, you can loosen the grip.)
Howard says
Hi. For me to install barn doors for my closet, the only way it would work is for either both doors or one large door(opening is 72" x 80")to slide only one way. And that would put the door directly over the doorway to my office. I am thinking that would work, but is that a no-no? Code violation or just looks wrong? Thanks
Meredith says
Hi Howard, great question! Code violations vary by location, so you'd need to check with your city building department. Personally, I'd be wary of using a door that infringes on another doorway. It might be frustrating to use, and might look a little funny, but it's hard for me to say without looking at your space. It's always hard to design around several doorways in a small space!