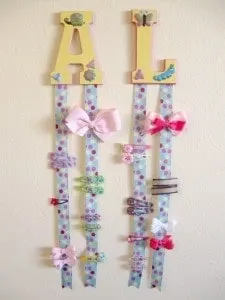
So, about a month or two ago, I told you to check back next week for part two of my hair accessory organization project. (See “Craft Storage Saves our Bathroom“.) Unfortunately “punctual” and “organized” do not always go hand in hand. Here (finally!) is my cute solution to all the hair clips that have taken over my daughters’ bathroom.
My only problem is that I coordinated these hangers to go with our bathroom decor, but my kids liked them so much that they each want to keep theirs in their own room. So you might want to get your kids involved in this project from the beginning if yours have opinions about such things. In fact, it’s such an easy project you could probably hand it off to your kids altogether.
Here’s how it’s done.
You’ll need:
A wooden letter about 5-6 inches tall
Ribbon about an inch wide and at least 2 feet long
Two colors of acrylic paint
One or two paintbrushes
A few stickers (I like the puffy kind to add dimension)
Hot Glue Gun
Small metal or plastic hanger or hook
Mod Podge (I used gloss)
Directions:
1. Cut the ribbon in two equal pieces.
2. Trim the ends by folding in half lengthways and cutting a diagonal slit from the middle to the end.
3. Dip the very edge of the ends in Mod Podge to seal, set aside to dry.
4. Paint the front of the letter in your main color, let dry.
5. Paint the edges of the letter in the accent color, let dry.
6. Attach stickers.
7. Paint over the whole thing, including stickers, with Mod Podge, let dry.
8. Hot glue the ribbons to the back bottom edges of the letter, with at least an inch of ribbon glued on.
9. Attach the hanger to the back near the top of the letter.
10. Collect all the hair clips you can find and get to organizing!

