The Palette Muse

menu icon
go to homepage
  • DIY
    • Home Improvement
    • Home Maintenance
    • DIY with Paint
    • DIY Decor
    • Cabinets
    • Furniture
    • Camper
    • Makeovers
    • Tips
    • Tools
    • $100 Room Challenge
  • Crafts
    • Painting Crafts
    • Paper Crafts
    • Fabric and Yarn
    • Wreaths and Banners
    • Handmade Gifts
    • Christmas
    • Art
  • Design
    • Color
    • House Flipping
    • Home Staging
    • Bathroom
    • Bedroom
    • Home Office
    • Kitchen Design
    • Home Decorating
    • Outdoor Decor
  • Organizing
    • Airbnb
    • Cleaning
    • Planners and Worksheets
    • Printables
    • Saving Money
  • Family
    • Recipes
    • Camping
    • Creativity
    • Faith
    • Holidays
    • Musings
  • Printables
    • Get the Newsletter and Free Printables
  • About Me
    • Work With Me
      • Affiliate Disclosure
      • Disclosures & Disclaimers
      • Privacy Policy

subscribe
search icon
Homepage link
  • DIY
    • Home Improvement
    • Home Maintenance
    • DIY with Paint
    • DIY Decor
    • Cabinets
    • Furniture
    • Camper
    • Makeovers
    • Tips
    • Tools
    • $100 Room Challenge
  • Crafts
    • Painting Crafts
    • Paper Crafts
    • Fabric and Yarn
    • Wreaths and Banners
    • Handmade Gifts
    • Christmas
    • Art
  • Design
    • Color
    • House Flipping
    • Home Staging
    • Bathroom
    • Bedroom
    • Home Office
    • Kitchen Design
    • Home Decorating
    • Outdoor Decor
  • Organizing
    • Airbnb
    • Cleaning
    • Planners and Worksheets
    • Printables
    • Saving Money
  • Family
    • Recipes
    • Camping
    • Creativity
    • Faith
    • Holidays
    • Musings
  • Printables
    • Get the Newsletter and Free Printables
  • About Me
    • Work With Me
      • Affiliate Disclosure
      • Disclosures & Disclaimers
      • Privacy Policy

×

Spiced Up Paint Caddy

Modified: Aug 18, 2021 · This post may contain affiliate links · 84 Comments

  • Share
  • Email
  • Print

Have you ever been browsing through a thrift shop and seen one of these spice racks? Or maybe you have one in your own kitchen? This spice rack needs a new purpose in life

I was at a shop the other day and spied this one, bereft of its glass jars, looking a little lonely on the shelf. Indeed, the price tag only showed $1, an indication of its fallen state. I thought, "surely I could do something with that." Not sure what I'd do, I decided that $1 was a price I was willing to gamble on and I picked it up. (This is why I'm in danger of becoming a hoarder some day.) When I got home and walked into my laundry/craft room, I was greeted by an overflowing mess of acrylic craft paint and painting supplies. Inspiration strikes in the strangest places!

Using just a few tools and some leftover supplies, I redesigned my sad spice rack into quite a happy little paint caddy, complete with carrying handle, and slots on the side to store brushes!
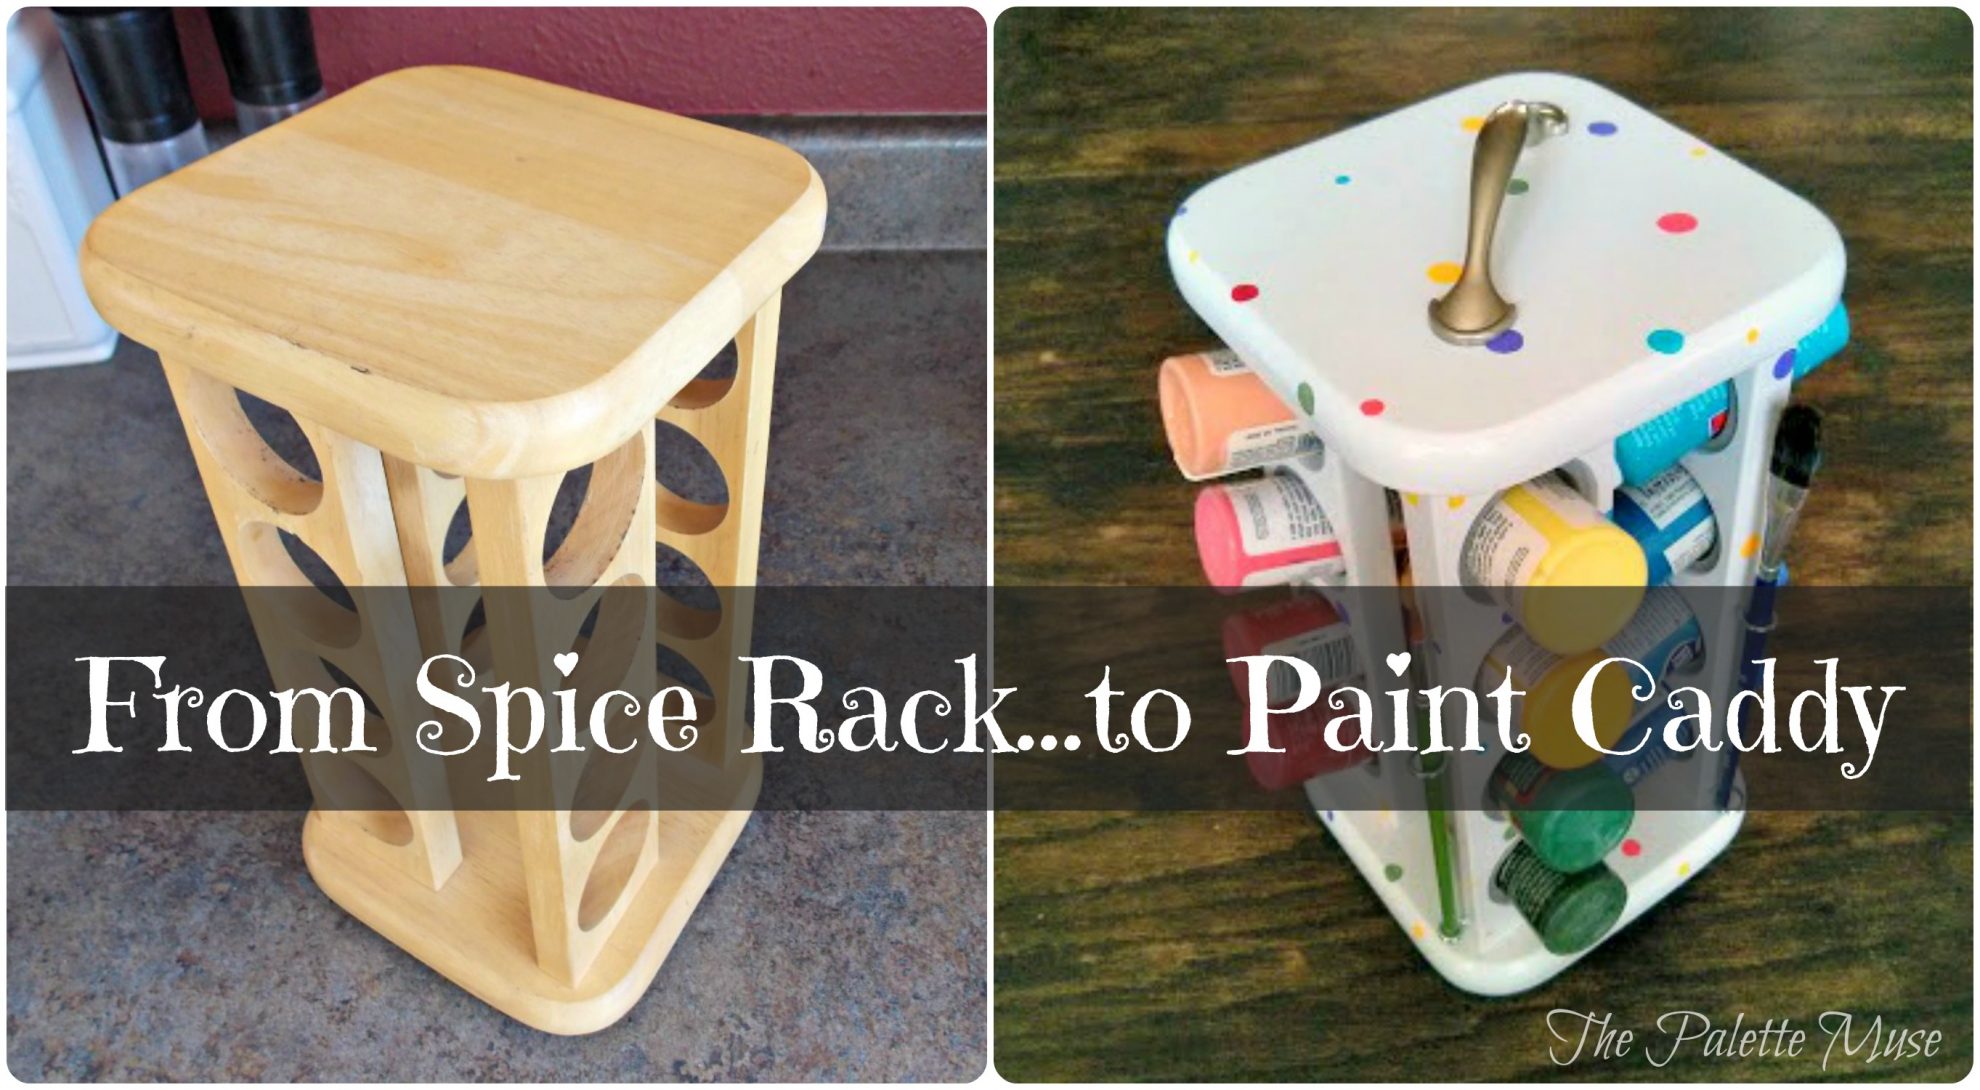
An old spice rack gets new life as a craft paint organizer

Here's how:

First, I sanded the whole piece down really well, then cleaned it with a cloth.

SandingThen I spray-painted it white. I had a hard time deciding what color/style to make it, but in the end I went for fun and colorful, since it would be carrying all different colors of paint.

I free-handed the different size polka dots all over, using the craft paint that I'd be storing in it. You could also use a hole punch and small pieces of blue painter's tape to create little dot stencils for yourself, if you're not into free-hand painting.Colorful polka dots

Then I screwed eye-hooks into the sides of the caddy. Hint: Pilot holes are your friend. It's so much easier to screw in these little eye-hooks when there is already a hole to screw them into. Simply select a drill bit that is slightly smaller in diameter to the size of the shaft on your hook.Selecting Drill Bits

Drill the hole almost as long as the length of the shaft.

Then screw in the hook, making sure it ends up level horizontally. I used one hook for the top, and one at the bottom to stabilize the brush.

Next, I used Weatherstripping Foam Tape to line the inside of each space for the paints to rest on. My paint bottles were too narrow to sit comfortably in these holes, without wanting to slide out. I found that weatherstripping is adhesive on one side (allowing me to attach it to the inside of the circles) and slightly tacky on the other side (perfect for gently gripping the paint bottles).Foam Tape

Now the paint bottles are nice and cozy, and don't go sliding out when I move the caddy around.

Tip: If you are the type of crafter who hoards stores small supplies like beads or glitter, then look for a spice rack with its original glass jars still in place. They'd be perfect for those little items.

Finally, it came time to attach the handle to the top, for easy carrying ability. Have you ever attached a drawer handle to a drawer, and struggled to get the measurements right for the screw holes?

Here's a trick: tape a piece of blue painters tape to the bottom of the handle.Painters Tape for Marking

Mark the holes.Painters Tape 2

Remove the tape from the handle and apply it to the surface you're going to drill through (careful not to stretch the tape!).Painters Tape 3

Now drill through the holes you marked on the tape. No measuring, and the tape protects the surface you're drilling on.Painters Tape 4

All finished! I loaded up my caddy with paint and brushes and congratulated myself on how easy it would now be to keep my paints organized. Then I abruptly came back to reality again when my kids claimed my masterpiece for themselves.

Can you blame them?
With my handy paint carrying case
Off to work!

Guess it's back to the thrift store again to find one for myself!

More Crafts

  • Easy Dip Dyed Wooden Spoons
    Easy Dip Dyed Wooden Spoons
  • Organize your craft stash
    How to Organize Your Craft Stash
  • Holding an etched glass shampoo bottle
    How to Make Etched Glass Shampoo Bottles
  • The Palette Muse Ultimate Handmade Gift Guide
    The Ultimate Handmade Gift Guide for the Holiday Season

Comments

  1. Rena McDaniel says

    March 28, 2014 at 7:03 pm

    You have an amazing eye for treasues! Beauiful and useful. Shared.

    Reply
    • Meredith says

      April 01, 2014 at 11:13 am

      Thanks Rena!

      Reply
  2. Johanna says

    March 29, 2014 at 12:28 pm

    Super cute!

    Reply
    • Meredith says

      April 01, 2014 at 11:14 am

      Thanks Johanna!

      Reply
  3. melissa @ my whole food life says

    March 31, 2014 at 6:53 am

    Just found you via the social media link up. Looking forward to connecting!

    Reply
    • Meredith says

      April 01, 2014 at 11:14 am

      Thanks Melissa...nice to meet you!

      Reply
  4. Paul Graham says

    March 31, 2014 at 9:10 am

    Good share on the Paint Caddy Meredith and well presented. Painters tape is useful for many drilling projects and also keeps the dust contained if the material is noxious. Hope the kids paint you something nice !

    Reply
    • Meredith says

      April 01, 2014 at 11:15 am

      Thanks Paul, I love painters tape for all sorts of uses!

      Reply
  5. Laurie S Hurley says

    March 31, 2014 at 9:17 am

    In my next life I will come back as a DIY person. I seem to have not a creative bone in my body, except when it comes to online stuff. Hands-on projects and I are just not compatible. I love what you made!

    Reply
    • Meredith says

      April 01, 2014 at 11:17 am

      Thanks Laurie! I think my husband wishes I was less of a DIY person. It's not all fun and games when there are power tools in the kitchen and drop cloths all over the house. 🙂

      Reply
  6. Trish says

    March 31, 2014 at 9:38 am

    That's such a cool idea! And even someone who's craft-challenged like me could pull it off 🙂

    Reply
    • Meredith says

      April 01, 2014 at 11:19 am

      Thanks Trish - you definitely could! Sometimes it just takes a little nudge in the right direction....

      Reply
  7. the Frozen Canuck says

    March 31, 2014 at 10:35 am

    Excellent paint caddy! Always a pleasure discovering new uses for something that has been thrown aside. I liked the polka dots!

    Reply
    • Meredith says

      April 01, 2014 at 11:19 am

      Thanks! I always love a good excuse to use polka dots. 🙂

      Reply
  8. ballnchainz says

    March 31, 2014 at 11:32 am

    This is Jay

    Very nice. You should do your Owen hgtv show restoring items back to being useful. Great pics and great post. Thanks for sharing.

    Reply
    • Meredith says

      April 01, 2014 at 11:20 am

      Thanks Jay!

      Reply
  9. Lenie says

    March 31, 2014 at 11:42 am

    Meredith, I love your ideas. I'm not a crafter, but always on the lookout for a bargain and you get me started thinking - If you got one with the jars, wouldn't it be great to use it in the sewing room to store all those little things like pins, bobbins, etc.?
    Lenie

    Reply
    • Meredith says

      April 01, 2014 at 11:21 am

      That's a great idea Lenie! And you wouldn't have to paint it, if you're not into that kind of crafting, it would be perfectly useful as is.

      Reply
  10. Jeri Walker-Bickett (@JeriWB) says

    March 31, 2014 at 5:42 pm

    That is too cute, and I used to have one of those types of caddies, but it's long gone now. I would love it if you did a post on mod podge. I have some rustic pine furniture that I hate to replace, but it could use a face lift. I'm not sure if painting or some other creative application would be for the best.

    Reply
    • Meredith says

      April 01, 2014 at 11:22 am

      Great idea Jeri! I love mod podge. I'll put it on my list...

      Reply
  11. Christina says

    March 31, 2014 at 6:52 pm

    Cool idea for repurposing! And the tape tip is great. Have you showcased any of your projects at the county or state fairs?

    Reply
    • Meredith says

      April 01, 2014 at 11:23 am

      I never thought about the state fair, but that would be really fun. Thanks for the idea!

      Reply
  12. jacquiegum says

    March 31, 2014 at 8:32 pm

    Adorable! I so envy your knack!!!! Hope you found another for yourself 🙂

    Reply
    • Meredith says

      April 01, 2014 at 11:24 am

      Thanks Jacquie! I'm on the hunt...

      Reply
  13. Leora says

    April 01, 2014 at 7:48 am

    Such patience! A creative project indeed. Years ago I painted a old stool pink - that made my daughter happy.

    Reply
    • Meredith says

      April 01, 2014 at 11:24 am

      There's nothing like seeing your kids' faces light up when you make them something, is there?

      Reply
  14. Welli says

    April 02, 2014 at 1:49 am

    Never a gull moment for a creatve mind. Life is much too fun to be dull. Great work and post.

    Reply
    • Meredith Wouters says

      April 03, 2014 at 8:37 am

      Thanks! You're right, why let life be dull when you can fill it with fun things!

      Reply
  15. andleebakhlaqkhan says

    April 02, 2014 at 1:52 pm

    It was such a nice idea to change spice jar holding rack.
    This is another great Idea and by little work how we can change the looks and usage.... I still have your last Idea in my mind and I will try this as well during my holidays.

    You are really creative. All the best.

    Reply
    • Meredith says

      April 03, 2014 at 5:07 pm

      Thanks, and good luck with your creative endeavors!

      Reply
  16. Max's Midway Marketplace says

    April 03, 2014 at 11:37 am

    Hi Meredith; just remember all the fun you had doing it. and i have to wonder how long you would have stayed all neat and clean even with your beautiful new catti. I can remember starting school with neat arranged folders that lasted a week or two maybe a month. smile i also wonder if you wouldn't have ended up giving it away as a gift at some point. I can't remember many craft projects I've ever done that i still have. smile thanks for sharing the experience. but now its back to work for both of us. take care, Max

    Reply
    • Meredith says

      April 03, 2014 at 5:08 pm

      Thanks Max, and I agree. I think the best end to a good craft project is by brightening someone else's life with it.

      Reply
  17. crystalzakrison says

    April 03, 2014 at 2:09 pm

    This is a great idea! Thanks for sharing with us! =)

    Reply
    • Meredith says

      April 03, 2014 at 5:09 pm

      Thanks, glad you enjoyed it!

      Reply
  18. Beth Niebuhr says

    April 04, 2014 at 10:52 am

    Very cool, Meredith. It looks great! And I like the hint about the blue tape for marking where to drill. Thanks for sharing.

    Reply
    • Meredith says

      April 05, 2014 at 9:03 am

      Thanks Beth! That blue tape trick is really handy for hanging pictures too.

      Reply
  19. theJenWeaver says

    April 04, 2014 at 11:04 am

    You are so creative! I love repurposed items and I'm never going to look at an old spice rack the same way again! 🙂

    Reply
    • Meredith says

      April 05, 2014 at 9:05 am

      Thanks! I love using repurposed things too!

      Reply
  20. Jennifer Saarinen says

    April 04, 2014 at 4:33 pm

    This is such an awesome idea! I have a spice rack I don't use and can't wait to do this. I'd love for you to share your post on my Just for Kids weekly link up 🙂 Thanks so much ! http://www.homeschoolingmom4two.com/2014/03/just-for-kids-weekly-link-up-crafts_31.html

    Reply
    • Meredith says

      April 05, 2014 at 9:00 am

      Thanks! I just did (and followed you on pinterest and g+!)

      Reply
  21. niekkamcdonald says

    April 05, 2014 at 1:42 pm

    That is really cute! I wish I was creative like this. You have such good vision for the things you are creating.

    Reply
  22. Meredith says

    April 07, 2014 at 1:08 pm

    Thanks Niekka!

    Reply
  23. Danielle Fouts says

    April 07, 2014 at 2:45 pm

    Such a great idea! I love repurposing and this is so cute!

    Reply
    • Danielle Fouts says

      April 07, 2014 at 2:45 pm

      oh! and I'm stopping by from the Click and Chat Social Media Link Up! ~ Danielle from Family Centsability ~

      Reply
      • Meredith says

        April 09, 2014 at 2:34 pm

        Thanks Danielle! It's great to meet you.

        Reply
  24. Marwa Farouq (@marwa_farouq) says

    April 09, 2014 at 12:53 am

    This is so beautiful and has such a lively feel to it! I will try this out with my daughter maybe she loves the DIY kind of things! Thanks for sharing. Found your blog on the Click n chat link up!

    Reply
    • Meredith says

      April 09, 2014 at 2:37 pm

      Thanks Marwa - that's the best way to do DIY, with a friend or daughter!

      Reply
  25. Marti @ SewliciousHomeDecor says

    April 09, 2014 at 9:47 am

    This is just too cute and so useful! I've been tempted to buy a spice rack like this just for this reason! Thanks so much for sharing this with us Show-licious Craft party!! I am excited that you liked up! I pinned it to the party board. 🙂

    Reply
    • Meredith says

      April 09, 2014 at 2:35 pm

      Thanks Marti! Glad you liked it. Heading over to follow your board now...

      Reply
  26. Cindy deRosier says

    May 05, 2014 at 10:06 am

    I'm the Editorial Assistant for Fun Family Crafts and I wanted to let you know that we have featured your paint caddy! You can see it here:

    http://funfamilycrafts.com/spice-rack-paint-caddy/

    If you have other kid-friendly crafts, we'd love it if you would submit them. If you would like to display a featured button on your site, you can grab one from the right side bar of your post above. Thanks for a wonderful project idea!

    Reply
    • Meredith says

      May 05, 2014 at 3:47 pm

      Thank you Cindy! I'm heading over right now... 🙂

      Reply
  27. Victoria says

    October 05, 2014 at 8:29 pm

    Super cute! I made mine a few years back and it's so handy. Here's how I made mine if you want to check it out! http://www.vixenmade.com/2012/03/spice-rack-to-paint-organizer.html?m=1

    Reply
    • Meredith says

      October 06, 2014 at 10:40 am

      Thanks for stopping by! I will...

      Reply
  28. Bre @ Average But Inspired says

    January 27, 2015 at 7:22 pm

    I LOVE this idea!!!

    Reply
    • Meredith says

      January 29, 2015 at 8:58 am

      Thanks Bre!

      Reply
  29. Kristen from The Road to Domestication says

    February 27, 2015 at 4:58 pm

    Now, I've seen a lot of different uses for spice racks, but I think this one is my favorite! WOW! Thanks for joining us at the #HomeMattersParty – we hope to see you again next week! Feel free to bring a friend with you 🙂 Happy Friday! #TGIF

    Reply
    • Meredith says

      March 04, 2015 at 10:29 am

      Thanks Kristen! I'll definitely be there this week. I love the #HomeMattersParty!

      Reply
      • Kristen from The Road to Domestication says

        March 06, 2015 at 6:49 am

        Awesome! Well, in case you haven't noticed it yet, you've been featured this week at the #HomeMattersParty - because we loved your link so much! Feel free to check it out at: http://theroadtodomestication.com/2015/03/06/home-matters-linky-party-27/

        Reply
        • Meredith says

          March 07, 2015 at 9:53 am

          Thank you so much for featuring me!

          Reply
  30. the Painted Apron says

    March 06, 2015 at 6:07 am

    I LOVE this! Great tip on the handle placement too! You can make great polka dots using the handle tip end of a paintbrush too 🙂
    Jenna

    Reply
    • Meredith says

      March 07, 2015 at 9:53 am

      Thanks Jenna, that's a great tip about the end of a paintbrush. I was thinking a pencil eraser might work too.

      Reply
  31. satrntgr says

    March 06, 2015 at 1:18 pm

    What a great idea!!! I always see those racks at the thrift store, now I can make something to help organize my craft room! 🙂

    Reply
    • Meredith says

      March 07, 2015 at 9:54 am

      Thanks! I love to see old things redeemed and put to good use. 🙂

      Reply
  32. izabelakumar says

    March 07, 2015 at 6:33 pm

    That's beautiful Meredith! Very creative! I found you on #homemattersparty 🙂

    Reply
    • Meredith says

      March 10, 2015 at 1:03 pm

      Thanks, and nice to meet you!

      Reply
  33. milamyk says

    March 12, 2015 at 4:01 pm

    What an awesome idea! It looks so cheerful now!

    I would love for you to share your it with our Thursday Link Up Party- Idea box:

    http://milaslittlethings.com/2015/03/idea-box-thursday-link-party.html

    xx
    Mila
    milaslittlethings.com
    [email protected]

    Reply
    • Meredith says

      March 13, 2015 at 7:57 am

      Thanks Mila! Heading over there now...

      Reply
  34. Danielle says

    March 14, 2015 at 6:24 am

    Super, super cool! I love ideas like this!! Thanks so much for linking up with Idea Box!

    Reply

Trackbacks

  1. The Weekend Retreat Link Party #62 - MOMMY ON DEMAND says:
    April 10, 2014 at 4:56 pm

    […] Spiced Up Paint Caddy by The Palette Muse […]

    Reply
  2. Weekend re-Treat Link Party #62 says:
    April 10, 2014 at 5:01 pm

    […] Spiced Up Paint Caddy by The Palette Muse […]

    Reply
  3. How To Repurpose An Old Spice Rack says:
    July 29, 2014 at 9:37 am

    […] Click Here To See The Transformation […]

    Reply
  4. Home Matters Linky Party #27 - The Road to Domestication says:
    March 5, 2015 at 10:04 pm

    […] Spice Rack To Paint Caddy from Meredith @ The Palette Muse […]

    Reply
  5. Home Matters Linky Party #27 - Overdue Organizing says:
    March 5, 2015 at 10:05 pm

    […] Spice Rack To Paint Caddy from Meredith @ The Palette Muse […]

    Reply
  6. 50 Clever Craft Room Organization Ideas - DIY Joy says:
    February 1, 2016 at 7:54 am

    […] thepalettemuse […]

    Reply
  7. 8 Adorable Ways You Can Upcycle Old Furnitures for Your Kids - LifeTitude says:
    March 3, 2016 at 6:59 pm

    […] assist you in making a colorfully creative organizer for all your paints and brushes. Meredith at The Palette Muse offers instructions and step-by-step photos to complete this […]

    Reply
  8. 8 Adorable Ways You Can Upcycle Old Furnitures for Your Kids | LifeTitude says:
    March 3, 2016 at 7:00 pm

    […] assist you in making a colorfully creative organizer for all your paints and brushes. Meredith at The Palette Muse offers instructions and step-by-step photos to complete this […]

    Reply
  9. 22 Creative Arts & Crafts Storage Inspiration - Arts and Classy says:
    March 4, 2016 at 4:24 pm

    […] {SOURCE} […]

    Reply
  10. 26 Genius Ways To Make Something Old New Again says:
    March 14, 2016 at 8:54 am

    […] Spice rack paint caddy – Once a spice rack starts to look dated, repurpose it in the art room! Just as it kept your spices separated, this paint caddy does a great job of separating and highlighting all the colors in the rainbow. […]

    Reply
  11. 26 Genius Ways To Make Something Old New Again | Prepper's Survival Homestead says:
    March 14, 2016 at 5:15 pm

    […] Spice rack paint caddy – Once a spice rack starts to look dated, repurpose it in the art room! Just as it kept your spices separated, this paint caddy does a great job of separating and highlighting all the colors in the rainbow. […]

    Reply
  12. 26 Genius Ways To Make Something Old New Again – Small Steps.Big Dreams. says:
    March 30, 2016 at 3:28 am

    […] Spice rack paint caddy – Once a spice rack starts to look dated, repurpose it in the art room! Just as it kept your spices separated, this paint caddy does a great job of separating and highlighting all the colors in the rainbow. […]

    Reply
  13. How To Make Something Old New Again says:
    July 7, 2016 at 8:10 am

    […] Spice rack paint caddy – Once a spice rack starts to look dated, repurpose it in the art room! Just as it kept your spices separated, this paint caddy does a great job of separating and highlighting all the colors in the rainbow. […]

    Reply
  14. 16 Neat DIY Projects For Your Craft Room | homedesignfind says:
    April 27, 2017 at 6:39 am

    […] Source […]

    Reply
  15. 16 Neat DIY Projects For Your Craft Room - The Veranda of ideas says:
    April 27, 2017 at 8:10 am

    […] Source […]

    Reply
  16. 15 Storage Hacks to Banish Clutter – chuckiesblog says:
    May 12, 2019 at 7:21 pm

    […] Idea via thepalettemuse […]

    Reply

Leave a Reply Cancel reply

Your email address will not be published. Required fields are marked *

Welcome!

I'm Meredith, the designer, crafter, and DIY-er behind The Palette Muse. I love all things colorful and creative, and I love sharing them with you. Thanks for visiting today!

More about me

Popular

  • The best way to paint kitchen cabinets, with no sanding
    The Best Way to Paint Kitchen Cabinets (No Sanding!)
  • How to install double barn doors
    What I Wish I'd Known about Double Barn Doors
  • How to Paint Laminate Cabinets
    How to Paint Laminate Cabinets without Sanding
  • How to make your own simple chair covers
    How to Make Your Own Simple Chair Covers

Seasonal

  • Color palette based on Tourmaline crystals with aqua, green, amethyst, and mauve
    Tourmaline Color Palette
  • Thoughts on empty nesting, represented by a book, glasses, a candle, and a small white pumpkin.
    3 Things I've Learned in my First 3 Weeks Empty Nesting
  • Turquoise and terracotta complement each other in this Southwestern inspired turquoise color palette.
    Turquoise Color Palette
  • New Mexican Hot Chocolate Recipe
    New Mexican Hot Chocolate Recipe

Footer

↑ back to top

About

  • Privacy Policy

Newsletter

  • Sign Up! for emails and updates

Contact

  • Work With Me

As an Amazon Associate I earn from qualifying purchases.

Copyright © 2025 The Palette Muse

  • Pinterest
  • Facebook
  • Email