Concrete Christmas Ornaments? Who ever heard of such a thing? Well, when you’re a DIY-er like me, you sometimes find yourself with spare material left over from projects. And if you’re also cheap like me, then you hate to see things go to waste.
If necessity is the mother of invention, then leftover material is its quirky aunt. She always seems to run off on a tangent, but at least you can count on her for some fun, and and an interesting story or two along the way.
Wait, where was I? Oh right. Concrete Christmas Ornaments. I had a little leftover Feather Finish concrete from my Guest Bathroom Remodel, and I thought it would make cute and rustic Christmas ornaments. After a couple of false starts and failed attempts (real life, people!), I finally figured out an easy way to turn leftover concrete mix into ornaments.
Today I’m sharing this project with you as part of Remodelaholic’s Creative Christmas, where 26 bloggers have teamed up to bring you all kinds of crafts, decor, gifts, and Christmas inspiration to get you in the mood for the holidays. Be sure to check out the full linkup over at Remodelaholic for all the projects!
How to Make Concrete Ornaments

~ This post contains affiliate links, which means I’ll receive a small commission if you make a purchase. Thanks for supporting The Palette Muse! ~
This is a great craft because it requires so few ingredients. With just a little leftover concrete and some cookie cutters, you can make your own ornaments. Think of these like salt dough ornaments, but with concrete instead of dough.
Gather your initial supplies.
You’ll need a few cups of dry concrete mix. I used Henry Feather Finish, because it’s what I had leftover from covering the counter tops in my guest bathroom. You could probably use regular concrete too, if you have it, but I liked this kind because it has a nice smooth finish to it.
Then you’ll need a work space covered in wax paper. I used a cookie sheet, with a sheet of foil wrapped around it and the wax paper laying on top.
Try a plastic cup and plastic knife for mixing and spreading the concrete; it’ll make cleanup a whole lot easier.
Finally, you’ll need several plastic cookie cutters and a straw.
Mix and spread the concrete.
Here’s the first place I originally went wrong. I thought it would be cool to mix the concrete really thin and pour into the cookie cutters like molds. Everything went great until I tried popping the ornaments out of the cookie cutters and they all shattered. Then I read the directions (something I rarely do unless things are going wrong) and it said not to thin the mix. So I went back to full strength concrete mix.
Step 1: Pour half a cup of water into your plastic cup. Then add one cup concrete and stir well with the plastic knife. Make sure you get all the lumps out. The consistency should be pretty thick, like cookie dough. (This amount of concrete makes about 6 medium size ornaments.)
Now you need to spread the concrete onto your work space. Here’s the second place I went wrong. I thought I would lay the cookie cutters on the tray and spread concrete into each one of them. But that produced really thick, heavy ornaments, with a choppy finish. Definitely high on the rustic scale, but not so pretty. So I finally came to the conclusion that I should spread the concrete out like cookie dough and use the cookie cutters the way God and Betty Crocker intended them.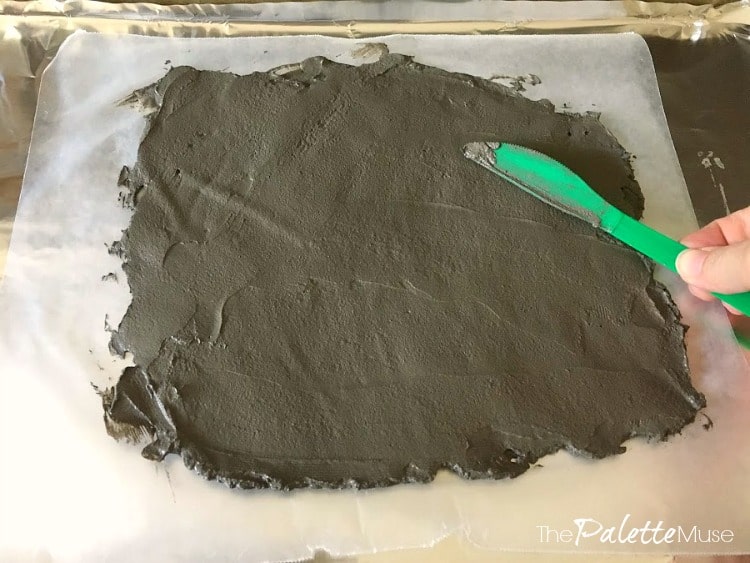
Step 2: Use the knife to scoop out the concrete mix onto your waxed paper surface, and spread around evenly until the concrete is about 1/8″-1/4″ thick. Think sugar cookies. Just don’t lick your fingers while you’re working.
Cut out the ornament shapes.
The cookie cutters have to stay in the concrete as it dries (probably overnight) so that’s why we only work with a little concrete at a time. If you have lots of cookie cutters and work space, then you could definitely do more. I did mine in three batches, which sounds like a lot, but it really only took a few minutes of work, spread out over three days.
Step 3: Press your cookie cutters into the concrete.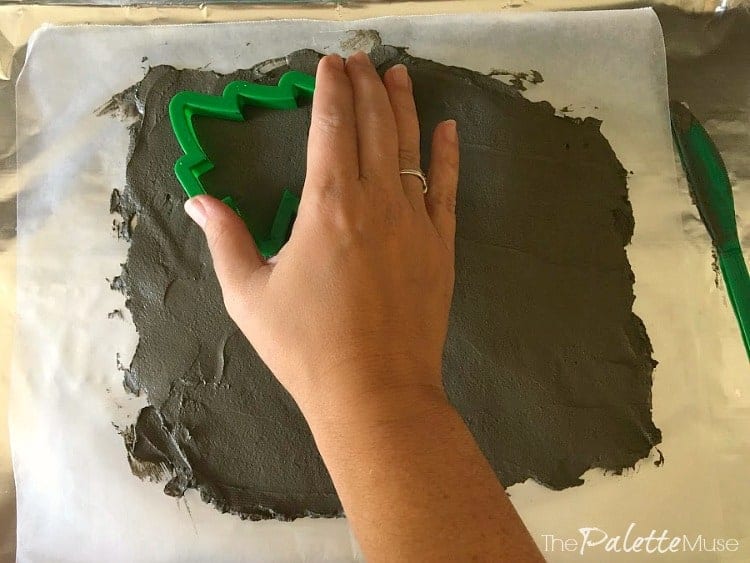 Try to fit as many as you can on the concrete, because unlike cookie dough, you can’t do much with the leftover pieces. Leave the cookie cutters in place.
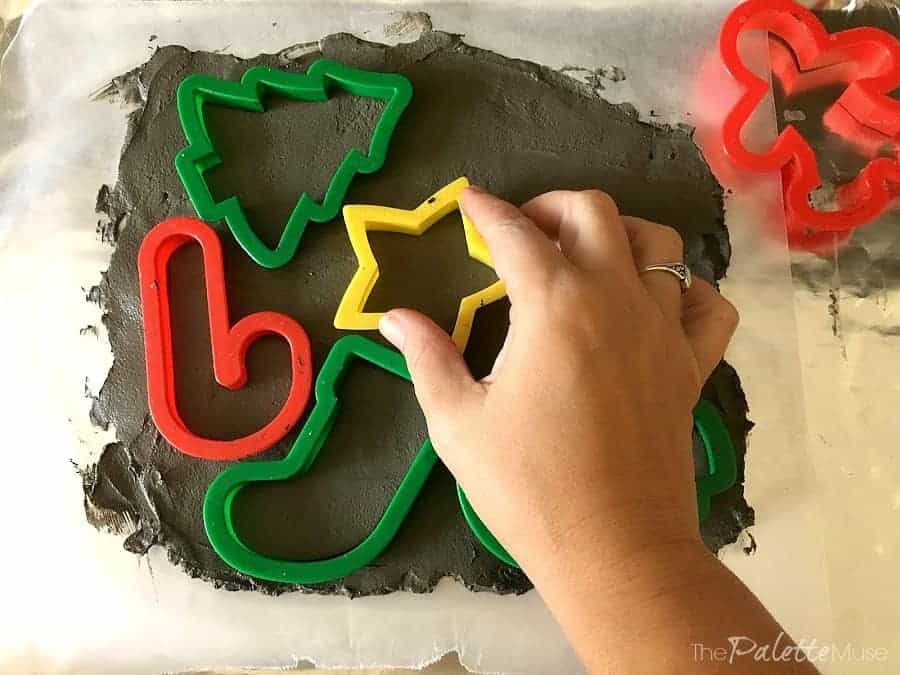
(It’s a good idea to use plastic cookie cutters instead of metal, because the concrete has such a high moisture content. As the moisture dries, it could rust your metal cookie cutters.)
Step 4: Cut your straw into several small pieces. Press a piece of straw into the concrete near the top of each ornament, and give it a little twist. Don’t get closer than 1/4″ to the edge. This will be the hole that you’ll put string through to hang the ornament. (You can omit this step if you don’t want to hang them on a tree.)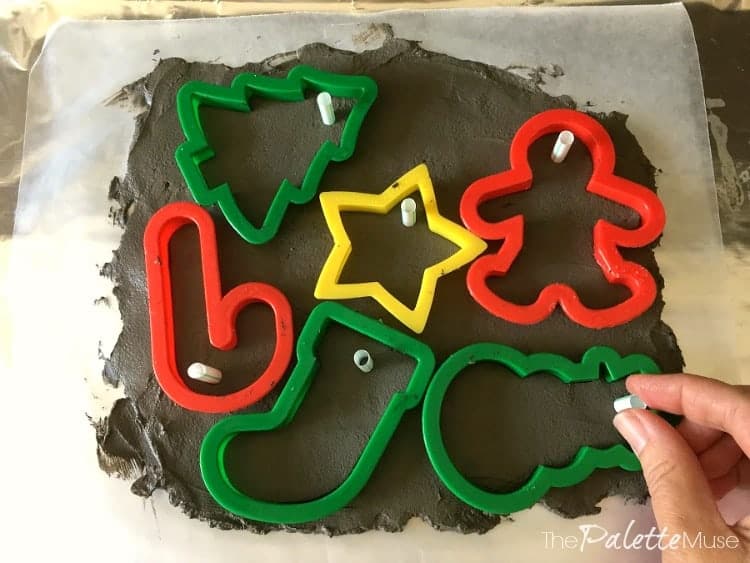
At this point, you just have to wait for a few hours. I did my batches at night, and by the next day, they were ready to pop out of the cookie cutters and finish drying on their own. Be gentle when popping the concrete out of the cookie cutters, and pushing the straws through the holes. The concrete is strong, but a little brittle, kind of like porcelain.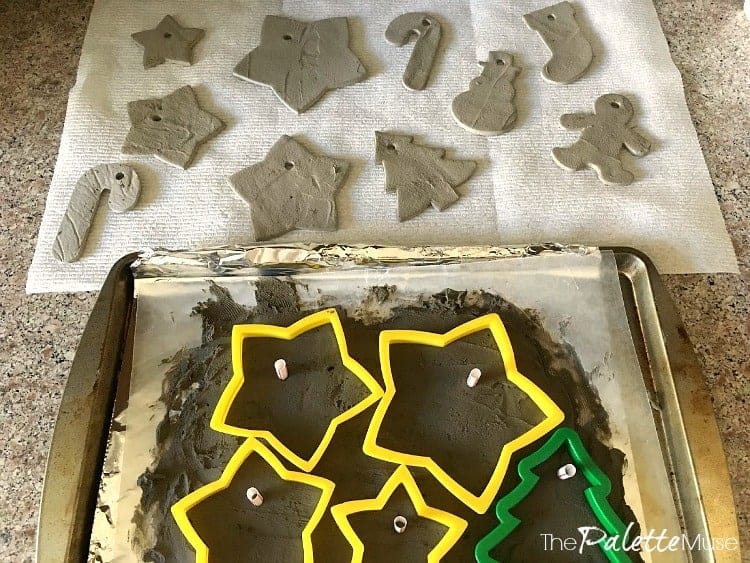
Decorate!
Now the fun part! You can decorate your ornaments however you’d like. I used white paint in an asymmetrical pattern on mine, and my daughter got creative with colorful craft paint.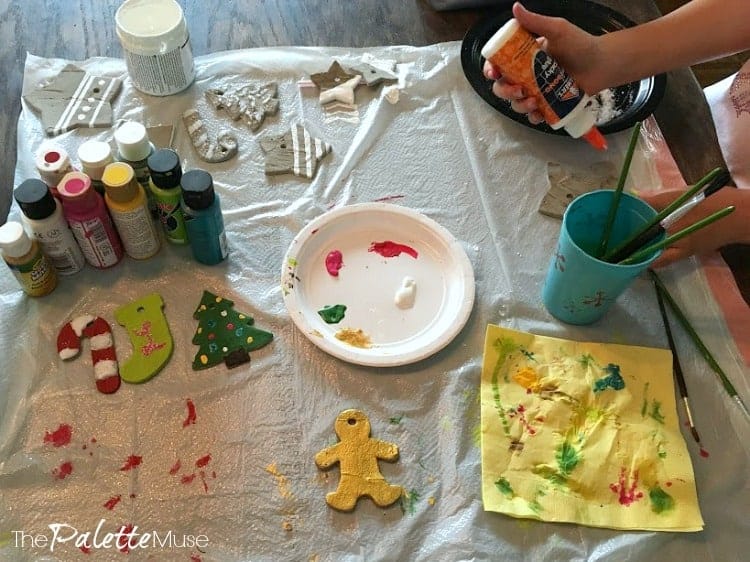 We both used a little glue and Epsom salts to give a snowy look to some of them.
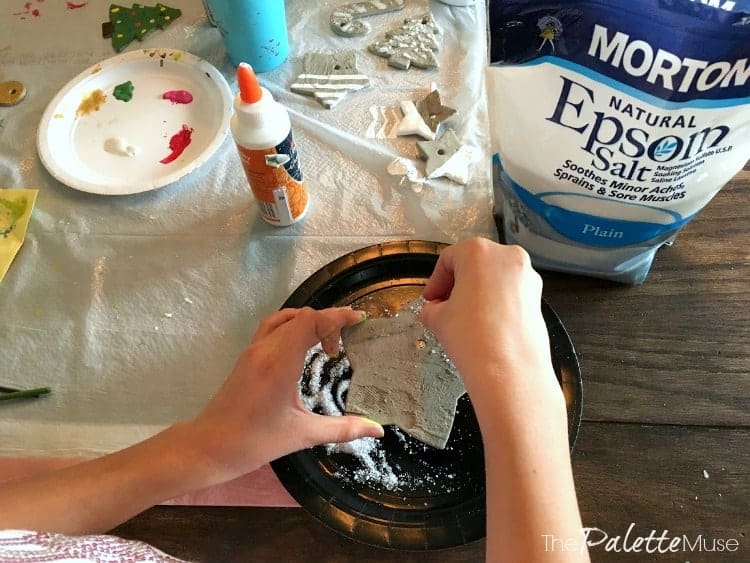
Once the paint was dry, I used twine to hang them and accentuate their rustic style.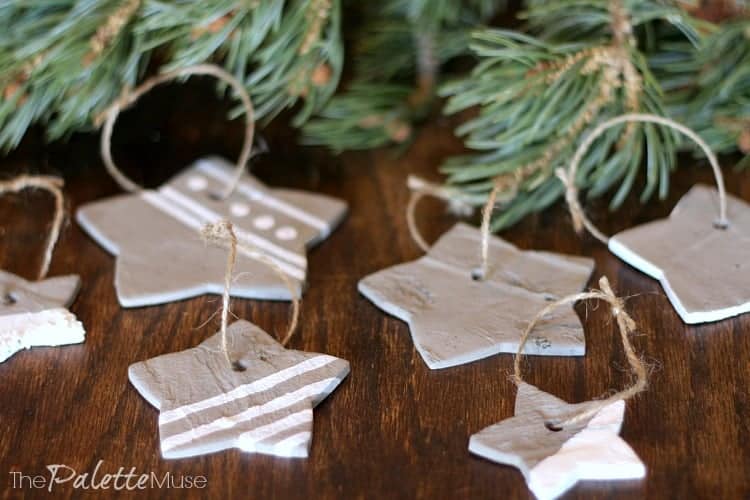
These concrete ornaments are surprisingly light, almost with the feel of papier mache. They’re a snap to paint on, and easy to store flat. What more could you ask from Christmas Ornaments? Oh, and if you happen to have a little leftover concrete and some cookie cutters, they’re free to make!
Concrete Ornament Resources
You probably have most of these supplies already, with the possible exception of the concrete. (Not that I’m doubting you! There’s no shame in not owning concrete mix.)
Star Cookie Cutters – or any other shape you like.

For lots more inspiration and holiday cheer, be sure to check out all the other amazing projects in Remodelaholic’s Creative Christmas week!

DIY Christmas Trees and Ornaments
Wintry Silver Dollar Store Christmas Tree Decor | Remodelaholic
Marbled Christmas Ornaments | Doodlecraft
Scrap Wood Inlay Ornaments | The Ugly Duckling House
Woodburned Wood Slice Ornaments | Sisters What
Flocked Pine Cones | Practical and Pretty
Abstract Monogram Ornaments | Domicile37
Concrete Christmas Ornaments | The Palette Muse
Wood Slice Deer Ornaments | Our Crafty Mom
Vintage Gumball Machine Ornaments | Beth Watson Design Studio
Etched Glass Ornaments | Just Call Me Homegirl
Unicorn Inspired Christmas Tree | The DIY Mommy
Driftwood Reindeer Ornaments | Sustain My Craft Habit

DIY Christmas Gifts and Decor
Christmas Pine Hoop Wreath | This Mama’s Dance
Gingerbread Man Candles | Nourish and Nestle
Wire and Glass Chandelier | Home with Cupcakes and Crinoline
Christmas Scroll Wall Art | Grace In My Space
Lighted Wood Trees | Frazzled Joy
Crocheted Christmas Hat | Luz Patterns
Christmas Card Photo Display| Hertoolbelt
JOY Porch Sign | Ginger Snap Crafts
Folding Bar Cart Table | Everyday Party Magazine
Wood and Burlap Christmas Sign | Leap of Faith Crafting
Wood Block Snowman | Anika’s DIY Life
Holiday Candle Wrap | Dragonfly & Lily Pads
Christmas Pom Pom Pillow | Small Home Soul
Handlettered Wall Art | Smiling Colors
And while you’re busy crafting and creating, don’t forget I’m happy to answer any questions that come up along the way. Just drop me a comment below!
gorden kamar rumah sakit
Wednesday 19th of June 2019
kain gorden anti bakteri
Easy Concrete Ornaments You Can DIY in a Weekend - The Palette Muse
Andy
Sunday 19th of November 2017
Something tells me that these ornaments would be no match for the family cat. :-)
Meredith
Tuesday 28th of November 2017
Ha! Maybe not, but so far they've survived my dog, two children, and a husband, so that's pretty good!
Toni | Small Home Soul
Friday 17th of November 2017
These ornaments are perfect, I love that you can make them from leftovers, and using the straw to make the hole is genius. I love that you share "real life," because not all projects go perfectly on our first attempts.
Meredith
Tuesday 28th of November 2017
Thanks Toni! It's so true that sometimes it takes a while to get past the "fail" stage on a new project. ;)
Jeri Walker (@JeriWB)
Tuesday 14th of November 2017
What a great idea! DIY concrete ornaments make perfect sense, but I never would have thought to give such a thing a go without seeing this post.
Meredith
Thursday 16th of November 2017
Thanks Jeri! Now, if you ever end up with half a bag of concrete leftover from a project, you'll know what to do with it!
Sandey
Tuesday 14th of November 2017
While I may never be crafty or artistic, I always appreciate good writing. This post was ripe with hilarity. Thanks for the giggles, Meredith! Here are my favorites: "...then leftover material is its quirky aunt" "Then I read the directions (something I rarely do unless things are going wrong)" "...use the cookie cutters the way God and Betty Crocker intended them." "Think sugar cookies. Just don’t lick your fingers while you’re working." I love your blog - you are pure joy! xoxo
Meredith
Thursday 16th of November 2017
Oh Sandey, it always makes my day to know you got a smile from my posts! Thanks for reading (and commenting!) even though I know you're probably rolling your eyes at the projects! Hugs, friend!