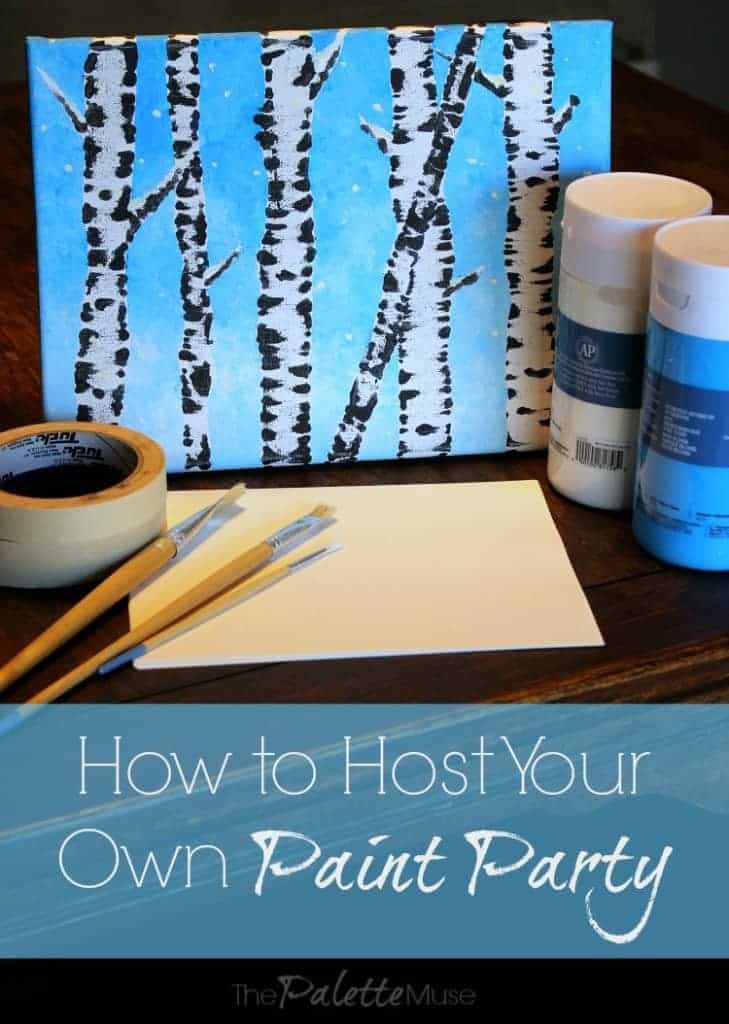
What's more fun than creating your own painting? Doing it with your friends! (And a little wine never hurts either.) Here's how to host your own paint party.
I'm convinced this is why the whole social painting scene is taking off. You may have heard of Paint and Sip nights or Coffee and Canvas. It's also called Social Painting, or Social Creativity, and it's a great way to get some "girl time" while doing something creative, especially if you think you have no artistic ability and would never attempt to paint a whole painting by yourself.
The only drawback is it can be kind of pricey, and you may not have a studio near you that offers such a thing.
Never fear, I'm here to show you how to host your own paint party, and I'm even going to walk you through the process of creating an aspen tree painting, so you can lead your own group of intrepid artists-in-training.
We recently did this at my church, and it was a blast! It was a great way to spend time together, and the guests all amazed themselves with their paintings. The question I heard the most leading up to the painting party was "Do I need to know how to paint?"
I reassured everyone that even if they'd never held a brush, they'd be able to create their own painting, and I would lead them every step of the way. They all looked simultaneously relieved and skeptical. But it was true! The secret is creating a simple, well-planned project ahead of time. Here's how we did it.
~This post contains affiliate links. If you make a purchase, I will receive a tiny bit of the profit at no extra cost to you. Thanks for your support!~
First, plan your party:
Party (and Painting) Space
You'll need a venue with plenty of table space. Each painter will need about two feet of their own space, so don't try to cram 6 painters around your kitchen table.
Lighting
Lighting is also important. If you're having an evening party, consider whether your space will have adequate lighting for each workspace.
These two considerations made our church the perfect location.
Party Decor
When you're planning your party decorations, make sure to get enough cheap plastic tablecloths to cover the work tables. They'll look nice with your party decor, but will really serve the purpose of protecting your tables and helping with cleanup later.
You don't need much for decor because the paintings will make it pretty for you.
Party Food
Make great food! Nothing brings people together like party food. Stick to finger foods that can easily be munched on with one hand, while holding a paintbrush in the other.
(Although we had an amazing chocolate cake which didn't fit the finger food requirement, but it was so worth it anyway!)
Party Drinks
Don't forget the drinks! Since we had this shindig at the church, we skipped the wine (although I'm pretty sure Jesus would have been OK with it) in favor of coffee.
Party Invites
Invite your friends, and reassure them over and over again that they'll have fun, even if they can't paint a lick. I promise they really will.
Next, plan your painting.
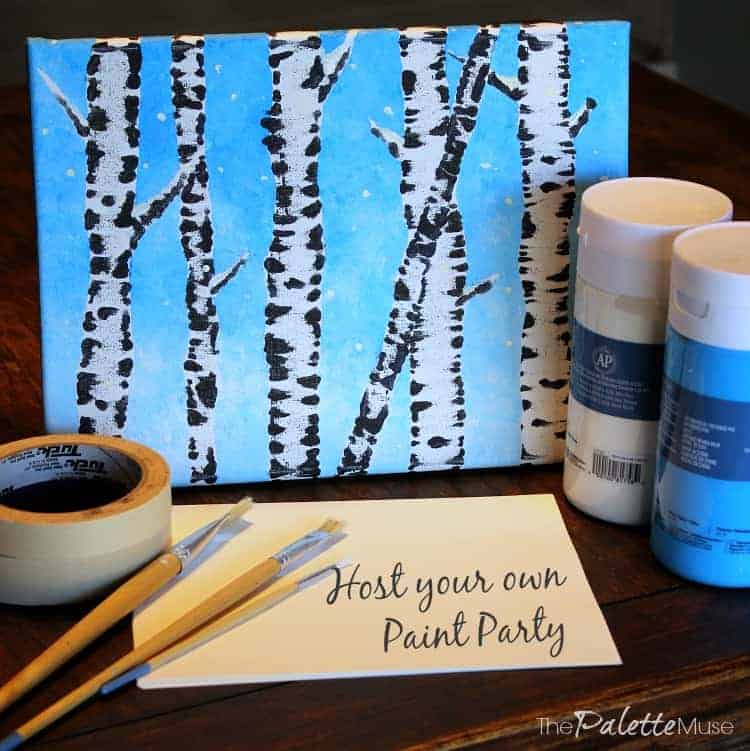
Or just use this one.
For this first go-round, I decided to stick with a limited palette and use a simple composition, so we painted aspen trees in the snow. This allowed us to use a couple of tricks that cut down on the need for special painting techniques.
For this painting, each person will need:
- A 9 X 12 canvas (Get the kind that's stapled on the back, not the side, so the finished painting doesn't need to be framed.)
- 3 paintbrushes - a fine point, a medium, and a larger flat brush
- A sheet of palette paper, or a foam plate for mixing paint
- A solo-cup sized plastic cup of water for washing brushes
- Acrylic Paint
: Cerulean Blue, White, Black
- Several strips of masking tape
- A credit card or library card
Here is the step-by-step process for creating your painting:
Tear the masking tape into several strips long enough to reach from the top to the bottom of your canvas and wrap around the edges.
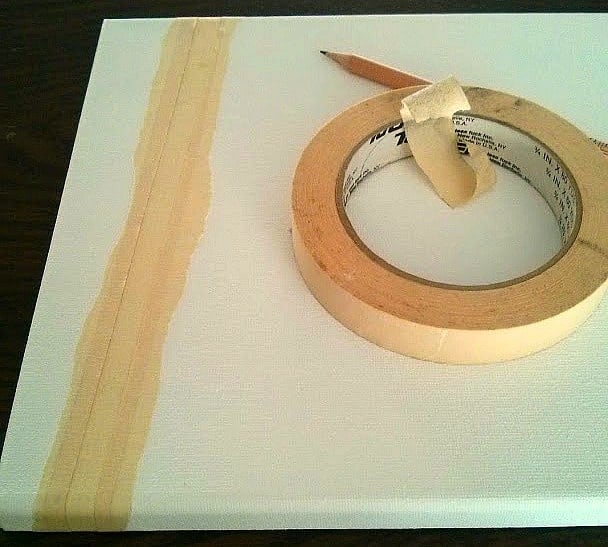
Tape them vertically onto the canvas in a random pattern. These strips will be the trees. You can cross a few to make a falling or leaning tree, or you can leave them straight up and down.
Advanced tip: tear the masking tape into halves longways, and put the irregular torn part on the outside edges of the trees to simulate the natural uneven lines of the tree trunks.
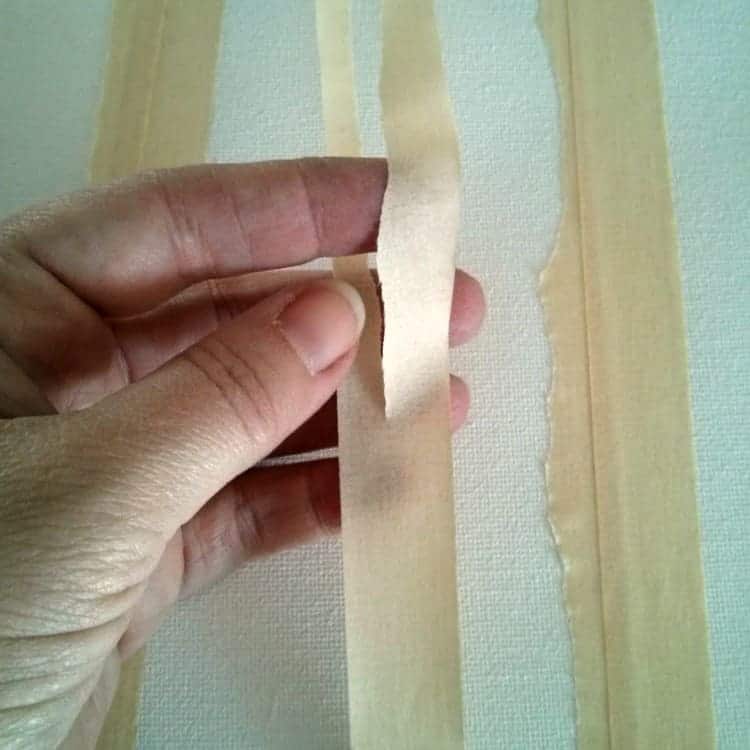
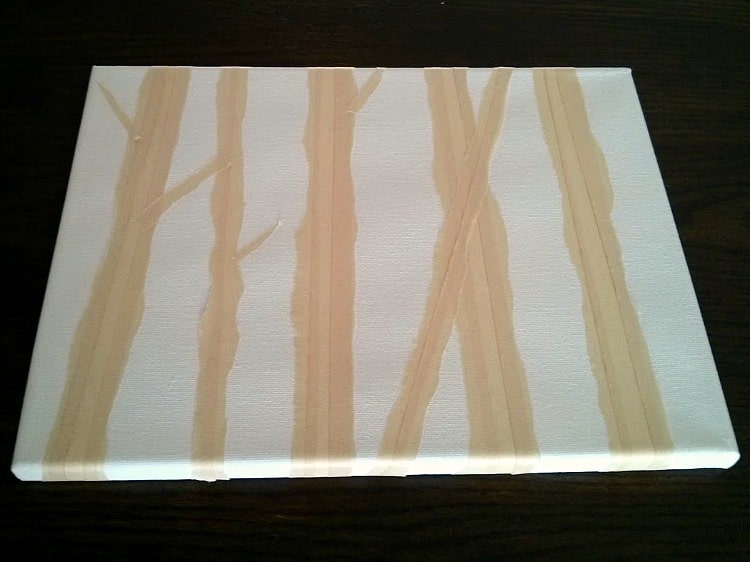
You can make a few small strips for smaller branches and apply them diagonally or horizontally.
Once you like the composition, be sure to smooth your tape down well, so no paint bleeds underneath.
The sky is made by blending the Cerulean Blue with the White, starting at the top with pure blue, and ending at the bottom with lighter blue. To achieve this effect, you'll use your large or medium brush to mix the paint a little at a time.
First apply some pure blue along the top of the canvas. Then dab your brush into the white paint and add a little to the blue paint on your palette.
Dab this slightly lighter blue all along the bottom edge of the pure blue on the canvas and use your brush to mix the two together, just a little bit, on the canvas.
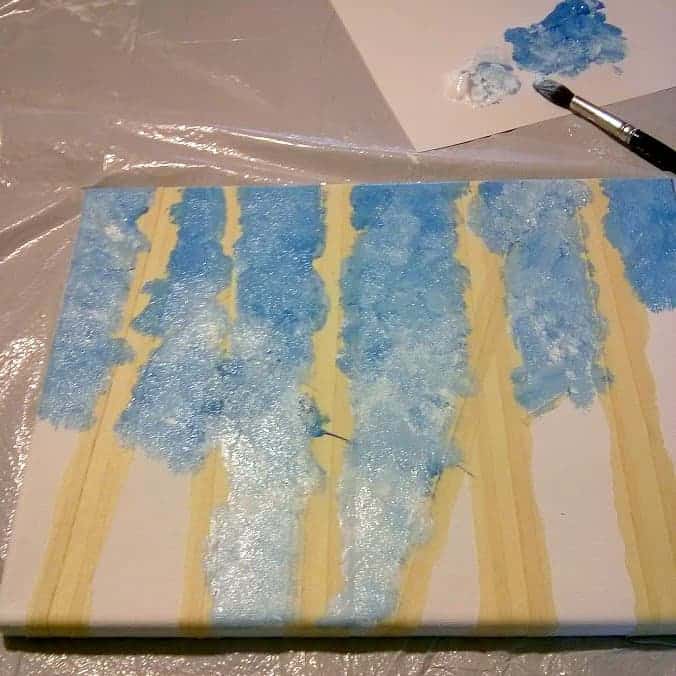
Keep repeating this step, adding a little more white each time until you get to the bottom of the canvas.
Tip: You can use any kind of brush strokes. Smush it, swirl it, drag it, or try a combination. This is art, it doesn't have to be perfect!
Be sure to paint around the edges of the canvas too, so when you see it from the side it doesn't look messy and unfinished.

Carefully lift up the masking tape. You don't need to wait till the paint is dry, just be careful not to smudge it while you're working on the tape.
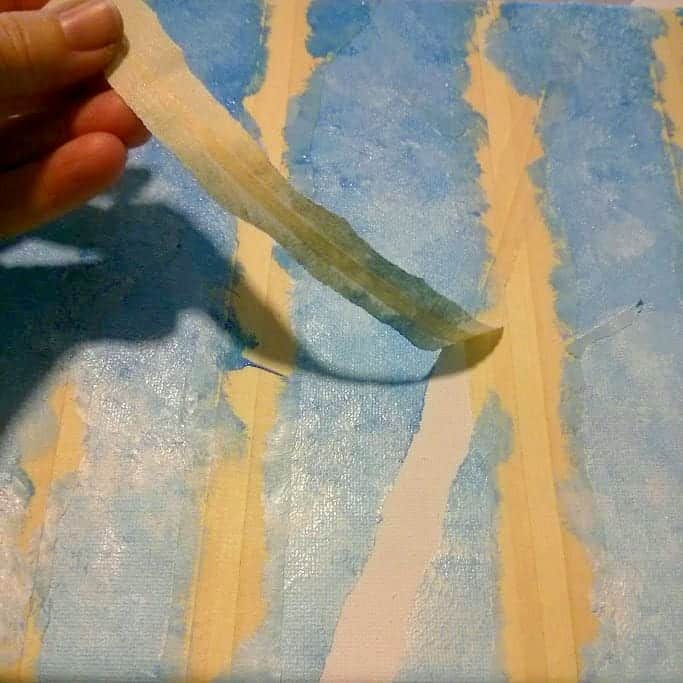
It already looks good!
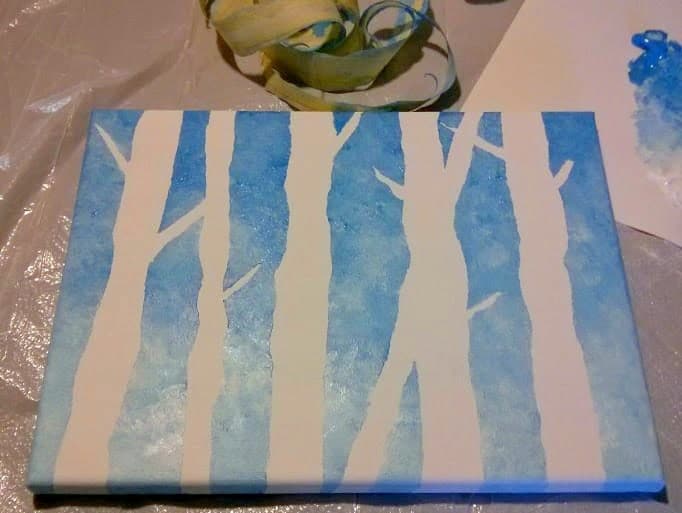
Now we're going to add the black stripes to the tree trunks.
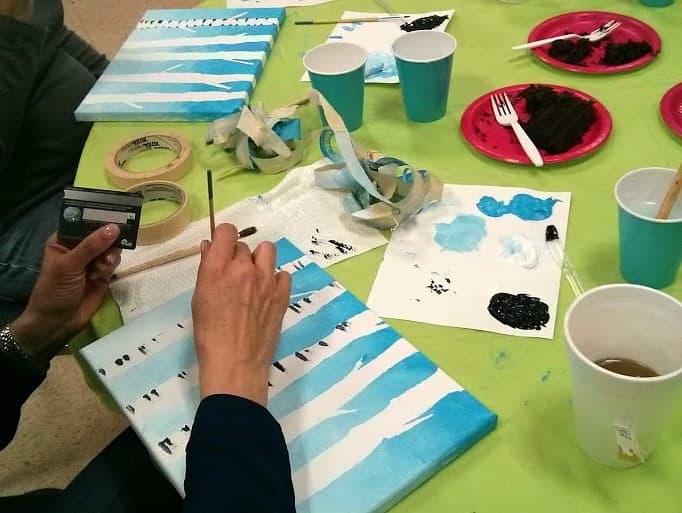
Working in small sections, dab a few dots of black along the edge of a tree.
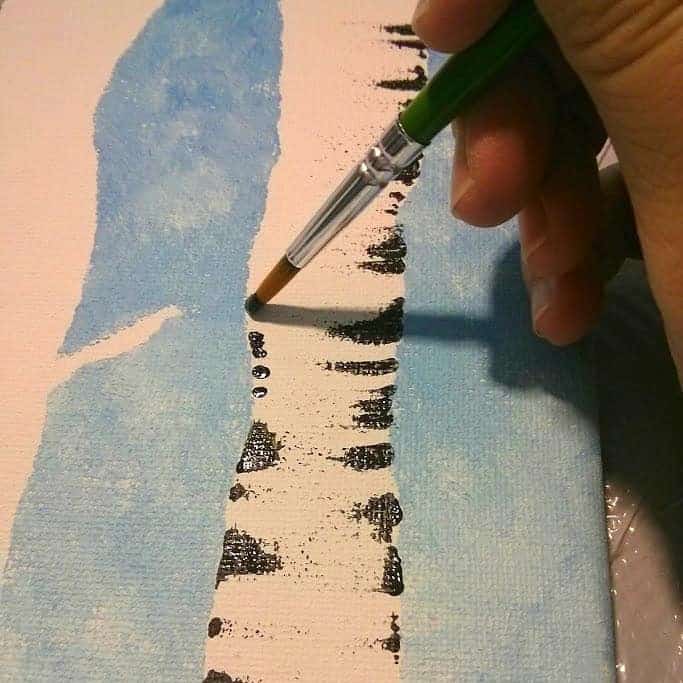
Then place your credit card on the outside edge of the dots and drag it toward the center of the tree trunk.

This helps the bark look more natural by giving it an uneven, mottled look. Be sure to place your dots unevenly (three here, one there, six over here) or your trees will end up looking a little zebra-y.
Great job! You can stop here, or you can use your smallest brush to dab on a few dots of white for falling snow.
There. You just created a painting! Be sure to sign it so it'll be worth something long after you're gone.
Paint Party Hosting Tips
Now I'm guessing that since you're considering leading this party, you probably have some kind of creative or artistic ability. (If not, that's OK!)
Just keep in mind that folks who consider themselves non-artists will probably be intimidated by the process, and they'll be looking to you for reassurance.
Remember to break each step down into the smallest steps you can and describe everything. We started with how to hold the brush, and what the water cup is for. (Then we all labeled our water cups because people kept accidentally trying to drink out of the wrong cups.)
If you remember to encourage your guests liberally, they'll loosen up and have a much better time!
Party Timing
This painting has three basic parts to it: masking the trees (steps 1-3), painting the sky (steps 4-6), and adding the bark and snow (steps 7-9). It took us about 30 minutes for each part, which meant an hour and a half of painting.
I feel like this was just about right. Any longer, and it would have been tiring. The whole party was about 2 hours long, including time to talk before and after.
Also, it took me and two of my friends about an hour to set up, between general party prep and getting everything laid out at each painter's spot at the tables.
Enlist Help
We had about 16 painters at this party, and there was just enough of me to go around.
If you want to host a party for more people, it's probably a good idea to have two artists leading, one to demonstrate the steps, and one to walk around and help answer questions while people are working.
Party Budget
One last thing...cost. Since we kept our supply list short, it only cost about $10 per person to do a painting. (That doesn't include costs for food and party decor.)
I don't think you could do it for much less, and I would probably recommend budgeting for about $15-20 per person, just to be on the safe side.
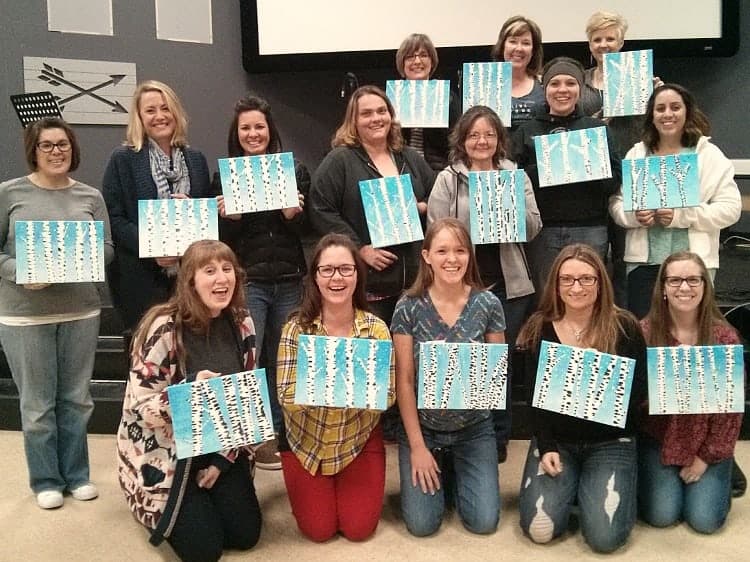
Whew! It sounds like a lot of work, but it really wasn't bad, and was SO worth it to see all these lovely ladies learning to paint! I love how each painting has a slightly different personality to it, and they all look great.
Want to start your own Paint and Sip night? Give it a try, and let me know how it goes! I hope to do more of these in the future, and I'll be sure to share my painting process for each project, so you can follow along and host your own.
If you have an idea for a painting concept, send it to me in the comments below and I'll try it next time!


jacquiegum says
This is one of the coolest ideas I have heard of in quite some time. I don't think the paint and sip idea has hit Charleston yet! Maybe a little work, but honestly such a great payoff! Just the idea of engaging with friends in a new way...love it!
Meredith says
It really is a great payoff Jacquie! It's so much fun, and so rewarding to help people make something they thought they couldn't do.
rachel621 says
What a fun excuse to get together and the artwork is lovely! My mother-in-law went to a (dry) paint party with some ladies and it was expensive. Glad to see you all had a great time. Love it, love it, love it!
Meredith says
Thank you Rachel! That's really what it was - a fun excuse to get together and make something pretty. That shouldn't have to cost a fortune!
Susan cooper says
What a cool idea! And fun way to spend time with friends who,also enjoy exploring their creative side. Getting the cost down is just a huge bonus too. Great project!
Meredith says
Thanks Susan, it was funny for me to see how some of these ladies were so intimidated by the thought of creating a painting, and it was so awesome to see them find success. They're all asking when the next one will be!
kimjonesfive says
What a great tutorial and a FUN idea!!! I think we might have to try this over here!
Meredith says
You should! Your friends will love it!
Chanell @ Hobnail House says
So fun! And you make it sounds so simple, too!
Meredith says
Thanks Chanell, it really was a lot of fun. It really was worth the effort!
Flourish and Knot says
I completely agree about serving great food! I feel like food makes or breaks ANY party. But I love the idea of a painting party! (Maybe I can call it that and get my friends to come finish painting the furniture for the ORC?) 🙂
Meredith says
Ha! That's a great idea! I'd do just about anything for some good party food and hanging out with friends. But I might be a little bit weird that way... 🙂
Jeannette Paladino says
Meredith -- what a terrific idea! I've never heard of a paint party and I love the idea of using the masking tape. I'm intimidated by painting, but I think even I could master this method. If your friends aren't too fussy and you don't have a space in your home or church, you could hold the party in your unfinished (or maybe even finished) basement and not worry too much about the paint splattering.
Meredith says
Most of my friends were intimidated too! It took a lot of encouragement to get them to see they really could do it. That's what I love about this method, it requires very little painting skill and delivers great results!
[email protected] says
You have such a pretty blog,filled with all my favorite creative projects, such as painting and making crafts! I love the tree painting, there is no doubt i will be trying this
Maria
Meredith says
Thank you Maria! I'd love to hear what you think, if you give it a try!
C.D. Loken says
Love your painting, Meredith! Our community just had one of these paint and sip parties recently, but I couldn't make it! I definitely will next time around!!! Sound like a LOT of fun!
Meredith says
Thanks CD! You should definitely try to go. I was a little jealous while I was teaching the class, wishing I could just be sitting in on it, so I'm hoping to find one myself, that someone else is teaching. 😉
Jeri Walker (@JeriWB) says
I've been seeing more posts on FB of people who have been going to paint parties. It really does look like lots of fun. My boyfriend has a house that is much too big for him and his son, so he let his friends come over and everyone painted something in one of the extra rooms downstairs. It's quite colorful and very Portland-like in its vibe.
Meredith says
Oh how fun! There's something inspiring about being creative together. I think that's why it's catching on. And a little wine or coffee never hurts...
Roxanne says
I love the concept of these paint parties, great idea hosting your own!
Meredith says
Thanks Roxanne! It was a great way to save money, and still get together to do something fun.
Debi says
What a fun idea for girls' night! Love how they turned out, too.
Meredith says
Thanks Debi! I was pretty impressed myself at how well everyone did on their painting!
Bernadette Davis says
Hi Meredith, Thank you so much for a simple wonderful "How to" My niece passed away at the age of 39 and we want to honor her memory .she was an artist but did not have confidence in her abilities. We organize a Girls Night Out and we want to raise the funds and donate to a worthy cause. Where do we buy the supplies wholesale???
Meredith says
Hi Bernadette, I'm so sorry to hear about your niece. What a wonderful way to honor her memory! I don't know about wholesale pricing, but I would recommend following the weekly sales at Hobby Lobby and Michael's. I got the canvases on a 3-for-1 deal and the paints were 50% off. If you have a little bit of time before your party, you can maximize your savings by shopping in different weeks to make the most of their sales. Best wishes!
Becky says
I'm organizing this type of even for my church's Advent workshop this weekend. I was thinking that I needed to find or make some type of table top easel. Do you think that's necessary? It didn't look like you used any for your party. Thanks for all your awesome tips and advice!!!
Meredith says
Hi Becky! No, I think it's actually easier to lay the canvases flat on the table to work on them. Easels can feel a little awkward until you get used to them. Plus it saves you time and money! I hope you guys have a great event!
Diane peters says
Hi I run paint parties regularly and they are so much fun. It doesnt matter if there are 3 people or12. Please like my facebook page, Paintings BY DIANE.
Bonny says
Thank you Meredith for sharing your talent with us.
I certainly will keep on looking at your post for new I ideas.
Meredith says
Thanks Bonny!
Nicole Wildeboer says
Thanks for sharing! Great ideas. I'm getting ready to lead my first paint party. If I do more in the future, do you care if use your idea and post pictures?
Meredith says
Thanks Nicole! Yes, by all means, that's exactly why I shared this post. I'd love to see what you do with it!
jennifer Jenkins says
This was such a great tutorial! I am curious if you have any more to share. I would like to host a painting party but with the weather turning warmer, I am looking for more "spring" inspiration! I absolutely love the step-by-step you provide and would love for you to share another incredible painting project with me!
Meredith says
Thank you Jennifer! I haven't come up with any more tutorials yet, but I do often see them on pinterest. I bet you could find some good ones by searching "paint party" and checking out what other artists and bloggers have done. Good luck!
Donna Paino says
Thanks for sharing! If i were to try this, approximately how many tubes/bottles of each color would you need for 10 people?
Meredith says
You will probably only need one of the large tubes per color, per person. But I would buy two of each, just in case! ?
melanie durnford says
I manage a bar, and im thinking of having a paint and sip ladies night. Ive never been to one, all suggestions would be helpful
Meredith says
Hi Melanie! My biggest suggestion would be to attend a paint night at a local paint 'n sip shop, if you have one. Then you can see how the process works, and have a little fun!
Veronica says
Reading this was oh so fun! My creative juices are flowing. Thank you so very much for this fantastic idea.
Meredith says
I'm so glad! Your guests will love it!