Stencils are great for making all kinds of crafts and decor. But what do you do when you can't find the right stencil for that creative project you have in mind? Make your own! I'll show you how, using supplies you probably already own.
This project brings all my favorite things together: thrift store diving, paint, and flannel. For just under $10, you can make your own fun Christmas wall art, and you get a great excuse to make a trip to your favorite thrift store!
This will be a two part process, with the first being to prepare your canvas and the second, making and using the stencil. We've got several small steps, but don't be intimidated because each step is easy and doesn't take too much time.
Part 1: Prepare Your Canvas
First, you need a canvas! I find canvases all the time at my local thrift stores, usually for as low as $1. The uglier the better, because we're just going to cover it up. Consider these the Ugly Christmas Sweater of crafting. Actually, you don't really need a whole canvas. What you really need is a frame, so get creative and look for anything you can use.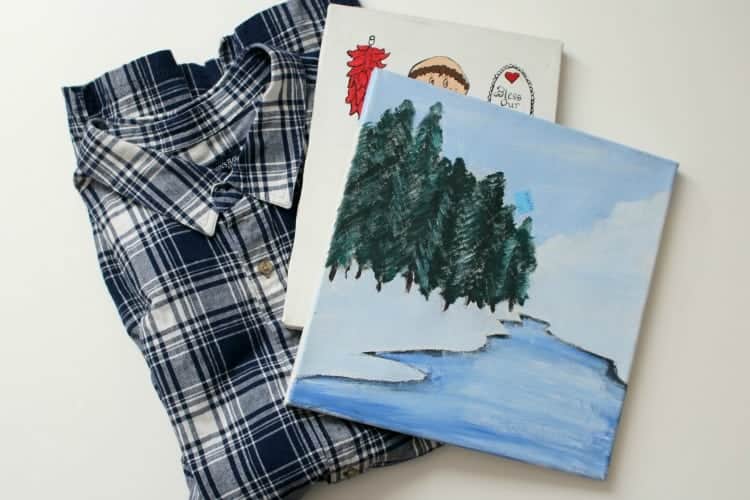
Next, you need the canvas. I feel like I just said that? What I mean is, you need something to stretch on your ugly canvas frame to make it pretty. In this case, we're going to use a plaid flannel shirt. Make sure you get a shirt large enough to cut out the shape of your canvases, plus at least 2 inches on each side.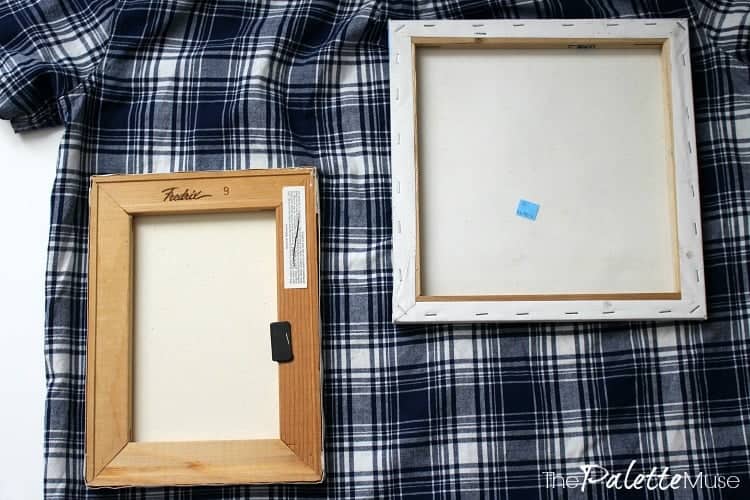
Out of the back of the shirt, cut around the canvases, leaving two inches on each side.
Next, grab your trusty staple gun. If you don't have one, you should ask for one for Christmas. They're useful for all sorts of DIY projects! But don't worry, if you don't have one, you can definitely use craft glue or hot glue to cover your canvas with flannel. You just won't be able to stretch it as tight, but that's OK as long as you glue it down well.
Start by placing one staple in the middle of one side of the flannel and canvas frame.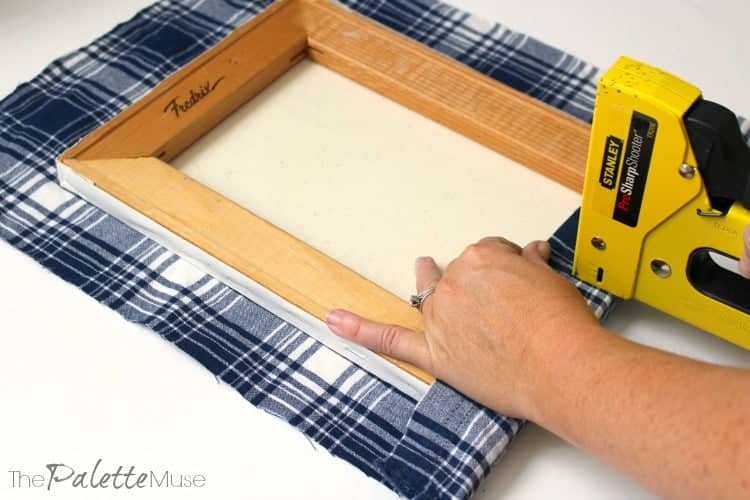
Then stretch your flannel a little to pull it taut over the frame and put a staple in the opposite side, followed by stretching and stapling in the middle of each adjacent side. Think, "North, South, East and West."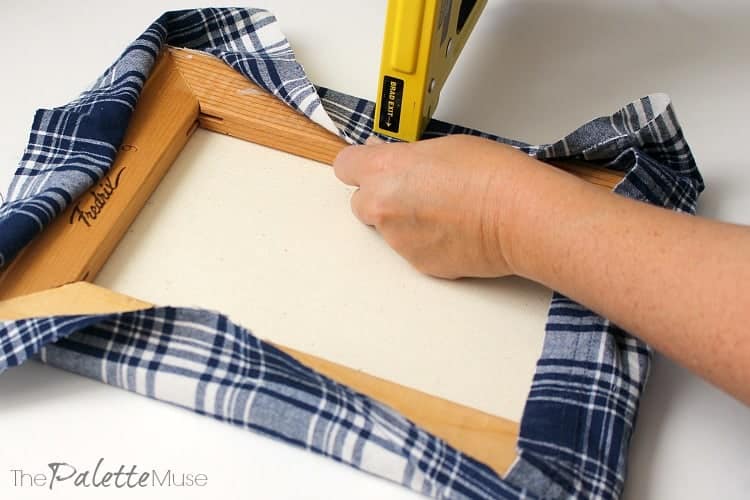
Once you get a staple in each side, check the front to make sure your plaid lines up evenly. This part is kind of tricky when using a pattern as linear as plaid. Try to stretch it evenly, a little at a time, then work your way around the back of the frame, stapling in between the other staples. Check your lines often, and use lots of staples!
Then, fold the corners into "V" shapes and staple them down, after checking your lines one more time and adjusting the stretch.
If you're looking for a little more detail on how to stretch fabric for frames or upholstery, check out this post for step by step instructions.
Part 2: Make Your Stencil
As promised, you'll see how easy it is to make your own stencils, even if you don't have a fancy cutting machine! You'll need a printed version of the design you want to use.
Feel free to draw your own, or you're welcome to use mine, just follow the instructions at the end to get your downloadable PDF of this project.
You'll also need a sharpie, a transparency or stencil blank for each stencil, and a sharp X-Acto or craft knife.
Note: if you're designing your own stencil, keep in mind that you'll need to find a way for the stencil to hold together, once all the pieces are cut out. This is why stenciled letters have those funny little lines in them (like the "o"s here), to keep them from becoming gaping holes in the stencil.
First, print out your design. Lay the transparency page or stencil blank on top, and trace with Sharpie. (You can also use card stock if you don't have any transparent plastic, but you'll need to print your design on it, since you won't be able to see through it to trace the design.)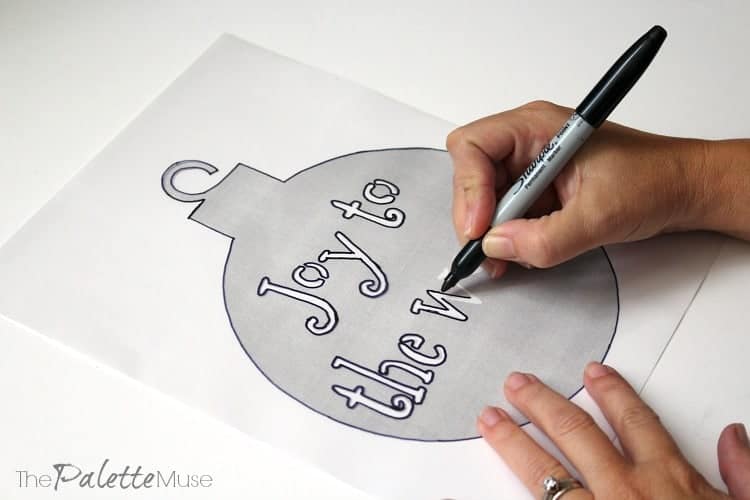
Then, using your craft knife or X-Acto, carefully cut out the design you've traced or printed. For this, I like to use a special craft knife with a rotating head, to make it easier to follow the curves, but it's not necessary. Any sharp craft knife will work.
Make sure you work on top of a cutting board, so you don't cut right through your table!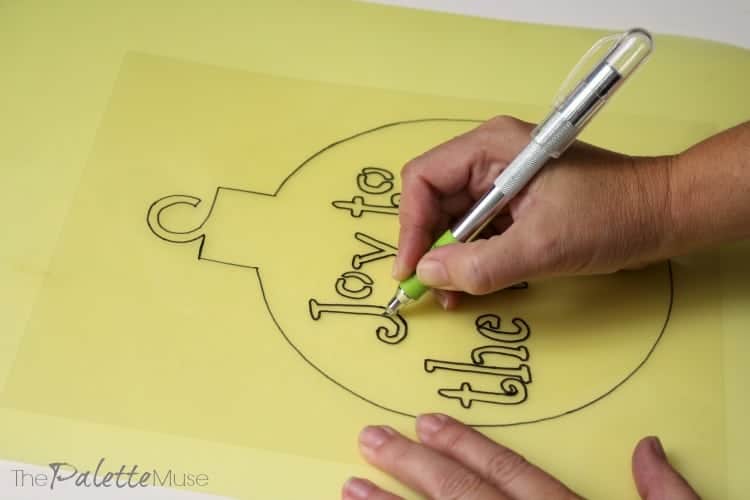
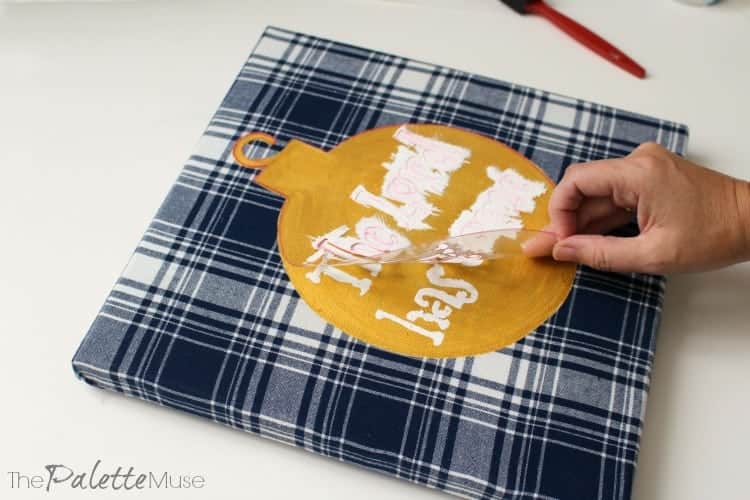
This stencil works in two parts. First, paint the larger outline of the ornament for the background. Then once that's dry, you'll use the smaller part to paint the letters. By the way, sorry my ornament kind of looks like a bomb or a wrecking ball. That definitely was not my intent! 😉
Tip: You might find it helpful to place a book under the part of the canvas that you're stenciling, so the fabric and stencil won't flex under the weight of your brush, causing blurred lines. (Yikes, what's happening to my innocent little Christmas project!)
First, lay the large outer part of the stencil on your canvas and paint using your background color. For mine, I chose gold, but first I'm painting a layer of yellow because gold paint tends to be slightly transparent and I think it will show up better with yellow underneath.
When the yellow is dry, I'll simply repeat this step with gold.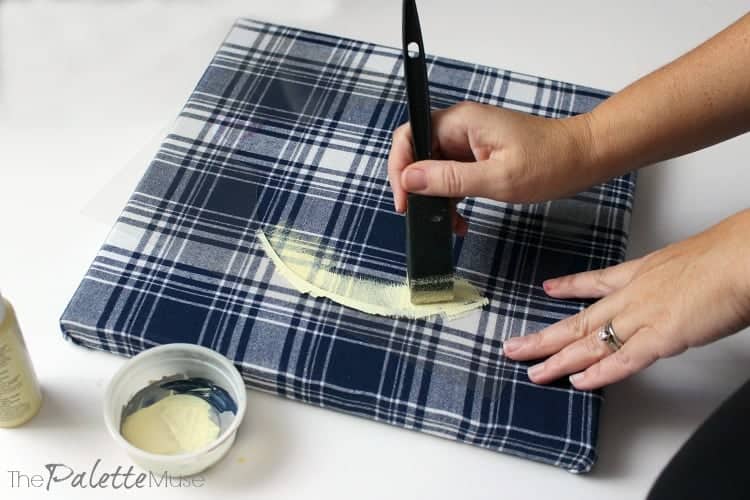
Once the background dries, lay the smaller inside part of the stencil on top of the background and stencil the letters in a contrasting color.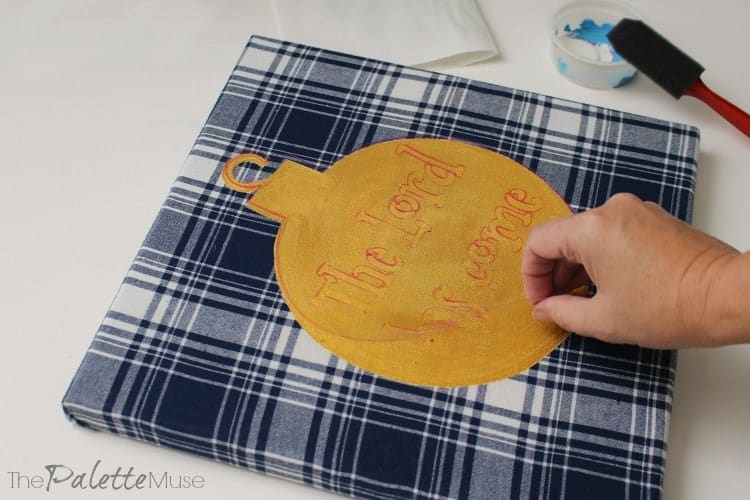
If you have any paint bleeding under your stencil, you can touch up later with the background paint color. Just be sure to let this layer dry first.
Stenciling tips:
First, use an actual stenciling brush, which this one is not. Stencil brushes look like little round brushes with very flat bottoms, kind of like a stamp.
Second, less is more! Dip your brush into the paint, then lightly paint on a piece of scrap paper or a paper plate to remove any larger globs of paint that might seep under the edges of the stencil.
Finally, to minimize paint bleeding under the stencil, be sure to dab straight down with the brush, or pull away from the edge of the stencil toward the inside part. Don't use your brush to push paint underneath the stencil.
Once your canvases are dry, you can hang them on the wall as is, or attach ribbons to the outside of the frames for a cute finish.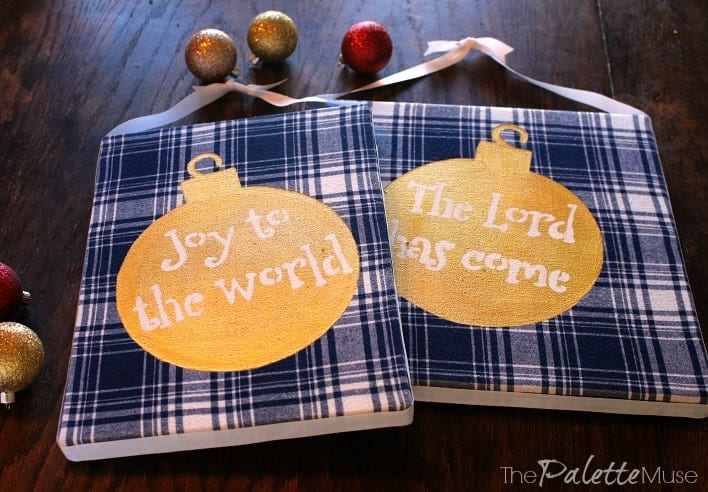
Then simply hang them on a wall or from hooks, and you have instant Christmas cheer!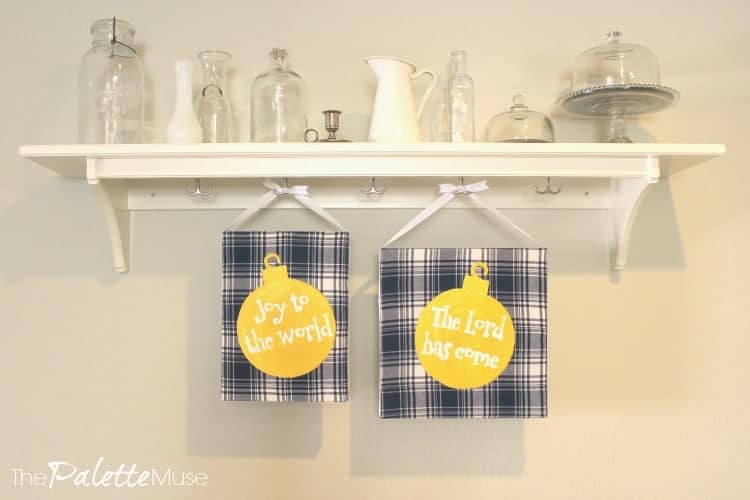
These would be a fun alternative to a wreath on your front door, or leaning on a mantle, all decorated for Christmas. And of course, now that you know how to make your own stencils, you can make any design you want, for any time of year!
Don't forget to grab your free printable Joy to the World Stencil below!
Get your FREE Printable:
Sign up for The Palette Muse Newsletter and get access to all my free printables, including this one!
If you’re already a subscriber, click over to the Free Printables Library to find the download. You’ll need the password at the bottom of any of my emails.


Patti @ Garden Matter says
Hi Meredith,
I love your project. Lately I've really enjoyed all the flannel repurposed projects I see and have it on my list for something to create next year. Beautiful sentiment. Wishing you a blessed and merry Christmas!
Meredith says
Thanks Patti! I do love anything flannel this time of year - I just want to wrap up in it! Merry Christmas to you too!
Carole West, Garden Up Green says
This is co clever each step is so detailed and I love the plaid background. I've never made my own stencil but this tutorial has been a gem for inspiration. I'm going to give this a whirl after the holidays. Thanks for joining us Meredith is always a pleasure to work with you. Hope your Christmas is a special one.
Meredith says
Thanks Carole! I was a little nervous about making my own stencil, but it turned out to be pretty easy, and now the possibilities are endless! Thanks for including me on this inspiring challenge, and have a Merry Christmas!
Jemma says
What a creative and talent artist you are! I love this beautiful project and the fact that you created your own stencils is fabulous and inspiring.
Love the plaid!
Merry Christmas,
Jemma
Donna Harvey says
Hi Meredith, I really like your Stencil Project. It will give me a great way to use all the leftover material from my Quilts. I think I have a piece of Homespun that should work. Along with leftover canvases from painting, I think I got it made. Thanks for the stencil tutorial, that will also save me from buying some. I like how you hung it on the shelf, I have one in my Laundry that looks a lot like that. Hope you have a Merry Christmas. I know I am getting in the Christmas Mood after visiting all of you Ladies, and now I'm off to meet Jemma. Think I'm ready for Christmas Music and Hot Cider first.
Meredith says
Thank you Donna! This would be a great way to use up some of your leftover fabric and canvases. I love it when nothing goes to waste. Thanks so much for visiting and commenting, and have a very merry Christmas!
Jeri Walker (@JeriWB) says
I have been using cloth for lots of decorative effects, so I really like the idea of using plaid as a backdrop for Christmas stencils 🙂
Meredith says
I agree Jeri! There are so many fabulous cloths available, and they really add a pop of color and pattern to anything you're trying to make. Hope you have a beautiful holiday!
William Rusho says
Stencils are great to work with. I just began using them myself, and they can certainly make something drab into something exciting.
Thanks for sharing.
Meredith says
Hi William, so great to see you here! Stencils are a lot of fun, glad you're enjoying them. Have a great holiday!
Karen says
Meredith - I absolutely love what you've done from beginning to end! You really show how doing it all yourself doesn't have to be complicated or time-consuming. The thrifted canvases are just brilliant and I have lots of mental wheels spinning now - thank you!
As always, it was sheer joy working on a project with you. Wishing you and your family a joyous Christmas season!
gritantiques says
super cute! I'm definitely going to be looking for the ugly canvas at the thrift store and an old flannel shirt! I have never made my own stencils...what a great idea! I may give this a try in the New Year for a spring project.
I've enjoyed this creative bunch...inspired to craft a little!
Wishing you and your family a Merry Christmas, xo
Meredith says
Thank you Jane! It was so great to meet you through this challenge, I hope we can work together again! Merry Christmas to you and yours!
Susan Cooper/findingourwaynow.com says
Hi Meredith, super cute idea and looks fairly easy. Gives me all kinds of ideas. Red flannel would be cool for Christmas. 🙂
Meredith says
You're right Susan, now I kinda wish I had been able to find red flannel! Next time... Merry Christmas!