How we built our Yardistry Gazebo from a kit, and all the tips and tricks we learned along the way.
'Tis the season to get outside!
This is the time of year it starts feeling like summer, even though officially it's still spring. Which means it's time to get outside before it gets too hot to enjoy it! I can't wait to share this post with you today as part of Remodelaholic's Get Out! Outdoor DIY Challenge.
We haven't done much to our backyard since moving in two years ago, but this summer that's all about to change. As much as I love interior decor, I also love to get outside and enjoy the amazing Albuquerque weather as often as possible. When you get about 300 days of sunshine a year and almost no bugs, you should take advantage of outdoor living!
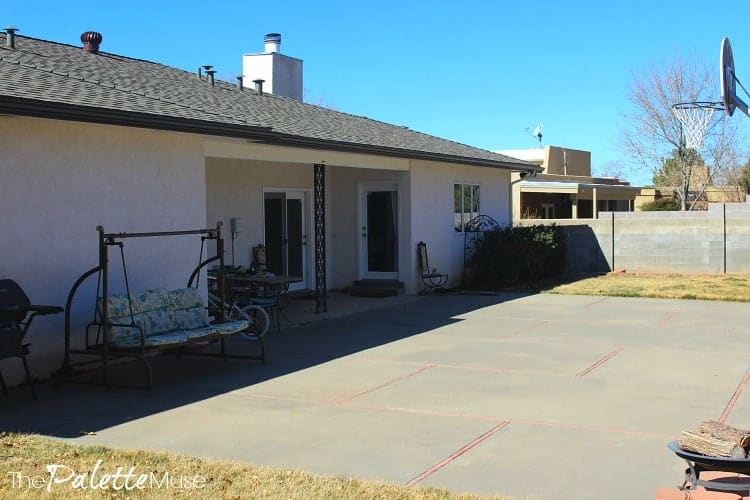
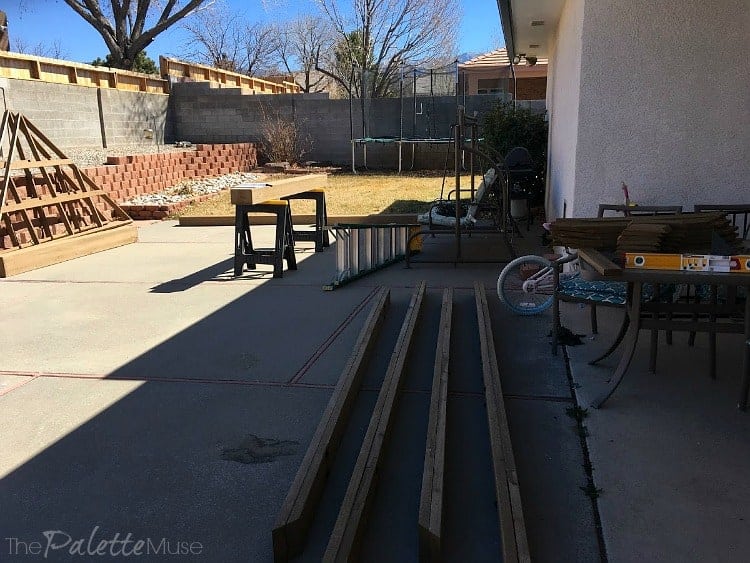
The Problem - Our Concrete Backyard
This house has a good size yard, but it seems like the majority of it is covered with concrete. I wasn't thrilled about that when we first saw the house, but in living here I've realized that we actually use that space more than I expected.
It makes a great roller skating rink, and the perfect basketball court. Mind you, none of us are naturals with a basketball (especially me, at 5'2"), but it gives us something fun and active to do together.
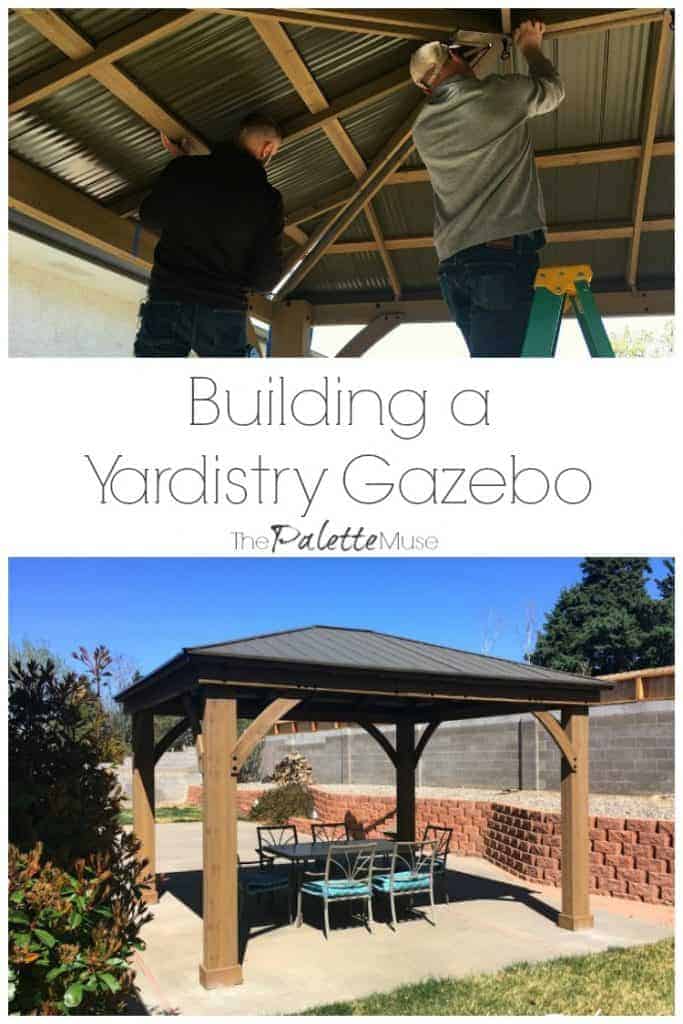
To give the sprawling concrete jungle a little more definition, I decided to invest in a pergola. We chose one with a complete cover, which I think technically means it's a gazebo.
We wanted shade (did I mention 300 days of sun?), architectural interest, and colors that look natural and compliment our house.I think we found exactly what we wanted with this 12' by 14' gazebo by Yardistry.
This post contains affiliate links. If you make a purchase, I may receive a small commission at no additional cost to you.
Yardistry Gazebo Installation Tips
We found our kit at Costco, but you can also buy the same Yardistry 12x14 Gazebo on Amazon, if you don't have a Costco near you.
I won't try to reconstruct the instructions here (the manual is 57 pages long!) but I do want to share some of the helpful tips we learned while we were putting it together.
This was one of the biggest builds we've ever attempted, and it took some time, but it wasn't hard. I guess what I mean by that is, if you can read an instruction manual and follow the steps closely, they've engineered this thing really well and it's totally do-able. I've had more frustrating experiences than this, putting together IKEA furniture.
Take your time, have a buddy, and know that some day soon you'll be sipping margaritas under your gazebo. Now let's get started!
First things first.
In the instruction manual, they've provided a page to write down the numbers on your packaging. Take a minute to write them down in case you need to call customer service.
Later in the process of putting the gazebo together, we found that two of our parts needed to be replaced (a stripped screw and a cracked piece of wood). Customer service was amazingly polite and helpful and we had our new parts in two days!
Inventory all your parts! This took us an extra hour, and our whole garage floor was covered with pieces and parts. It feels like an extra step at the time, but I promise you do not want to get halfway through this build and find out you're missing one crucial part. (I forgot to take pictures of this step because I was overwhelmed by the sheer number of pieces, but I wish I could show you!)
This is how the pieces looked about halfway through the process when most were already put together in chunks.
Read the instructions!
I was impressed with how clearly everything was labeled in the manual, and how thorough the instructions were. Plus, they seemed to be written by a person (or people) whose first language was English, which really helped with deciphering everything.

My husband and I developed a system where we would read a few pages of instructions first, then refer back to them as we were doing that part of the project. Truth be told, he did most of the work, with me standing around rereading instructions to him.
Yardistry also included links to their tips video in the manual, which came in really handy at a couple of points, especially when we got ready to put the roof panels on. I'm linking to it here as well, in case you want to take a look before you get started.
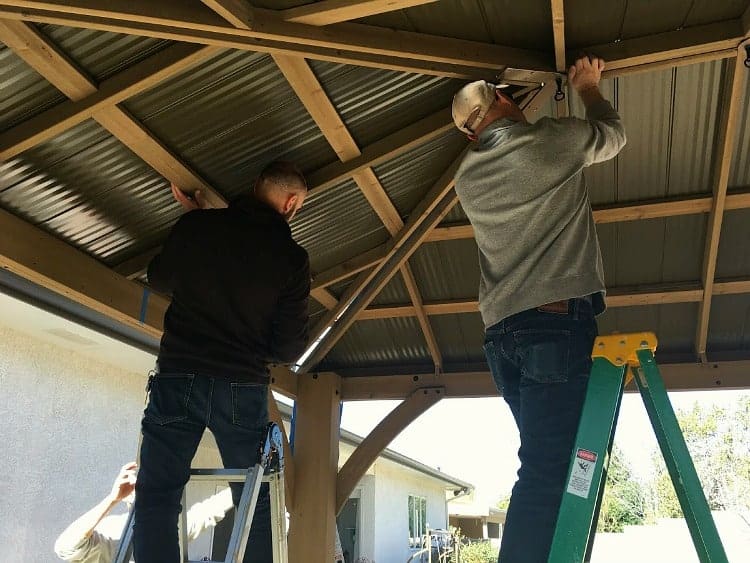
Get help.
They mean it when they say you'll need 4 people for certain steps of construction. We actually used 6 at one point, and were glad we had all of them.
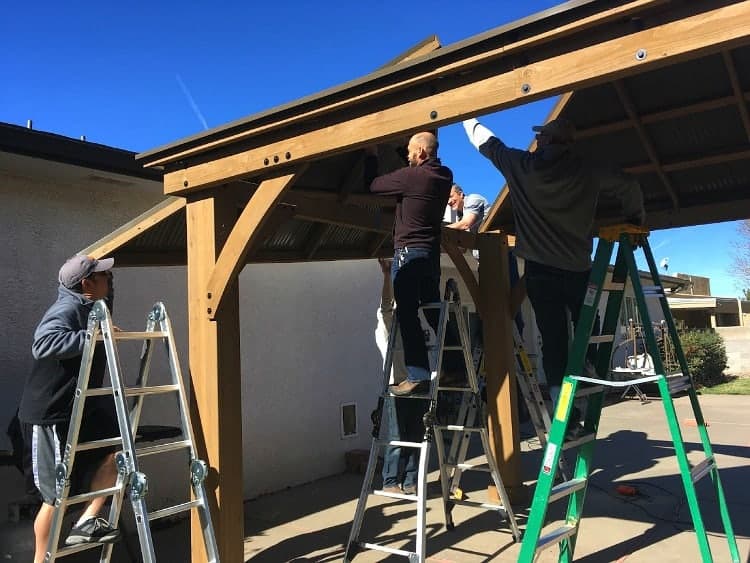
So make a few good friends now, and offer them donuts and breakfast tacos when you call in that favor.
Putting the roof on the gazebo was definitely the trickiest part, between the ladders, the weight of the roof panels, and trying to maneuver 4-6 guys into the right place.
The last panel is the toughest because it has to fit well against the other panels. The instruction manual recommends pushing up on the other panels to get the last panel to fit, and we found that to be the most helpful piece of advice.
Everything finally came together and fit like a glove. Success!
Safety first!
Don't forget to anchor your gazebo! This thing is heavy, but with the right (wrong) wind conditions it could definitely go airborne and wreak havoc on your yard, house, or neighbors.

One thing we have plenty of in Albuquerque is wind, so we were not about to mess around. We used concrete anchors and a hammer drill to secure the gazebo to our slab. If you don't have a slab, you may need to pour concrete footers first.
Final Thoughts on our Yardistry Gazebo
This is not really meant to be a review of the Yardistry gazebo, but since we've come this far, here are my final thoughts:
Overall Impression: Very well built, with well written and thorough instructions. Not a build for the faint of heart. Worth every penny and hour spent building it.
Takeaway: All our friends that helped us with the final build now want one of their own. Choose friends who have no room in their backyard, or you'll have to return the favor multiple times.
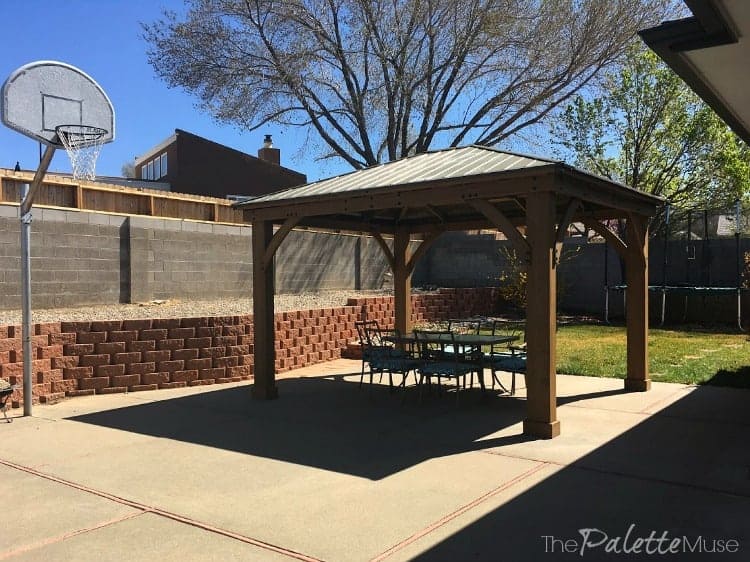
Yardistry Gazebo Before and After
Here's a quick reminder of how the space looked before:
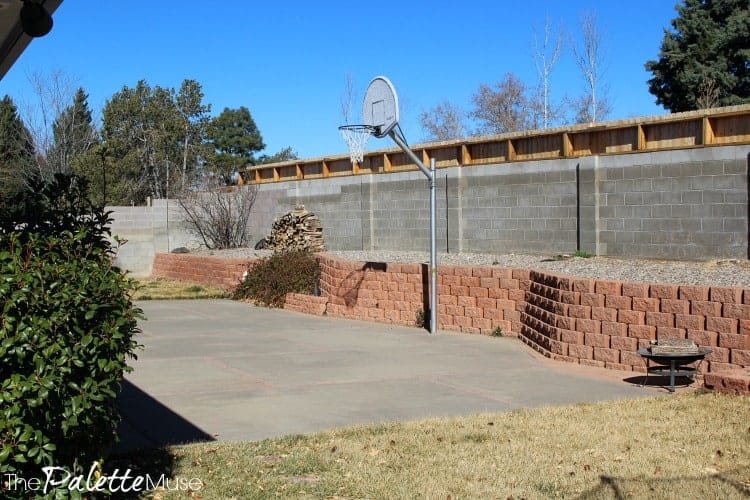
And now here's the after:
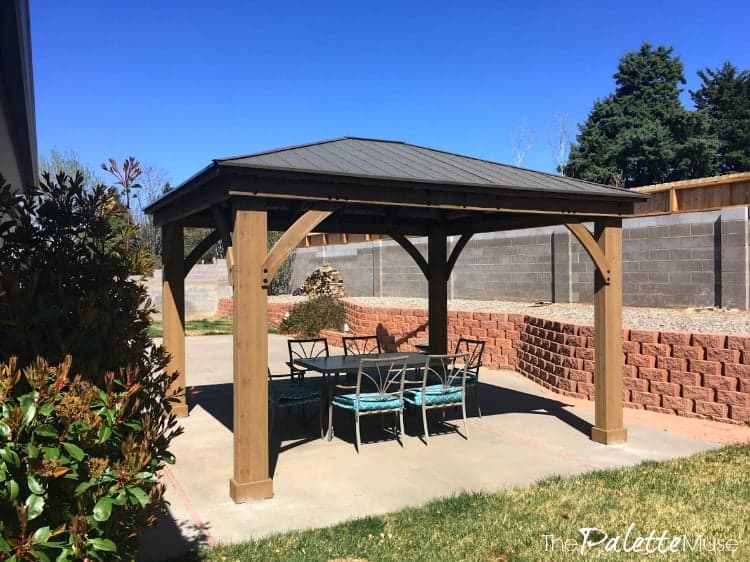
We are so happy with our gazebo, and all the shade it brings to our yard. I'm planning on some other fun upgrades to this space, so be sure to check back later in the summer for those projects!
In the meantime, let me know if you have any questions. I'm always happiest when our experiences can help someone else.
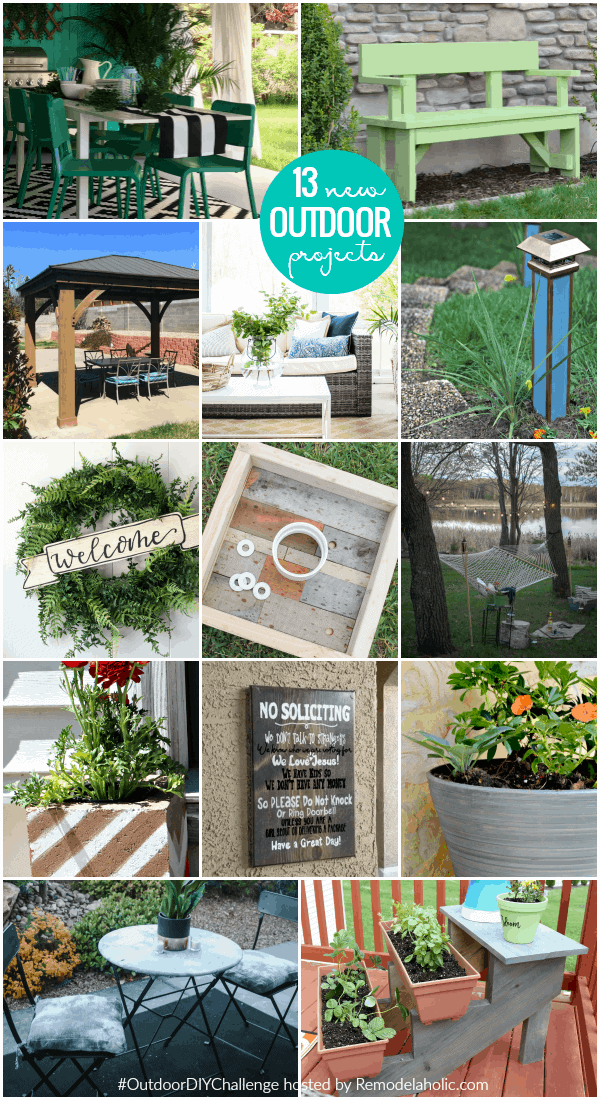
Get Out! Outdoor DIY Projects
DIY Outdoor Bench | Hertoolbelt
How to Build a Gazebo (from a Kit) | The Palette Muse
Sunroom Makeover | Lantern Lane Designs
DIY Solar Walkway Lights | Toolbox Divas
Wooden Welcome Sign Wreath | Lemon Thistle
DIY Washer Toss Game | Everyday Party Magazine
Backyard Hammock Area | North Country Nest
Easy Cinder Block Garden Planters | Our Crafty Mom
Funny DIY No Soliciting Sign | Leap of Faith Crafting
Simple DIY Tricks for a Covered Porch | Ugly Duckling House
Bistro Set Makeover | Practical & Pretty
Tiered Vertical Planter Garden | Creative Ramblings


sevanderkooy says
This is a great gazebo, I would definitely be spending time in the shade out there.
Meredith says
Thanks! It's changed the way we use our whole backyard!
Jeri Walker (@JeriWB) says
I'd love to try a better shad source in my backyard. I envy houses I see that are built with covered back patios.
Meredith says
I agree! I wished our covered patio was bigger so we could fit our table and chairs under it. This solved that problem!
Nadya Jones says
I'm excited for my sister to read this. She's thinking of having a gazebo in her backyard and this might help her decide if she want to build a gazebo or use a portable gazebo. Any advise?
Meredith says
Hi Nadya, I'm glad this was helpful! I would definitely recommend a permanent gazebo, especially if she lives in an area with wind or harsh sun. My parents are in the process of dismantling their portable gazebo and getting one of these because their portable one just didn't stand the test of time. That being said, if she's renting, or planning on moving soon, maybe a portable one is better. In all other cases, I would definitely buy this one again!
Candace says
I am thinking of buying a gazebo but I can't decide between a wooden or metal frame gazebo any advice?
Michael says
Looks very nice. I am getting ready to install the same gazebo in my backyard. Did you anchor the posts to the concrete after it was all assembled? Did you run any electrical to it? I am thinking the posts are hollow and could have wire run through them, but it looks like they may be closed at the top of the post. Really good post, thanks for sharing.
Meredith says
Thanks Michael! Those are great questions. First, yes we anchored it after it was assembled. That was the last step in the process. We didn't run electrical, but I wish we had! You are correct, the posts are hollow, but closed at the top. It seems like it would be pretty easy to just drill a hole in the top of one to run your electrical through. Best of luck with your project - you'll love it!
Michael Davisson says
Any issues with bolting it to the slab and weather conditions? I am planning on doing the same thing.
Meredith says
Hi Michael, we've had no problems with it. Bolting it to the concrete required a hammer drill, but with the right equipment it's no trouble. This thing is solid. You'll love it!
Ira says
Thanks for all the helpful info. We are about to start step 5 where we erect the 4 posts and connect them with the long beams. I wanted to ask when in the process you anchored your gazebo to the concrete. Did you wait till it was completely done or did you do it shortly after standing up the posts? Thanks!
Meredith says
Great questing! Definitely wait till you're all done putting everything together. As you're connecting things, it will cause slight shifts. At the end you'll square everything up and then you can anchor your posts into the concrete.
Joseph says
Just curious, what is the height measurement from the very edge of the corners?
Meredith says
Hi Joseph, do you mean the diagonal measurement? Or the length and width?
Vic says
Just wondering what size pad to put under it. Do you recommend a large pad like your yard is , or perhaps the large pad holds water on rainy days.
What do you suggest as we are getting ready to put a pad in. Thanks in advance
Meredith says
We love our large pad, but we don't get much rain here in the dessert, so you may have a point about it holding water where you live. I would check with a local landscaper or builder for the answer.
Chris says
How thick is your slab? Does it have rebar?
Meredith says
I'm not sure, as it was already in place before we bought the house.
jacq says
Hi Meredith,
Your gazebo&patio looks good!
Just wondering if would it be a problem if the blue plastic/films at the inner part of the roof are left? Our installer already screwed the tin panels to the frame when I told them they need to be peeled.
Thank you!
Meredith says
Hmm that's a good question. I wouldn't think it would cause problems, if you don't mind the way it looks. It might start peeling after a while, but then you can just peel the rest off. Just check occasionally to make sure it's not getting condensation inside the plastic.