This dog crate side table is the perfect space saving solution when you want your best friend's bed to be part of your living space, and it's easy to build with just a few ingredients.
Our dog runs our life. Yep, I've become one of those pet parents who thinks the dog deserves a spot at the table. Well, not literally, but in a more figurative part-of-the-family sense. (For all you concerned pet owners out there, we do not feed our dog from the actual table. Well, at least not if I can catch the kids in the act.)
Let me back up.
When we rescued our pup from a local shelter, he came with a nasty case of kennel cough and a hefty dose of anxiety. The kennel cough was easily treated, but we soon learned that the best way to make him feel safe in his new home was a comfy dog crate.
Not being a dog person before, I first thought it was mean to lock him up at night and when we left the house, but I soon realized that his crate was his safe place, and he needed to know he always had a home base. Otherwise, he'd go around peeing on everything, in an apparent bid to mark his territory and feel safe.
Not cool. And not conducive to his actual safety.
So his crate became his happy place, and he gladly trots over to it whenever we tell him it's time for bed.

This post contains affiliate links. If you make a purchase, I may receive a small commission at no additional cost to you.
Why We Need a Dog Crate Side Table
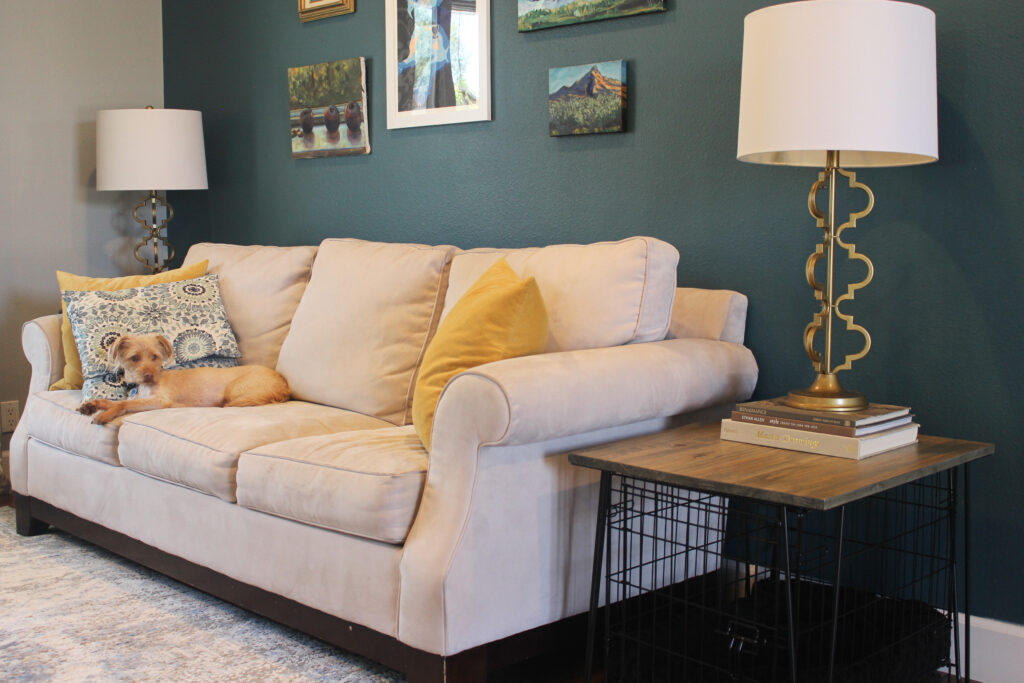
We have a lot of great storage in our house, but there's no real spot for a dog crate. So we put his crate by the couch in the living room, where he can keep an eye on the front door. (He's a 15 pound Cairn Terrier mix who thinks he's a 90 pound watchdog.)
That spot is convenient, and close to the family, but I needed a better way to integrate the crate into our decor. Until I came up with this solution, his crate was functioning as an end table for the couch.

It's the perfect size for an end table, but looked a little dorm-room-shabby, if you know what I mean. Plus, it didn't really work for setting your coffee cup on it, or anything else.
So I decided to build a table to go on top of the crate, and was surprised at just how easy it was, once I found a few key items.
How to Build a Crate Cover Table
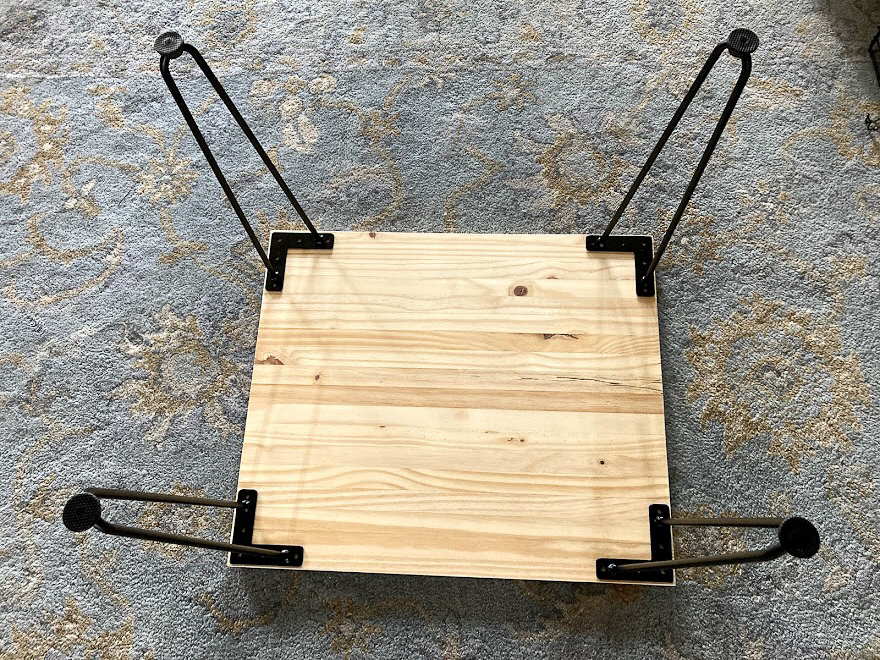
This dog crate table consists of basically two ingredients: the wood top, and the hairpin legs. Easy peasy. Plus I dressed mine up with a little stain and poly finish, to tie it in with my coffee table. (If you missed my coffee table rescue project, that's what helped me solve this problem.) Here's how you can make your own side table crate cover.
Fit the Table Top
For a small size dog crate, you'll need a piece of wood that measures 22"x26" and about an inch or so thick.
I found the perfect option at Lowe's, called a project panel. We took a 24"x36" unfinished pine board and cut it down to the right size with a circular saw.

Size Note: I don't think of our dog as particularly small, but the small crate fits dogs up to 25 pounds. For a larger crate, you can still use this same process. Simply add 4 inches to the front measurement of your crate for the short side of the top, and 2 inches to the side measurement for the long side. If you can't find a big enough project panel, you can try butcher block or other wood paneling products. Be sure to test your measurements by standing your table top on the legs to make sure it fits your crate correctly before cutting.
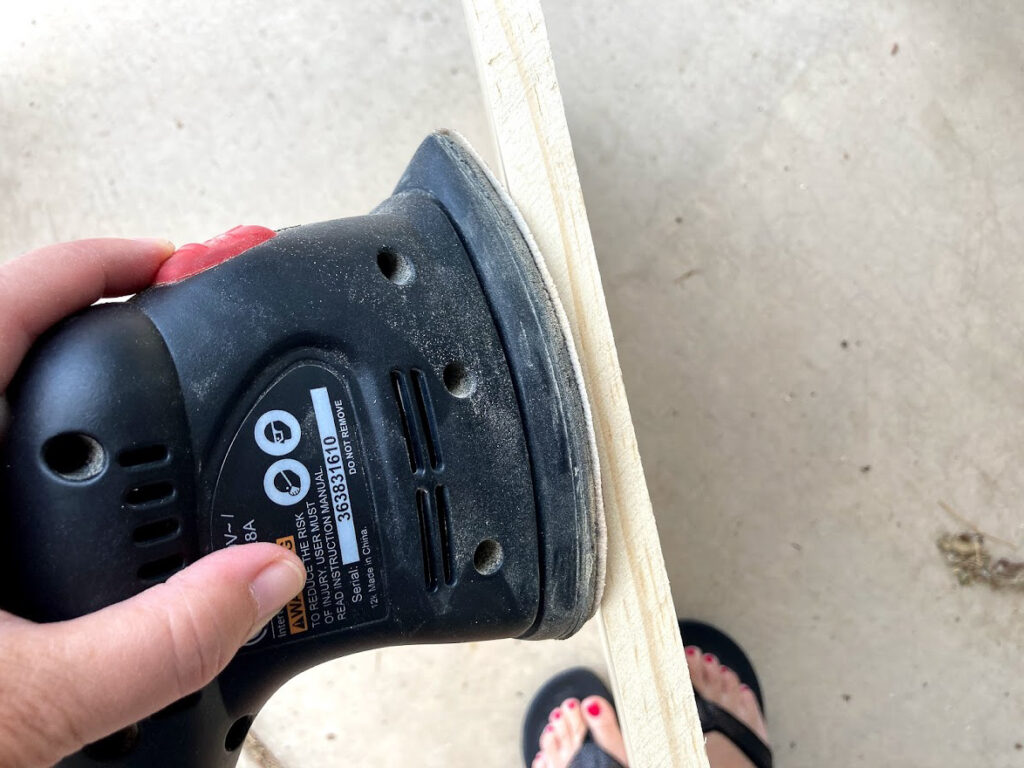
After cutting the wood panel down to size, you might want to lightly sand the edges with a palm sander to remove any rough spots, and take the hard edge off the wood.
Find the Right Legs
Inspired by my brother, who recently built a dining room table out of an Ikea table top and a set of hairpin legs, I decided to try that method for this table too. I like how the hairpin legs hug the corners of the dog crate, to keep the table in place.
These 20" metal hairpin legs are the perfect fit for this crate, and they come in several lengths if your crate is a different size. Mine came with these little bumper feet, which I used while constructing the table, but removed before putting it in place.
(You can use any furniture legs you like, just make sure to measure how they attach to the top before cutting the top to size. You may need more or less space for the legs to fit around the crate.)
Put the Pieces Together
To assemble your table you'll need an electric drill, a set of drill bits, and a screwdriver. (Your hairpin legs should come with their own set of screws.)
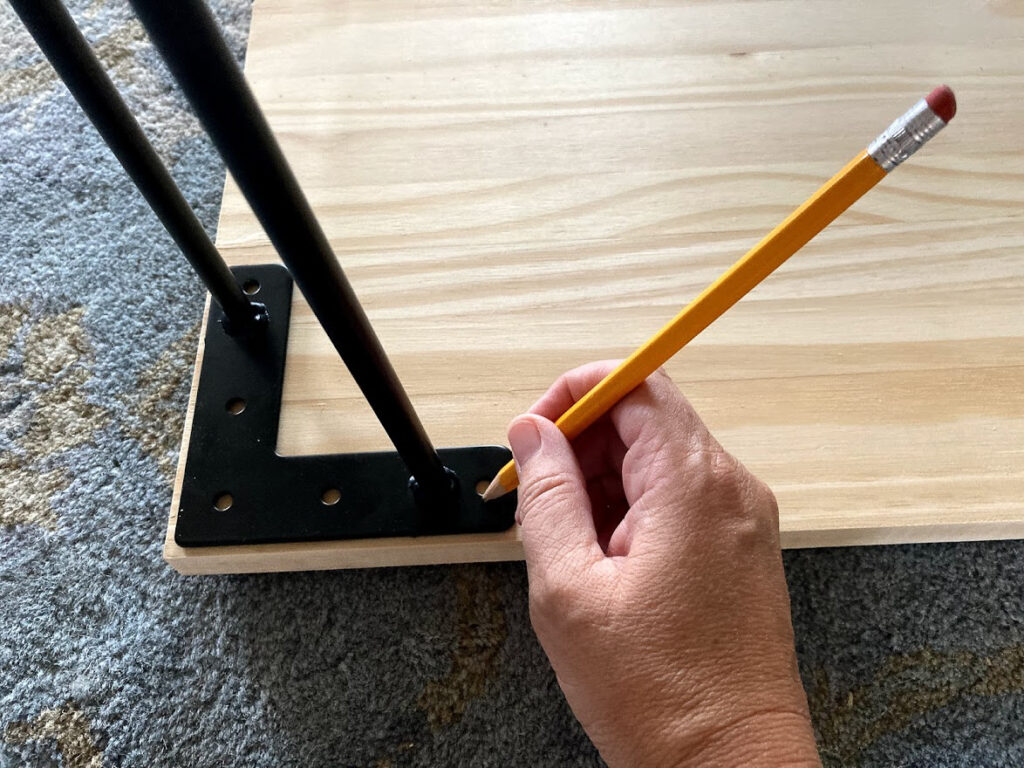
First, turn the tabletop upside down and set the legs in their places at the corners. Mark the holes where the screws go.
A Word about Pilot Holes
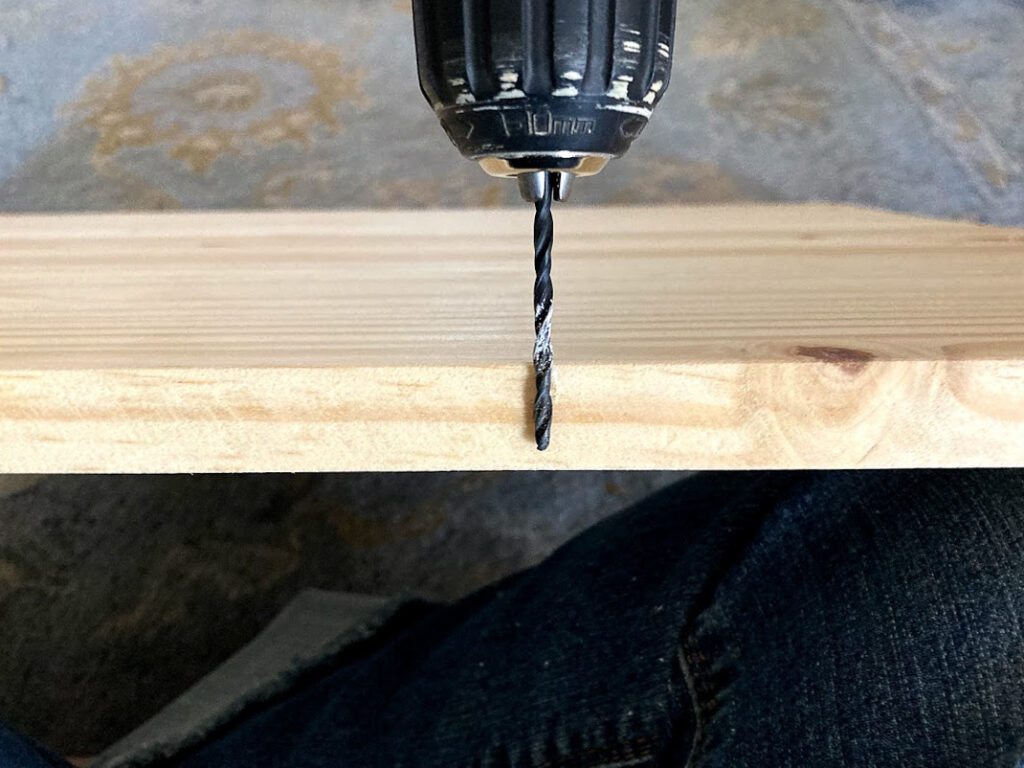
Before screwing the legs onto your table, you'll need to drill pilot holes where each screw goes. This is crucial so you don't split the wood with the screws.
To drill a pilot hole, you'll need to select the drill bit that most closely matches the width of the shaft of the screw, not including the threads. This clears the way for the screw shaft, while still allowing the threads to dig into the surrounding wood. When in doubt, start with a smaller drill bit than you think you'll need. You can always increase the size of the hole if the screw is too difficult to turn.
Don't drill too deep! Be sure you're not drilling through the wood completely, or you'll put a hole in the top of your table. To keep this from happening, measure the drill bit against the side of the wood and mark the bit with chalk where it should stop.

While you're drilling, stop before you get to the chalk mark.
Once you've drilled the pilot holes, you can use your screwdriver to attach the legs to the tabletop.
Note: I decided not to use the corner screws because they would be so close to the edge of the wood panel. I was afraid that would increase the possibility of the wood splitting at some point. And with four other screws per leg, I decided that was plenty of support for a small side table.

Make Your New Side Table Pretty
Now that the table can stand up, it's time to give it some style. (I actually liked it in its natural state too, but decided a stain would help it go better with my decor.)

Using the same Minwax Classic Gray that I used on my coffee table, I applied a layer of stain to the top and sides of the table.

Then I applied 3 coats of Polycrylic to the tops and sides of the table to seal and protect it. (Find out more about how to apply Polycrylic to get a perfect finish.)
I prefer Polycrylic to Polyurethane because it doesn't yellow over time, and clean up is a lot easier since it's a water-based product.
Be sure to let the Polycrylic dry for at least 24 hours before setting anything on it!
Get the Dog's Approval
Yep, we really are that family now. If the dog had turned up his nose at this new arrangement, the table would have gone somewhere else. Fortunately, he approved and he loves his new hidey spot.

And I love how it looks like real furniture now! Plus I can set my coffee cup on it without it tipping over, or losing a pen through the metal grate.

This dog crate side table solved our problems, without much work. That's what I call a DIY furniture win!
P.S. If you're interested in more tips to get your house ready for a dog, you can check out what I learned while fostering a puppy, before we found this little guy.


Anita says
Well now, aren't you the clever one. (I love the fact that your brother influenced your decision. Does he know that?) So glad the pup approved!
Meredith says
Thank you! I guess I should let him know!
Susan says
Hi, Meredith! What a great solution to a not very attractive necessity. So glad your little pup has a safe place and you have peace of mind when you leave the house. Sounds like he's a lucky little guy. I am a huge fan of crate training, my pups love their crate, it's great for travel and in an emergency I can just say "Crate!" and they'll run right to it and I can grab them and head to safety. I hope I won't ever have to do that, but we've practiced and it's nice to know should the need ever arise, we'll be prepared. Thanks for the great idea!
Meredith says
That's a really great point about preparing for emergencies, Susan! I hadn't thought of that, but it's another great reason to love crate training.
Lynne says
I happened upon this post while searching for solutions to hide our crate in a spot where we previously had a side table with a lamp. The custom wood tops made to fit crates were too expensive to order, and I didn’t have the tools to make my own. Your idea was perfect, and with minimal cost and effort I was able to make a pretty side table by following your instructions. Thank you so much for this!
Meredith says
Oh I'm so glad this was helpful to you (and your pup)!
The Furniture Gallery says
It's refreshing to see a design that caters to both pets and homeowners. This project not only provides a comfortable space for the dog but also adds a chic element to the living room.
Meredith says
Thanks! And he loves it so it makes me happy!