Painting bookshelves and cabinets in my den is one of the foundational pieces of this room makeover.
It's already week three of the $100 Room Challenge and I'm working my way through this living room makeover! I've gotten my closet doors done, and this week I (mostly) finished painting my bookshelves and cabinets. Today I've got a few tips for you if you're thinking of painting a bookshelf.
For these shelves and cabinets, I used basically the same process as I did with the closet doors last week, but I added an extra step of sealing the shelf tops with Polycrylic, to protect the paint from books sliding in and out of the shelves.
If you're just joining us, check out Week 1 and Week 2 to see where all this is coming from.
~ This post contains affiliate links. If you make a purchase, I may receive a small commission at no extra charge to you. ~
$100 Room Challenge - Painting Bookshelves and Cabinets
I love this built-in bookcase.
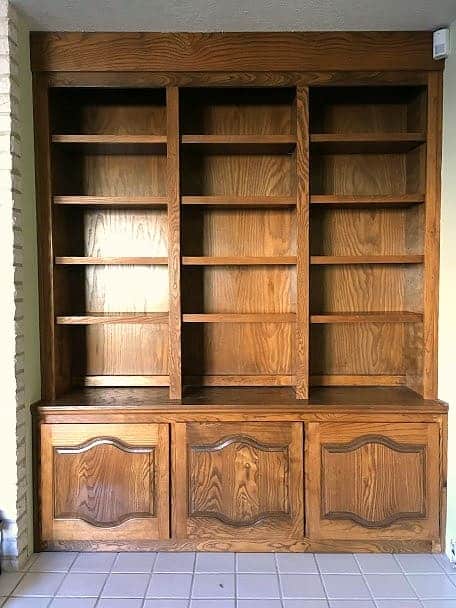
They hold so much stuff! And they must have been gorgeous back in their day when dark stained oak was the height of home fashion. I believe in salvaging as much of a home's character as possible, while adding in all the updates you want, so painting these built-ins seemed like the way to go in this case.
I used the same paint color, Valspar's Ashen Gray, that I painted the closet doors to tie the whole wall of built-ins together.
Before I get started, if you're planning on painting a lot of cabinets, like in your kitchen, I recommend following the steps in this kitchen cabinet painting tutorial, where I outline lots of helpful tips to keep you sane during a kitchen remodel, or get my quick read book on painting cabinets by clicking on the image below.

If you're just doing a few, or a bookshelf like mine, read on!
Painting Built-in Bookshelves
First I removed all the actual shelves and put the little pegs in a ziploc baggy for safekeeping during this process. I did not remove the cabinet doors yet.
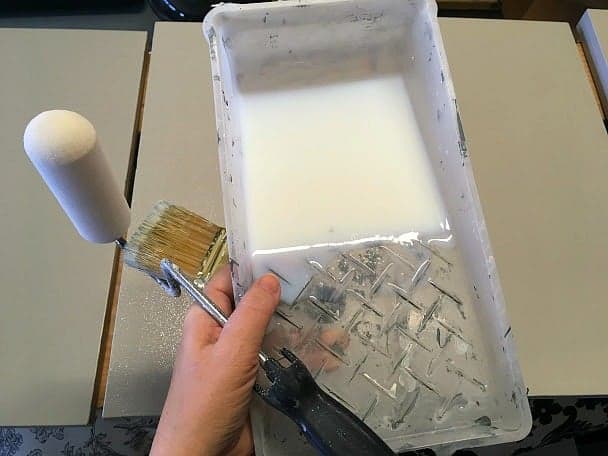
Then (after dusting and cleaning well) I covered everything in a coat of Kilz Premium primer.
Once the primer was dry, I used my 6" foam roller to put on a coat of paint. Then I went back with my smaller brush to fill in all the edges and trim.
I know it may be unconventional, but I find it easier to put the first coat of paint on cabinet doors while they're still attached to the frames. Then, once that coat is dry, you can remove them and touch up the spots you couldn't paint before.
Again, as with the closet doors, I found that one coat of paint worked great, but you might need more depending on the colors you use.
Pro tip: several thin coats of paint work better than a thick coat!
While the frames were drying, I followed all the same steps for the removable shelves. I set them up on two boards suspended on sawhorses in my garage and just went to town, assembly line style. It was kind of fun, after all the tedious edging and trim painting of the frames.
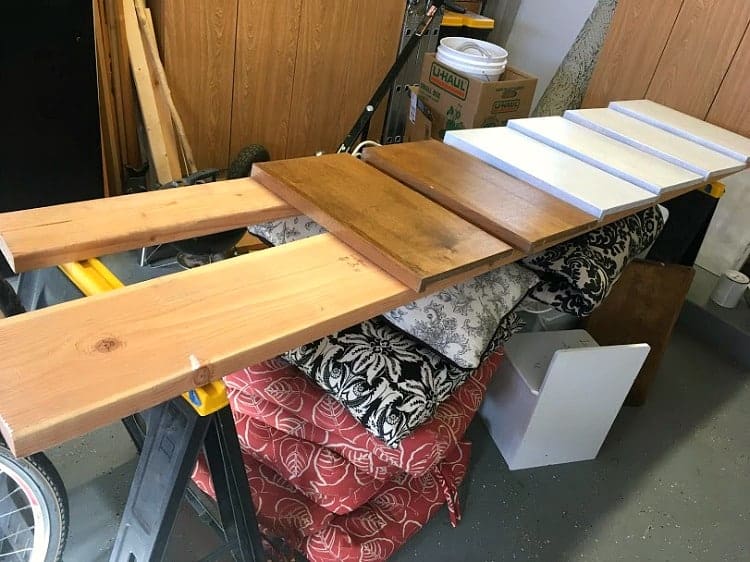
(Don't look too much at the condition of my garage. A lot of life happens out here.)
Sealing Bookshelves to Protect the Paint
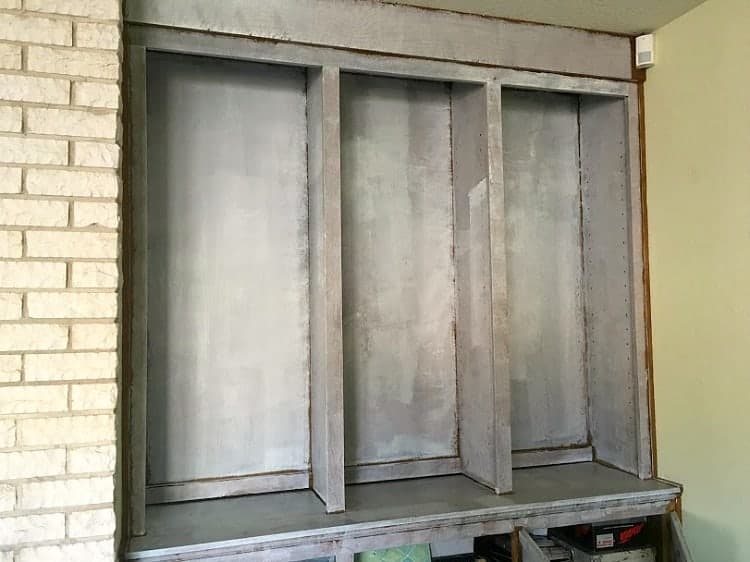
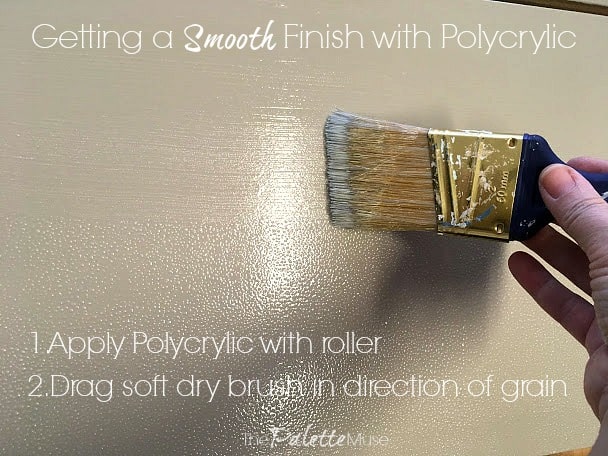
Finally, I used Polycrylic to seal just the top of each shelf, and the ledge on top of the cabinets. Adding a top coat of acrylic sealer on the flat surfaces of the bookshelves will give me the best results in the long term, since that area may get lots of wear and tear from pulling books off the shelf and moving items around on it.
The easiest way to get a good finish with Polycrylic is to paint it on quickly with a roller, then use a soft dry paint brush to lightly drag through the wet sealant. This will take out all those little bubbles you get from the roller and leave a nice smooth finish.
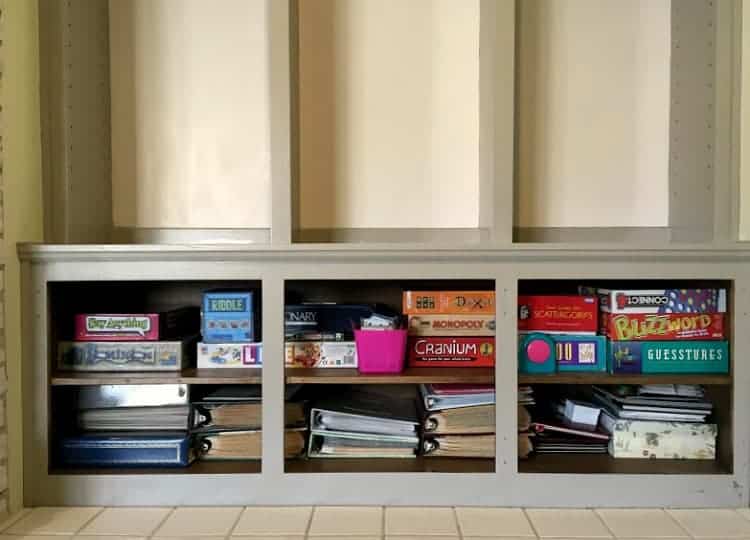
While the doors were off, I took the opportunity to finish cleaning out and organizing the cabinets. How did all this stuff come from this small space?
With the clutter cleaned up, these cabinets look way better, even before the doors got reattached!
As you can see, I painted the backs of the book shelves white, which will make more sense next week. Stay tuned...
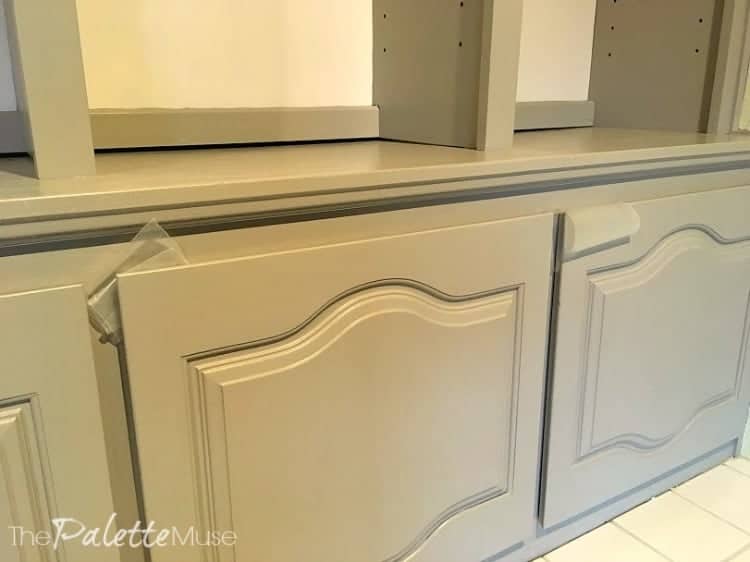
The last step was to reattach the doors. I decided to save money by just using the same hardware. Although the hinges are dated, you can hardly see them.
I need to get some pads to keep the cabinet doors from rubbing on the frame, but in the meantime I used wax paper wherever the painted surfaces touch each other to keep the paint from sticking as it cures. What do you think? Should I add pulls?
Let's Talk about What Type of Paint to Use on Bookshelves
What is the best paint to use on a project like this?
As I mentioned, I painted these bookshelves with latex paint because I had some leftover from a previous project and this is, after all, the $100 Room Challenge so we're working with a very limited budget. But I don't normally recommend latex paints or acrylic paint for cabinets or furniture.
I will always recommend an enamel paint product like Valspar's Cabinet and Furniture Enamel or DecoArt's Satin Enamels. They hold up better on wood and are easy to clean up, unlike oil-based paint. For more on painting furniture or kitchen cabinets, check out my full cabinet painting tutorial.
We're getting close!
I don't have a complete photo of the finished product with the doors and cabinets matching now because there are a few more changes I want to make first before I give it away. But this old bookcase already looks way better and changes the whole feel of the room. You'll just have to be a little patient to see what I'm talking about...


Melissa says
Oh my gosh!!! I cannot wait to see this finished room. Those shelves turned out so beautifully. It looks like a ton of work but wow! So worth it. Love the wax paper tip - I’ll have to remember that one.
Meredith says
Thanks Melissa, they were a lot of work, but I have no regrets! They make the whole room look better!
Emily says
Looks amazing! I love the color you used.
Meredith says
Thank you Emily!
Patti Estep says
Great color choice Meredith. It's going to look amazing. I have to get my husband to allow me to paint some of our old wood built ins.
Meredith says
I know what you mean Patti. Painting over such classic wood is a big debate, and I even wondered about it myself. But in the end, I decided it had to be done, and I have no regrets!
honeynhydrangea says
Loving the color you chose!!
Meredith says
Thank you! I wasn't sure about it at first, but now I love it!
sweetparrishplace1970 says
Loving your color choice on those built ins!
Meredith says
Thanks! I was afraid it might be too beige, but it dried to exactly the gray color I was hoping for.
Dawn says
Love it so far. A thought for a future blog....all those photo albums (I believe they are) what do you think about removing the photos from the old flip book style and placing them in colorful pattern photo boxes. I think the boxes would look nice on the shelf and you can fit a lot of photos in one box. Try to add any info (dates, places, people) on back of photo or on the divider cards that come in each box. Just a thought. Love your blog!
Meredith says
Thanks Dawn! That's a great idea about photo boxes, but my kids still love flipping through the big old photo book pages. I think if I had to downsize someday, that would definitely be the way to go. Thanks for stopping by!
Emy says
The built-ins look amazing!
Meredith says
Thank you Emy!
Jeri Walker (@JeriWB) says
They look fabulous! My love is still waiting for his cabinet shelves to cure, and he didn't label the fronts when he took them off, so we'll see how that goes when it comes to putting them back on 😉
Meredith says
Oh boy, that should be fun! Good job letting them cure first, that will really help the paint hold up.
Jeri Walker (@JeriWB) says
He acquired polyurethane this weekend at Home Depot as well. I told him about it when he got started, but he ignored me until the shelves remained tacky.
Roxanne says
What a beautiful transformation, it's amazing what paint can do!
Meredith says
Thank you Roxanne, it truly is!
Wendy says
Wax paper, genius! I am going to have to remember that. They look awesome, I can't wait to see the final product!
Meredith says
Thanks Wendy! There's nothing sadder than spending all that time painting, just to have it peel off if it's not completely cured!
Kim Carter-Young says
Wow! Such a difference! It took forever for us to paint over our oak but once we did we wondered why we'd waited so long! I can not wait to see how this comes out!
Meredith says
Thanks Kim! That's exactly how I feel about this project!
Organized Squirrel says
Looking good friend!! Can't wait to see the final result.
Meredith says
Thanks Gabby! Me too!
meghemm says
Ooh they look so good!! Can't wait to see the finished room!
Meredith says
Thank you Meg, me too!
Erin Meyer says
Thanks for the dry brush tip when using polycrylic... you are so right about those little bubbles 🙂 That whole cabinet is looking gorgeous... I know I put in my vote on IG already, but I do love hardware (if you have it in the budget 🙂 )
Meredith says
Thanks Erin! And thanks for the vote! I'm still trying to decided what to do, it may come down to the budget...
Kristen says
Whoohoo you have gotten a lot done! Love the look of painted cabinets
Meredith says
Thanks Kristen! It feels good to see such a big change!
Maria - House by the Preserve says
The cabinets looks SO good!!! I cannot wait to see this room come together!
Ashley@BiggerthantheThreeofUs says
lots of coffee! Love that. It looks so good... can't wait to see with styling!
Esther says
I have identical bookcase/cabinets, and was delighted to see your carefully detailed method for transforming them from brown to light. I will follow your strategies, with just a change of paint color to a white/magnolia. Thanks for the tutorial!
Meredith says
I'm so glad this was helpful! They'll look wonderful when you're done!