Oops! Have you ever said something you wish you could take back? It happens to me regularly. You'd think I'd be used to it by now. Well, here I am again. I wrote this great post, but then the next day, realized it was wrong! My dry erase board doesn't erase, if you leave the marker on it to dry more than a day. I didn't realize this until after it was out there all over the internet. However, I found that it does work great if you use regular markers on it, then erase them with a damp paper towel. The process described below still applies, and you get to use regular markers without all the chemicals of dry erase markers. So I decided to let the post stand, with a few corrections throughout (in red). I hope it's still helpful to you, even though it's really just a marker board, not an actual dry erase board. Read on to see what you think and feel free to leave me feedback in the comments!
I have more dry erase boards, message boards, chalkboards, and magnetic list pads strewn around my house than I care to admit. I keep thinking the next one will be just the thing to get me organized. Turns out, it helps if you actually use them.
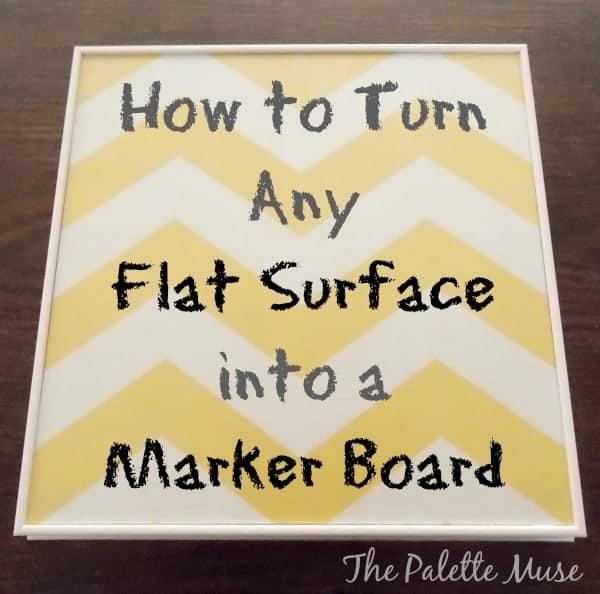
Well, for me to use something consistently, it also helps if it's cute. Enter my new find from Target. I found this piece of wall art with a cute yellow chevron pattern, that's just tailor-made for my office. Now, what to do with it? Turn it into a dry erase marker board of course!
~This post includes affiliate links. If you make a purchase, I'll receive a small commission at no extra charge to you. Thanks for supporting The Palette Muse!~
I was inspired by Rustoleum Dry Erase paint. But then when I went to buy some, I sadly discovered that a small quart sized bottle costs about $20. Hard to justify that expense to embellish my $3 clearance find. But by now I was determined to find a way. Next I tried Mod Podge. Y'all know I love my Mod Podge. I figured since it dries to a nice gloss finish, it just might do the trick. Well, in a way it sort of worked, but I couldn't get it painted on smoothly enough. I could mark on it with no problem, and it erased fine, but the ink got stuck in all the brush marks. There had to be another way.
Finally I remembered using contact paper on another project, and how smooth it felt to the touch. I wondered if that would work? And it did! Like a charm. (For a while.) So for an extra $5, I was able to finally get my cute dry erase marker board. I just know this will be the one that keeps me organized!
Here's how to turn any flat surface into a dry erase marker board, for less than the cost of the markers you'll use on it...
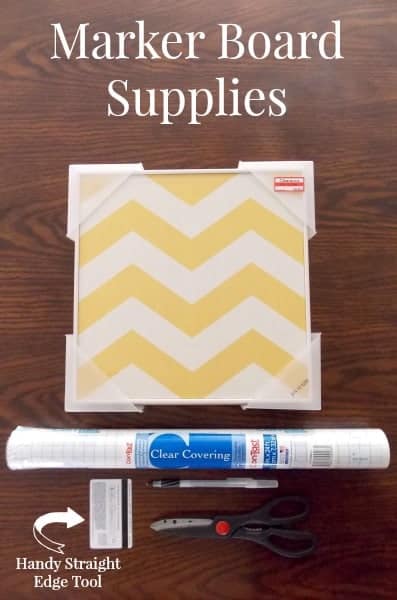
What you'll need to make your own marker board:
- Something with a flat surface. This would be really cute to do with a photo, or even scrapbook paper glued to a piece of wood or foam board
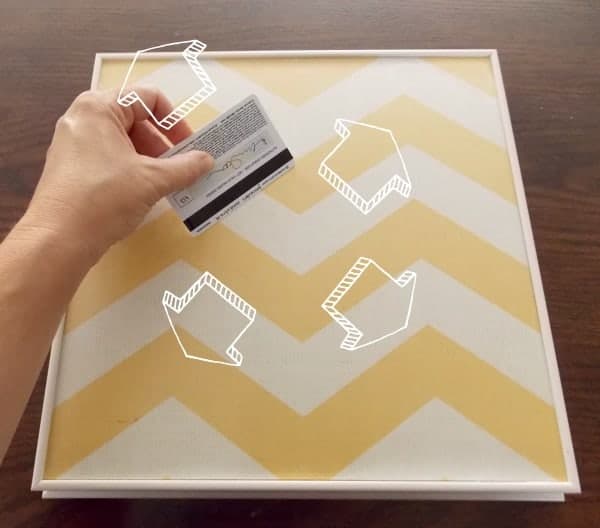
- One roll (or much less) of Contact paper, the glossiest finish you can find
- Scissors
- Pen or pencil
- Squeegee or something similar with a flat edge, like a ruler or a credit card
Marker Board Process:
- Make sure your flat surface is clean and dry.
- Measure and mark the contact paper with the dimensions of your project.
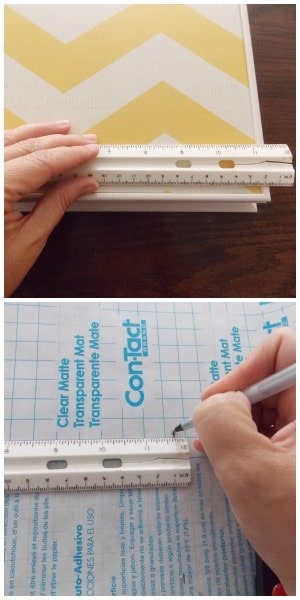
- Cut the contact paper and carefully remove the backing paper.
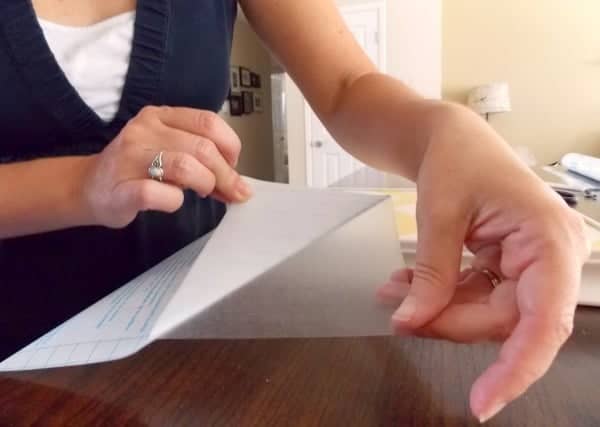
- Affix it gently to your project. You can re-position it if it's not quite right.

- Working from the center toward the edges, use your squeeqee or flat edge to smooth out all the bubbles and wrinkles.
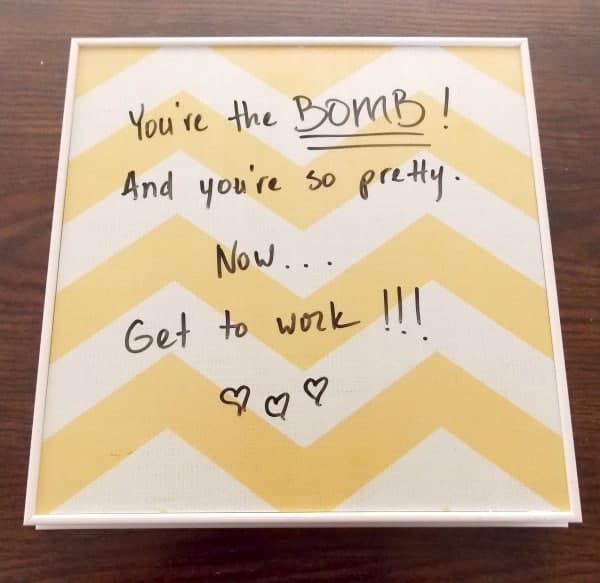
- Write yourself a fun, congratulatory note on your new board, using regular markers, such as Crayola. Then simply wipe off with a damp cloth or paper towel.
Quick tip: Do you ever get residue on your boards from dry erase markers that won't quite erase? A quick swab of rubbing alcohol will make that board as good as new. It also works on walls that have been, um, "decorated" with errant dry erase markers in the hands of an enthusiastic toddler. This part is still true!
Anyone need some contact paper? I now have a 24 foot roll, with about 1 foot of it missing. Oh well, I'm sure there will be another project some day....
Update: I've since found actual dry erase sheets that look like they'd be a better fit for this project, if you want to use dry erase markers. You would follow the same process as this one to apply them to your surface. So there you have it, two ways to make a marker board or dry erase board!


normaleverydaylifeblog says
I'm getting ready to set up a dorm room and this might come in handy! Thanks for sharing!
Meredith says
Thanks! And check the post again for revisions before you do! I just discovered it's really not great at all for dry erase markers, but works for regular markers. So sorry!
DAN DREW says
Thank you. This was extremely helpful. I have students who benefit from gross motor activity, plus they just love writing with markers. If they go to the overhead and write, it's really no different than writing on their own paper. Anyway, wanting to turn these ugly tables and concrete walls into dryerase boards. Suggestions?
Meredith says
Hi Dan, I'm glad it's helpful! I know my kids love markers too. You can also buy large sheets of dry erase plastic, that you could cut down to fit the desks, or apply to the walls. Or simply wrap the desks in contact paper too. The added bonus of contact paper is that it's pretty good about being removable. (I would test it out on the wall first, to make sure it doesn't affect the paint!) Good luck, and my best to your students!
Robin @ Redo It Yourself Inspirations says
Wow! Your discovery is so clever! I love your dry erase board. It looks awesome! You know, that extra contact paper could be used on children's table tops and other similar projects. I have a dry erase board that needs to be redone and wasn't sure what to do with it. Thank you so much!
Meredith says
Thanks Robin! I love the idea of putting it on kids table tops! Also, check my revisions if you're going to use it for dry erase. I can't get mine to erase, once it's really dry! So sorry! But it works great for regular markers - and bonus - you can use washable markers which are great for kids.
Robin @ Redo It Yourself Inspirations says
Thank you for the alert. I haven't done this yet (need to buy the contact paper). Hey, we all have a project learning experience ( I do quite often!) 🙂 I like the idea of using the washable markers because of all of the colors available. Not to mention my son has a box full. That error you had actually gave us a more exciting project than dry erase! Kudos!
rachel621 says
This is so cool! I love the customization of it. No more boring white dry erase board! Pinning for when I can do my craft room.
Meredith says
Thanks Rachel, but I just discovered that once the ink is really dry, it doesn't erase without rubbing alcohol. OOOPS! So sorry to mislead you. But it works great if you use regular markers and just erase them afterward with a damp cloth. I still love mine, but didn't want to mislead you.
jacquiegum says
Ha! I only wish that all the things I said and wanted to take back were as benign as this Meredith! It's still a really coll idea and fun and actually motivating because you can customize it to fit a meeting theme, or something that is just sheer personality! Regular markers are great anyway:) Thanks for coming back to tell us:)
Meredith says
Thanks Jacquie! Once I got over my initial dismay, I realized that regular markers may be better anyway!
Beth Niebuhr says
Good for you, finding that it wasn't as you hoped and then letting people know. Classy move!
Meredith says
Thanks Beth!
Susan Cooper/findingourwaynow.com says
Aw, if only all the things I said and so desired to take back were like this, i would be a very happy camper indeed. Regardless, I still love the idea. 🙂
Meredith says
Ha! Susan, you're so right. This one isn't half as bad as some of the other things I shouldn't have said in my life. 🙂
Tim says
I have a three day rule for stupid stuff I say or do. If, after three days i am still feeling like a complete idiot then I will do what I can to correct the situation. If that feeling of being a ridiculous moron has passed, then I leave it be. I don't think you have anything to worry about Meredith; ever.
Meredith says
Thanks Tim! And that's a great idea. I really like the 3 day rule...
Maxwell Ivey says
Hi Meredith; I think you handled his perfectly. Instead of worrying about the mistake trying to delete the post and put up a new one you just edited it and threw in some humor. also its great to know yourself so well. and i believe that this time you will in deed finally get organized. 🙂 take care, Max
Meredith says
Thanks Max, I think a little humor always goes a long way in fixing problems, whatever they may be. And thanks for your faith in my organizing! 🙂
Ken Dowell says
If my son read this, he'd go for that 24-foot roll and would do all the walls in his room. I don't think I'll show him.
Meredith says
Ha! Ken, maybe covering his walls in contact paper isn't such a bad idea! It would be sort of like a mess-proof room. 🙂
Duke Stewart says
This is awesome! I always love stopping by and seeing your great ideas. You could really turn a house into a living memo pad with this.
Don't worry about your retraction. It's cool that you still did that. I think more people would applaud you for that than anything else.
Meredith says
Thanks! You really could. I'm thinking of doing something for my kids next, so they can use their markers whenever they want...
lenie5860 says
Hi Meredith - I love the way you turned this around. I think I might try this on a piece of plywood so when the grandkids come I can set it on the table or floor (kids love sitting on floors, don't they?) and they can mark it up whatever way they want - washable markers noted.
Lenie
Meredith says
Thanks Lenie! I bet the grandkids would love it. Those washable markers are one of the best inventions ever for kids.
bindu saju says
Hi Meredith, you are awesome!
That is a great idea to make a dry erase board. Write on it with crayola is more interesting and fun. I want to do this project. I sure want that contact paper.
Meredith says
Thanks! You should give it a try. I could see you using contact paper on one of your mixed media creations!
William Rusho says
What a great idea, using contact paper. I would have never thought of that. Thanks for sharing.
Meredith says
Thanks William!
Jeri Walker-Bickett (@JeriWB) says
What a great idea and much better than needing to spend $50 on the special dry erase paint. I used to have a set of 25 small dry erase boards for my classroom which I bought with some rare extra funds. The more frugal science teacher would go to Home Depot and get pieces of show stall fiber glass cut into squares to serve the same purpose. As you can imagine, students are very hard on the markers, but the boards last well.
Meredith says
Interesting! I wouldn't have thought of the fiberglass. Teachers are the most creative people on earth, I think. They have to make their money go farther than most average people. And kids love marker boards!
patweber says
Fabulous! I bet my two granddaughters would love a handmade gift like this. Who would have thunk it. Thanks for the instructions and final product pictures.
Meredith says
Thanks Pat! Kid's love to use markers, and what better way to let them than with something they can use over and over again? Glad you liked it...
Erica says
I love this and it looks so easy! What a great idea! This is definitely going to be used as a gift for someone. I'm sure I could put a dry erase board to good use as well. I need a little help with organization. 🙂
Meredith says
Thanks Erica! Glad to know I'm not the only organizationally challenged one!
Welli says
I like your practical posts where you turn your experiences and thoughts into something to help others. Thanks Meredith.
Meredith says
Thanks Welli! I sure hope my projects help someone along the way.
aspectsgalore says
What a nifty idea! I can think of a few things that it would work well on. Thanks
Meredith says
Thanks! Glad you liked it...
jbutler1914 says
That is pretty neat. It could come in handy for college students or anyone with a home office.
Meredith says
Thanks! Yes, I was thinking of college students too. I wish I'd known about this when I went off to college.
Jeannette Paladinoj says
Meredith -- I don't happen to use a physical board for notes and I'm no good at designing. I've gotten hooked on leaving notes on my computer in my scheduler. It works for me.
Meredith says
Jeannette, I envy you! I'm one of those "piles of paper" people. If it's not out in plain sight somewhere, it doesn't exist. I keep trying to train myself to use online notes, but so far no luck...
Laurie S Hurley says
Is your desk really that neat all the time? hahahaha - I love this idea. I must admit I do have a big dry erase board in my office on an easel and I use it all the time. The markers are nasty though, smelly. The one you did is cute and who cares if it is just a marker board and not dry erase. Thanks for correcting. Maybe I will try this project..... maybe 🙂
Meredith says
Hahahaha Laurie, that's really funny. Right now, I've got barely enough space on my desk to type, between all the piles that have built up since I tidied up for that picture. Oh well, do as I say, and not as I do... 🙂
Michal says
Thanks for the tutorial!
Visiting from Say G'day
Meredith says
Thanks for stopping by!
Christina says
Awesome! Glad you mentioned using a photo. I just might give it a try.
Meredith says
Oh good! I'd love to see how it turns out if you do...
Erlene says
Sounds like a fun project. So you can use regular water based markers, but not dry erase? Would love if you shared this on Merry Monday.
Meredith says
Thanks Erlene! Yes, you can use regular waterbased markers. You can also use dry erase, but they will only erase with rubbing alcohol, so at that point, it's not really a "dry" erase board. But it would work, if you don't mind keeping dry erase board spray or rubbing alcohol handy. And I'm heading over now to share on Merry Monday... 🙂
balmtomysoul says
Awesome! Love this, plus it would be great for gifts as well! Thanks. Pinning.
Meredith says
You're right, this would make a great gift! Thanks for stopping by, and pinning!
Eve Koivula says
Love this! (Only wish I had the walls for some noteboards as well....)
Carie Spence says
Even with regular markers it's a great message board. Thank you for linking up to the Bloggers Brags Pinterest Party. I have pinned your post to the Bloggers Brags Pinterest board.
Meredith says
Thank you Carie!
Audrey@That Recipe says
Fun idea. And I am glad to know I can use regular markers. My husband is a college instructor so he takes all of the dry erase ones to class.
found you on Merry Monday.
Meredith says
Thanks for visiting, Audrey!
Julie says
I did a similar thing at work, just laminated a nice bit of clip art border so we can pop up on the notice board when the next team meeting is. 2 months in it's got a lot of smeary marks - those pens really shouldn't have the word "erase" in their title! I think glass works well, but I don't want glass pinned to a notice board!
If you do get pen stuck where you don't want it , esp permanent marker on a dry wipe board you can get it off my scribbling with a dry erase marker then wiping both off really quickly. It gets most off then alcohol will bring the rest off - but don't take vodka into work for this purpose you may be tempted to take a swig mid morning - I speak from experience!
I might start trying just regular felt pens on our laminated paper and see how we get on. Loving your tidy desk btw, all the little splashes of yellow, sigh, my desk needs a makeover.
Meredith says
Haha! Vodka and work don't mix, I guess. Unless you work from home, like me! And don't worry, my desk only looks tidy like that for pictures. 🙂
Valere says
Does the board smudge with the washable markerS?
Meredith says
If you give the washable markers just a second or two to dry, then they won't smudge. Maybe if you're lefthanded they would smudge a little if you touch them as you're writing. But in general, they dry quickly and won't move until you erase them.
Karen says
I just googled "dry erase contact paper" and the brands that came up got mixed reviews. Is that what you used, or was it regular contact paper? Have you used any of the dry-erase contact paper? Just looking for other people's experiences with that material before I cover a large area of my wall. Thanks!
Meredith says
Hi Karen, this was just regular clear contact paper. I've heard mixed reviews about the dry erase paper too, and there's nothing worse than a dry erase board that won't erase! Sorry I don't have a better answer for you...
Alana Delisle says
Hi. So just to confirm, it works with regular markers and some dry erase markers? What type of markers do you use?
An idea I had a while ago... I wanted a large board to draw on, I taught kids drawing classes. You can purchase large pads of paper that are like an easel but I didn't like the waste. I wanted a dry erase board that wasn't really expensive. I remebered a yoga studio I went to that laminated their new client info form, scared it then wiped it clean for the next person.
I asked a printing company about the cost for a large page, maybe 3 x 4 feet and I think it was thirty dollars. I think that's about half the price of a board, and I old roll it up and take it with me in a poster tube. More portable and cheaper. Thought this idea could help for the woman who said she wanted to do a wall.
I think the smoother the surface, the easier to erase? Have you tried with glossy contact paper? I may try a roll from the dollar store and see if it works.
Thanks for your post!
A says
I found this post while looking for a way to erase dry erase markers off of contact paper! I had the same idea myself and was bummed it wasn’t working out. So happy to learn I can use rubbing alcohol and regular markets from here on out! Thanks for the post!
Meredith says
I'm so glad to know it's not just me! Glad I could help!
Pati says
Was your contact paper clear? Can I use plain white or anything with light coloring on it?
Meredith says
Yes, mine was clear because I wanted to see the pattern of the board underneath. But I think you could use any kind, as long as it's got a glossy finish.
Jamie P says
Awesome idea. Looking forward to making some dry erase boards now myself.
a n g i e says
ur smart but girl you took a lot of time to say something so simple but I like it the dry erase board you maybe should talk so much
Chris Schulman says
I love how I'm at my wit's end, turn desperately to the internet, and a Voice speaks: Right under your nose, silly. You're my Voice today. I love you.
Meredith says
That makes me so happy!
Melody says
Highlighters also work. If you have any ghosting, just use a little hand sanitizer to wipe it away.