A kitchen may be the most expensive room to remodel in your house. Keep your project on track and in budget with this free downloadable kitchen remodeling budget worksheet.
I know it may sound weird but I love a good budget. Saving money comes easily to me, but spending it is sometimes harder, especially when it comes to big purchases. And there's not many bigger house purchases than a new kitchen!
When we started thinking about remodeling our dated kitchen, I quickly became overwhelmed by all the expenses. I knew we needed a budget to keep us on track, but also to help me know that these expenses are all part of the plan.
I leaned heavily on my bathroom remodeling budget worksheet to create this one for my kitchen, and just tweaked it a little to include a few different items and ways of tracking costs.
And today I'm sharing it with you, along with some of my favorite cost saving tips for your kitchen!

This post contains affiliate links. If you make a purchase, I may receive a small commission at no additional cost to you.
How to track your kitchen remodeling budget with a simple worksheet
I'm a designer, not an accountant, so this worksheet is super simple. Hopefully that's a bonus to you, especially if you (like me) are not a spreadsheet whiz.
First, follow these steps to access your free budgeting worksheet:
Get your FREE Printable:
Sign up for The Palette Muse Newsletter and get access to all my free printables, including this one!
If you’re already a subscriber, click over to the Free Printables Library to find the download. You’ll need the password at the bottom of any of my emails.
Once you've downloaded a copy of the worksheet, open it up in Google Sheets or Excel. (I used Sheets to create it, so it may work better in that format.)
You'll see two pages (or sheets) in the worksheet file. The first one is called "Projected" for budgeting numbers, and the second is for tracking actual numbers once each expense is finalized.
I won't judge if you just want to use the first page and never move on to the second. If you're just trying to get an idea for how the different costs will add up, you may only need the first page. If you want to know how closely you stuck to your budget, use the second sheet to track any actual expenses.
When creating the worksheet, I chose not to lock any part of it so you can use it however you want. But I recommend only filling in fields marked in green. Some of the other fields have simple formulas in them to track taxes and totals, so don't accidentally write over those. You may want to make a copy of the worksheet before starting to use it, so you can use it over and over again.
You can add lines wherever necessary if you want to break things down into more detail. Just make sure to copy the formulas to the new lines, and include the new lines in any totals or sums. I've included an empty line at the end of each section for you to easily fill in or copy.
In addition, you could use this same worksheet as a template for any room in your house. (That's how I got this one from my bathroom remodeling budget worksheet.)
A Few Accounting Details
Before you start filling in costs, let me point out a couple of things on this worksheet. At the top there are three columns to fill in, but you may not need all of them for every item.

Quantity
You can use this column to track square footage, like for countertops, or item quantities, like cabinet knobs. It will multiply with the next column (cost per item) to give the total material cost.
Material Cost per Item
This would be each unit's cost, like $5 if each drawer pull costs that. As mentioned above, this column gets multiplied by the quantity to give you the total material cost.
Certain types of expenses come bundled up and you may not know the cost per item, or number of quantity. In this case, you can either put a 1 in the quantity column and the total cost in the material column. Or you can break the rules a bit and put the total under Material Total. Just know that writing a number in that column will overwrite the formula that lives in that field.
Labor Cost
Some, but not all, of your expenses carry a separate labor or installation cost. If you can't separate the two, just use the first columns above. I personally like to separate out the labor costs because we do so much of the work ourselves. It's nice to see all those zeroes in the labor column!
The material cost and labor cost columns get added together on the right for the total cost.
Contingency
Near the bottom of the page after the subtotals line, you'll see a line for contingency costs. Contingency is the category for unexpected costs, and every major project has them, so you should budget for them.
I've pegged this at 10% of the total budget, but you are welcome to use a different number here by typing in a different decimal in the formula. For instance 5% would be .05 and 20% would be .2.
Taxes
Don't forget the taxes! You can change the percentage of sales tax in this field by simply typing the percentage of your local sales tax in the green box.
All these get totaled together at the bottom, and you can have fun (in a weird way) playing with changing the numbers and seeing how the totals come out.
How did my kitchen remodel budget turn out?
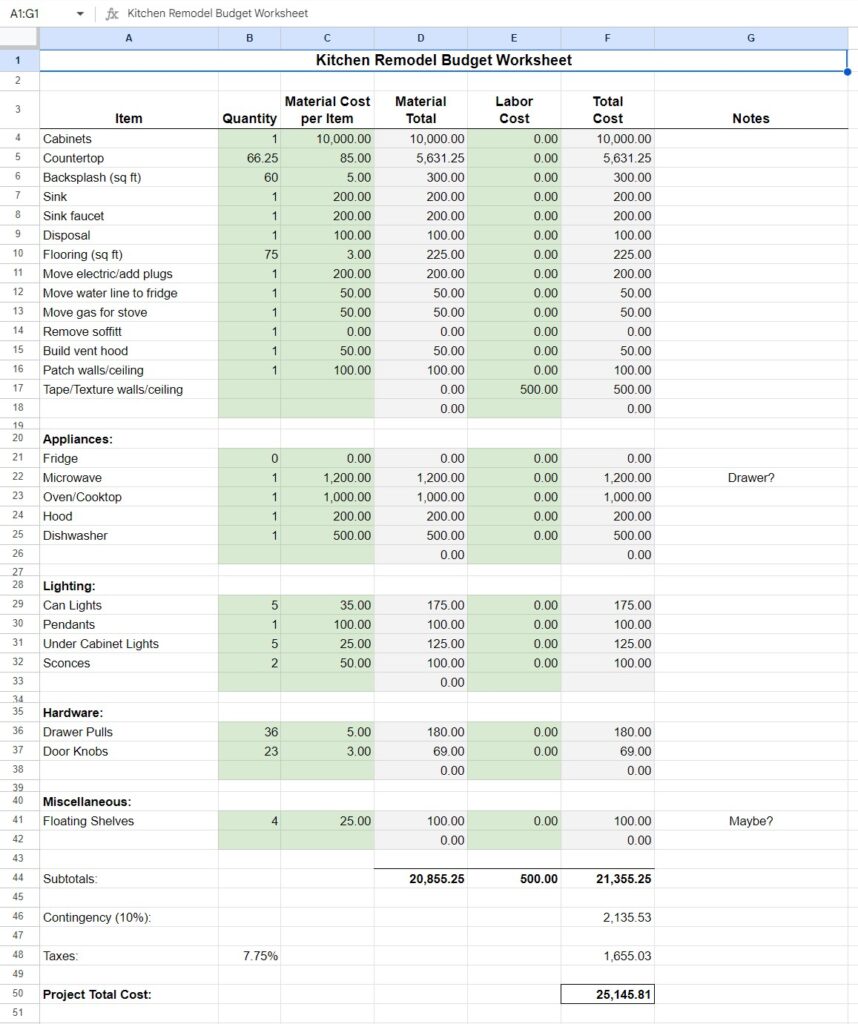
The spreadsheet that I've linked to for you to use doesn't have any numbers in it because they vary so widely from project to project and region to region. But if you're curious to know what my worksheet looked like, here it is.
My own kitchen remodel budget:
My actual kitchen cost:
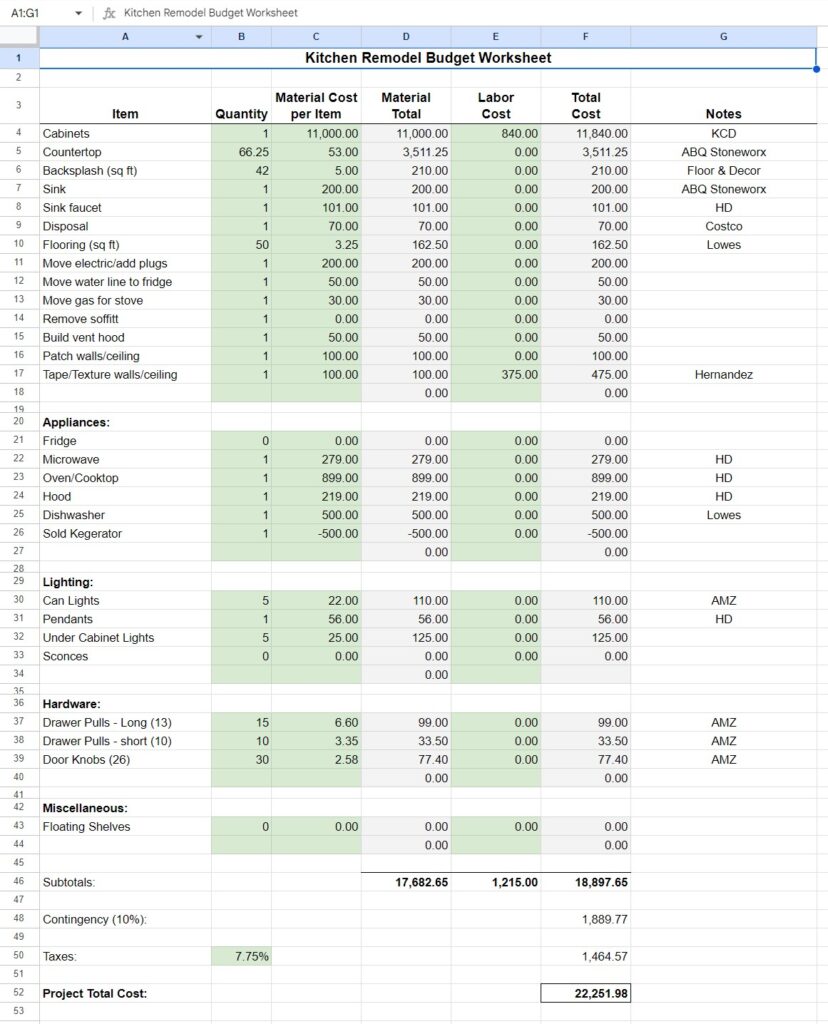
I had a few happy surprises, and a few not-so-happy ones, but in the end I'm very pleased with how closely I stuck to my budget and how much I was able to do with the money I set aside for our new kitchen makeover.
Budget Saving Tips for your Kitchen Remodel
Check online for cabinet hardware. I like D. Lawless and Wayfair, and I ended up getting mine on Amazon. Be sure to buy all you need at one time, to have the best chance of all the finishes being the same.
Look for a granite supplier who can save you money on remnants and partial slabs. I also like to use suppliers who give me a separate cost of the material and the labor. In my part of the country, I find that they tend to be lower cost and you always know what you're paying for.
Think outside the (big) box for cabinet suppliers. You may think that smaller local suppliers are more boutique and expensive, but they can often give you access to cabinet lines that you can't get on your own. Plus they're so much easier to work with than whoever happens to be staffing the counter at the big hardware stores!
Ask your contractor(s) if you can save money by doing the demolition yourself or helping with installation. Some won't let you help (like electricians) but you might be able to save some money on things you can do yourself, like painting the walls.
Check scratch and dent sales for appliances, and start watching prices long before you need them. We bought our oven for $500 off by catching it on sale, even though it sat in its box for weeks while we waited for that phase of the project!
Coming Soon... Our New Kitchen!
You may have noticed that I've filled in all the spaces on my worksheet for the actual costs for our kitchen. Does that mean we're finished? Almost. We've bought everything, and most of it is in place. We're just finishing a few projects and I'll be ready to share the big reveal of our newly remodeled kitchen soon! Stay tuned...


Leave a Reply