Does your oven have spills inside the front door, between the glass? It seems like there's no way to get in there to clean it, but I found a way to clean in between the glass!
How do you clean in between glass oven door layers?
Today might not be one of my most artistic and creative posts, but since I'm getting my house ready to sell, you guys will have to bear with me as I drag you through some home maintenance with me.
The good news is if you have a Maytag oven (or similar glass front oven) you can benefit from my messes.
How to clean between oven glass without disassembling the door:

Disclaimer: Since posting this hack, I've had a few people chastise me in the comments section for doing it wrong. I NEVER want to lead you guys astray, and just because it worked for me may not mean it will work for everyone.
So read on, and if you try this at home, just be sure not to force anything. And for a little chuckle at my expense, as well as some good advice, read the comments for what other people (probably smarter than me) think. Finally, just remember... glass is breakable.
Cleaning Inside your Maytag Oven Door
Some time in the past (I'm ashamed to say how long, so let's pretend it was last week), something I was cooking on the stove boiled over and spilled, not just down the front of my oven door, but actually inside the vents and between the glass of the oven door. No amount of that oven cleaning itself was going to get that mess out.
Plus, when the sun streamed through the kitchen during the day, it highlighted all the dust that had also accumulated (last week) inside the glass. Something had to be done before showing off my almost spotless kitchen to prospective buyers.
But when I searched online, I couldn't find any tutorials that talked about how to take apart my particular type of oven, nor was there anything in the Maytag manual. (Maybe they don't want you doing this yourself, but that never stopped me before.)
So I figured it out myself, and it was so surprisingly easy I had to share it with you.
(Forgive me for not having any "before" pictures and believe me when I say it was bad. I was just on such a tear to get that thing pulled apart that I only started taking pictures once I realized that I should preserve the process for posterity.)
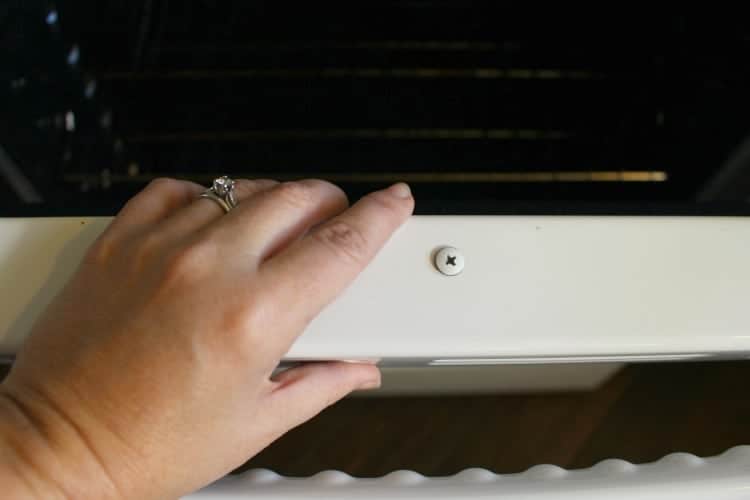
How to Remove Oven Door (at least the front layer):
Apparently some oven doors come in two parts. Mine is actually all one part (more or less), with a large sheet of glass on the front that's held on by a ledge running along the bottom, and the frame of the door on top.
When I started unscrewing screws, I got several removed before I realized I didn't need most of them. So I put them all back in and got on with the actual productive part. Here it is in three easy steps.
1. Open the oven door slightly, to the point where it naturally rests open a few inches. Remove the three screws from the top of the door and set them aside.
2. Slightly lift the top frame section of the door. It won't come off, but it will rock up a little bit, just enough so it's not holding the glass from the top.
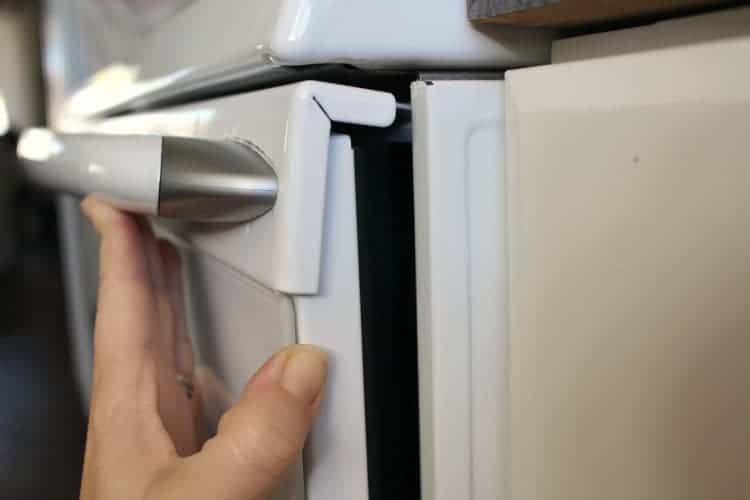
(At this point I felt like I was doing it wrong and was about to break something, so I went back to unscrewing things which didn't help at all. In the end I realized the top only needed to rock back about a quarter of an inch to clear the glass and allow it to swing out.)
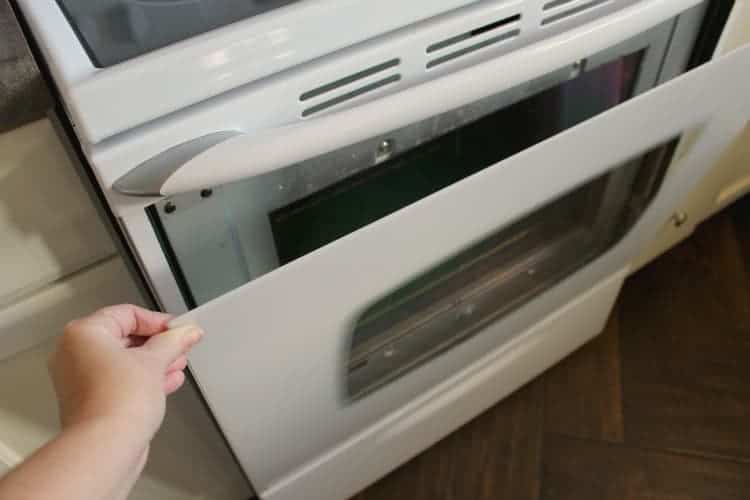
3. Gently grasp the glass on each side and pull up from the bottom ledge. The glass may be difficult to remove because it has a few little adhesive pads along the sides. Just work it gently out and set it aside on a blanket or the carpet.
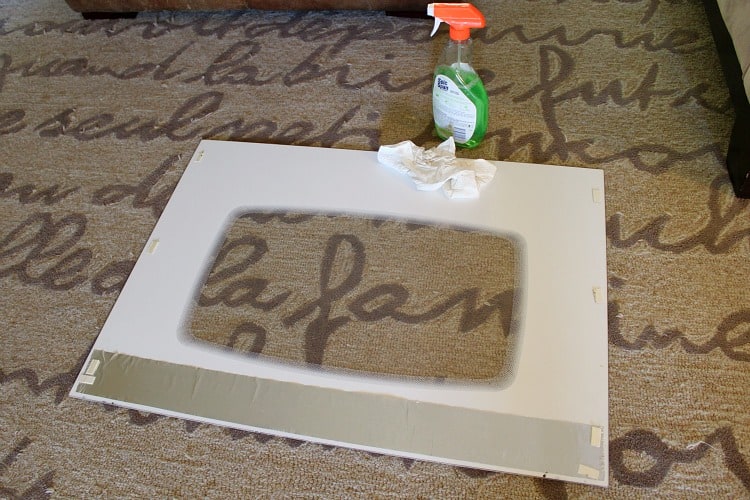
How to Clean Between Oven Glass
Whew! That wasn't so bad. Now all you have to do is take a little glass cleaner to the inside of the glass. (I used Spic and Span first to degrease, then finished with glass cleaner to clear off all the streaks.)
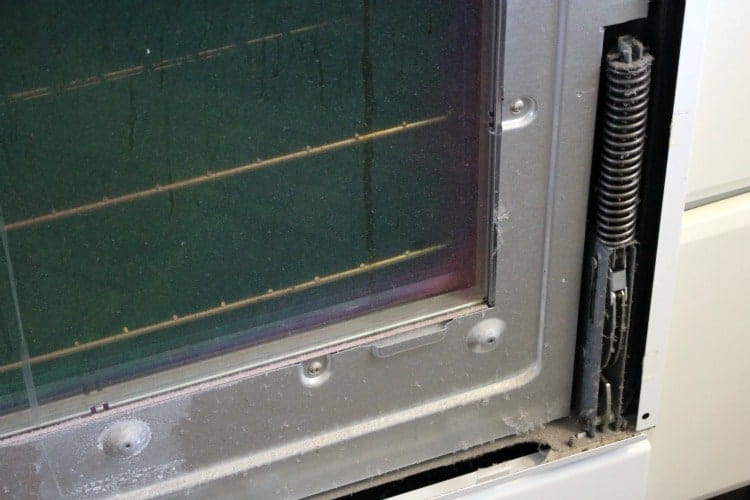
Then do the front of the door that's still attached to the oven. I also dusted all around the inside of the door. There was a lot of gunk built up in the springs and along the bottom ledge, but that came right off with a paper towel and some Spic and Span.

While you're cleaning the door, make sure you watch out for exposed screws. Those suckers are sharp!
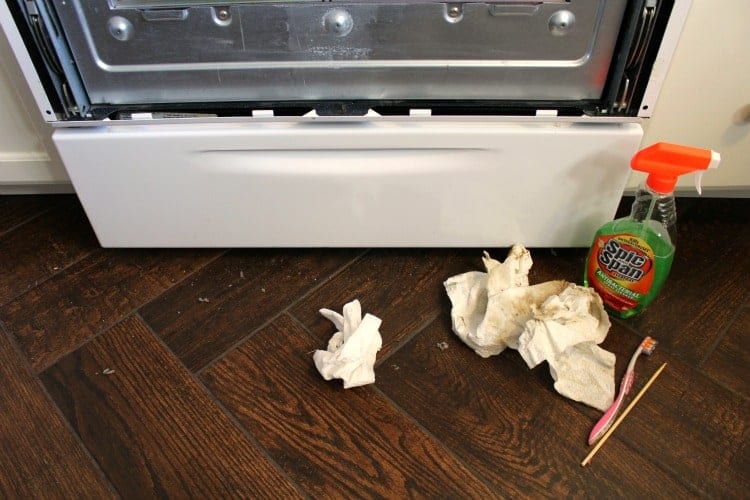
The dust and grime is gone, thanks to several paper towels, a tooth brush, and a chopstick for those hard-to-reach spots.
Replacing the Glass on your Oven Door:
- Once you've cleaned both the inside of the door, and the inside of the glass front, you can gently set the glass back in the bottom ledge, center it, and lay it flat against the door.
- Lift up the top edge of the door again, tilt the glass in, and let the top clamp down over the glass.
- Replace the three screws and screw them in nice and tight, and you're done!
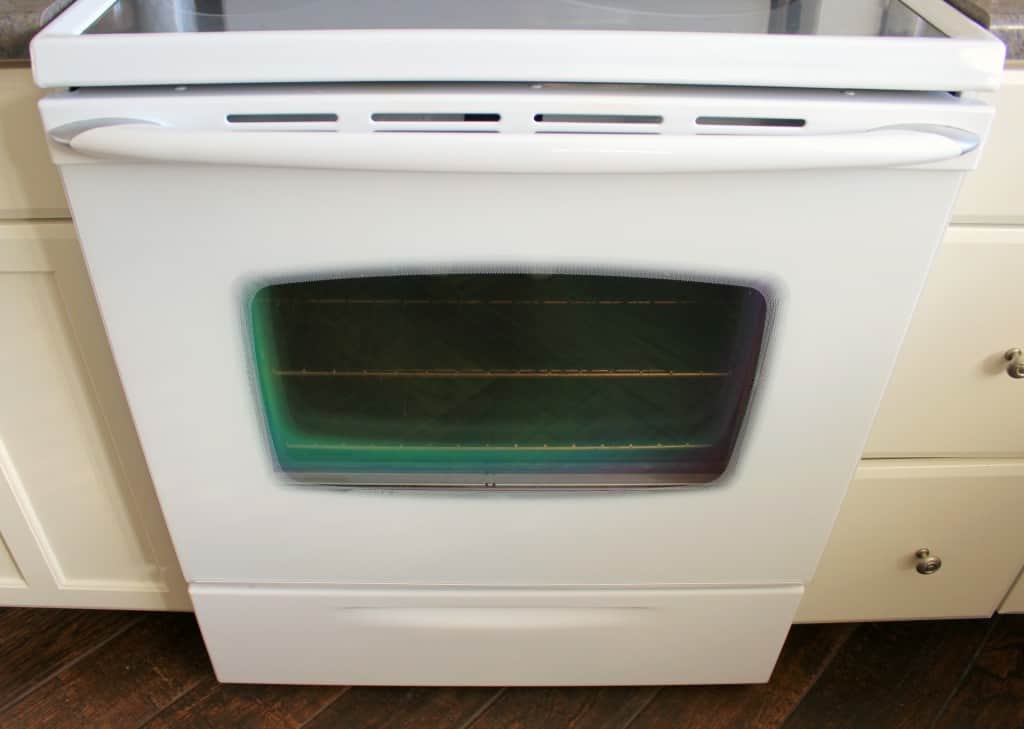
Now you know how to clean inside oven glass doors and suddenly your trashy looking oven is all clean and sparkly again, ready to wow your prospective home buyers, or at least your guests. At this point, it's probably a good idea to run a self-cleaning cycle, so it's truly clean inside and out.
Now that the kitchen's ready to go, next week we're moving on to baseboards! I know you're hooked now, so plan on coming back for that riveting tutorial...


Carole West, Garden Up Green says
This is very helpful - we're also getting our house/farm ready to sell. Hope to have it listed by April. Which means I need to get offline and get busy. LOL
Meredith says
Good luck Carole! I can't believe how many things I found to clean, once I decided to list our house!
Virginia Hymer says
I am a happy woman! I had had it with the embarrassing oven doors. I am in the process now and nearly finished. Problem? Too many screws left over!! Not to worry! Thank you!!
gary says
excellent! worked ever so well. we should have done it years ago!
Sandey says
Terrific post, as always! Looking forward to the upcoming baseboard tutorial since mine are filthy (only since last week, of course). 😉
Meredith says
Ha! I love it Sandey. Last week was a messy one for a lot of people! 😉
jacquiegum says
Wow! Really useful information... seriously. It's a problem or those of us with any brand with a glass door and I always wondered why there isn't more information on how to do this. Plus, I loved the chopstick tool!
Meredith says
I always wonder that too, especially given how often this happens! And as for the chopstick, that was my brilliant husband's idea. 🙂
Roxanna Surfus says
We were unable to get the glass out from the top so took the three screws out of the bottom of the door and slid the glass down. Was able to slide that track off the bottom of the glass and clean it in the sink then putt he door all back together. My dear husband helped me. We are in our 70"s so getting down onthe floor wasn't the easiest!
Tammy says
@Meredith,
kelly says
Thank you -- Thank you -- Thank you!!!! This is SO helpful and timely too.... "spring cleaning" is starting soon for me!!!! Can't wait for the next post!! Kelly
Meredith says
Thanks Kelly! Gotta love spring cleaning!
Sarah Painter says
Thank you!!!!!! I've been needing to this for...a few days...ha! I'm so doing it this weekend.
Meredith says
Hi Sarah! Glad to know I'm not the only one with this problem. Great to hear from you!
pamela says
OMG I'm embarrassed to say, "I didn't even know you could DO that"! And seeing the dirt on the oven door stresses me out. Thank-you for this Meredith. But Meredith, you have a Maytag. Doesn't that repairman comes with the oven? : )
Meredith says
Ha! Pamela you crack me up! Where is that Maytag guy when you need him?!?
Jeri Walker (@JeriWB) says
Oh dear, now my inner clean freak can't stop thinking about what I will find should I do this. Just underneath the lower pullout drawer gets so gross. I never thought about what it would look like behind the glass front of the door. You've planted a cleaning seed I am not going to be able to ignore now 😉
Meredith says
Oh dear, sorry Jeri! But now I have to go look at that bottom drawer, which I never thought about doing before, so you got me back. 😉
Susan Cooper/findingourwaynow.com says
Don't have a maytag oven, but all the same, this is pretty cool. Hopefully all would be somewhat similar to do. 🙂
Meredith says
Thanks Susan. When I started looking this up, I was surprised how many different types of doors there are out there! Maybe yours has already been covered by someone else...
susan says
very helpful!! short and sweet! Thank you
Lavonne says
Thank you so much for this tutorial. I found a Youtube video the last time I did this--ummm a couple months ago. It was helpful but required oh, so many more steps. This felt a little dangerous, what with getting that glass panel to pop out and all, but it was absolutely worth it. Twenty minutes, start to finish.
Meredith says
I'm so glad this was helpful to you Lavonne!
Bruce says
@Lavonne, this works great! Thanks for posting!!!
Bruce Johnson
Richelle Ludwick says
*scream* I'm gonna have a heart attack trying to rock the top thing back and forth enough to get this darned glass out. Simply will not budge.
Richelle Ludwick says
Aaaand.... I broke it. I actually cracked the whole thing. Damnit.
Tom Hartwick says
I was unable to lift the top frame up enough to get the glass out. So...I slid a knife between the glass and the frame to loosen the tape. Then I was just able to lift the glass enough to get it out of the bottom of the frame. Used the same method to replace it after cleaning. Thanks for the methodology.
Scott says
My Maytag would not come apart the same way. Close but no cookie. I was simply 1/8 inch shy of that glass coming out no matter how much I rocked or pulled on the top. I ended up taking the door off and then unscrewed the bottom panel (the one the glass sits on). and slid it out from the top. The hardest part of the job was to put the door back on. I had to find a utube video to show me how. But be warned there is two open positions to put your springs in (utube forgot to mention this(made my job alot harder)). Make sure the springs will not open anymore. I just used my foot to open them fully. I would suggest this method over the one given hear if you can't easily rock the top clear enough to get the glass out.
Jay says
unbelievable, the repairman told me how to do it, and it involved taking the door off, removing the hinges and completely disassembling the door from the inside. put it off for a year until I saw this. keep up the good work!
Dave says
I found this post o0n the web and almost fell for it. I've been fixing things since I rebuilt my first lawnmower at the age of five. I was a certified welder before going back to school and getting a BS and MS. My family has been in construction my whole life and there is very little I can't fix. All I can say is I wonder how many stove doors were damaged beyond repair because of this post. I'm sorry, but you might have gotten away with it, but I'm willing to bet a lot of folks didn't. I looked on the net for instructions on removing the front glass on the Maytag for my ex. If anyone thinks removing an oven door from the stove and removing three to five screws is too complicated to handle, they have no business being around a tool of any kind. There is a clip on each door hinge holding the door to the stove. These are simply pryed down, the door lifted up and off, the screws holding the retainer bracket on the bottom of the glass are removed along with the retainer (which is about the width of the door), and the glass easily removed. What's the big deal? Doing it the way you show is completely ass backwards and you should know better.
BobK says
Totally agree Dave. The 3 screws by the handle do NOT need to be removed, nor the handle assembly forced or pried up to release the front glass. Doing so could be very harmful and even dangerous Remove the door, remove the retainer bracket, the grass, and clean. I wonder how the people that replied above positively really got this to work?.
CleanFreak says
Ahhhhh...little harsh there Dave!...”you should know better!” Or just man-ego!
Meredith’s posts and ideas are ALWAYS well thought through, previously successful hints!
Another “tried and works” idea for most ovens...
http://askannamoseley.com/2013/01/how-to-clean-between-oven-glass/
Of course if there is so much build up it will take a few tries. But for regular cleaning, PERFECT!
Keep posting Meredith! Your hints are amazing!
Michelle says
Why be so rude? If you’re such a professional on the matter why couldn’t you KINDLY share your opinions on how you think it should be done. Honestly construction and “rebuilding a lawn mower at 5” have nothing to do with cleaning a stove. It saddens me to see such a “talented” person as yourself so heated over something so simple. Why don’t you spend your time doing something more constructive such as getting a higher degree in something lol
Dave says
Dave is correct. There is a locking mechanism on the hinges. Push down on the retaining clips and lift the door. Remove about 5 screws and the glass mount comes right off. Replacing the door properly on the oven was a bit challenging to do alone but after a few tries it snapped right back into place with almost no chances of damaging the door. Ours was so messy I removed all of the glass parts and the handle for a true deep cleaning but I wasn't willing to risk the damage by following the advice posted here.
MtnMia says
CleanFreak.....Agee! It’s a guy thing!
The coat hanger definitely works! Especially for routine cleanings.
http://www.theeyesofaboy.com/2016/03/oven-cleaning-hack-between-glass-door.html
Keep up great tips, Meredith!
Regina says
I can’t get my glass out.... any suggestions?
Violet says
Thank you so much! Very clear instructions. You saved me from buying a new oven door!!
Meredith says
I'm so glad, Violet!
Ray says
Dave sure is full of himself. He got a BS and MS. Wow. Impressive but so what does your MS and BS have to do with absolutely anything this tutorial is about? Oh, by the way, this procedure works. I've done it and I don't even have an MS or BS,
Carla Wilson says
@Ray, I totally agree with you Ray!
Mary London Szpara says
I think someone needs to create an oven that doesn't have vents in an area that makes a mess. Obviously none of these ovens were designed by someone who really uses them daily
Ray says
...or has to CLEAN them.
Meredith says
I agree! Who ever thought to put vents in the exact place where you spill stuff?
Carla Wilson says
@Ray, maybe that smart dude with the MS and (full of) BS can design one! Bahahahaha!
Tamara L Fogelson says
Pretty sImple with your instructions. Take out the top three screws - then we pulled the draw out underneath and with a short phillips screw driver - removed the bottom screws. Glass "fell" right out. No prying. Easy - thanks for the tip!
Meredith says
I'm so glad! And you're welcome! 😉
Tom Whitman says
Thank you! Your tips made the job much easier. We have a Maytag stove and had to take off the oven door so to make it easier to remove the three screws on the bottom, plus the four screws on top to split the door. After that there was a set of four screws inside, two on either side of a frame that held the two glass plates in place. It was a breeze and the wife was right there helping with the cleaning. Looks like a new one now! Appreciate your help page. Thank you very much!! Tom & Jan
Meredith says
Thanks for sharing your experience Tom, glad this was helpful!
Bruce Taylor says
Thanks, as you said, models will vary in design. I had only two screws to remove to get the top part with the handle off. This has a channel that holds the glass in place at the top, so you must pull it straight up and at not too much of an angel. The bottom channels will be full of gunk, so you have to pull straight up again carefully, but with a bit of force to get it out. mine had two side plastic pieces that sit behind the glass that support and provide a bit of pressure to keep everything in place when it's together. These fell away when I removed the glass, so don't be surprized if that happens, just a warning to not drop the glass if this happens.
I got a bonus, behind the top panel was where the handle was attached, it had been loose, so I fixed that while I was in there. looks great for an old (2006) oven, thanks again.
Meredith says
So glad to hear how it went for you Bruce, thanks for sharing!
Gayle Williamson says
I did it just as you explained. Pulling the top up was a little scary but two of us kept easing it up on both sides till the glass was free. Thank you so, so much!
Meredith says
I'm so glad to hear that! Thanks for commenting!
Jay Andres says
Worked great. What did we do before the internet? Been putting this off for a few years now. No more excuses that I don't have any time since the Covid got me locked down. Now when I go to my friends house and I see there dirty oven windows, I will be able to say. I can tell you how to fix that! Thank you.
Meredith says
I'm so glad Jay! Thanks for commenting!
Lavinia says
Hi -
I have an old Maytag Double Oven range Model YMET8665XS00 - came with the house. Small upper oven, main oven and no drawer below - joy, floor of main oven is at floor level!
The glass was such a mess inside both doors, could barely see inside. Had to get inside doors to clean it. So took main door off and by removing two top corner screws on inside face and the three along the bottom it came apart easily. Great.
BUT small upper door - no way to remove from stove, was puzzled how to access glass inside. Could only access the door edge at the bottom by peering upside down - realised that door was constructed same as main, except main one was on dining table so could be handled easily. With my husband helping be an extra set of hands I could take front off carefully. Found you had to make sure you could still open door with handle removed - had a cloth through the top of the doorframe, that plus some prying allowed me access to pull door open. BIG warning - if you take the top inside corner screws off it allows you to get into door but the three on the bottom edge are still attached and the tabs that belong to the silver front (steel?) are thin and flexible so you have to make sure you do not stress them by moving the face too far from the top edge of the door body. I think on reflex now it would have been easier to have removed the bottom 3 screws first then holding door together take out the two top corner screws. Ah well.
Oh and after several small patch tests I went with the ammonia process - (DO ONLY ONE DOOR AT A TIME - TOO SMELLY OTHERWISE). This was super successful with this hugely filthy oven.
Meredith says
Thanks for sharing your experience Lavinia, I'm glad this worked for you!
Barb says
Poor Dave, but in case you didn’t know this, not all stove doors have the type of hinges you’re talking about. There are 2 different kinds.
Ian MacCready says
Thanks. This worked great.
Deborah Saka says
Hello, What I would like to know is who is the freaking idiot who leaves an opening between the doors of an over where dirt, food and dust can get in??? Hello Maytag??
Meredith says
That was my thought exactly while I was working on mine!
Karen says
Thank you,but my handle would not bend enough for the glass to get free. Any ideas? So much easier than the other post but I could not bend the handle enough.
Meredith says
Hi Karen, sorry to hear that. I'm not sure what else to do, but it's probably a good idea not to force it, so I think you might want to look at other cleaning options. Sorry I don't have a better answer for you!
Jerry Kreun says
your procedure worked GREAT!! Followed your instructions instructions and got the glass out. I don't know how old your range is but mine is 18 yrs. old.
Thank you
Meredith says
I'm so glad to hear that, thanks for commenting!
Lori says
Wow. I had COBWEBS in mine. And, yes, just made my 10+ years but still new looking stove look gross. This worked great. Had my husband help and it was a bit tense because I was worried about breaking the glass but it went quite smooth. Thank you!!
Meredith says
Yikes! Glad it worked out for you!
Shelley says
Thank you ! I took the three screws out but I thought I was going to break the door and glass until I saw your article. The stove looks brand new!!!
Meredith says
I'm so glad you got it!
JennyM says
For whatever reason, I decided to get motivated to clean my oven door tonight - 9/11/2021. Anniversaries of loss are hard, and so doing something that is SO mundane and normal seemed to soothe my soul a bit.
I first read Meredith's instructions here three or four years ago, which was the first time it occurred to me that it could be done. My oven is 20 years old, and this is probably the first time I have tried to do anything other than the very ineffective self-clean setting. Okay, I have a Whirlpool wall oven Model gbs307pdt3, so I went to youtube first and watched the relevant videos. They were very helpful to take off the door, or very helpful to clean the glass on the inside (but there were three layers of glass in my oven door and they didn't match the oven setup), and then I couldn't get one of the glass layers to go back right. I knew it was wrong, but I had to have my hubby come help me solve the puzzle. It turns out that there were hidden corners where the second layer of glass is held under the top, and then a retainer on the bottom that holds that layer in. Then moving towards the door side of the oven, there is another layer that goes under a holder on the top and a retainer on the bottom. It was the hidden corners that I couldn't find - and I knew the glass wouldn't have those kinds of angles. Anyway, success - and i hope that helps anyone with an old whirlpool.
Meredith says
Jenny, you did it! I'm so proud! Thanks for sharing your experience in case someone else with a whirlpool is reading. And you make a good point about mundane tasks. Sometimes they are good for the soul. Or at least for your kitchen.
Liza Zawadzka says
Woah. I'm embarrassed to say that I didn't know you could do this. Just went at my 17 year old Maytag gas stove, and OMG it looks brand new. This is amazing. Thank you soooo much!
Meredith says
I'm so glad! I didn't know either until I got completely fed up and gave it a try!
Jen says
I have tried your same method several times, ending in frustration each time. I even tried cleaning cloth on a hanger reaching up through the holes in the bottom of the door, I got some of that mess but not all of it. I do have to say I agree with the bottom three screws method. I just did it now, it took me about half an hour by the time I cleaned everything and scraped out the gunk from the bottom bracket. It really was quite simple that way. Thank you for encouraging us to read comments, it helps to look at a problem from all sides.
Meredith says
I'm glad you got it worked out, and thank you for sharing your story!
Mary Ann Joyce says
I was so happy to find this tutorial. After having my Maytag for 15 years I thought it was about time to clean the oven. (Please no judgement) I got the inside almost clean as new and did a good job on the glass inside the door. But there was so much gunk left between the glass panes the oven still looked dirty. Even with all the YouTube tutorials I could not remove the door. Then I came upon this tutorial. My oven door glass looks as good as the day I bought the oven. I had to gently pry off the front glass a little at a time but it finally popped off without breaking. I was not aware that there was another pane inside of that to be cleaned. That pane came off very easily by removing the two brackets (3 screws each). Everything went back together in a heartbeat. Thank you!
Richard Winschel says
Thank you very much. This worked well for me, but when I started the self-clean cycle, there was a lot of clicking, then the cycle shut itself off. Now the door is locked shut and I can't open it, I've tried cancelling. I've tried turning the oven on and off. The lock is stuck engaged. Any ideas?
Meredith says
I'm not sure what would cause that, but I'm guessing it has something to do with the the parts not going together right after removing the glass. I apologize that it's been a while since you posted. Were you able to get it resolved?
Jeanette says
This worked beautifully for me! Thank you for the information. The in-between glass windows on my Maytag stove are now clean. And it was much easier to do than I expected it to be. Thank you! Thank you! Thank you!
Meredith says
I'm so glad to hear that! Thanks for sharing!