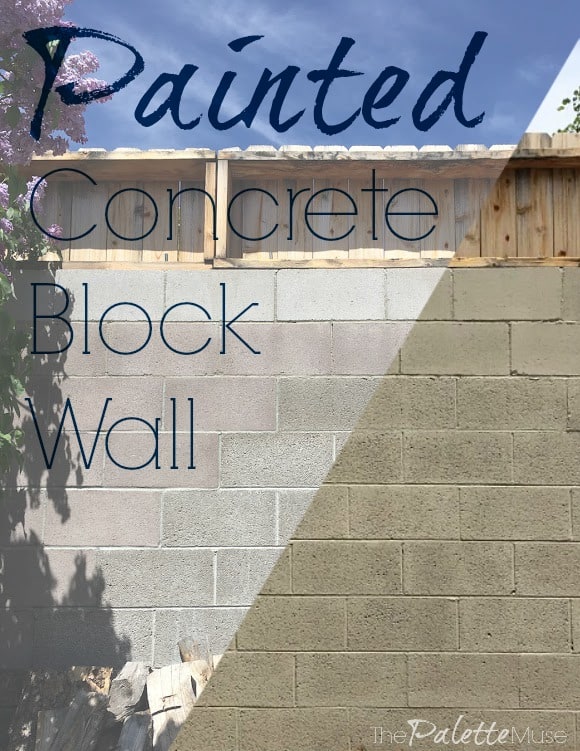
This patio makeover gets a kick start from a fresh paint job on an ugly concrete block wall. Further proof that paint really does fix everything!
This month I'm tackling a patio makeover that all started last year with our new gazebo. We installed the gazebo, loved how it looked and functioned, and immediately wanted to fix up the rest of the backyard but got distracted by summer activities with two kids. (The best kind of distraction!)
Now that the weather is getting nice again, my husband is planning several sprinkler and landscaping upgrades, and I'm looking for ways to get out of digging ditches with him. So I'm painting instead!
I want to make this back patio an oasis for outdoor living and dining. Right now it's functional (the shade from the gazebo helps!), but it needs a little more decorating to make it feel inviting and comfortable.
I plan on painting the table and chairs, adding some lighting, and generally brightening up the whole area with color and accessories. But first, I needed to do something about our ugly cinder block wall.
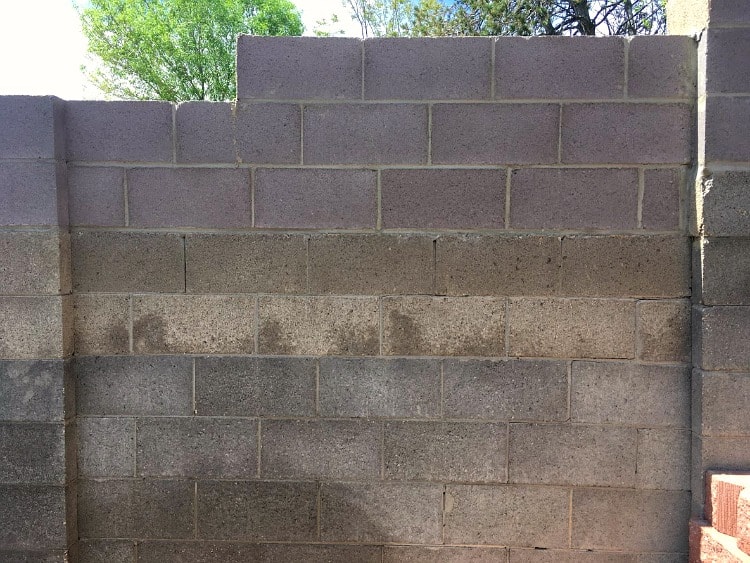
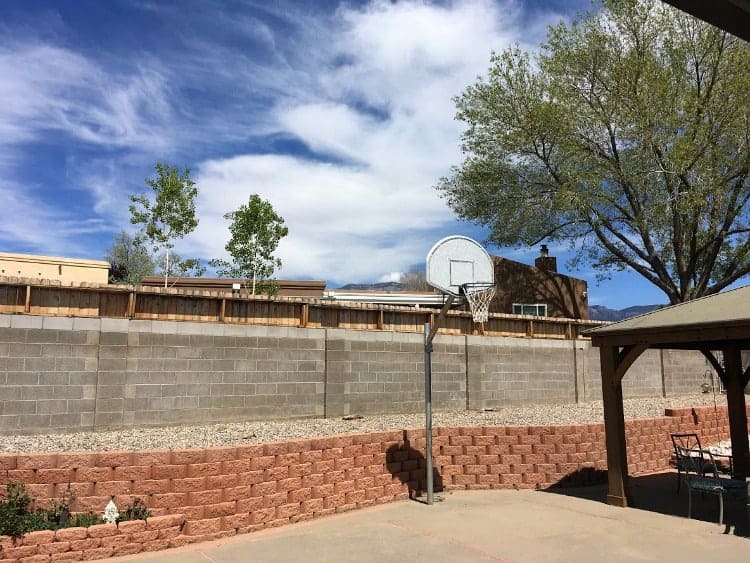
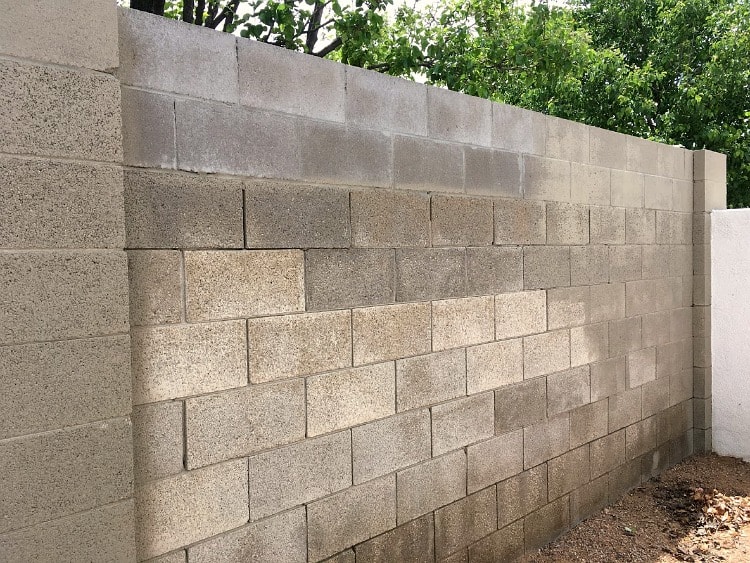
Here in Albuquerque unpainted block walls are a common building material, and great for privacy. But they can look a little, well, institutional. And mine looked especially bad because previous owners had added on rows over the years, causing several color variations that just looked cheesy.
I thought about stuccoing the walls or creating a faux stone wall, but that was waaaay out of our budget. So you know my motto: when in doubt, paint it!
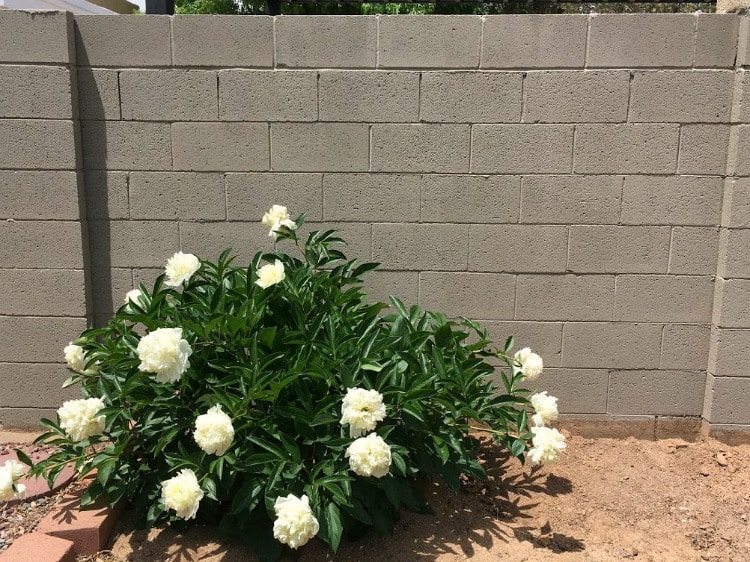
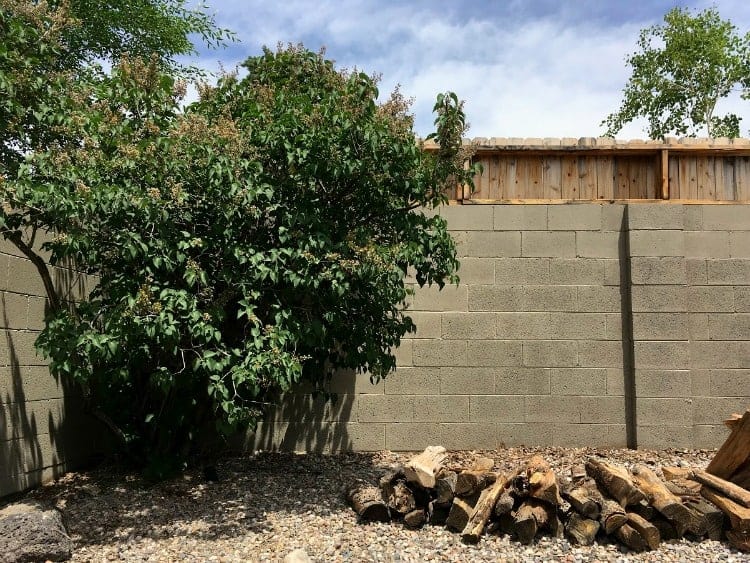
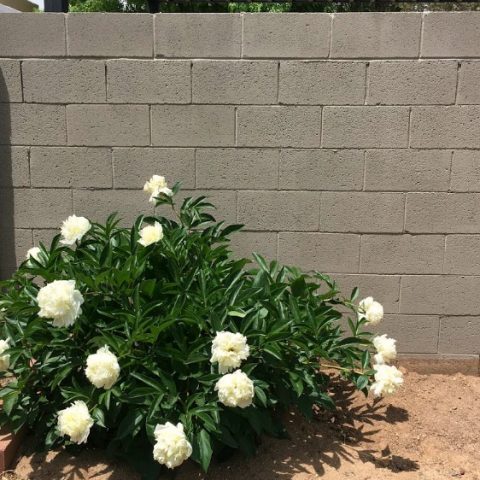
I love how clean it looks now with a fresh coat of paint, and once we put in some more plants and trees I think it'll be the perfect backdrop for some greenery.
Painting a Concrete Block Wall
As we were working, I came up with a few tips to share with you if you decide to try painting a concrete wall at home. I can't say it was super fun and easy, but it wasn't technically difficult. It just took some time, and a couple of extra hands. And 7 gallons of paint!
~ This post contains affiliate links. If you make a purchase, I may receive a small commission, at no additional cost to you. ~
Picking Colors and Paint
We chose a neutral warm gray for our wall because we wanted a good backdrop for greenery. The color is "Stone Mason" by Valspar, which seemed like an apt description of what we'd be painting over.
While I didn't give it much thought at the time, it turned out to be a good thing that the new color was similar in tone to the concrete blocks. It made it so much easier to cover the concrete color without having to put on extra coats.
While the new color is somewhat similar to the old, it's a much warmer brown-gray, and more like a color you'd see in nature. That makes it feel much more cozy and less like a prison yard when you look out our back window.
Color Picking Tip: Exterior walls will generally look a little lighter and brighter in real life (especially in daylight) than the sample suggests. Something about painting a color over a large area and then shining full sun on it makes the color seem a little less deep and dark than when you're looking at a picture or color swatch. Don't be afraid to go a little darker when picking colors for a wall.
We used Valspar Duramax Exterior paint in a Flat finish. I thought we'd need a masonry surfaces paint or elastomeric paint for the porous surface of the blocks, but the paint guy told me this would work better in our sprayer, and he was right. The exterior latex paint has a much more liquid consistency than masonry paint does and it made it easy to apply, both with the roller and the sprayer.
Time will tell how well it holds up to the weather and elements. I'll try to remember to update this post next year and tell you how it's doing.
Update: It's been a year since we painted our fence, and this durable paint has held up amazingly well. No peeling or fading whatsoever. I guess the paint guy was right!
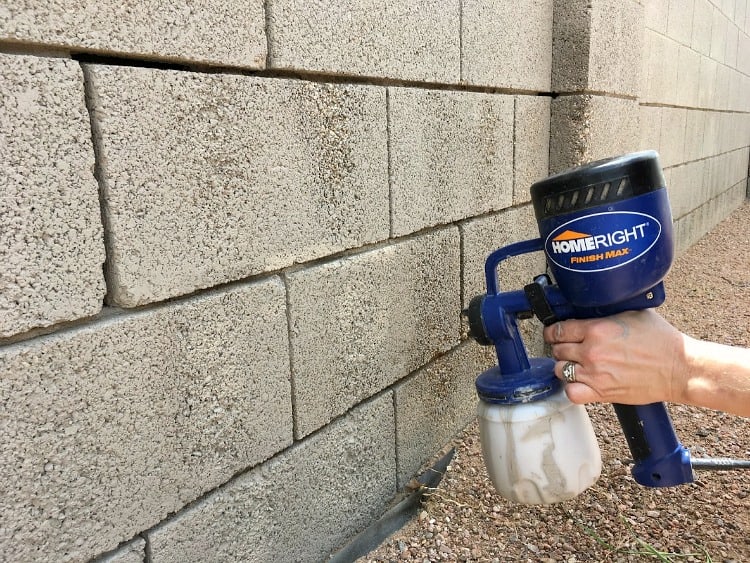
Painting Tools
Let me throw a disclaimer in here before I tell you what we used. First I'll tell you that if I'd had access to a commercial grade paint sprayer, that would have been the way to go for this project.
With such large areas to cover, a professional sprayer would have helped. But that's one tool I don't have in my arsenal (yet), so I relied on my trusty little Homeright Finish Max and a traditional roller. I was impressed by how well they got the whole thing done!
Here's what we used to paint our block wall:
- Valspar Duramax Exterior Paint, flat finish, color: "Stone Mason"
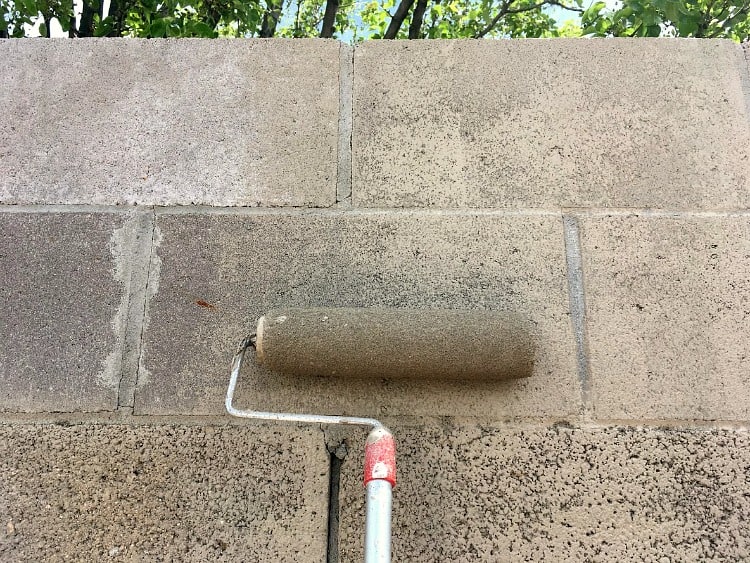
- Heavy texture paint roller - at least ¾" or 1" nap roller to get into all the texture of the blocks
- Extendable roller handle
- Homeright Finish Max paint sprayer
That's all there is to it, not a lot of finesse or fancy tools required to do this job!
Tips and Tricks to Make the Painting Process Easier
Speaking of the best way to do this job, here are a few things we found as we went that made it easier:
- The first step is to use a broom, scrub brush, or a
- Couldn't you just do one or the other? Yes, but it takes a lot more time with either the roller or the sprayer to get into all the nooks and crannies of the block. (This wouldn't be a problem with a professional sprayer, but we're working with what we got here!) Plus we got a built-in second coat on the wall as we went.
The Next Step for our Patio
Now that we have our backdrop painted, we can get busy planting pretty greenery. I'll happily leave this job up to my family, as I'm known as the plant killer.
For me, it's time to move on to our seating area. I've got plans for better mood lighting, perhaps a fun outdoor rug, and updating the furniture with paint. That should keep me busy for a while! Be sure to check back for those updates throughout the month.
And let me know if you have any questions about painting your concrete block wall. I'm always happy to help. (With the questions, not the actual work!)
From Boring Concrete Wall to Pretty Painted Patio
See how easy it is to update an old concrete patio wall with paint. It's an inexpensive way to breathe new life to an old patio.
Materials
- Valspar Duramax Exterior Paint - I used Stone Mason
- Heavy texture roller – at least ¾″ or 1″
- Extendable roller handle
Tools
- Homeright Finish Max paint sprayer
Instructions
- Use a broom or a pressure washer to clear away any dust, debris or cobwebs from your wall.
- Rake the rocks or dirt away from the base of the wall before painting.
- Use your roller to paint around any edges that you don’t want to worry about overspray.
- Roll on the flat parts of the paint.
- Use the sprayer to fill in all the gaps.
Recommended Products
As an Amazon Associate and member of other affiliate programs, I earn from qualifying purchases.
-
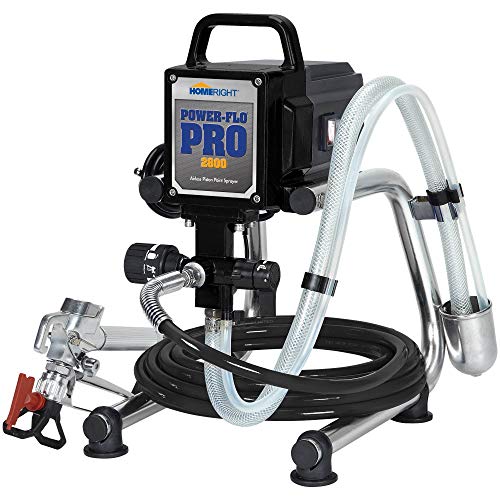 HomeRight Power Flo Pro 2800 C800879 Airless Paint Sprayer Spray Gun, Power Painting for Home Exterior, Fence, Shed, and Garage 2800 psi, 0.24 gpm
 -
 HomeRight C800766, C900076 HomeRight Finish Max Paint Sprayer HVLP Electric Spray Gun, 1 Nozzle Sprays All, Superior Brass Spray Tip, 3 Spray Patterns
 -
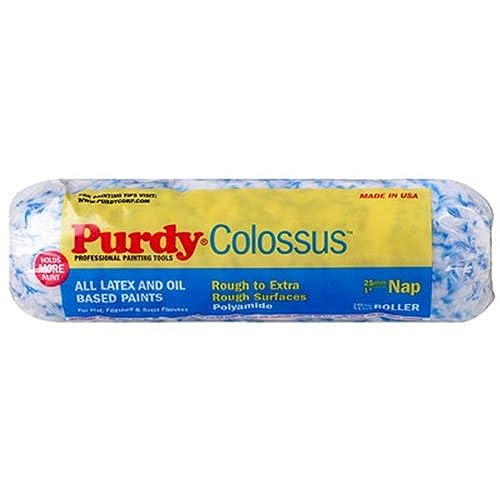 Purdy 144630095 Colossus Roller Cover, 9 inch x 1 inch nap


PresslyAnn says
Wow, great tips and I LOVE the finished product!
Meredith says
Thank you Pressly Ann! You should come see it in person! 😉
Ben says
looks so much better allready! have you thought about applying some stencils to the wall? maybe even colourful ones to brighten it up a little? or are you trying to create more of a subtle backdrop? either way I can't wait to see the finished result.
Meredith says
Oooh I hadn't thought of that! My next door neighbor had an artist friend paint a giant mural of flowers on his wall so that his garden would always be blooming. I think I'm going for more of a subtle backdrop, but I do love the stencil idea!
Louise Hizon says
Pleased with how you did the paint job. It actually enhances more attention with concrete wall. You deserves a recognition. Well done!
Meredith says
Thanks Louise! It's made a big difference to our back yard!
Larry Blade says
You made the house more stylish by painting the wall. I have enough ideas now for my next project that can add attractiveness to my home. Thank you for sharing.
Meredith says
Thanks Larry!
Andra ridout says
I am thinking of painting a mural on my wall but my husband is concerned about when we sell the house in a few years. Do you think your paint would cover over a painted picture and still look good?
Meredith says
Yes! I also think a coat of basic primer first would help. That's the great thing about paint, when you want something different, just paint over it with a new color!
Alison says
Just curious how the paint has held up over time? I’m fixing to paint my concrete blocks under my house.
Meredith says
Hi Alison, I'm very happy with how this paint has held up! As long as your blocks aren't under attack by either excessive moisture, or clinging vines then you should be fine.
Karen says
Hello Meredith, may I ask what kind of Valspar did you use? Did you buy the one labeled Massory Stucco and Brick? I thought in one of your comments you mentioned that you did NOT get the massory paint...so which one did you get? I am going to do the same in my wall excited to know. Thank you!
Karen says
ops never mind I found it Valspar Duramax Exterior with Primer. Got it! Thank you!
Sarah says
Hi! Is there a picture of the finishes wall? I am only seeing the before pictures.
Meredith says
Hi Sarah, the finished pictures are the ones near the end, and the photo at the beginning is a split between before and after (after is on the right). The painted color is very similar to the plain concrete color, just a little more brown, so it may not be very noticeable on your screen. You can also see a bigger picture of the whole wall in this post: https://thepalettemuse.com/summer-patio-makeover-reveal/
Marisela Garcia says
Love your painted block wall. I see that you have installed a wood extension. I would like to add an extension to my block wall and paint it all. Would you share how you anchored/installed that wood fence extension, please?
Meredith says
Thanks Marisela! Unfortunately, my neighbor is the one who raised the fence on his side, so I don't know how that part is done. I wish I could help more!
Sherryl says
We moved from the east coast to Alamogordo and this is exactly what I needed to read! Our wall is so big and we are getting older, so I’m not positive we will do it, but at least now we know! Thank you!
Meredith says
Welcome to New Mexico!
John Wall says
Before painting, cleaning dust and dirt is necessary.
A power washer is the best tool for that.
Thanks for this useful information
Debbie says
Looks like it has been a couple of years since you painted the wall. How has the paint held up? I'm curious because we also live in Albuquerque and have been thinking about painting our block wall.
Meredith says
Hi Debbie, nice to meet a local neighbor! Yes, it's been a couple of years and they look like I just painted them yesterday. I'm so happy with how this paint has held up in the weather, especially the sun!
Susan says
I couldn’t find them before’s and Afters
Margie says
Hi! I also live in Albuquerque and am increasing the height of our existing wall. We know the colors will be a little 'off' and have been thinking about painting as well. I looks like it's been several years since you did this project. How has it held up? Would you recommend renting a professional paint sprayer? Have you had to do any touchups?
Thanks!!!
Meredith says
Hi Margie, so nice to meet a neighbor! Yes it's been a few years and it's held up perfectly. I haven't done a single touch up or any maintenance, and it still looks the same as the day I applied the paint. As for the paint sprayer, I would say it depends on whether you're comfortable using one. I find there's a learning curve with sprayers, but if you've already used them before or are willing to put in the time to learn the tool, it will probably save you time (and sweat) over the project. Best of luck on your project!
V.nolan says
Hey! Just wondering how did you find the valspar paint to hold up? Looking at painting our walls and on the hunt for a good exterior paint that I won’t have to redo next year!!
Meredith says
The Valspar has been amazing! It's been years and I haven't had to do any touch ups. It looks like I just painted it!
Clearwater Concrete says
Thanks for the awesome tips! Your painted wall looks amazing and really brightened up the patio. We’re working on a stamped concrete project, and your ideas gave us new inspiration for adding charm to outdoor spaces. Grateful for your help—keep the great content coming!
Meredith says
Thanks! I would love to try stamped concrete some time.