Reveal day is my favorite part of the $100 Room Challenge! I love to see a project come together, and it's even better when you get to see all your friends' projects come together! This month I gave my breakfast nook a little makeover, and I'm amazed at the difference a few little details can make. One month and $100 doesn't seem like much to go on, but it gets the job done!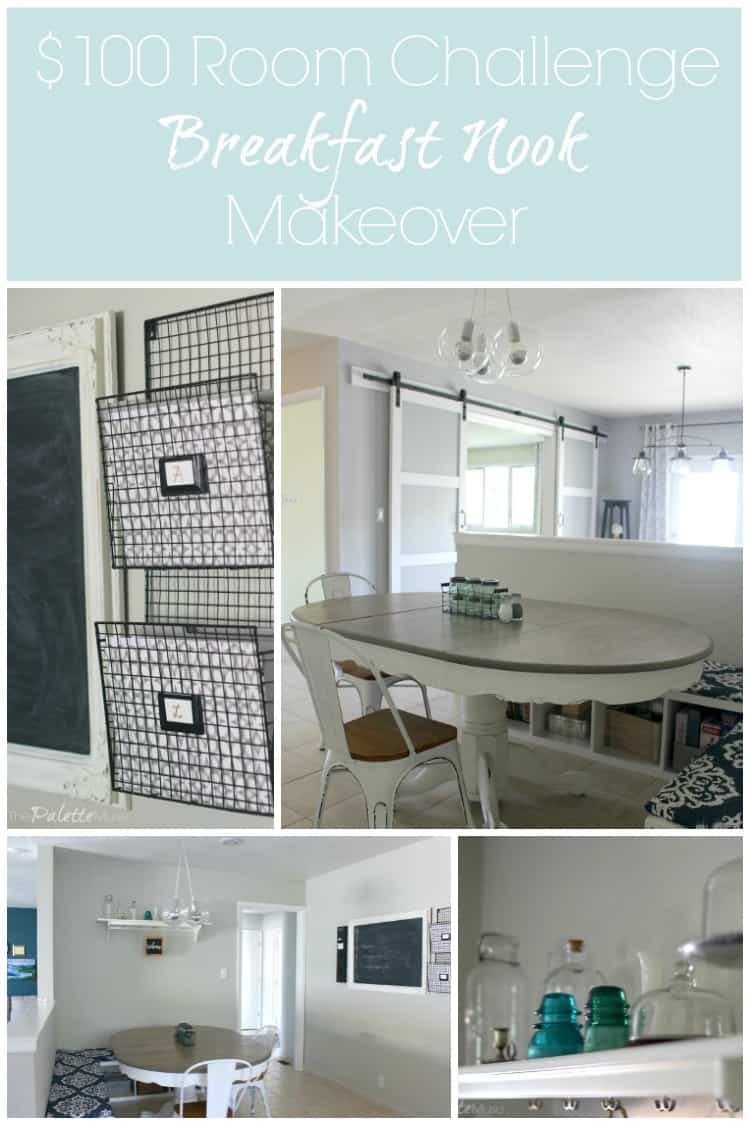
Before we get to the big reveal, let's take a quick look back. If you're just joining us, check out my previous posts about this challenge:
Then take a look at Erin's vision for this challenge. She blogs over at Lemons, Lavender, and Laundry and is the creator of this whole experience. She was even featured on The Rachael Ray show!
As a quick reminder, here is what I started with: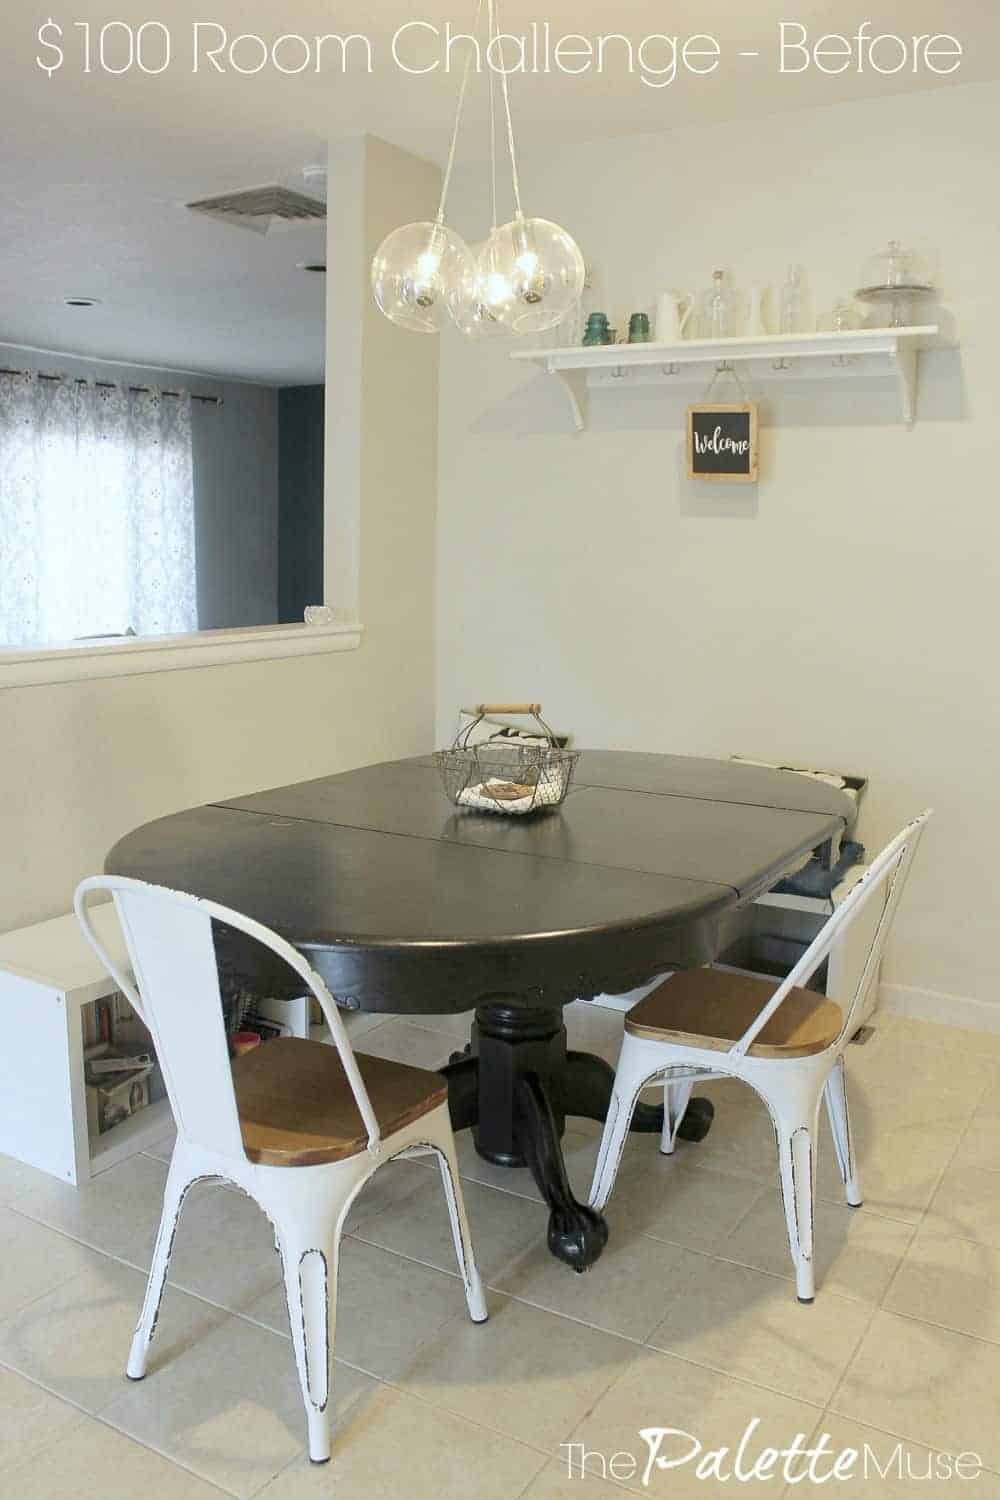
Not too bad, but needs some fine tuning.
And this is our breakfast nook now: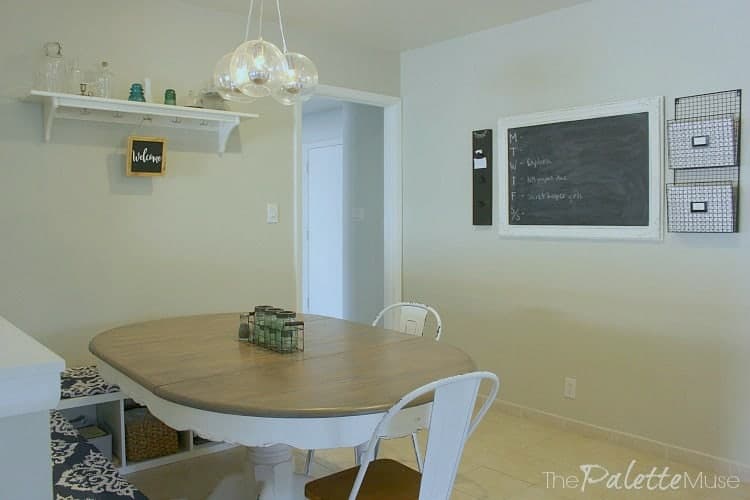
I couldn't be happier with the changes. For once, I didn't move any furniture or repaint any walls. (We'd already done that previously.) I loved my farmhouse table and storage benches, but they just needed a little updating with fresh colors.
I gave the table a makeover using stain and chalk paint, to make it a little lighter looking, and not quite so much like the black hole of the room. (You can see exactly how I did it in my 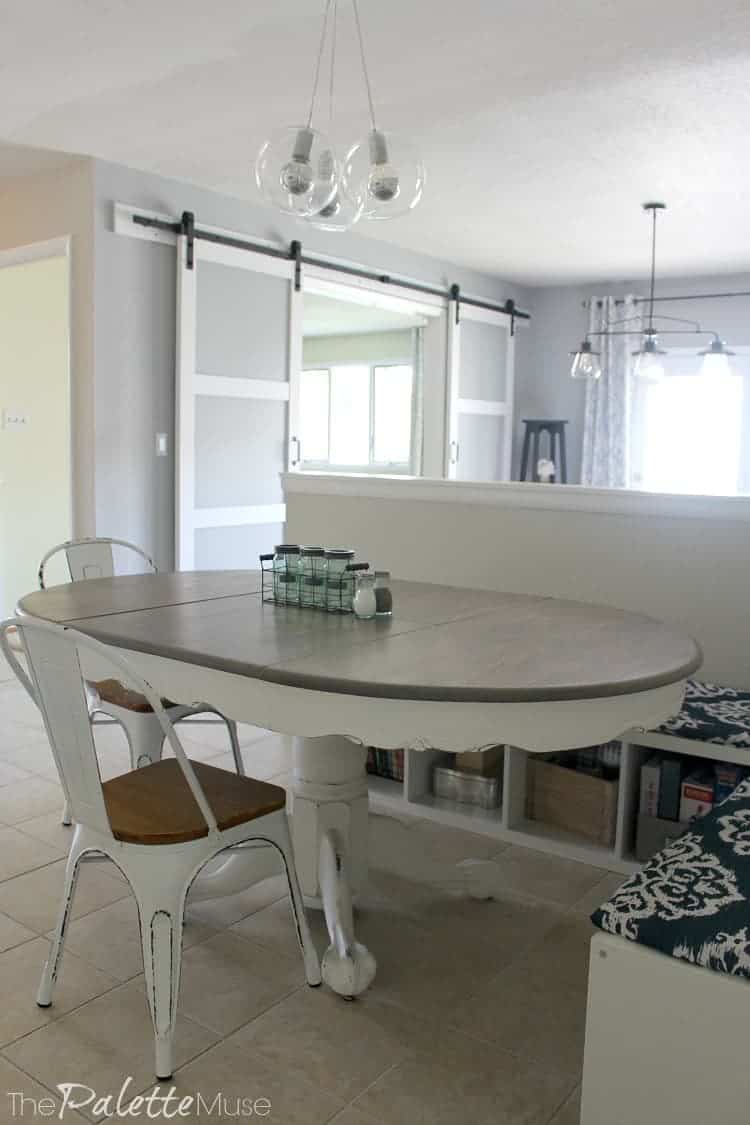
These benches were great for seating lots of people, as well as storing my recipe books, the kids' craft supplies, and our seasonal table linens. But they just didn't look very pretty. The new colorful and comfortable cushions brought up the style factor, and gave them a more built-in feel. Adding storage baskets to corral everything in the cubbies cleaned them up and made them look more intentional and less like the catch-all they had become. (More on that transformation in this 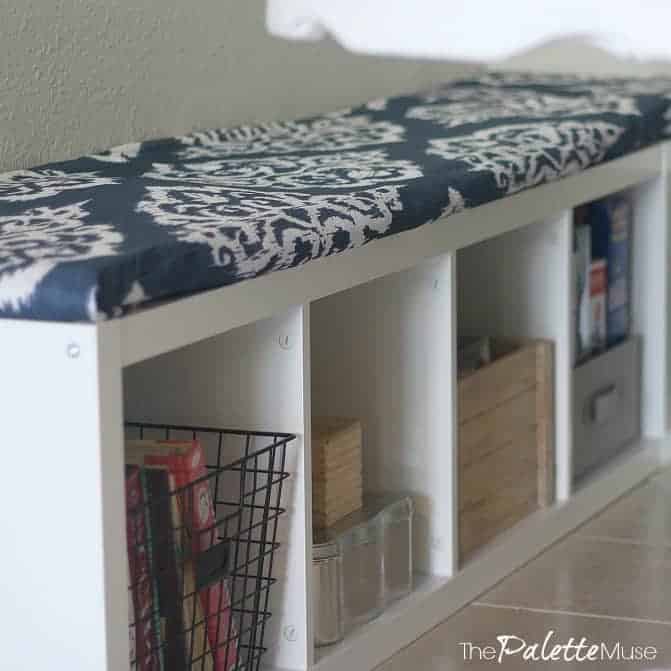
Finally this week I added to my chalkboard to create a family command center.
This chalkboard has become the focal point of our kitchen and breakfast area. My youngest loves to "redesign" it with new sayings and drawings every once in a while, and I love it when she leaves me notes, like this little gem that I shared on instagram. It's also great for jotting down a quick to-do list for the kids. (If you're wondering where I got such a fabulous huge chalkboard, I'm spilling my secret here!)
But we still needed a little better system for organizing all the school papers, notes, sign-up forms, and general detritus that kept accumulating on my kitchen counter. (I work best with piles and organized chaos, but that doesn't mean I want it to be the first thing I see when I walk in!)
On one side of the chalkboard I hung these wire basket files.  I'd had my eye on similar farmhouse style baskets for a while, but couldn't justify the cost. Finally I found these on clearance for $7, but they were a vibrant hot pink color. A quick coat of black spray paint from my stash took care of that, and brought them in line with the style of this room. One little note: I added fun patterned folders on the inside of the baskets, so you would see that, rather than all the random stuff on the papers that go in them. Small detail, big impact.
 And this little clipboard is the perfect size for the space on the other side of the chalkboard. I found this one also on clearance for $2. Yes, $2! It said something like "Happy Graduation 2016" on it, so I covered that up with some black chalkboard paint that I had leftover from my chalkboard project, and now it's perfectly plain and goes with everything. (Did I mention $2?) I use it to clip little notes and Bible verses that I'm working on. Plus, the clips provide the perfect ledge for storing a piece of chalk.
Now I have a clipboard for the small pieces of paper, folders for the larger ones, and a chalkboard to keep a weekly schedule and any other notes to each other. Hopefully this will help keep the whole family more organized, and I can go back to using my kitchen counter tops for more fun activities like making cookies.
Finally, I just wanted to add a couple of farmhouse accessories on the table,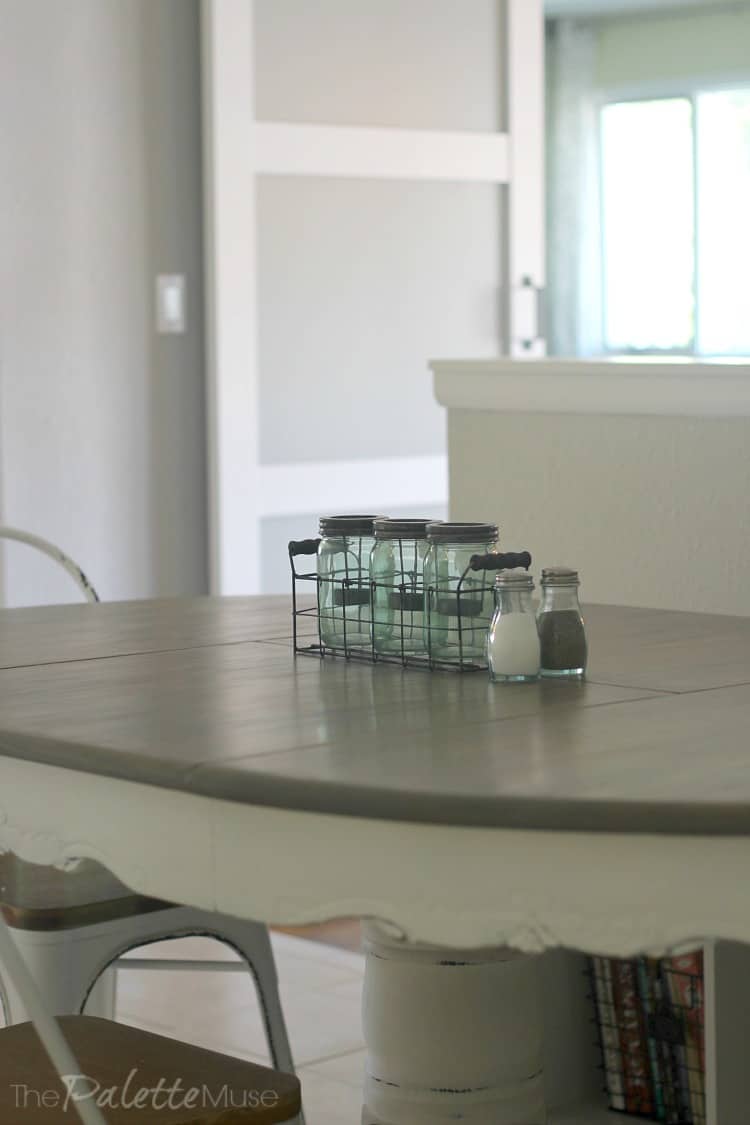 and clean up my shelf that holds my decorative glass collection. I love how the blues and greens in the seat cushions, mason jars on the table, and insulators on the shelf pull the space together.
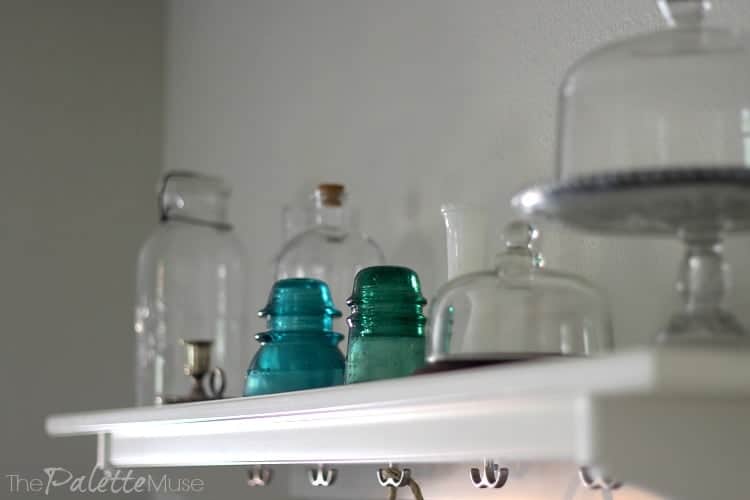
And there you have it, my updated classic farmhouse breakfast nook!
Here's how my expenses added up:
- Stain - 8
- Sanding Pads - 3
- Chalk Paint - 9
- Polycrylic - 9
- Fabric - 17
- Hanging Basket - 7
- Folders - 5
- Clipboard - 2
- For a grand total of... $60
I love coming in under budget! But, to be fair, most of the expensive work in here (such as taking down a wall, painting, bringing in furniture, hanging a shelf and chalkboard) had already been done. That's OK, I'm still counting it as under budget for this challenge!
P.S. Next week, I'll be back with an update on our Flip House. You won't believe how far It's come!


Brittany Serowski says
Talk about organized! 🙂 This is fantastic! Looks so great and paired so well with your barn doors!!
Meredith says
Thanks Brittany! I love being organized, at least for a few minutes while my family is out of the house!
Natalie @nelidesign says
The space looks nice and cozy! Love the chalkboard!
Meredith says
Thanks Natalie! It's turning out to be really useful!
charlestoncrafted says
It looks fantastic! So bright happy and also functional! great job!!
Meredith says
Thanks Morgan! I love having a bright spot to have family time!
Jeri Walker (@JeriWB) says
I love the idea of the wire basket and how cool that you came in under budget 🙂
Meredith says
Thanks Jeri, that doesn't often happen to me!
Emy says
Your dining room looks fantastic! I love how the table looks with the pretty barn doors! Great job!
Meredith says
Thank you Emy, I'm so glad they all go together now!
designbyd9 says
Looks fantastic Meredith. I love the table and the hanging file holders. Now I need to get a table like that to refinish 🙂
Meredith says
Thank you! I see tables like this sometimes in consignment shops and thrift stores.
Lindsay Brown says
The room looks great! I love the idea of the folders in the basket - very smart!
Meredith says
Thanks Lindsay, it's a great way to hide the madness inside!
Melissa says
This looks amazing! You did such a beautiful job on the bench and the table and it just pulls the whole room together. The command center is such a handy addition. I love how you added the folders so it conceals the papers. Beautiful job!!
Meredith says
Thank you so much Melissa, I'm just glad it's finally done!
kerikulhanekgmailcom says
I love your command center, and bench transformation. Both of these things are on my long to-do list and you have completely inspired me! I'm also doing a face palm over the graduation clipboard. I have passed over so many seasonal frames and such, never even thinking to spray paint them! I am sure your family is going to really use this space to it's full potential now. 🙂
Meredith says
Thank you so much! Ya gotta love the power of spray paint!
fourseasonliz says
It's perfect! I am so in love with the table. Great work!
Meredith says
Thank you so much Liz!
Erin @ Lemons, Lavender, & Laundry says
That command center is PERFECT! I love every single thing... and $9 for the file holder and clips?! LOVE IT. I would have never guessed they started out as hot pink and "happy graduation" gifts 🙂 They look like they all came as a set! You did an amazing job at an amazing price! So happy to have you joining the challenge for another round!
Meredith says
Thanks Erin! I love how this challenge gets me to finish up projects I've been meaning to do forever! It was such a fun and inspiring challenge, and I already can't wait for the next one!