…And The World’s Longest Kitchen Cabinet Painting Tutorial!
It’s finally done! I’ve finished painting my kitchen cabinets and to celebrate, I’m sharing the entire process with you! I’ve learned a lot along the way, made a few mistakes, and in the end, am thrilled with the results. This makeover has completely transformed the look of my kitchen, and since the kitchen is open to the living room, it’s even changed the feel of the whole area.
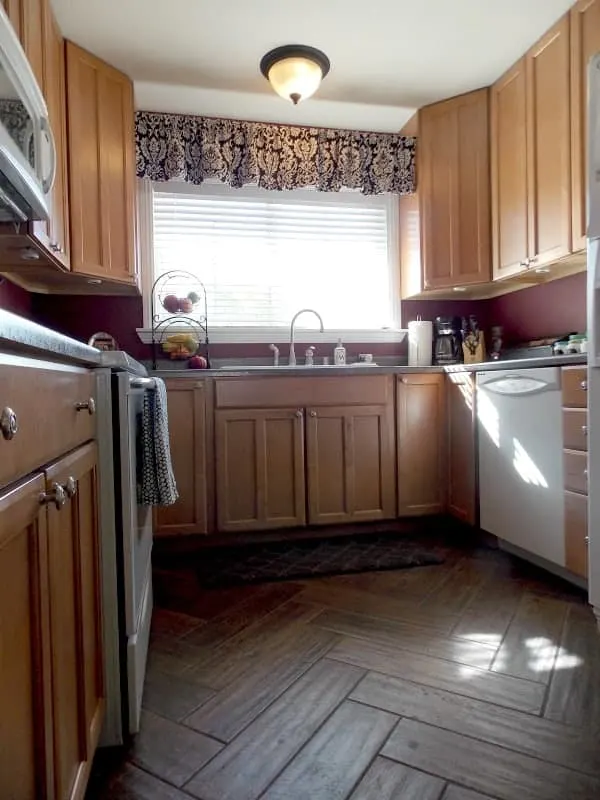
Here’s a quick reminder of what the kitchen looked like before…
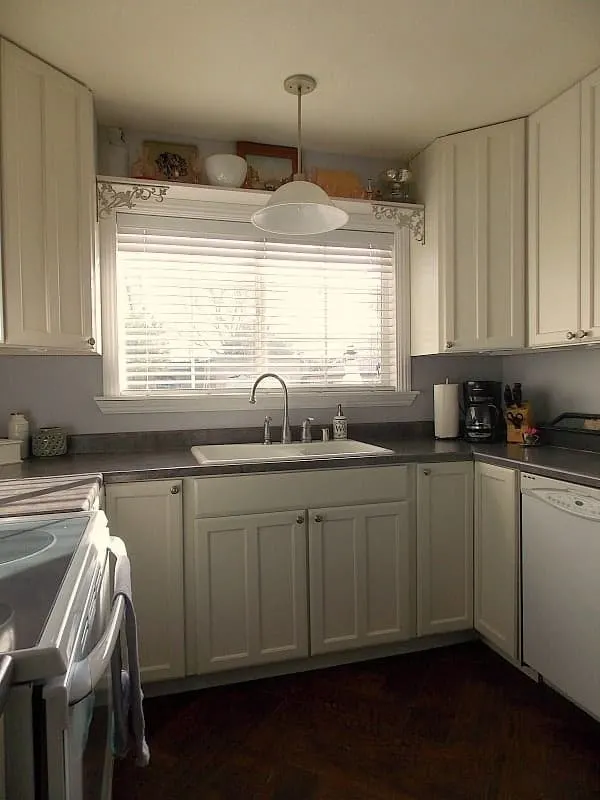
And here is the new improved (and very bright) kitchen!
My husband jokes that we could signal outer space from our kitchen, with the way the light bounces around. I choose to take that as a compliment. To me, who does not love to cook, and really really does not love doing dishes, the only thing worse than these tasks is having to do them in a dark and dreary space. Now, I don’t even mind cooking in my new kitchen, although I do still mind dishes a little bit.
Here are a few quick facts about this makeover, before I get to the tutorial:
- The whole project cost me about $160. I bought paint, primer, new rollers, and sandpaper. I already had brushes and most of the other items for preparing the surfaces. I bought shelf brackets (at Hobby Lobby) and a new shelf (at Lowes). The new light fixture is actually an old one that used to hang over my dining table. I still loved the knobs and hinges, so I kept all the hardware, and saved hundreds of dollars. All appliances and countertops are the same, although I’d love to change them out some day as part of “Kitchen Remodel 2.0”.
- It took about 3 weeks from start to finish, working an average of 2-3 hours a day on weekdays and almost none on weekends. This may sound backwards to some of you DIY-ers, but as a work-at-home mom, I was surprised at how many distractions (don’t tell my kids I called them a distraction!) popped up to get in the way. So I just did the best I could and worked whenever I could get away without traumatizing the family. You could probably achieve the same results working only on the weekends for longer chunks of time. And if you really applied yourself, you could probably be done with a project like this in about a week or two, working full time on it.
- There is only one way to get a professional-looking finish when painting your kitchen cabinets: do it the way the professionals do! Anyone who tells you there is a hack, trick, or special product to cut corners is trying to sell you something. Speaking of which, I’m not selling anything. This is not a sponsored post, meaning all the products in the post are ones I’ve found, tried, and evaluated on my own, so my opinions are unbiased and solely based on my own experience.
~ This post contains affiliate links, which means if you make a purchase I may make a small commission, at no additional cost to you. Thanks for supporting The Palette Muse! ~
Alright, let’s get down to business. How do you paint your kitchen cabinets the right way? Read on…
When I started this project I had visions of naming it something like “The Lazy Girl’s Guide to Painting Cabinets” or “The Secret to Easy Cabinet Painting.” Sadly, as I started researching and working, I quickly came to see that there would be no easy way out for me. And you can be sure that if there was an easy way out, I would find it! (I’m not known for my diligent work ethic.) But laziness has its advantages, and in this case I was motivated by a burning desire to never have to do this work again. To get it right the first time became my mantra, and I hope my experience helps you if you are similarly motivated to try a project like this. 
Phase One: Organize Your Project
- Pick paint colors. I chose Valspar’s “Totten’s Inlet” in Satin for the Cabinets and “Gravity” in Flat for the walls.
- Decide what kind of paint to use. I knew I wanted a self leveling paint with a long drying time, (more about why in a minute) and chose Benjamin Moore Advance. It’s an Alkyd paint, which is like an oil paint suspended in water, so it’s got all the advantages of oil, with none of the messy clean up. Along with the paint, I used a mohair roller and synthetic brushes.
- Define your workspace. Ha! This one is a joke. This project will take over your whole house. Just be prepared. But really, you can make your life easier by breaking this project down into two pieces: the boxes, or frames, and the doors and drawer fronts. Also, consider the weather. If you are planning on working in your garage, keep in mind that the temperature needs to be at least 50 degrees for the paint to dry properly. Any colder than that and you’ll be inside painting cabinet doors on every horizontal surface in your house!
- Collect your supplies. It’s inevitable, but nothing is more frustrating than having to make a run to the hardware store in the middle of a project because you ran out of sandpaper. I know this from much experience.
Kitchen Cabinet Painting Supply List:
- Sandpaper: 100, 200, 320 grit
- Sanding Block
- Orbital Palm Sander and replacement sanding pads
- Paint
- Primer (tinted close to paint color)
- Small Mohair Roller and Handle
- Synthetic Bristle Brush (I actually like the cheap foam brushes)
- Paint Trays (I cover mine with foil, so I don’t have to clean it every day!)
- Microfiber Cloths
- Rubbing Alcohol
- Drop Cloth or Floor Coverings
- Blue Painters Tape
- Krud Kutter
- Screwdriver for removing hinges and knobs
- Caulk or Wood Filler
Click page 2 or 3 below to keep reading…

tami Luttrell
Wednesday 27th of January 2021
I know this was forever ago, but what primer did you use? Advance Primer? Is Zinsser shellac-based compatible? I want to make sure there is no bleed through. Thank you
Meredith
Thursday 28th of January 2021
Hi Tami, when I did these cabinets I used the Ben Moore Advance primer and it worked great. But I've since started using the Zinsser shellac primer, called BIN. It covers everything! It smells a bit worse and cleanup is a bit tougher, but I'm always impressed at how it prevents bleed through. You can read more about that here if you're interested: https://thepalettemuse.com/what-you-need-to-know-before-painting-cabinets/
Laurie Gattis
Tuesday 24th of April 2018
Your tutorial is hands down THE BEST!!! I've been contemplating this project for a few years, yes, years ;-) After researching the do's and don't ad nauseam, I'm now in the thick of it and keep going back to your post as I run into those inevitable snags we run into when doing a project for the 1st time. And your advice and tutorials are spot on! Honestly, if I had just printed this out from the get go and followed to the T, there would have been no snags! So, thank you for taking the time to walk through this so thoroughly, because in a project like this, those little details will make or break your project! So this morning I'm heading to the store for that Mohair roller you recommended ;-) because I've just discovered cutting corners on this project isn't an option if you want a professional finish.
Meredith
Tuesday 24th of April 2018
Thank you Laurie! You're so right, it really is all about the details. I know your project will turn out great since you are obviously taking the time to do things right. It will be worth it in the end!
Mary
Sunday 15th of April 2018
Lovely rehab. How has the paint held up over the years?
Meredith
Wednesday 18th of April 2018
Thank you Mary! We've since moved out of the house, so I can't really answer that. I did redo the cabinets in my new house, and wrote about them here: https://thepalettemuse.com/best-way-paint-kitchen-cabinets/ and I did an updated post about how they've held up here: https://thepalettemuse.com/painted-kitchen-cabinet-faqs-theyre-holding/
Mona
Tuesday 27th of February 2018
Hi you have done a great job! I was just wondering, after sanding them once in the beginning why do you need to sand after primer and then after first coat of paint?
Meredith
Tuesday 27th of February 2018
Hi Mona, sanding between coats is what gives the paint a really smooth finish. If you want to cut down on sanding, try this newer method that I've found: https://thepalettemuse.com/best-way-paint-kitchen-cabinets/
joel
Thursday 15th of February 2018
Very impressive to do this yourself!! I run my home improvement business and i just finished painting a set of kitchen cabinets for a customer. This is not an easy thing to do. It requires skill and a lot of patience. I loved the part about professional results only come from professional labor, putting in the work will always get you the right outcome. I personally sprayed the doors and drawer fronts, but i have a quality spray gun necessary for this type of job. Awesome work. I know plenty of people who wouldn't have the guts to try this them self.
Meredith
Wednesday 21st of February 2018
Thanks Joel! And thanks for answering Sondra's question too. I would love to try a sprayer some time, but I know the learning curve would be a little more than I'd want to take on for a project like this.