How to change the candle covers on your chandelier, and give it a new look for almost free!
Our home, when we first moved in (in 2005), was the picture of vintage 1971 style, and not in a cool, retro way.
The sweet lady who lived here for the entire 34 years of the house's life had never changed out one thing, since it was all perfectly to her taste. The brown double-ovens with the orange decals on the front, the yellow epoxy/shell countertops, the red shag carpet, the medieval-looking wooden light fixtures, even the swingin' wet bar in the living room.
Sadly, it was not quite to our taste so it all had to go, little by little, as we claimed the house for ourselves.
Except for one thing. I loved the little chandelier that hung in the breakfast nook. It was classic, black, and best of all, free. So we kept it and moved it into the dining room.
The only problem was the candle covers were literally falling apart. Over time, they had yellowed and turned brittle, and the edges were now chipping off. I looked high and low for the right size candle covers, but couldn't find anything that fit the bill.
Finally I realized that with a few scrapbooking supplies and my ever-faithful bottle of Mod-Podge, I could make my own. It was such a handy project I thought I'd teach you how in case you need some fancy (or just unbroken) candle covers for yourself.
These candle covers are quick and easy, except for requiring a bit of fine-motor skills and dexterity. If you're a scrapbooker, you may already have all the supplies you need.
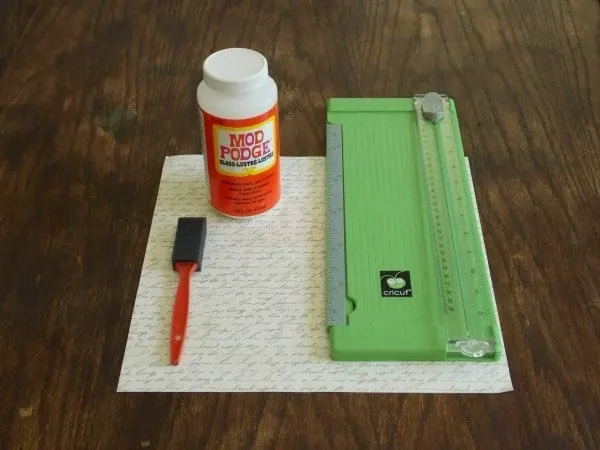
To make your own candle covers, you'll need:
- Mod Podge
- A paint brush
- A paper cutter, or a good pair of scissors and a straight edge
- A sheet of scrapbook paper that matches your decor (I bought two sheets since I don't have a great track record of getting things right the first time)
DIY Candle Covers Step by Step Instructions:
- Remove the light bulb from each branch of the chandelier.
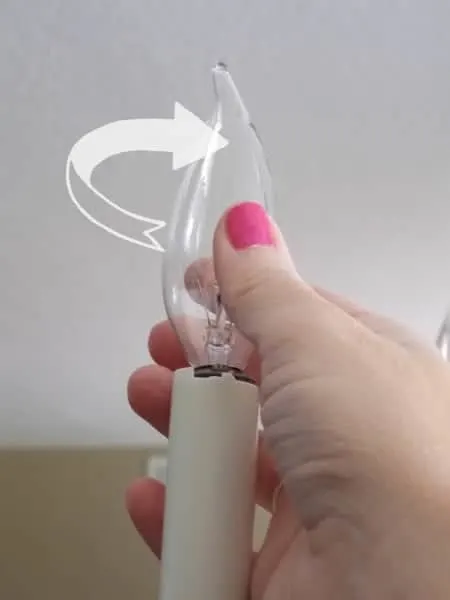
- Pull the existing candle cover up and over the light bulb socket.
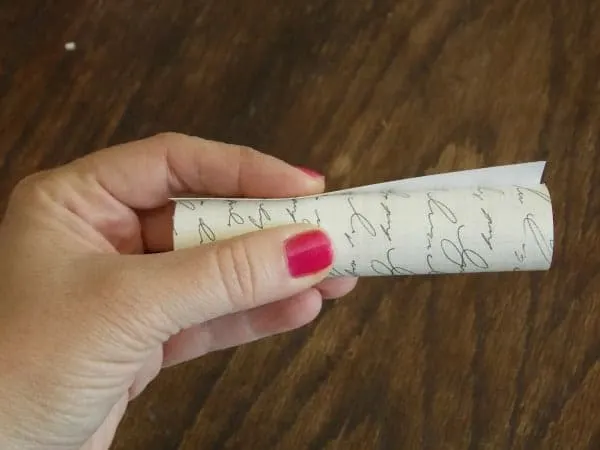
- Lay the candle cover on the paper to measure the height (or you could get all scientific about it and measure it with a ruler).
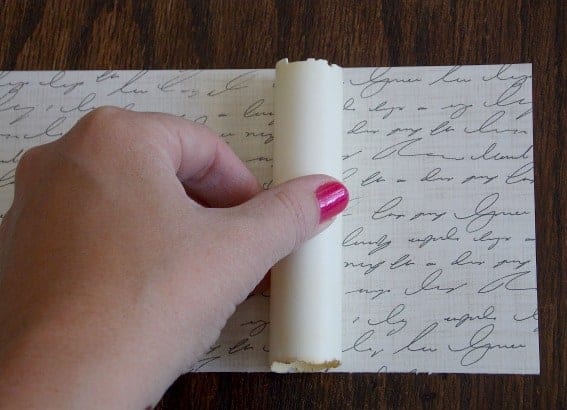
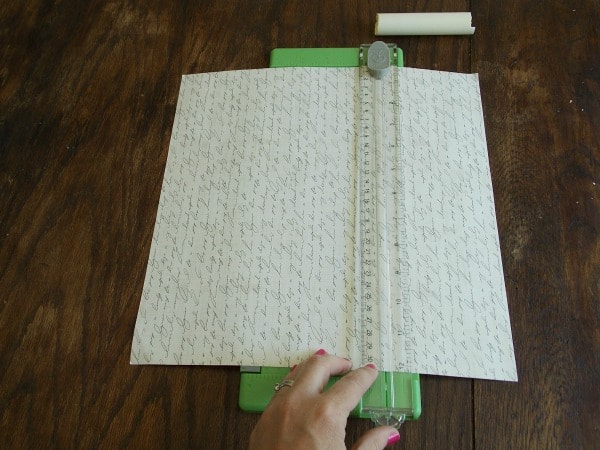
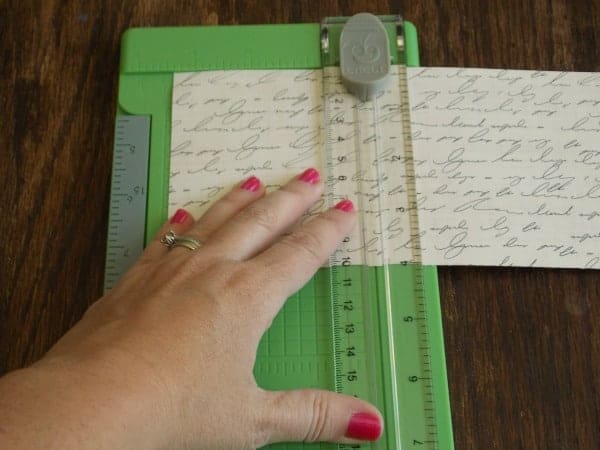
- Cut a strip of the paper the same height as the candle cover. Be sure to turn your paper the right direction before cutting, so that any writing or patterns will be right-side-up when you stand the candle cover up.
- Roll the strip around the cover to measure the length of the paper. (Or if you prefer the science-y approach, measure the circumference of the candle cover and add about an inch.)
- Cut the paper. It really doesn't take much for these little guys!
- Check to be sure you measured correctly.
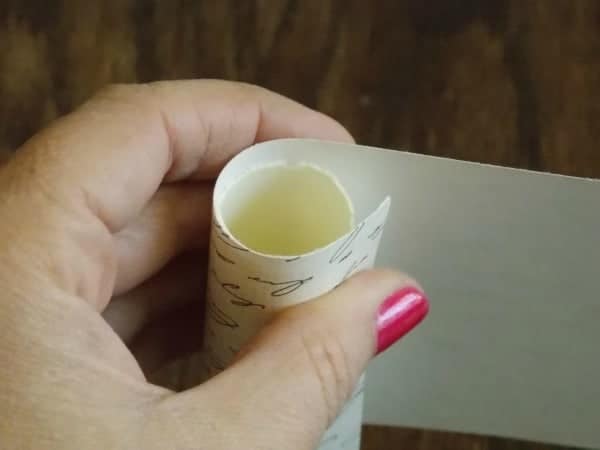
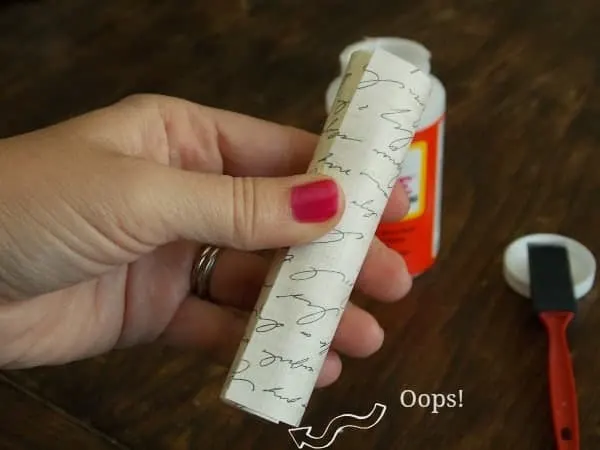
- Roll the paper around the candle holder and paint a strip of mod podge about an inch wide along the leading edge of the paper.
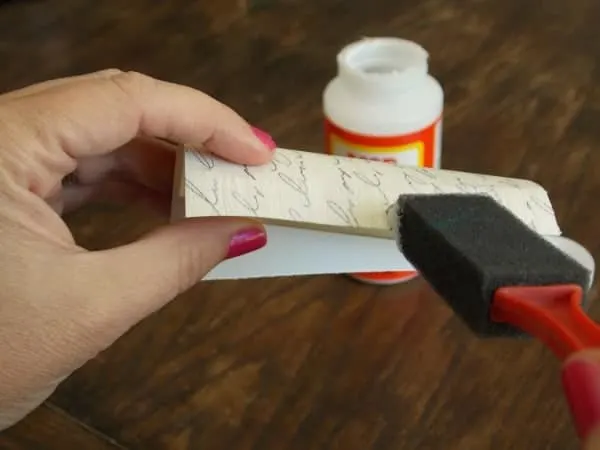
Then glue the paper to itself like an old fashioned hand-rolled cigarette, making sure the ends line up evenly. (I wouldn't know anything about this from experience!) This is a little tricky, but important to the finished look of the project. Repeat, if you missed it the first time around.
- Paint an even layer of Mod Podge all over the outside of the new candle cover to seal it.
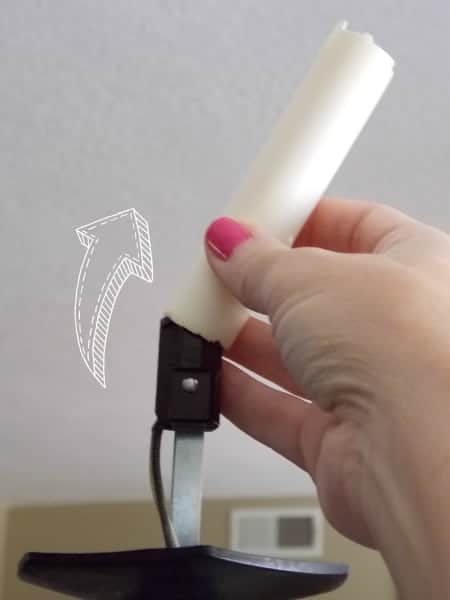
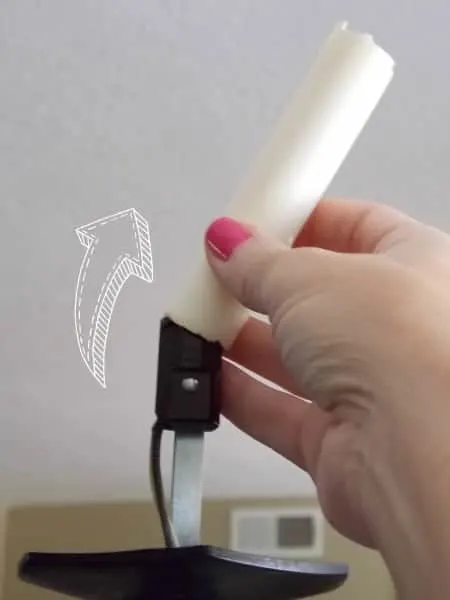
- Once they are dry, slip the new candle covers over the sockets, replace the bulbs, then stand back to admire your new creation.
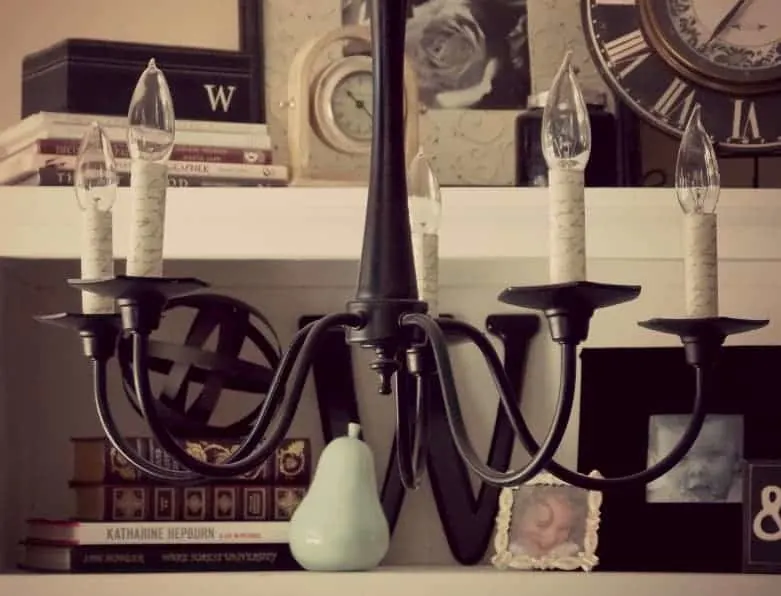
It's a little detail, but you know what they say about details. In design, I find that it really comes down to little details like these to make a house look "finished" and put together.
Here are a few tips before you get started.
First, pick a paper that has a small pattern, or maybe just a texture effect on it. There's not enough real estate on the candle covers to support a busy print.
Second, I left the old candle covers inside my new ones, just to add some structural support, but that's not really necessary.
Finally, make sure the new candle covers don't actually touch your light bulbs. I don't know how fire proof they are, and I don't want you to be the one to find out the hard way!
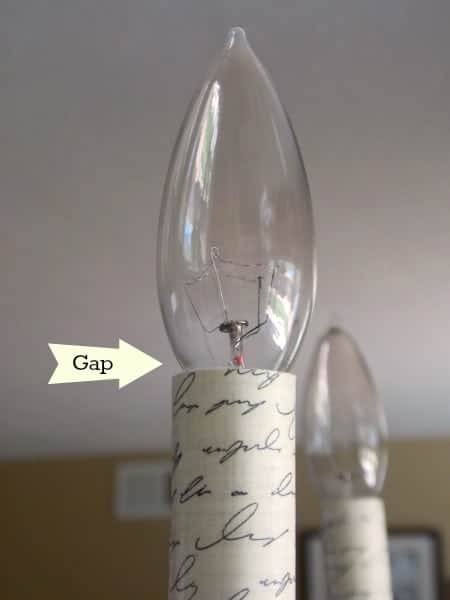
As always, I'd love to hear from you if you try this project for yourself. And let me know if you run into any questions along the way. I'm happy to help!
Paul Graham says
Hi Meredith. What a good idea for candle covers. My travel trailer had some very ugly sconce covers which I removed pending finding some nicer ones. I discovered that I preferred the quality of light without the covers but the bulb holders look rather unfinished. Your technique will be perfect for finishing them while maintaining the quality of light. Thanks !
Meredith says
Thanks Paul! I like bulbs without the shades too in the right setting, but you're right, they can look a little bare without a little something decorative on them. Glad to help!
Johanna says
So fun!!
Meredith says
Thanks Johanna! 🙂
Anita says
I adore a good document print like this--even better if it's in French! You're right, it's the attention to details that make such a big difference in decor.
Meredith says
I know, why does French look prettier than other languages? In theory, it wouldn't matter what language the script is written in, but somehow it does!
Jeri Walker-Bickett (@JeriWB) says
There's so much that can be done with decorative paper 🙂
Meredith says
Yes, and at $.59 a page, you can't beat the price!
Debra Yearwood says
Meredith the candle holders are absolutely lovely and so original. They are waaaay better than anything you could have bought. Nicely done.
Meredith says
Thanks Debra!
Rena McDaniel-The Diary of an Alzheimer's Caregiver says
You are so creative! I would never have thought about doing that! Looks great! Thanks for sharing!
Meredith says
Thank you Rena!
Home Jobs by MOM (@HomeJobsbyMOM) says
That looks great Meredith! It looks so classy and more modern now. My grandparents had one of those houses you were talking about. I bet when they sold it the people that bought it gave it a makeover just like you have done.
Meredith says
Thanks! Yes, I felt a little bad about ripping out all those lovely 70's touches that someone had been so proud of. Oh well, nothing can stay the same forever!
Lenie says
Meredith, there are many people who would have thrown out the chandelier, now thanks to you, many may be able to save theirs. A small cost to save an expensive item, works for me.
Lenie
Meredith says
Thanks Lenie! There are so many things to buy in a remodel, that every little bit saved helps.
A.K.Andrew @artyyah says
What a brilliant idea, and I love the paper that you used. Never heard of Mod Podge. Sounds like a sealant as well as a glue. Thanks for the tip.
Meredith says
Thanks A.K. I love Mod Podge! Yes, it's sort of like a cross between glue, wallpaper adhesive, and sealant. It's great for all kinds of projects.
Tim says
That is a very cool idea Meredith. It's always the simple ones that make you think; why didn't I think of that.
Meredith says
Thanks Tim! Usually I'm the one smacking my head and wishing I'd thought of that. I even have a whole pinterest board dedicated to those ideas. 🙂
jacquiegum says
I completely love that you didn't use plain white and opted for that beautiful decorative paper! Simply beautiful.I have fallen in love with your all of your projects Meredith, even if they make me feel like a complete dunce! LOL
Meredith says
Thanks Jacquie! It seemed like a lot of work to go through, just to have them be white again. And thanks for your kind words, but don't feel like a dunce, or I'll feel bad! 🙂
William Butler says
Hi Meredith,
You are so creative. You kept what you wanted and recreated it in a pleasant way.
I think that gap you pointed out is important, otherwise it would be a fire hazard.
All the best!
Bill
Meredith says
Thanks Bill! Yeah, I prefer not to burn my house down for the sake of pretty decor. 🙂
Erlene says
That is such a great idea. Totally might have to steal it. Pinned. Thanks for sharing on Merry Monday.
Meredith says
Thanks Erlene! Stealing ideas (and pinning them) is the highest form of flattery. 🙂
Ilaria says
Very cool idea Meredith! The simplest ones are always the best!
Meredith says
Thank you. I do love it when a cute project turns out to be really easy.
RUTH says
GREAT IDEA!! MAKES ME WANT A CHANDELIER ! AND I REALLY LOVE YOURS.. WROUGHT IRON IS VERY COUNTRY.
Meredith says
Thank you! I do love wrought iron.
jankedonna says
This is a very clever idea. I don't have a chandelier like this so I won't be trying it, but I think even I could handle a project like this. Mod Podge is so useful!
Meredith says
Thanks Donna, Mod Podge is great for all sorts of things!
Susan Cooper/findingourwaynow.com says
I had an aha moment. It was why in the world I hadn't done this yet to my chandelier. It would look so much better if I did. Now I have another cool project to do on my list. :-)))
Meredith says
The to-do list just keeps growing and growing! 🙂
tuhinmech says
Meredith, What I love about your tips is that these are so simple yet effective! I have a question here: Can we use sparkling or shiny papers too? Will it look nice if we use different colored papers for each candle?
Meredith says
Hi Tuhin, yes I think sparkly or shiny papers would be pretty and reflect the light. I don't know if I'd use different colors for each one, unless the colors are closely related. I'd love to see a picture if you try it!
Duke Stewart says
Such a great idea, Meredith. It's great that some people are able to keep things instead of just chucking them for something new and of lower quality. This looks like a fun project! Thanks for sharing.
Meredith says
Thanks! I love to try to keep and re-purpose things, if I can. No sense in filling up the landfills when you can re-use something and save money at the same time!
Arleen says
What a great idea to enhance and old chandelier. I have my walls painted a deep red and you gave me an idea to make the candle covers in red to match the walls. The shades are black so it should be fun. Thanks for the tip
Meredith says
That sounds gorgeous Arleen!
sabrinagwriter says
Fabulous idea! I love how you've made it so easy to follow with great visuals!
Meredith says
Thanks! It really was pretty easy, once I got the hang of not gluing my fingers!
jbutler1914 says
That looks like a nice simple project. If I had a chandelier I would try it.
Meredith says
Thanks! Maybe someday... 🙂
Erica says
I love your new chandelier candle covers...very very creative! I'm so horrible at being crafty and you made me feel like even I could do it! On a side note, I loved your description of your 70s house as you bought. It reminded me of so many apartments lost in time that I had seen when house hunting and your description brought me right back.
Meredith says
Thanks Erica! I have a lot of affection for vintage styles, but 70's is not quite my style. I felt a little bad about ripping everything out that someone had worked so hard to design. Makes me wonder what people will say about my house someday. 🙂
Adrienne says
Hi Meredith,
So I'm not very creative and I don't have a chandelier but I have to tell you that's just too cool the way you showed us how to make these covers. My Mom use to have one and I kinda wish she still did so I could show her this but I still think it's neat.
Thanks so much and enjoy your weekend.
~Adrienne
Meredith says
Thanks Adrienne! I figure that even if people aren't able to use this project exactly, maybe it will spark an idea that they can actually use. Best wishes!
Laurie S Hurley says
Once again, I am in awe. I am so not a DIY person, but I love to browse through Pinterest and see how creative others are. The chandelier is beautiful and I am jealous I cannot do something like that. The step by step pictures make it look easy. You should do a video, too!
Meredith says
Thanks Laurie, it really was pretty easy. I love the idea of making a video - I'll have to look into that...
Tammy says
I am defiantly going to try this. Could change them out all the time for the seasons. Love this. Thanks for linking up to the Bloggers Brags Pinterest Party. I've pinned your post to the Bloggers Brags Pinterest Board
Meredith says
Thanks Tammy! That's a great idea - there are so many options of seasonal paper available.
Robin says
Very cool idea and I love the results! Exactly what I need to do with mine...they aren't breaking but instead are brownish near the bulb from the heat. Which makes me wonder if putting paper on them might be a fire hazard. Thoughts?
Meredith says
Thanks! Glad you liked them. Yes, I'm a tiny bit concerned about a fire hazard for you. Mod Podge isn't especially flammable, but having paper that close to a bulb that gets so hot may not be the best thing. You could try making the cover a little shorter, so it's not as close to the bulb, or even switching out bulbs to a lower wattage. Mine are usually only turned on when we're in the room, so I don't worry so much, but I don't want to talk you into a fire hazard! 🙂
Marie says
Thanks so much for this! I've been looking for a way to replace the broken sleeves in a thrift-shop treasure! I might add some glue gun wax drips down the sides when I upcycle mine! Thanks again!
weddingbuysellfraservalley says
Here's my update.
I linked back to your blog! Thanks for the inspiration!!!
http://marielance.blogspot.ca/2015/05/chandelier-makeover.html
Meredith says
Thanks Marie, so glad to to help! I'm heading over to check out your creation...
Vicki says
I've just done this with an embossed white chevron paper. It looks fabulous on a white chandelier. Thank you so much for this idea
Meredith says
That sounds gorgeous! I'm so glad to have helped. Thanks for leaving me a comment!
Lisa says
I absolutely love the finished look of the covers, and the paper you used is perfect!
I'm wondering if you have a link to show how this chandelier was used in a room?
Thanks!
From Nova Scotia, Canada
☺
Meredith says
Thank you Lisa, that's a great question! I looked through all my archives and couldn't find a good picture. (Blogger fail!) So I took a couple and shared them on Instagram. You can see them here: https://www.instagram.com/thepalettemuse/ and I'll try to update this post soon as well, in case you're not on IG.
Barb says
Love it❤️ and your adding a better light to my dinning area. When you took off the candle cover did you have shut off the electricity or just had the chandelier off.
Ty and I look forward to your reply
Meredith says
Thanks Barb! No I didn't have to shut off the electricity, just unscrew the light bulbs and gently side the sleeve up and off.